Are you creating new pages, editing existing posts and generally improving your WordPress website, but those changes aren’t appearing on your actual website?
Your web browser and plugins can all serve cached versions of your pages and posts, so what you’re currently seeing may not be what everyone else sees!
In this article, I’ll show you how to quickly and easily clear the cache for all the major web browsers and all of the major WordPress caching plugins, including WP Super Cache and W3 Total Cache.
Regardless of whether the issue is browser-based or server-based, by the end of this article you’ll be seeing the most up-to-date version of your WordPress website.
What Is the Cache?
There are two kinds of caching that can cause an issue with your WordPress website: the browser cache and the plugin cache.
1. Browser Caching
When you visit a website, your browser saves certain files to your local computer. These cached files allow your browser to load this site faster on subsequent visits, but it can also make your browser slow to recognize that a website has changed.
This delay can be particularly frustrating when you’re editing your site—it’s not exactly practical to wait while your browser registers every tiny change that you make behind the scenes! In this scenario, you can clear the browser’s cache, which will force it to fetch a fresh copy of your website, complete with all your latest changes.
2. The Plugin Cache
WordPress websites are dynamic, which means they’re built every time someone visits one of your pages or posts.
Behind the scenes, the server retrieves information from your PHP files and MySQL database, and then generates the HTML content that’s displayed to the visitor. This is a time-consuming and intensive process, so instead of building the HTML content from scratch every single time someone visits your site, WordPress caching plugins make a copy of each page or post following the first load, and then serve this cached content to subsequent visitors.
Serving static content improves your website’s overall performance, but it can also cause you to see outdated content. If you’ve cleared the browser cache and your changes still aren’t appearing, then the issue may lie with your plugin cache.
Clearing Your Browser Cache
Before you delve into the plugin cache, it’s worth checking that your web browser isn’t simply loading cached files.
Clearing the browser cache is straightforward, but the process will vary depending on which web browser you’re using:
Clearing the Chrome Browser Cache
If you’re a Chrome user, then:
- Click the Menu icon in Chrome’s upper-right corner.
- Navigate to More Tools > Clear Browsing Data… This will launch a popup where you can select the cached content that you want to remove.
- Select the Advanced tab.
- Make sure that Cached images and files is selected. At this point, you may also want to deselect some of the other checkboxes—for example, you can opt not to delete cached passwords, sign-in data, and auto-fill form data.
- Give the Clear data button a click.
The Chrome cache will now be deleted; reload your webpage and you should now see the most up-to-date version of your website.
Clearing the Safari Browser Cache
You clear the Safari cache via a Develop dropdown menu that appears in Safari’s toolbar.
If you don’t have access to this menu, then you’ll need to enable it:
- In Safari’s toolbar, navigate to Safari > Preferences…
- Make sure the Advanced tab is selected.
- Select the Show Develop menu in menu bar checkbox.
- Close the Preferences window. You should now have access to a new Develop menu.
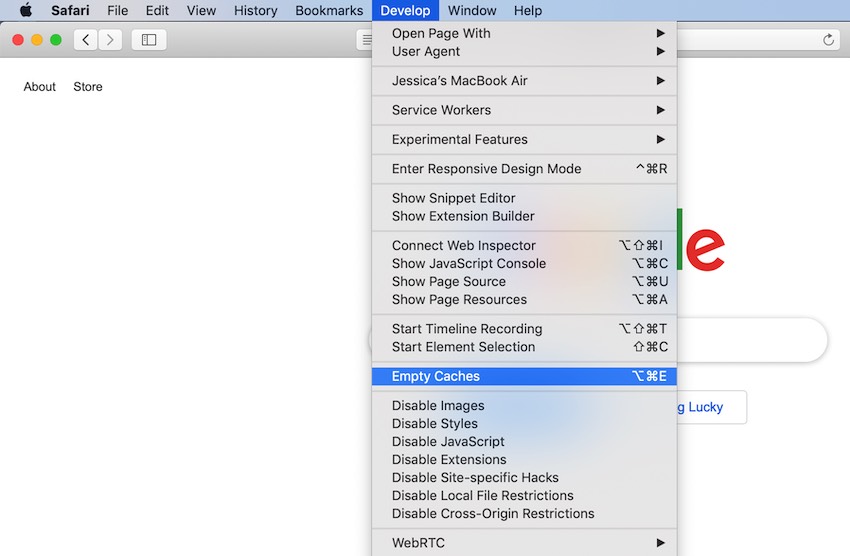
To clear the Safari cache:
- In the Safari toolbar, select Develop.
- Select Empty Cache.
Try reloading your site, and Safari should display the most up-to-date version of your website.
Clearing the Opera Browser Cache
If you’re an Opera user, then:
- In the Opera toolbar, select Opera > Preferences.
- Scroll to the bottom of the subsequent screen and expand the Advanced section, by giving it a click.
- Under Privacy and security, select Clear browsing data.
- Select the Advanced tab.
- Make sure Cached images and files is selected. At this point, you may also want to select or deselect some of the other options—for example, I’d recommend deselecting Passwords and other sign-in data and Autofill form data.
- When you’re happy with your selection, click Clear data to flush the cache.
Clearing the Internet Explorer Browser Cache
To clear IE’s cache:
- In the upper-right corner, select Internet Explorer’s gear icon.
- Select Safety > Delete browsing history.
- In the subsequent Delete Browsing History window, select Temporary Internet files and website files.
- Select Delete at the bottom of the browser window.
Your Internet Explorer cache will now be deleted.
Using a Different Web Browser?
If you’re using a web browser that we haven’t covered, then look for any Preferences, Security or History menus, as these often contain cache settings.
Alternatively, you can consult your browser’s official documentation, as this should contain information on clearing the cache.
Clearing Your Plugin Cache
If you’ve cleared the browser cache and are still seeing an outdated version of your website, then your plugin cache may be to blame.
Even if you didn’t install a caching plugin, it’s still worth reviewing your list of installed plugins, especially if you share your account with other people! Some WordPress hosting companies also provide their own built-in caching solutions as standard, so a caching plugin may have come pre-installed with your WordPress account.
If you’re unsure, then log in to WordPress and navigate to Plugins > Installed plugins. The majority of caching plugins have the word “caching” in their name, or you can check the description of any unfamiliar plugins.
There are countless caching plugins available, but in this final section I’ll be covering all of the most commonly used WordPress caching plugins.
1. WP Super Cache
The WP Super Cache plugin allows you to clear the cache with the click of a button:
- In WordPress’s left-hand menu, select Settings > WP Super Cache.
- Give the Delete cache button a click.
Your plugin cache will now be completely cleared.
2. W3 Total Cache
W3 Total Cache is a free caching plugin that’s used by over 1 million people. If you’re one of those million, then you’ll need to take the following steps to clear your cache:
- In the WordPress toolbar, select Performance.

- Give the Empty all caches button a click.
W3 Total Cache will now flush all of your site’s cached content.
3. WPEngine
WPEngine is a managed WordPress hosting provider that comes with its own built-in caching solution.
If you’re using WPEngine as your hosting provider, then you will have a caching solution and should therefore clear your WPEngine cache.
- Select WPEngine from WordPress’s side menu.
- Give the Purge All Caches button a click.
The cache will be cleared, and you should now be looking at the latest version of your website.
Conclusion
In this tutorial, we explored how caching can prevent you from seeing your site’s latest content, and how WordPress’s plugin cache can improve your website’s overall performance.
Throughout this tutorial, I showed you how to clear the cache for all the major web browsers and some of the most popular WordPress caching plugins. If you’re using a product that wasn’t mentioned in this article, then you should find the information you need in that product’s official documentation.
The Best WordPress Plugins on CodeCanyon
Explore thousands of the best WordPress plugins ever created on CodeCanyon. With a low-cost one time payment, you can purchase one of these high-quality WordPress plugins and improve your website experience for you and your visitors.

Here are a few of the best-selling and up-and-coming WordPress plugins available on CodeCanyon for 2020.