Flutter is fast becoming one of the most popular frameworks for developing cross-platform mobile apps. Most Android and iOS developers today are starting to agree that it is a faster and more future-proof alternative to other cross-platform frameworks such as React Native and NativeScript.
Google itself is leaving no stone unturned to attract more developers to it. For instance, Google I/O this year had several in-depth sessions that focused on developing Material Design compliant apps with it. During one of the sessions, Google also announced that Flutter is going to be a first-class platform for Material Design.
In this series of tutorials, I’m going to help you master the basics of developing Android apps with Flutter. In this tutorial, which starts off the series, I’m going to focus on Flutter widgets, the building blocks of all Flutter apps.
Prerequisites
To make the most of this series, you’ll need:
- the latest version of Android Studio
- a device or emulator running Android API level 21 or higher
1. Configuring Android Studio
After installing a few light-weight plugins, you can use Android Studio, the IDE native Android app developers are most accustomed to, to develop Flutter apps.
Start by launching Android Studio and choosing the Configure > Plugins option in the welcome screen.
In the dialog that pops up, press the Browse Repositories button and search for the Flutter plugin.
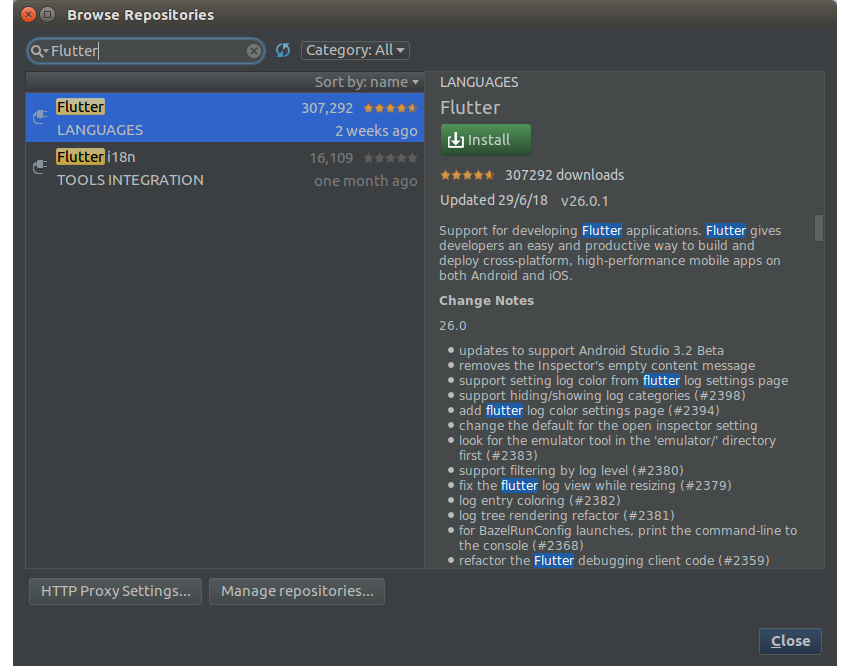
Once you find the plugin, press its Install button. At this point, you’ll be asked if you want to install the Dart plugin as well. Press Yes to proceed.

After both the plugins are installed, press the Restart Android Studio button to complete the configuration.
2. Creating a New Project
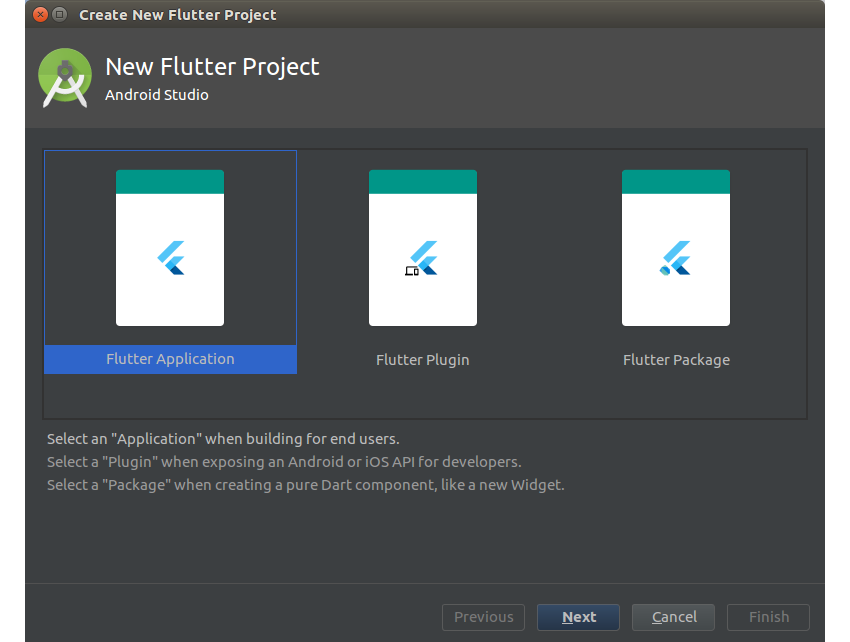
After the restart, you’ll be able to see a Start a new Flutter project button in the welcome screen of Android Studio. Press it to start creating your first Flutter project.
In the next screen, choose the Flutter Application option and press Next.
You’ll now see a form asking for various details about your Flutter application, such as its desired name and location. Make sure you type in valid values in all the fields.
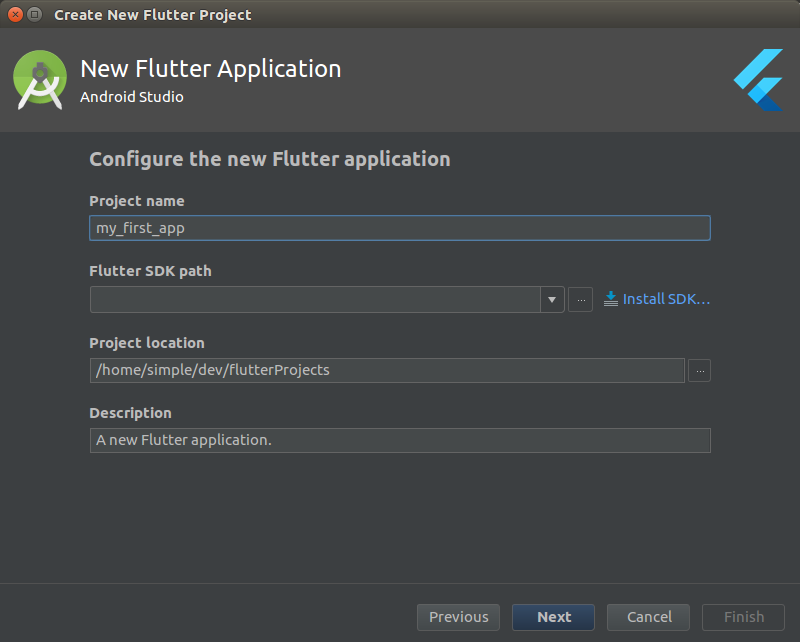
The Flutter plugin doesn’t come bundled with the Flutter SDK. Therefore, you must install the SDK separately. You can do so by pressing the Install SDK button now.
Depending on how fast your Internet connection is, the installation may take quite some time to complete. After it’s successful, you’ll be able to press the Next button to complete the project setup.
3. Adding an Entry Point
Throughout this tutorial, you’ll be writing code inside the lib/main.dart file. It will, by default, contain some sample code, which you won’t be needing. So delete all its contents before proceeding.
The Flutter framework uses the Dart programming language, an easy-to-learn language whose syntax is very similar to that of Java and C. Consequently, like most standalone Java and C programs, a Flutter app too needs a main() function, a special function that serves as an entry point to the app.
Accordingly, add the following code to the main.dart file:
void main() {
    // TO DO
}
At this point, you can press Shift + F10 to build and run the app. If you didn’t encounter any errors in the previous steps, you should see the app display a blank white canvas on your device.
4. Using Stateless Widgets
All Flutter apps are composed of one or more widgets, instances of classes that allow you to draw text and images on the screen. Usually, you won’t have to program any low-level widgets from scratch because the framework comes with a wide variety of pre-made, beautiful widgets that adhere to the design languages of both the Android and iOS platforms.
To be able to use basic widgets in your app, import the widgets library by adding the following code at the beginning of the main.dart file:
import 'package:flutter/widgets.dart';
The simplest widgets you can create are stateless widgets. As you might have guessed, they have no state associated with them and are thus static. They are ideal for displaying labels, titles, and other UI elements whose contents are unlikely to change while the app is running. To create a stateless widget, you must extend the StatelessWidget class and override its build() method. The following sample code shows you how:
class MyFirstWidget extends StatelessWidget {
  @override
  Widget build(BuildContext context) {
    // More code here
  }
}
As you can see in the above code, the build() method must return a Widget object. You are free to pick and return any of the dozens of pre-made widgets Flutter offers. For instance, if you want to display a line of text, you can create and return a Text widget as shown below:
return Text("This is nice!",
        textDirection: TextDirection.ltr);
Note that you must always remember to specify the directionality of your text while using a Text widget.
If you run the app right away, however, you won’t be able to see the text. That’s because, you still haven’t instantiated your stateless widget. So go to the main() method, instantiate the widget inside it, and pass it to the runApp() method. Here’s how:
runApp(new MyFirstWidget());
The moment you add the above code and save your project, Android Studio should automatically hot reload the app on your device, allowing you to see the text.

If you want to display an image instead of text, you can simple replace the Text widget with an Image widget inside your class’s build() method. The following code shows you how to create an Image widget that downloads and displays a remote image:
return Image.network(
    "https://images.pexels.com/photos/1168940/pexels-photo-1168940.jpeg");
On saving your project again, you should see something like this on your device:

5. Creating Widget Trees
All Flutter apps can be thought of as widget trees. The app you created in the previous step is a widget tree with just one widget. Using Text or Image widgets as the top elements of the widget tree, however, is not a good idea because you won’t be able to add any child widgets to them.
Flutter offers several widgets that can act as containers for other widgets. The most commonly used ones are the Row and Column widgets. As their names suggest, the Row widget allows you to place multiple widgets beside each other, and the Column widget helps you position widgets one below the other. They are indispensable while creating deeper widget trees.
The following code shows you how to use the Column widget to create a widget tree that has two children: a Text widget and an Image widget.
Text myText = Text("This is a nice photo!",
    textDirection: TextDirection.ltr);

Image myImage = Image.network(
    "https://images.pexels.com/photos/1168940/pexels-photo-1168940.jpeg");

return Column(
  children: <Widget>[myText, myImage]
);
The app should now look like this:

Additionally, there are widgets that help you better position a single widget. For example, the Center widget helps you center a widget. Similarly, a Container widget allows you to add paddings and margins to your widgets.
The following code shows you how to center the Column widget you just created by embedding it inside a Center widget:
return Center(child: Column(
    children: <Widget>[myText, myImage],
    mainAxisSize: MainAxisSize.min
  )
);
In the above code, note that the Column widget uses an additional property called mainAxisSize, whose value is set to min. It is necessary because, before centering a column, you must make its height equal to the sum of the heights of all its children. Without the property, the Column widget will be as large as the device’s screen, and the Center widget will have no effect on it.
6. Using Material Design Widgets
All this while, you’ve been using basic widgets that are a part of the widgets library. Flutter has an alternative library called material, which offers Material Design widgets. To use it in your app, replace the statement that imports the widgets library with the following:
import 'package:flutter/material.dart';
Next, to apply Material Design styling to your widgets, you must have a MaterialApp widget at the top of your widget tree. You must also embed all the widgets you created earlier inside a Scaffold widget, which can serve as the home screen of the MaterialApp widget.
Furthermore, because most Material Design apps have an app bar, you can optionally set the Scaffold widget’s appBar property to a new AppBar widget.
The following code shows you how to do all that concisely:
return MaterialApp(
    home: Scaffold(
        appBar: AppBar(title: Text("My App")),
        body: Center(
          child: Column(
            children: <Widget>[myText, myImage],
            mainAxisSize: MainAxisSize.min
          ),
        )
    )
);
The app should look much better now.

7. Using Stateful Widgets
Stateless widgets are immutable. With the code you wrote in the previous steps, there’s no easy way to modify the contents of the Text widget or the Image widget. Why? Because the Flutter framework prefers reactive programming over imperative programming. Consequently, most of its widgets do not have setter methods that can update their contents at runtime. For example, the Text widget has no setText() method that will allow you to change the text it’s displaying.
Stateful widgets, on the other hand, are mutable, albeit not directly. They rely on State objects to decide what they should display at any given instance. As such, whenever a State object changes, the framework will automatically update the contents of any stateful widget connected to it.
To create a stateful widget, you must extend the StatefulWidget class and override its createState() method.
class MySecondWidget extends StatefulWidget {
  @override
  State<StatefulWidget> createState() {
    // TO DO
  }
}
Next, you must create a new custom State class containing variables that form the state of the stateful widget. Additionally, inside the class, you must override the build() method to return your widget tree.
The following code shows you how to create a State class containing a single variable named url:
class MyState extends State<MySecondWidget> {

  String url = "https://source.unsplash.com/random/800x600";
              // A random image from Unsplash

  @override
  Widget build(BuildContext context) {
    // More code here
  }
}
For the sake of a concrete example, let’s now create a Material Design widget tree containing an Image widget, which displays a random image, and a RaisedButton widget, which the user can press to load a new random image. The following code shows you how:
return MaterialApp(
  home: Scaffold(
    body: Center(
      child:Column(
        mainAxisSize: MainAxisSize.min,
        children: <Widget>[
          RaisedButton(
            child: Text("Press Me"),
            onPressed: changeURL,
          ),
          Image.network(url)
        ]
      )
    )
  )
);
Note that the Image widget’s constructor now takes the url variable as its input, instead of a string literal. This allows the framework to use the latest value of the variable whenever the Image widget is drawn.
Also note that the RaisedButton widget has an onPressed attribute pointing to an event listener named changeURL(). The method doesn’t exist yet, so create it.
void changeURL() {
    // More code here
}
Inside the method, you must, of course, change the value of the url variable. However, you shouldn’t change it directly. If you do, the Flutter framework will not be notified of the change. To update the state of a stateful widget correctly, you must always make all your changes inside the setState() method.
For now, to display random images, I suggest you use the Unsplash Source service. All you need to do to download a random image from it is make an HTTP request to its URL and pass a unique query string to it.
The following code shows you how to do so using a timestamp to construct the unique query string:
setState(() {
  url = "https://source.unsplash.com/random/800x600/?" +
      "q=${new DateTime.now().millisecondsSinceEpoch}";
});
At this point, your custom State class is ready. All you need to do next is instantiate it and return it from the createState() method of your stateful widget.
return MyState();
If you pass an instance of your stateful widget to the runApp() method, reload the app, and press the button a few times, you should see it display a new photo every time.

Conclusion
You now know how to work with stateless and stateful widgets in your Flutter apps. You also learned how to apply a Material Design theme to them, change their contents dynamically, and make them interactive.
It’s worth noting that Flutter doesn’t use any mobile platform’s native widgets. It draws all the widgets itself, using a high-performance 2D graphics engine called Skia, which uses the GPU extensively. As a result, Flutter apps often run at close to 60 fps and feel very fluid and responsive.
To learn more about widgets in Flutter, do refer to the official documentation.