There are two popular open source projects which make this possible. These are NW.js, which we covered a few months ago, and the newer Electron, which we are going to use today (see the differences between them here). We are going to rewrite the older NW.js version to use Electron, so you can easily compare them.
Getting Started With Electron
Apps built with Electron are just web sites which are opened in an embedded Chromium web browser. In addition to the regular HTML5 APIs, these websites can use the full suite of Node.js modules and special Electron modules which give access to the operating system.
For the sake of this tutorial, we will be building a simple app that fetches the most recent Tutorialzine articles via our RSS feed and displays them in a cool looking carousel. All the files needed for the app to work are available in an archive which you can get from the Download button near the top of the page.
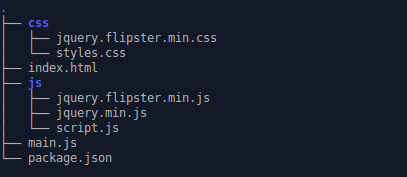
Extract its contents in a directory of your choice. Judging by the file structure, you would never guess this is a desktop application and not just a simple website.

Directory Structure
We will take a closer look at the more interesting files and how it all works in a minute, but first, let’s take the app for a spin.
Running the App
Since an Electron app is just a fancy Node.js app, you will need to have npm installed. You can learn how to do it here, it’s pretty straightforward.
Once you’ve got that covered, open a new cmd or terminal in the directory with the extracted files and run this command:
npm install
This will create a node_modules folder containing all the Node.js dependencies required for the app to work. Everything should be good to go now, in the same terminal as before enter the following:
npm start
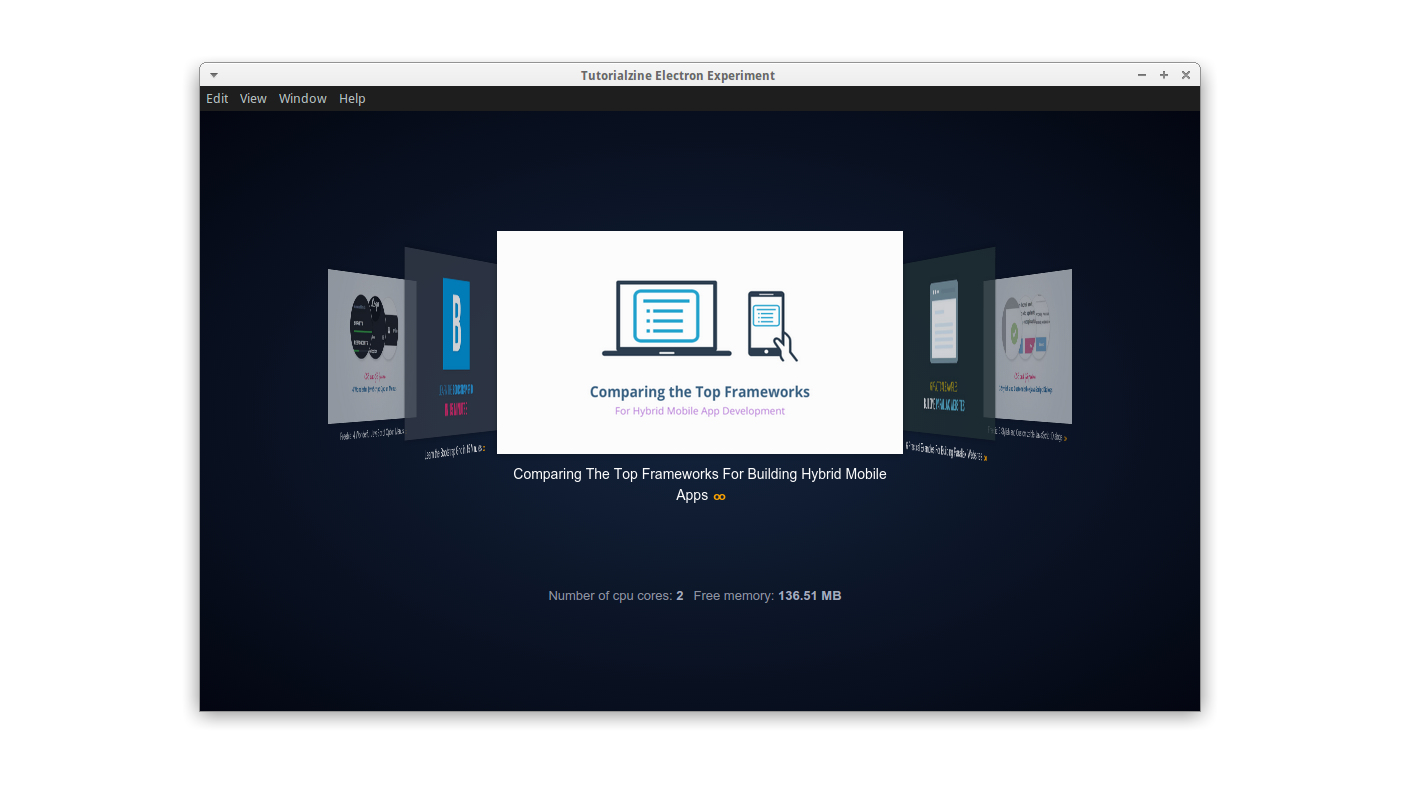
The app should open up in it’s own window. Notice it has a top menu bar and everything!

Electron App In Action
You’ve probably noticed that starting the app isn’t too user friendly. However, this is just the developer’s way of running an Electron app. When packaged for the public, the it will be installed like a normal program and opened like one, just by double clicking on its icon.
How it’s made
Here, we will talk about the most essential files in any electron app. Let’s start with package.json, which holds various information about the project, such as the version, npm dependencies and other important settings.
package.json
  "name": "electron-app",
  "version": "1.0.0",
  "description": "",
  "main": "main.js",
  "dependencies":
    "pretty-bytes": "^2.0.1"
  ,
  "devDependencies":
    "electron-prebuilt": "^0.35.2"
  ,
  "scripts":
    "start": "electron main.js"
  ,
  "author": "",
  "license": "ISC"
If you’ve worked with node.js before, you already know how this works. The most significant thing to note here is the scripts property, where we’ve defined the npm start command, allowing us to run the app like we did earlier. When we call it, we ask electron to run the main.js file. This JS file contains a short script that opens the app window, and defines some options and event handlers.
main.js
var app = require('app');  // Module to control application life.
var BrowserWindow = require('browser-window');  // Module to create native browser window.

// Keep a global reference of the window object, if you don't, the window will
// be closed automatically when the JavaScript object is garbage collected.
var mainWindow = null;

// Quit when all windows are closed.
app.on('window-all-closed', function()
    // On OS X it is common for applications and their menu bar
    // to stay active until the user quits explicitly with Cmd + Q
    if (process.platform != 'darwin')
        app.quit();

);

// This method will be called when Electron has finished
// initialization and is ready to create browser windows.
app.on('ready', function()
    // Create the browser window.
    mainWindow = new BrowserWindow(width: 900, height: 600);

    // and load the index.html of the app.
    mainWindow.loadURL('file://' + __dirname + '/index.html');

    // Emitted when the window is closed.
    mainWindow.on('closed', function()
        // Dereference the window object, usually you would store windows
        // in an array if your app supports multi windows, this is the time
        // when you should delete the corresponding element.
        mainWindow = null;
    );
);
Take a look at what we do in the ‘ready’ method. First we define a browser window and set it’s initial size. Then, we load the index.html file in it, which works similarly to opening a HTML file in your browser.
As you will see, the HTML file itself is nothing special – a container for the carousel and a paragraph were CPU and RAM stats are displayed.
index.html
<!DOCTYPE html>
<html>
<head>

    <meta charset="utf-8">
    <meta name="viewport" content="width=device-width, initial-scale=1">

    <title>Tutorialzine Electron Experiment</title>

    <link rel="stylesheet" href="./css/jquery.flipster.min.css">
    <link rel="stylesheet" href="./css/styles.css">

</head>
<body>

<div class="flipster">
    <ul>
    </ul>
</div>

<p class="stats"></p>

<!-->In Electron, this is the correct way to include jQuery<-->
<script>window.$ = window.jQuery = require('./js/jquery.min.js');</script>
<script src="http://tutorialzine.com/./js/jquery.flipster.min.js"></script>
<script src="./js/script.js"></script>
</body>
</html>
The HTML also links to the needed stylesheets, JS libraries and scripts. Notice that jQuery is included in a weird way. See this issue for more information about that.
Finally, here is the actual JavaScript for the app. In it we access Tutorialzine’s RSS feed, fetch recent articles and display them. If we try to do this in a browser environment, it won’t work, because the RSS feed is located on a different domain and fetching from it is forbidden. In Electron, however, this limitation doesn’t apply and we can simply get the needed information with an AJAX request.
$(function()
// Display some statistics about this computer, using node's os module.
var os = require('os');
var prettyBytes = require('pretty-bytes');
$('.stats').append('Number of cpu cores: <span>' + os.cpus().length + '</span>');
$('.stats').append('Free memory: <span>' + prettyBytes(os.freemem())+ '</span>');
// Electron's UI library. We will need it for later.
var shell = require('shell');
// Fetch the recent posts on Tutorialzine.
var ul = $('.flipster ul');
// The same-origin security policy doesn't apply to electron, so we can
// send ajax request to other sites. Let's fetch Tutorialzine's rss feed:
$.get('http://feeds.feedburner.com/Tutorialzine', function(response)
var rss = $(response);
// Find all articles in the RSS feed:
rss.find('item').each(function()https)://[w-_]+(.[w-_]+)+([w-.,@?^=%&:/~+#]*[w-@?^=%&/~+#])?/g;
// Fetch the first image of the article.
var imageSource = content.match(urlRegex)[1];
// Create a li item for every article, and append it to the unordered list.
var li = $('<li><img /><a target="_blank"></a></li>');
li.find('a')
.attr('href', item.find('link').text())
.text(item.find("title").text());
li.find('img').attr('src', imageSource);
li.appendTo(ul);
);
// Initialize the flipster plugin.
$('.flipster').flipster(
style: 'carousel'
);
// When an article is clicked, open the page in the system default browser.
// Otherwise it would open it in the electron window which is not what we want.
$('.flipster').on('click', 'a', function (e)
e.preventDefault();
// Open URL with default browser.
shell.openExternal(e.target.href);
);
);
);
A cool thing about the above code, is that in one file we simultaneously use:
- JavaScript libraries – jQuery and jQuery Flipster to make the carousel.
- Electron native modules – Shell which provides APIs for desktop related tasks, in our case opening a URL in the default web browser.
- Node.js modules – OS for accessing system memory information, Pretty Bytes for formatting.
And with this our app is ready!
Packaging and Distribution
There is one other important thing to do to make your app ready for end users. You need to package it into an executable that can be started with a double click on users’ machines. Since Electron apps can work on multiple operating systems and every OS is different, there need to be separate distributions for Windows, for OS X and for Linux. Tools such as this npm module are a good place to start – Electron Packager.
Take into consideration that the packaging takes all your assets, all the required node.js modules, plus a minified WebKit browser and places them together in a single executable file. All these things sum up and the final result is an app that is roughly 50mb in size. This is quite a lot and isn’t practical for a simple app like our example here, but this becomes irrelevant when we work with big, complex applications.
Conclusion
The only major difference with NW.js that you will see in our example is that NW.js opens an HTML page directly, whereas Electron starts up by executing a JavaScript file and you create an application window through code. Electron’s way gives you more control, as you can easily build multi-window applications and organize the communication between them.
Overall Electron is an exciting way to build desktop web applications using web technologies. Here is what you should read next: