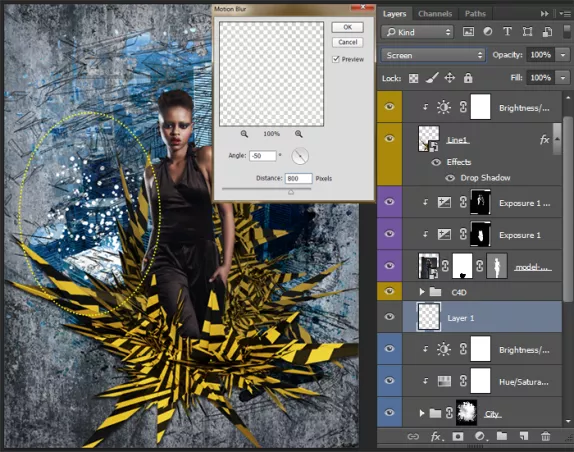
Step 20
Create a new layer (Cmd/Ctrl + Shift + N) under group “C4D” and draw a small cluster of strokes. Go to Filter > Blur > Motion Blur… Set Angle: -50, Distance: 800. Repeat filter several times until lines become smooth (Cmd/Ctrl + F or Filter > Last Filter). By blurring the lines almost invisible, so duplicate this layer a few times (Cmd/Ctrl + J or Layer > Duplicate Layer…) until the texture will be slightly visible.
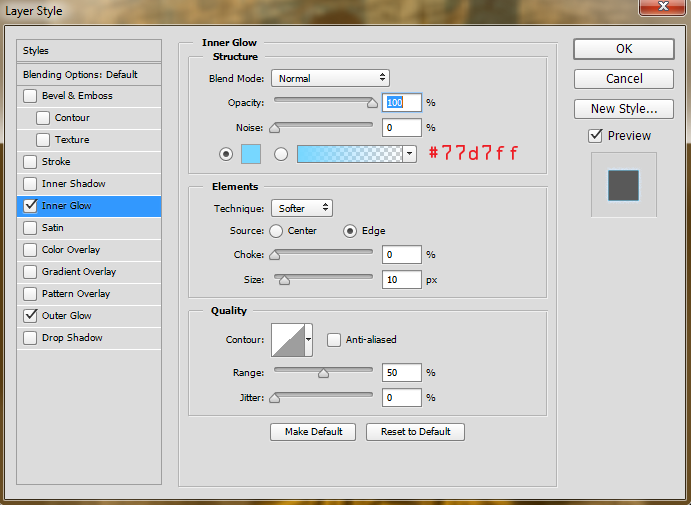
Step 22
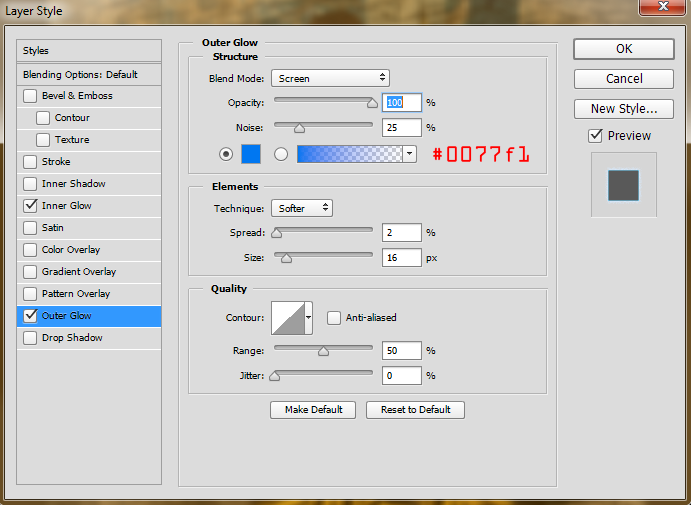
Merge all layers with lines(Cmd/Ctrl + E). Now add a glow to the lines by using layer styles “Inner Glow” and “Outer Glow” (“Fx” icon at the bottom of layer panel or go to Layer > Layer Style > Inner Glow/Outer Glow). For “Inner Glow” set Blend Mode to “Normal”, Opacity to 100%, Color ##77d7ff, Choke to 0% and Size to 10px. In “Outer Glow” tab change Opacity to 100% and add Noise around 25%. Set Color #0077f1, Spread: 2% and Size: 16px.
Step 26
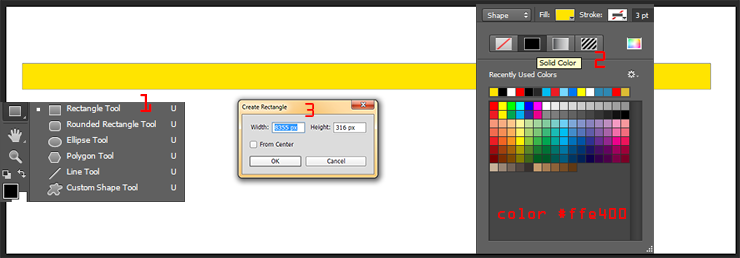
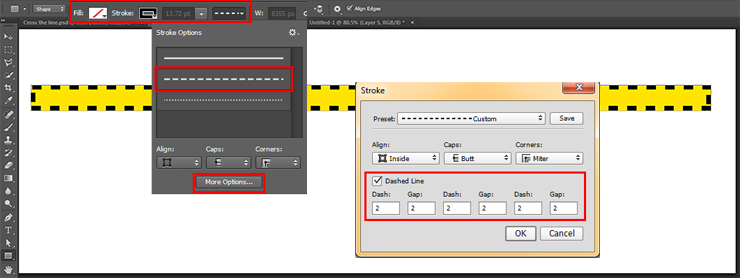
Duplicate this rectangle (Cmd/Ctrl + J or Layer > Duplicate layer…). Remove color fill and set stroke color to black, Stroke size to 13,72. Go to Stroke settings and click on button “More Options…”. In Stroke options set long lines preset, Align: Inside, Caps: Butt, Corners: Miter. For all lower windows with “Dash” and “Gat” set 2 and click OK.
Step 27
Select both layers with rectangles, make right click > Convert to Smart Object. Use Distort Tool (Edit > Transform > Distort). Select midpoint, hold on Shift and move it on 35 degrees to the right, hit Enter/Return to apply changes. Take a Polygonal Lasso Tool (L), hold Shift and select both edges. Hold Shift to make a straight line at 45 degrees. Hold Opt/Alt and click on “Add layer mask” icon to hide edges.

Step 28
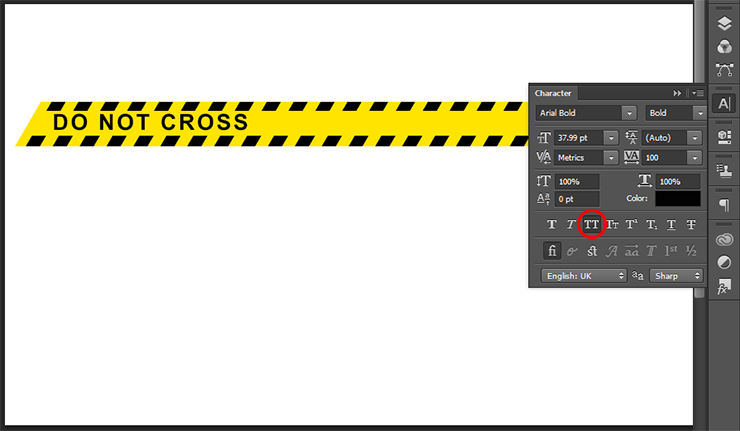
Take a Horizontal Type Tool (T). Place the cursor on the first black line on the left and write “Do Not Cross”. In “Character” panel (Window > Character) set Font to “Arial Bold”, Size around 37.99 pt, Color to black. Press “All Caps” button to make all letters are capital.
Step 29
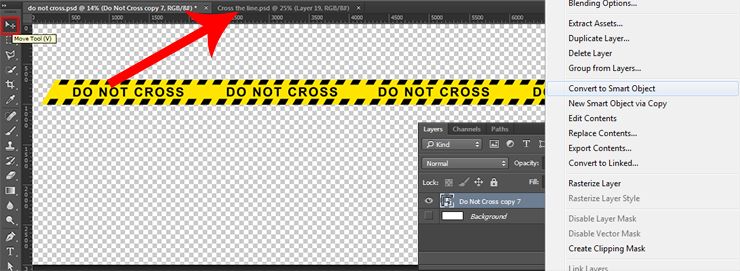
With Move Tool (V) and Opt/Alt key duplicate inscription until is no free space on the tape (Or you can use Cmd/Ctrl + J and move inscription). Hold Shift to keep inscription at one line. Select All layers and make from it a Smart Object (right click > Convert to Smart Object). With Move Tool (V) move tape in the document with the photo manipulation.
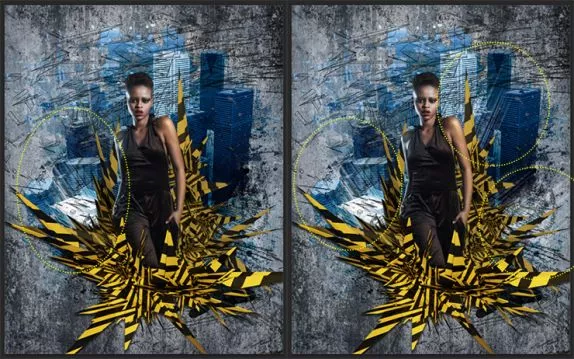
Step 30
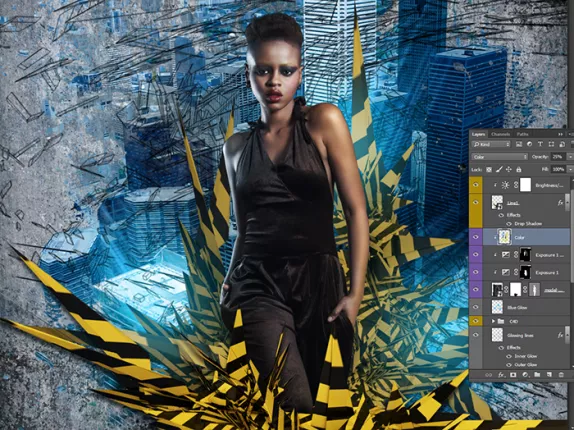
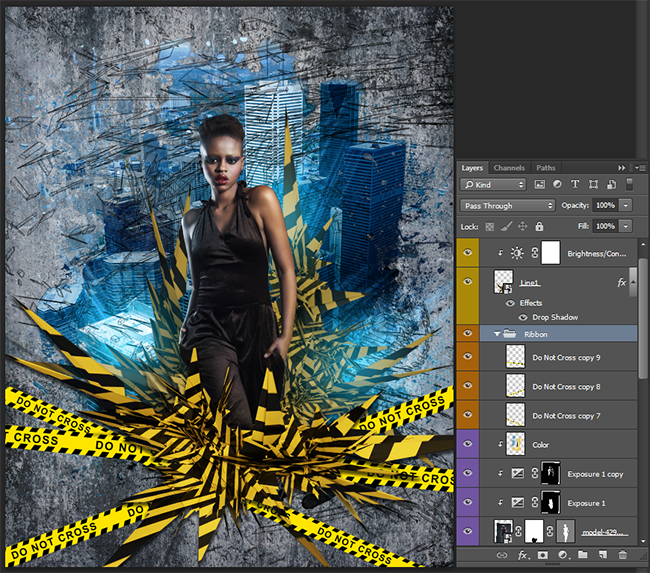
Duplicate ribbon two times (Cmd/Ctrl + J or Layer > Duplicate layer…) and with Free Transform Tool (Cmd/Ctrl + T or Edit > Free Transform) position ribbons as shown in the image below. You can change the location or size of ribbon as you want. Select all ribbon’s layers and group them (Cmd/Ctrl + G or Layer > Group Layers).
Step 31
The tape does not look realistic, so I used the layer styles to add gloss and texture. Start from “Inner Shadow” (Layer > Layer Style > Inner Shadow…). Set Opacity: 50%, Distance: 0, Choke: 5% and Size: 51px. Go next, checked “Satin” and there set color: #ffffff, Blend Mode “Screen”, Opacity: 90%, Distance: 80 and Size: 65px.
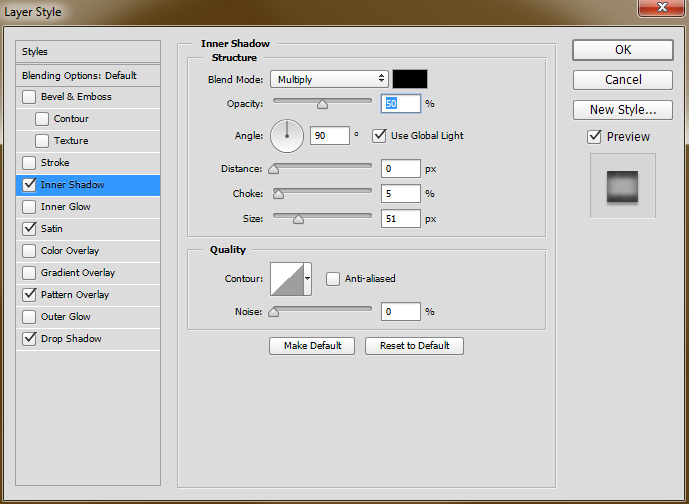
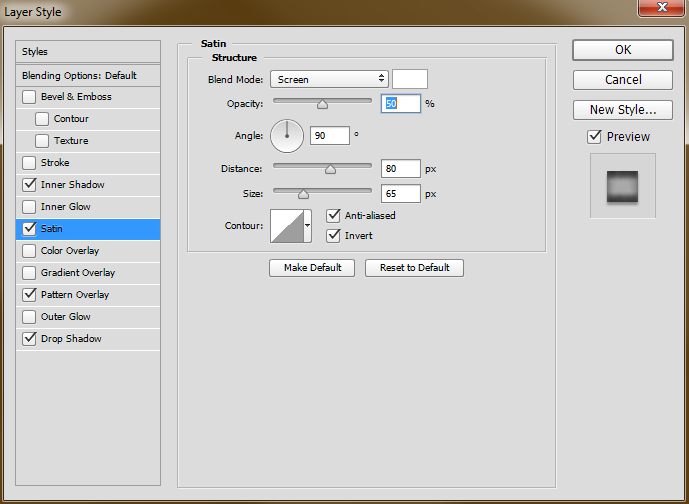
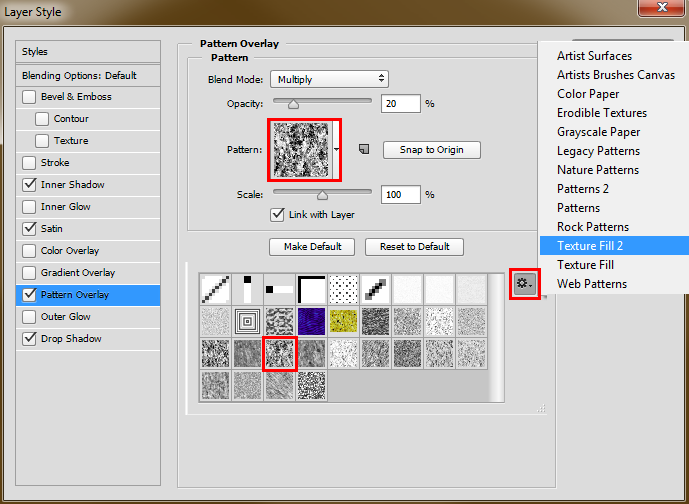
Add a bit of texture. Checked “Pattern Overlay” and make following settings – Blend Mode “Multiply”, Opacity: 20%, Scale: 100%. Click on pattern thumbnail go to settings (small gear on right side) and from list load “Texture Fill 2” pack, use “Stucco 3” pattern. At the end add a drop shadow. Set Opacity: 35%, Distance: 12px, Spread: 0%, Size: 13px and click OK to apply layer style.
Step 32
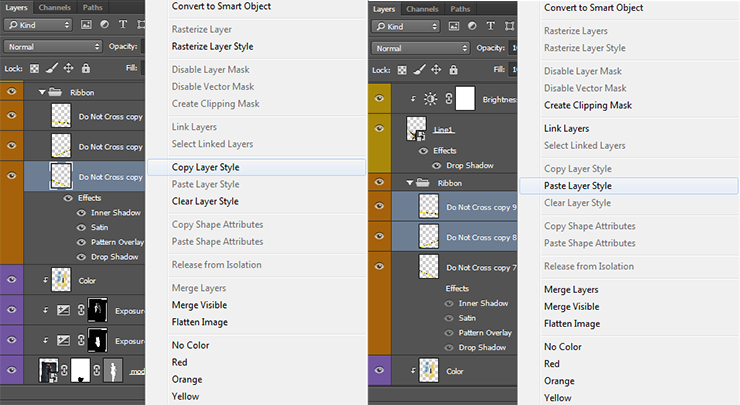
Make Right click on layer with style > Copy Layer Style. Select the remaining two layers and without style and paste it (right click > Paste Layer Style). I strongly do not recommend you to add style to the group, because it will not work on all layers, but only the figure of the ribbons.
Step 33
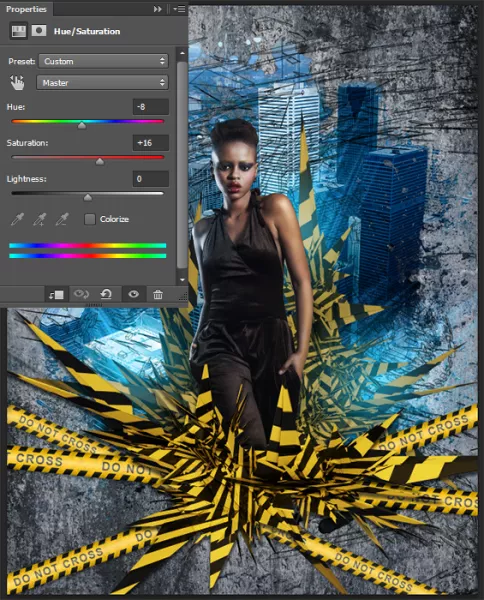
Color of ribbons slightly differ from the colors on an abstract render so I used an adjustment layer “Hue/Saturation” (Layer > New Adjustment Layer > Hue/Saturation…) with the settings – Hue: -8, Saturation: +16 and be sure to clip this layer to a “Ribbon” group.
Step 34
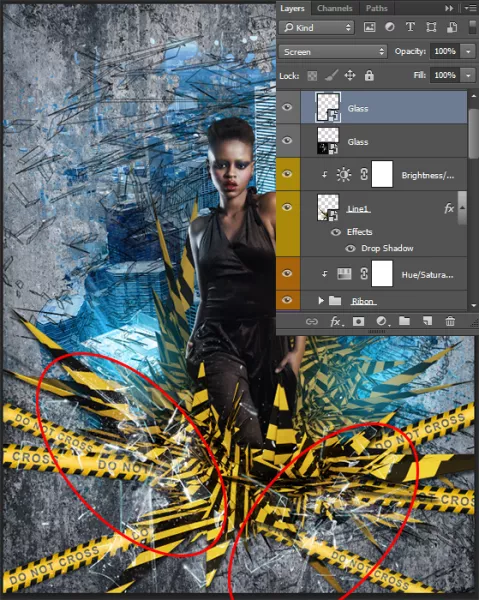
Add an image of break glass in the photo manipulation. Use image “Glass” in folder with abstract render. Resize it with Free Transform Tool (Cmd/Ctrl + T or Edit > Free Transform) and position it near foreground abstract render. Change layer Blending Mode to “Screen”. You can move glass to another location in the image.
Step 35
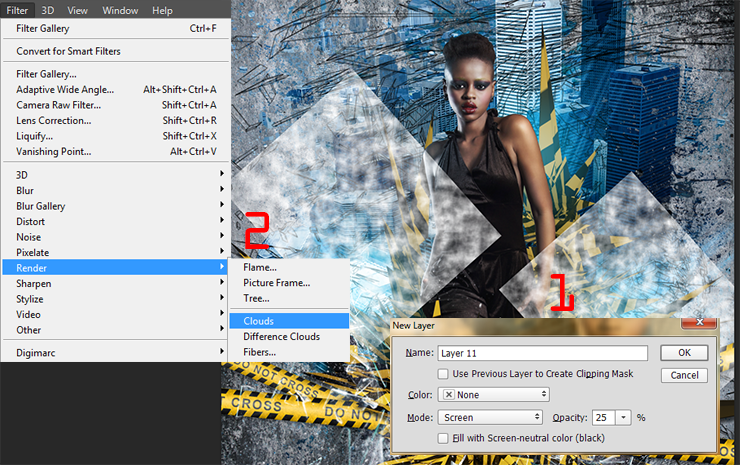
Now I will tell you how to create lightning near the model. This is a very interesting effect, which is created by Photoshop. Hold down Opt/Alt key and click on “Create a new layer” icon. Change Blending mode to “Screen”, reduce Opacity to 25%, set to default foreground/background colors (D) and go to Filter > Render > Clouds. With Free Transform Tool (Cmd/Ctrl + T or Edit > Free Transform) reduce the size to a small spot.
Step 36
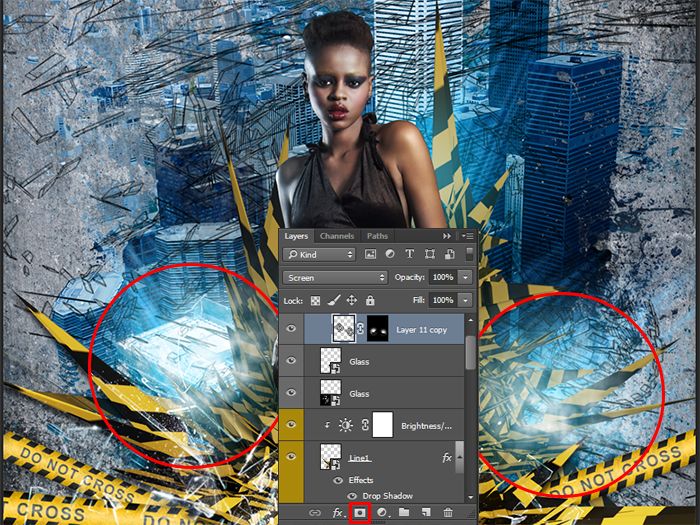
Duplicate this layer (Cmd/Ctrl + J or Layer > Duplicate layer…) and move it to the opposite side near the hand model. Merge there two layers into one (Cmd/Ctrl + E or Layer > Merge Layers). Hide all by using inverted layer mask (hold Opt/Alt and click on “Add a layer mask” icon or go to Layer > Layer Mask > Hide All). With soft round brush restore clouds near hands. Try to hide layer edges. This will be the basis of lightning.
Step 37
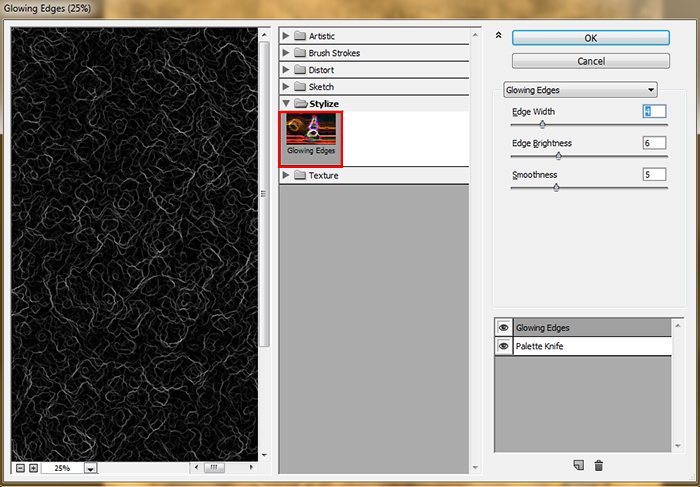
Create a new layer with “Screen” Blending Mode and apply “Clouds” filter (Filter > Render > Clouds). Go to Filter > Filter Gallery. When window appear, choose “Palete knife” filter in “Artistic” folder. Use following settings – Stroke Size: 25, Stroke Detail: 3, Softness: 0. Add new effect layer (button in the form of a sheet at the bottom).
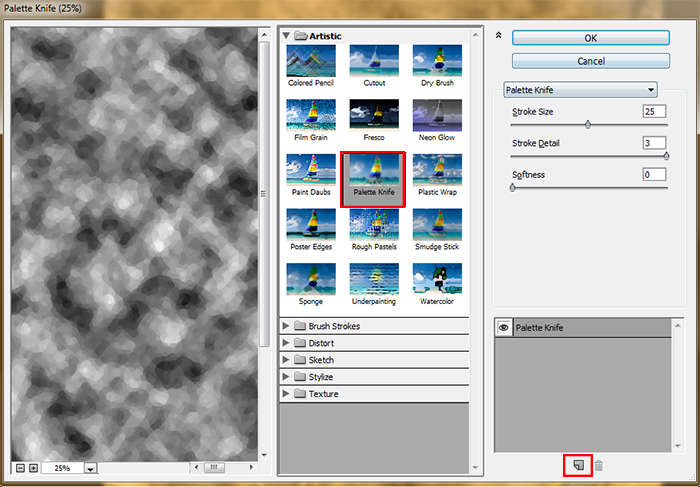
Go to folder “Stylize” and add filter “Glowing Edges” with settings – Edge Width: 4, Edge Brightness: 6, Smoothness: 5. Click OK to apply filter. Play around with there there settings and filters and you will find many more interesting features. You can also change the thickness and density of lightning.
Step 38
Add inverted layer mask to this layer (hold Opt/Alt and click on “Add a layer mask” icon or go to Layer > Layer Mask > Hide All) and as with clouds draw where you want add lightning. I increased area slightly compared to the spot with clouds. Duplicate this layer if you want make lightning brighter.
Step 39
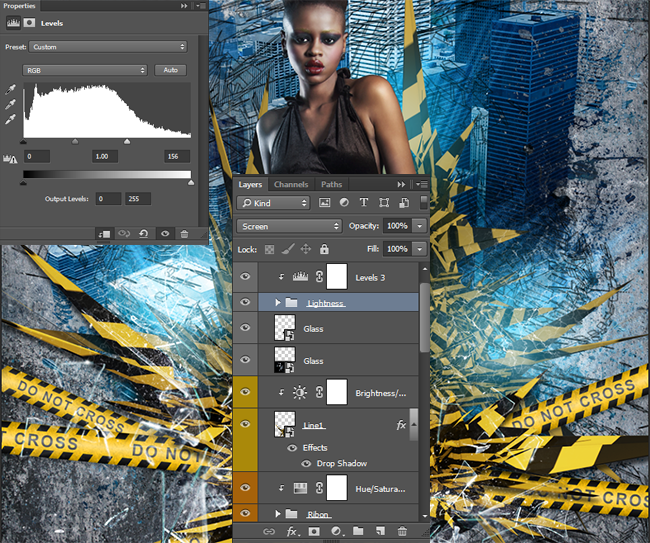
Group all lightning layers (Cmd/Ctrl + G or Layer > Group Layers…). Change group Blending Mode to “Screen” and add an adjustment layer “Levels” (Layer > New Adjustment Layer > Levels… or use icon at the bottom of Layer panel) with settings for white point 156. Make sure to clip this layer to a group. This will make more vivid lightnings.
Step 40
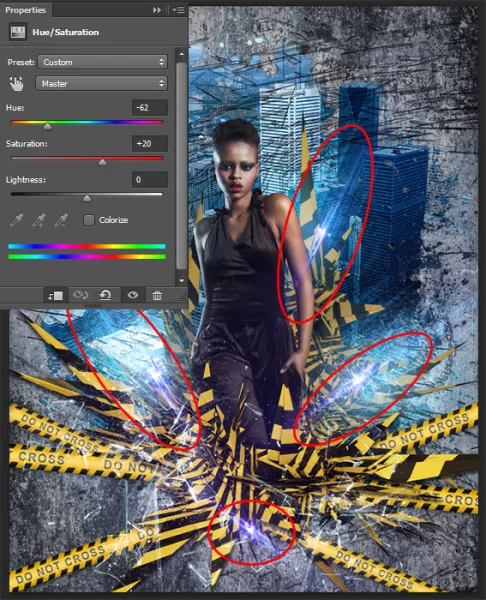
We are at the end of photo manipulation and now we add highlights to vary composition and add glamor. It is very simple as is the case with the glass. You choose desired flare, change its size and position. Then change Blending Mode to “Screen” and duplicate it several times (Cmd/Ctrl + J) and place in different parts of the picture. Very convenient to use as a basis the brightest spots in the picture. I use image “16” then group all flare layers (Cmd/Ctrl + G) and add an adjustment layer “Hue/Saturation” with Hue: -62, Saturation: +20 and clipping to flare group.
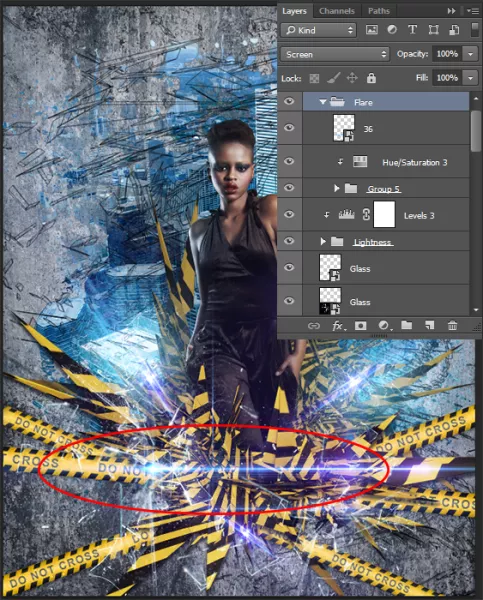
Step 41
Place another one flare “36” at the bottom of photo manipulation and group all flares (Cmd/Ctrl + G). Set group Blending Mode to “Screen”. I decided to collect all the glare in a sequence to be able to change their location and color groups. Also very interesting affects on a flares an adjustment layer “Color Balance”.
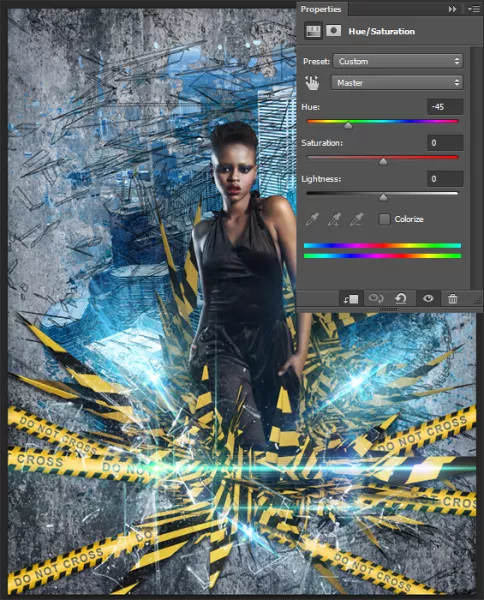
Step 42
To change color of all flares I use adjustment layer “Hue/Saturation” (Layer > New Adjustment Layer > Hue/Saturation…) with Hue: -45 and clip it to a group. You can try using other colors and location glare. In my experiments looked good flares with magenta tint. Flare a large number, so try to use the entire image with glare in the center and not to overdo it with their number.
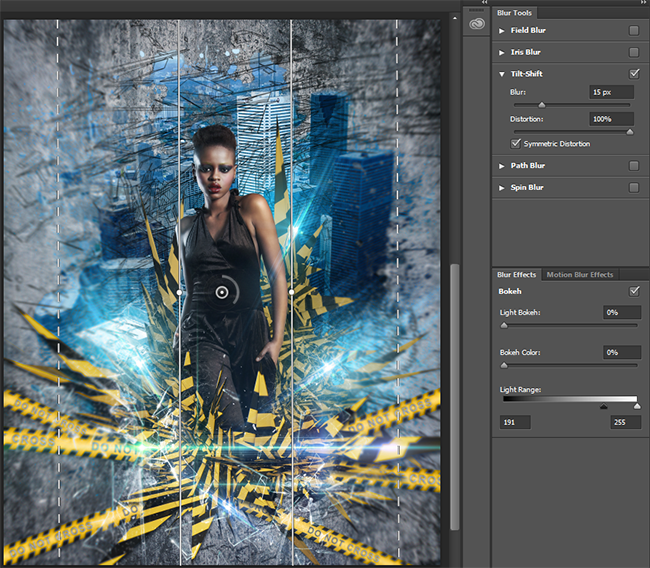
Step 43
One of the main details of this picture is a blur. This effect creates a dynamic movement and the destruction of the space. I love to use this effect in my works. This new filter which is available only in Photoshop CC. So let’s get started! Create a merged copy of image (Cmd/Ctrl + Opt/Alt + Shift + E), Convert it to Smart Object (right click on layer > Convert to Smart Object). Go to Filter > Blur Gallery > Tilt Shift… Set Blur to 15px, Distortion to 100% (this has the effect of particle motion picture), be sure to check “Symmetric Distortion”. Rotate guides around 90 degrees and apply filter. Change layer Blending Mode to “Luminosity”. If you have another version of the program, as an alternative you can use “Radial Blur” (Filter > Blur > Radial Blur with “Zoom” method), then remove some effect on Smart filters mask.
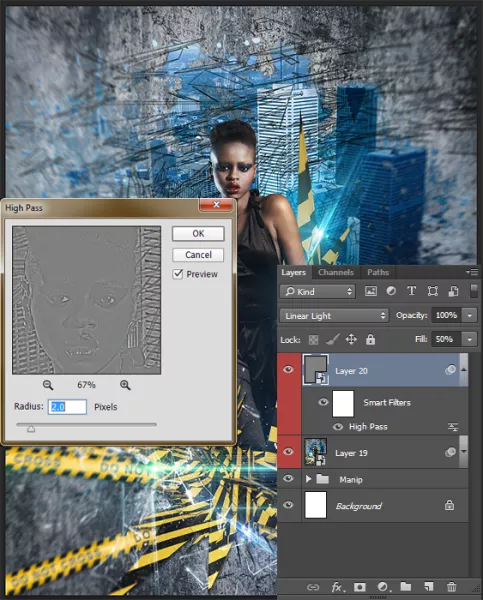
Step 44
To increase the sharpness of the image. Create a merged copy of image (Cmd/Ctrl + Opt/Alt + Shift + E), Convert it to Smart Object (right click on layer > Convert to Smart Object). Go to Filter > Other > High Pass. Set Radius to 2.0 pixels and click OK. Change Blending Mode to “Linear Light” and reduce Fill to 50% (do not use Opacity).
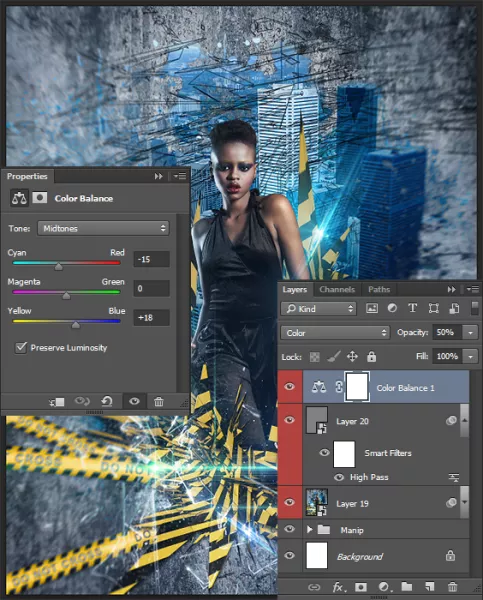
Step 45
There was only final image color correction. I wanted to make blue color a more bright and defiant. So I use “Color Balance” adjustment layer (Layer > New Adjustment Layer > Color Balance) and made changes only for midtones. Set for Cyan-Red: -15 (more cyan tint on image) and Yellow-Blue: +18 (more blue tint). Change Blending Mode to “Color” to effect only on color in picture and reduce Opacity to 50%.
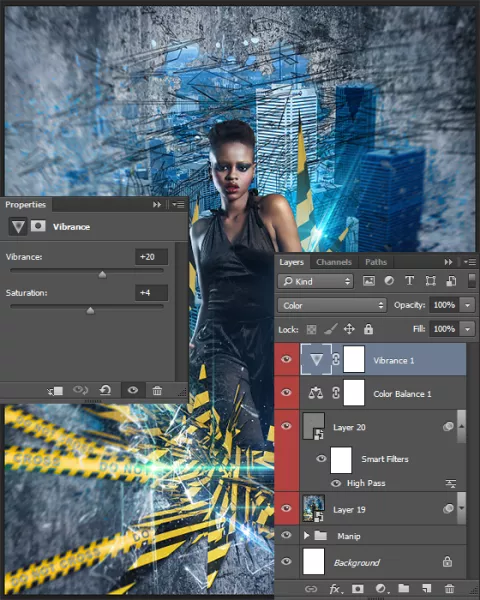
Step 46
The next and final adjustment layer is needed to increase the saturation of all colors. Go to Layer > New Adjustment Layer > Vibrance… Make Vibrance: +20 and Saturation: +4. I use “Vibrance” layer because is a smart-tool which cleverly increases the intensity of the more muted colors and leaves the already well-saturated colors alone. I was able to gently influence the colors do not overexpose picture. Change Blending Mode to “Color”.
Step 47
And now digress from the tutorial. The picture is ready, and I offer a variant of what I told you about the experiments. I just changed the color of flare on the top layer “Hue/Saturation” I move some tapes and created the latest a merged copy of image, rotate in and increase size with Free Transform Tool (Cmd/Ctrl + T). And now, a completely new variant of picture.
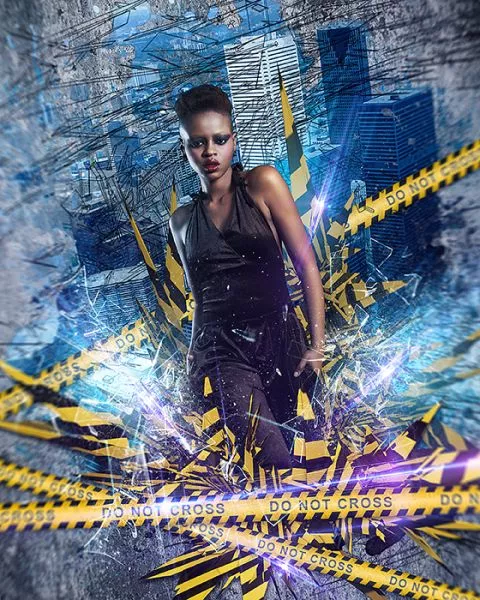
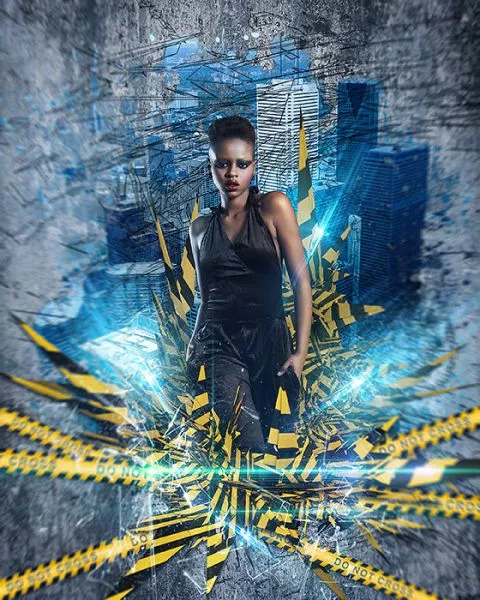
Final Results
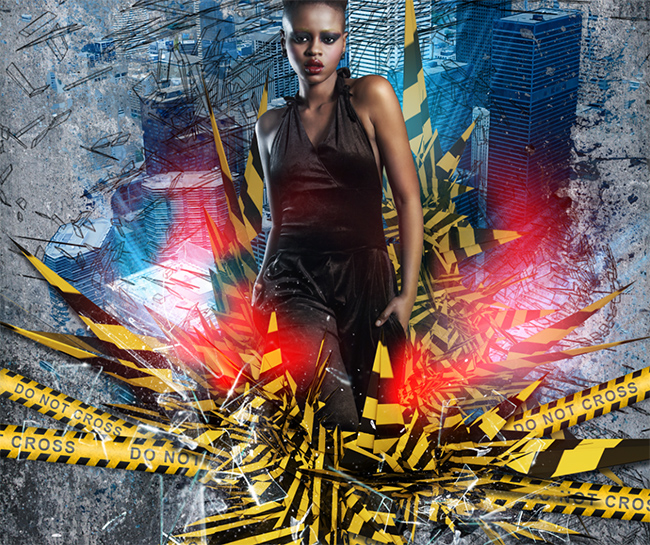
That’s all! Look at the finished result. I hope that you get exactly the picture. Do not be afraid to experiment! It is always justified. Have a question or a comment? Leave it in comment – section below :)