When you think of social websites, chances are that social networks such as Facebook immediately spring to mind, but the ability to create a profile and connect with other users can be a valuable addition to many different websites.
Imagine you’ve created a website for your business; you could use social features to build an employee directory where potential clients can identify and connect with the exact person they need to speak to.
Social and membership features can also be a good fit for any website where visitors can post their own content, such as forums, blogs, or review websites. If you visit TripAdvisor and click through to any user’s profile, then you’ll find many familiar social features, such as a list of their followers, an Activity feed, any badges they’ve earned, and a map of all the places they’ve visited.
By adding social and membership features to your website, you can improve the user experience while encouraging visitors to engage with your site’s content.
In this article, we’ll be implementing everything you need to create a thriving online community using WordPress’ UserPro plugin. By the end of this tutorial, anyone who visits your website will be able to create a profile and connect with others. In a future post, we’ll let them share their location, using Google Maps integration and give visitors the option to create an account using their existing Facebook or Twitter credentials.
Getting Started With the UserPro Community Plugin
To start, we need to download and install the UserPro plugin.
If you haven’t already registered, create your free Envato Market account. Head over to the CodeCanyon website, click the little Sign In button in the upper-right, and then enter your Envato account details.
Once you’re logged into your account, head over to the UserPro listing, click Buy Now and then follow the onscreen instructions to complete your purchase. When prompted, download the plugin. Unzip your plugin; the subsequent folder should contain a number of folders and files, including a userpro.zip file, which you’ll need to upload to your WordPress account.
Adding a Third Party Plugin to WordPress
Once you’ve downloaded UserPro, you’ll need to upload it to your WordPress account.
Log into your WordPress account, if you haven’t already. Select Plugins from WordPress’ left-hand menu, followed by Add New. Select the Upload Plugin button. Scroll to the If you have a plugin in a .zip format section, and select Choose file. Select the userpro.zip file and click Install Now.
UserPro will now be uploaded to your WordPress account. After a few moments, you should see a Plugin installed successfully message. Select the Activate Plugin button.
A new UserPro item should appear in WordPress’ left-hand menu.
How to Activate Your New Plugin
Next, you’ll need to active UserPro, by finding your unique purchase code and adding it to your WordPress website’s functions.php file, which is a template used by your WordPress theme.
When you purchased UserPro, you should have received an email with the subject line [CodeCanyon] Purchase Confirmation. Open this email, and you should find a Purchase code. Keep this information to hand, as you’ll be needing it shortly.
Switch back to your WordPress account, and in the left-hand menu click UserPro and select the Licensing tab.
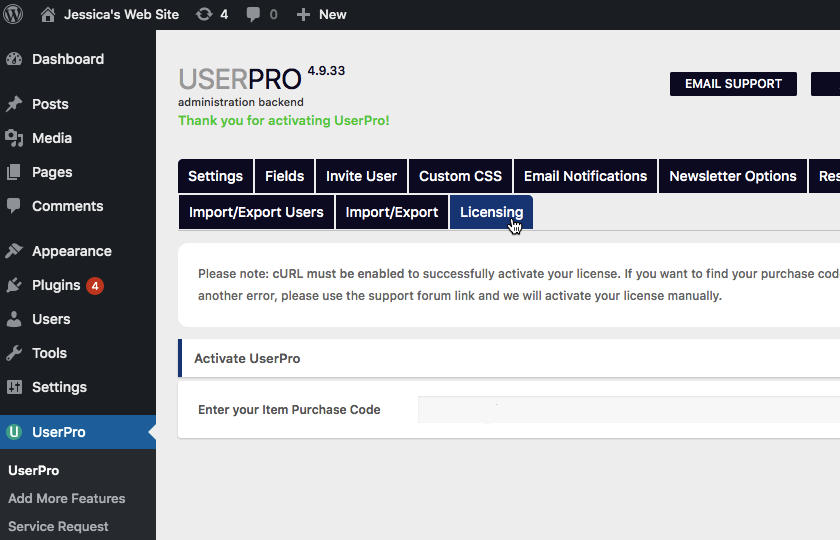
Scroll to the Activate UserPro section, and copy/paste your purchase code into the accompanying text field. Then select Save Changes.
Once the page refreshes, you should see a Thank you for activating UserPro message.
Exploring Your Website’s New Social Features
UserPro automatically creates all the pages you need to implement a functioning social network, including pages where the user can create a profile, edit that profile, and connect with other users.
Select Pages > All Pages from WordPress’ left-hand menu, and you should see that UserPro has created the following pages:
- My profile. This is the user’s public-facing profile.

- Edit profile. This is a page where the user can edit various parts of their profile, including their display name, profile picture, and location.

- Connections. This displays a list of the user’s connections.

- Followers. This displays all of the user’s followers.

- Following. This displays a list of every account this user is following.
- Member directory. This is a searchable directory of every person who’s registered with your website.

- Login. This is a page where visitors can log into their account, or navigate to your website’s registration form by clicking Create an account.
- Register. This is a page where visitors can create an account by entering their name and email address, and creating a password.
Note that if a visitor tries to access any of the following pages without logging into their account, they’ll be redirected to your website’s Login page:
- My Profile
- Edit Profile
- Followers
- Following
- Connections
What Does This Mean for the People Who Visit My Site?
Let’s take a tour of UserPro’s default setup, so we can see how our social features currently function.
To simulate the experience of registering as a new user, either log out of your WordPress account, launch an alternative browser, or open a new incognito tab. Next, navigate to either your website’s My Account or My Profile page. The process for navigating to these pages may vary, depending on how your website is setup, but I could access both pages by selecting them in my website’s footer.
Since these pages were generated automatically, they may not be properly connected to the rest of your website yet. If you’re struggling to access My Account or My Profile, then:
- Log back into your WordPress account.
- Navigate to Pages > All Pages.
- Find the My Account or My Profile item, and click its accompanying View link. This page will now launch in a new tab.
- Copy the page’s URL.
- Log out of your WordPress account, launch an alternative web browser, or open an incognito tab.
- Paste the URL into the address bar, and then hit the Enter key on your keyboard.
Since we’re not currently logged into an account, we’ll be prompted to register as a new user user; click the Create an account button.

You can now create your account by completing the subsequent form, and clicking Register. By default it’s possible to create a profile without verifying your email address, which makes it easier to test your website by creating multiple dummy accounts.
After clicking the Register button, you’ll be redirected to the My Profile page, which is your publicly-visible user profile.
To make some changes to your profile, click the Edit Profile button, which takes you to the Edit Profile page. From here, you can add extra information, upload a profile picture, or edit the information you’ve previously entered. When you’ve finished editing your profile, click Save Changes.
If you want to test UserPro’s follow functionality, then you’ll need to create at least one additional user account. To create subsequent accounts, log out of your current account by selecting View Profile > Logout, and then repeat the above steps.
Once you have at least two user accounts, head over to the Member Directory and you should see a preview of all the accounts you’ve created.
To follow a user, simply click their View profile button and then hit the Follow button.

Every time you follow a user, the follower count on their profile will increase. If you navigate back to your profile, then you’ll see that your following count has also increased.
If you select the Following tab, then it’ll display a list of all the users you’re currently following. If you gain any followers, then they’ll appear in your Followers tab.
Out of the box, this is pretty much everything you need to provide a functioning social network, but there’s lots of ways that you can customize and enhance UserPro’s default setup.
Troubleshooting: “Create an Account” Isn’t Working!
Have you fallen at the first hurdle? If you’re clicking the Create an Account button and nothing is happening, then don’t panic! There’s several fixes that you can try:
1. Switch From Relative to Full Paths
UserPro seems to occasionally become confused when trying to resolve relative paths, so you may be able to resolve this issue by switching from relative to full paths:
- Select UserPro > UserPro from WordPress’ left-hand menu.
- Make sure the Settings tab is selected.
- Click to expand the Compatibility Settings section.

- Open the Path Compatibility dropdown, and select Use Full Paths.
- Select Save Changes.
- Check whether this has resolved your issue.
2. Make Sure You’re Up to Date
Before we move onto some more disruptive fixes, it’s worth checking that all of your plugins and themes are up-to-date, and that you’re using the very latest version of WordPress.
If you’re behind on your updates, then it’s possible you’re encountering a bug or conflict that’s already been addressed in a subsequent update.
To start, select Dashboard > Updates from WordPress’ left-hand menu. From here, you can check for the following updates:
- WordPress. Even if WordPress’ Update list is empty, it’s still worth clicking the Check Again button, just to be certain no updates are available.

- Plugins. It’s not uncommon to encounter conflicts between third party plugins. Before you start deactivating plugins, you should make sure you have the latest versions installed. If Dashboard > Updates lists any available updates, then select all of them and then click Update plugins.
- Themes. Some users have reported encountering issues when using this plugin alongside certain WordPress themes. Changing your website’s theme probably isn’t a step you want to take lightly (if at all!) so it’s always a good idea to check that you’re using the very latest version of your chosen theme.
3. Disable Conflicting Plugins
If you have any other plugins installed, then it’s possible that UserPro may be conflicting with these pre-existing plugins. To identify the culprit, deactivate each plugin in turn and then check whether this has resolved your problem.
To start deactivating your plugins:
- Select Plugins > Installed Plugins from WordPress’ left-hand menu.
- Find the first plugin, and click its accompanying Deactivate button.
- Check whether this has resolved your problem.
- Rinse and repeat until you either identify the offending plugin, or verify that none of your plugins are causing the problem.
4. Change Your Theme
Some people have reported encountering UserPro’s “broken button” issue when using certain themes, so you may get positive results by switching your website’s theme.
To change your WordPress theme, select Appearance > Themes from the left-hand menu and then choose a replacement theme.
Getting More Out of UserPro: Google Maps, Facebook, Twitter and More
At this point, we have everything we need to create an online community, but there are plenty of other UserPro features that you can enable, including Facebook and Twitter Connect, and Google Maps integration.
In this section, we’re going to explore a number of optional added extras that you may want to add to your new online community.
Making Connections
UserPro has a “connections” feature that adds a Send Connect Request button to each user’s profile.

Once you’ve sent a connection request to a user, they can review that request by opening their profile and selecting the Connections tab.
From here, they can either accept or reject the connection request.
If the user accepts a connection request, they can choose to revoke that connection at any point by navigating to their profile’s Connections tab, finding the connection in question, and then selecting its accompanying Remove connection icon.

To enable the connect feature:
- Select UserPro > UserPro from WordPress’ left-hand menu.
- Make sure the Settings tab is selected.
- Click to expand the General section.
- Open the Enable Connections dropdown, and select Yes.
- Click Save Changes.
Keep Your Users Coming Back, With Email Notifications
To help drive user engagement, you may want to send an email notification every time the user gains a new follower, or one of their existing followers makes a new post.
To send an email notification about new followers:
- In WordPress’ left-hand menu, select UserPro > Social Extension.
- Click to expand the E-mail notifications section.
- Find the following dropdown: Send e-mail notification when someone follows another user, and set it to Yes.
- Click to expand the New Follow E-mail Template section.
You should now see the template that UserPro will use to generate its “new follower” emails. By default, this template should look something like this:
Hi there,

{USERPRO_FOLLOWER_NAME} is now following you on {USERPRO_BLOG_NAME}!
You can click the following link to view his/her profile:

{USERPRO_FOLLOWER_LINK}

Or view your profile at:

{USERPRO_MY_PROFILE}

This is an automated notification that was sent to you by UserPro. No further action is needed.
You can edit any of the plain text in this template, but make sure you don’t accidentally alter any of the code, or you may wind up addressing people as FOLLOWER_NAME!
When you’re happy with your changes, click Save Changes.
You may also want to send an email to followers of a user every they makes a new post:
- Navigate to UserPro > Social Extension > E-mail notifications, if you haven’t already.
- Find the following dropdown: Send e-mail notification to followers when user creates post. Open the dropdown, and select Yes.
- Click to expand the following section: New Post E-mail Notification to Followers Template.
By default, UserPro will use the following email template:
Hi there,

{USERPRO_FROM_NAME} has created a new post -

Post Name : {VAR1}
Make any changes, and then click Save Changes. Now whenever a user makes a new post, all their followers will be notified!
Conclusion
In this tutorial, I showed you how to build a complete online community, using the UserPro plugin. Anyone who visits your website will now be able to create a profile and connect with other users.
In the next post, I’ll show you how to let users display their location using Google Maps, and optionally connect their user account to Twitter and Facebook. For more information about UserPro, check out the UserPro website.