
In this tutorial, I will show you how to create a soccer-themed text effect, using basic Layer Styles, brushes, and a couple of textures. Let’s get started!
Tutorial Assets
The following assets were used during the production of this tutorial.
- Lobster font (Download the Lobster 1.3 version).
- White Texture pattern by Dmitry.
- Grass0138_20_M (Image 4 – Medium 1600×1067).
- SoilCliff0027_1_S (Image 1 – Small 1024×193).
- SoilSand0046_1_S (Image 1 – Small 640×640).
1. Create the Background
Step 1
Create a new 1000 x 1000 px document, and set the Resolution to 300.
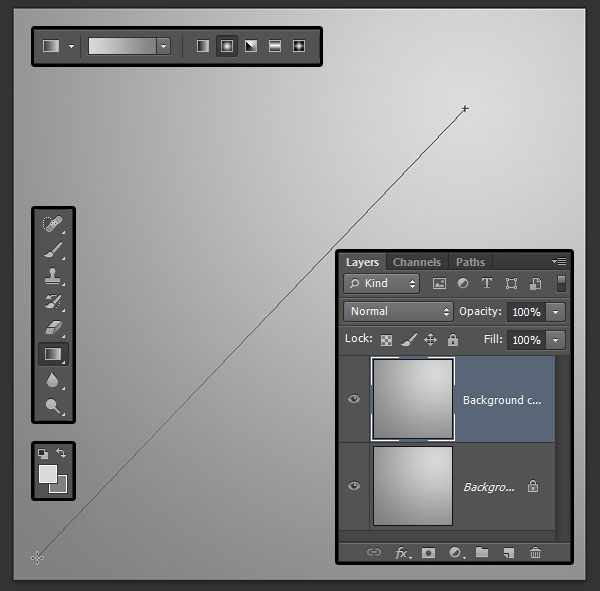
Set the Foreground color to #d9d9d9 and the Background color to #818181. Pick the Gradient Tool, choose the Foreground to Background gradient fill, and click the Radial Gradient icon.
Then, click and drag from a bit below the top right corner of the document to the bottom left corner to create the background gradient, and duplicate the Background layer.
Step 2
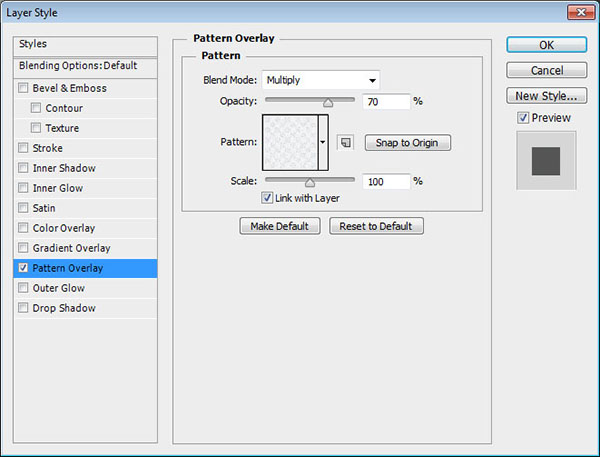
Double click the copy Background layer to apply a Pattern Overlay effect, by changing the Blend Mode to Multiply, the Opacity to 70%, and using the White Texture Pattern.
Step 3
This will add a subtle texture to the background.

2. Create and Style the Text
Step 1
Create the text using the font Lobster 1.3. The Color is #3f3f3f, and the Size is 70 pt.

Step 2
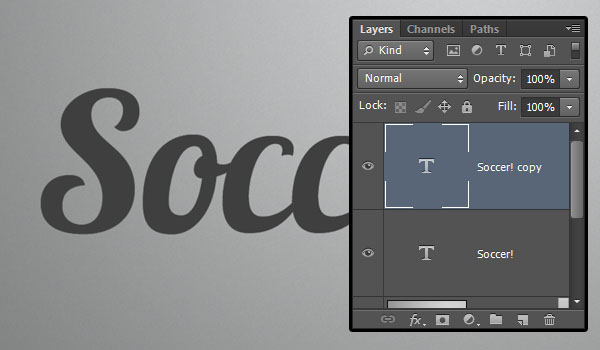
Duplicate the text layer and double click the copy to apply the Layer Style below:
Step 3: Bevel and Emboss
- Size: 3
- Check the Anti-aliased box
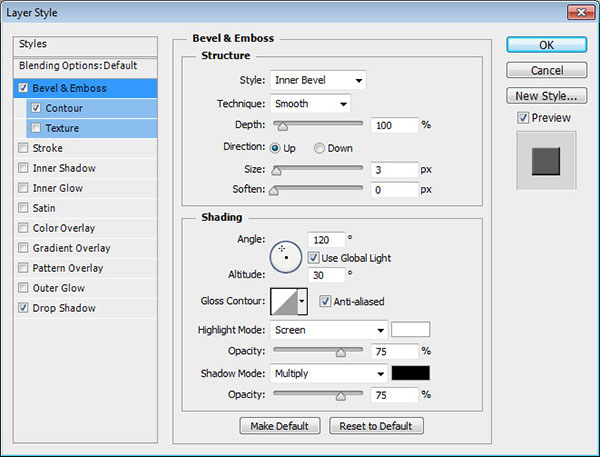
Step 4: Contour
- Contour: Half Round
- Check the Anti-aliased box.
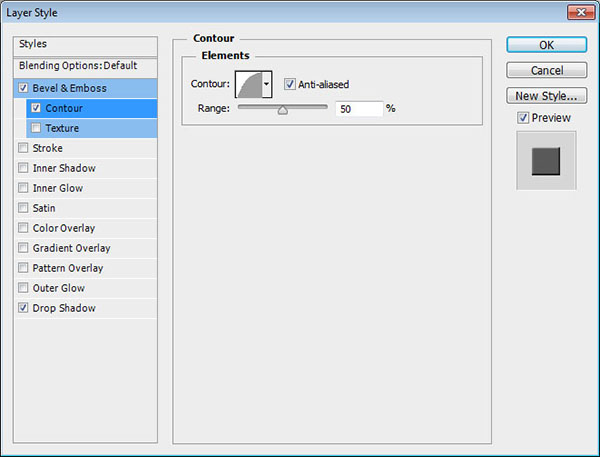
Step 5: Drop Shadow
- Distance: 1
- Size: 1

Step 6
This will style the text.

3. Convert to Shape and Modify the Shape Attributes
Step 1
Select the original text layer then go to Type > Convert to Shape.
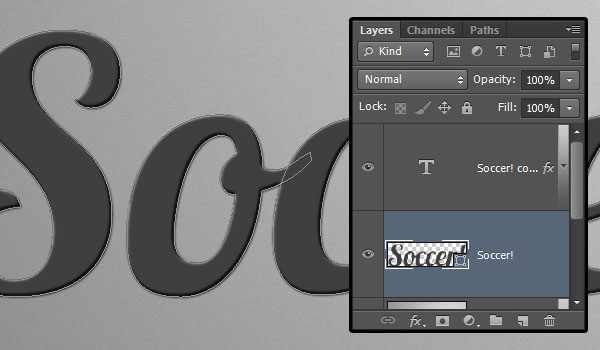
Step 2
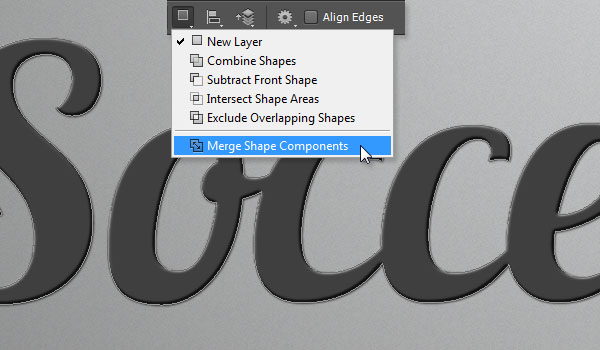
Click the Path operations icon in the Options bar, then click Merge Shape Components. This will ensure a better application of the Layer Effects.
Step 3
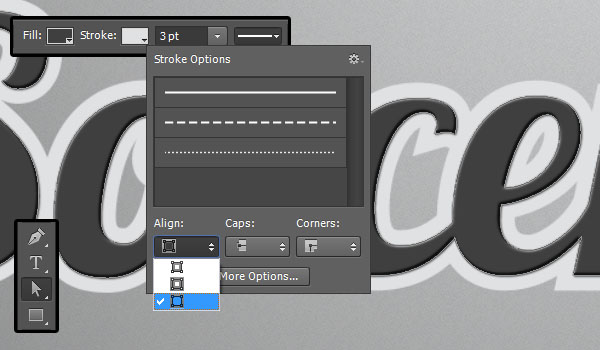
Pick the Direct Selection Tool, and in the Options bar, set the Stroke Color to #e0e1e3, the Size to 3, then click the Set shape stroke type icon and change the Align to Outside.
Step 4
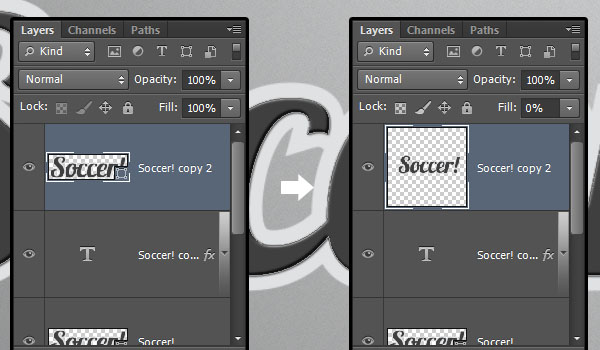
Duplicate the Shape layer then drag the copy on top of the text layer. Go to Layer > Rasterize > Shape, and change the Fill value to 0.
Step 5
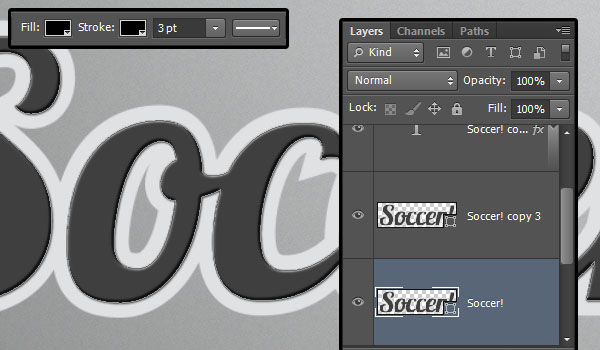
Duplicate the original shape layer once again, drag the copy below the original, then change both its Fill and Stroke colors to #000000.
Step 6
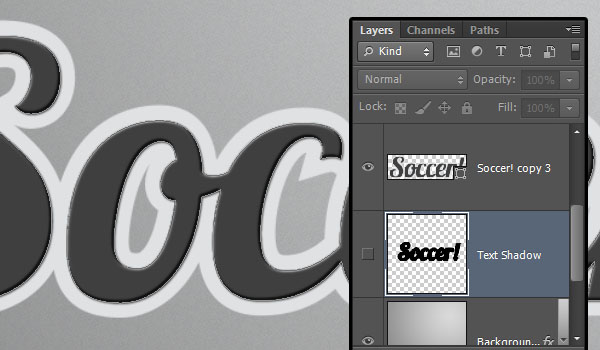
Rename the copy layer to Text Shadow, go to Layer > Rasterize > Shape, and make the layer invisible by clicking the eye icon next to it.
4. Style the Outer Stroke Shape Layer
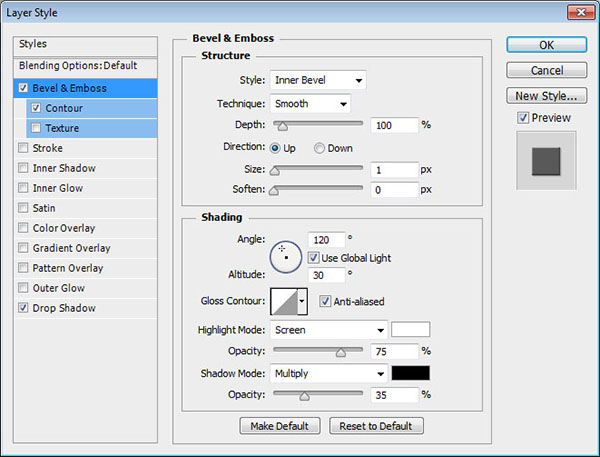
Double click the original shape layer (the one right on top of the Text Shadow layer) to apply the following Layer Style:
Step 1: Bevel and Emboss
- Size: 1
- Check the Anti-aliased box
- Shadow Mode > Opacity: 35%
Step 2: Contour
- Check the Anti-aliased box.
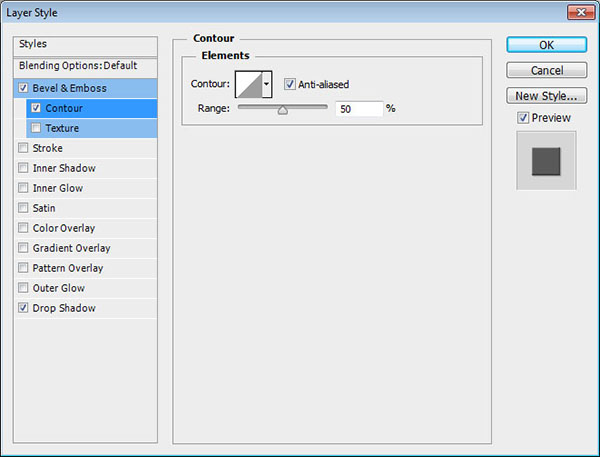
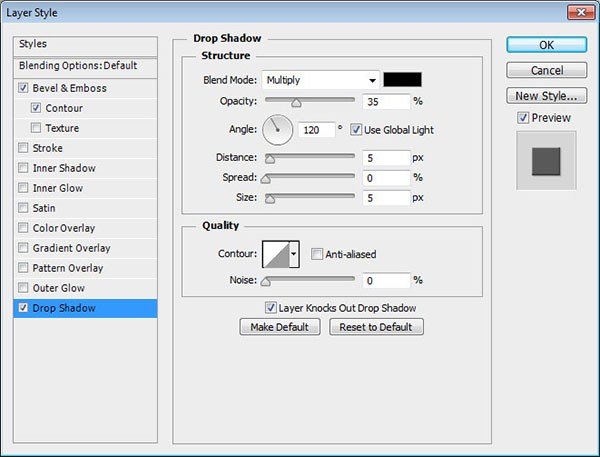
Step 3: Drop Shadow
The Drop Shadow effect is used in case you don’t want to add the grass part below the text. If you do add the grass, however, you can just un-check this effect to get a more realistic result.
- Opacity: 35%
Step 4
This will style the outer stroke of the text.

5. Style the Top Leather Texture Layer
Double click the rasterized layer (the one on top of the text layer) to apply the following Layer Style:
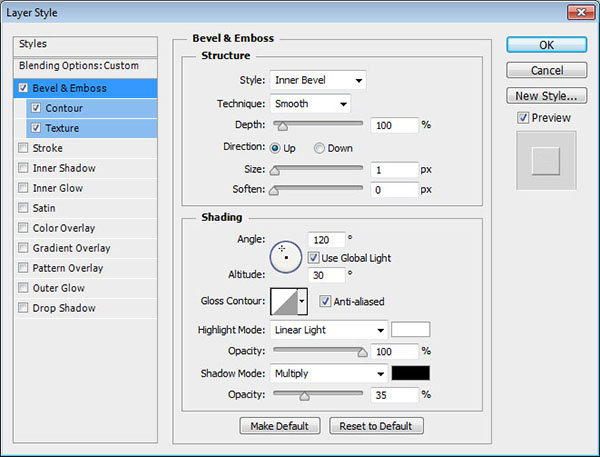
Step 1: Bevel and Emboss
- Size: 1
- Check the Anti-aliased box
- Highlight Mode: Linear Light
- Opacity: 100%
- Shadow Mode > Opacity: 35%
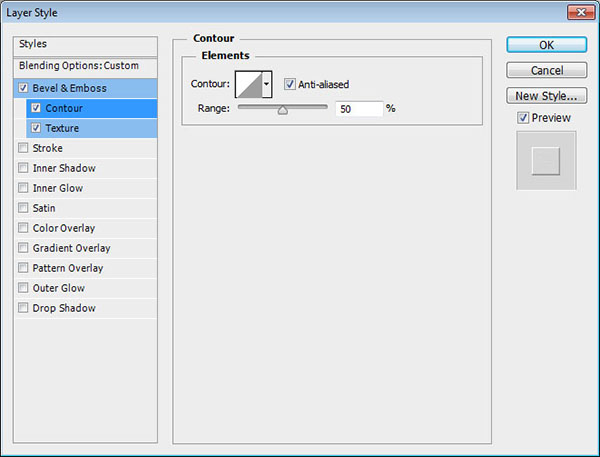
Step 2: Contour
- Check the Anti-aliased box.
Step 3: Texture
- Pattern: White Texture
- Scale: 25%
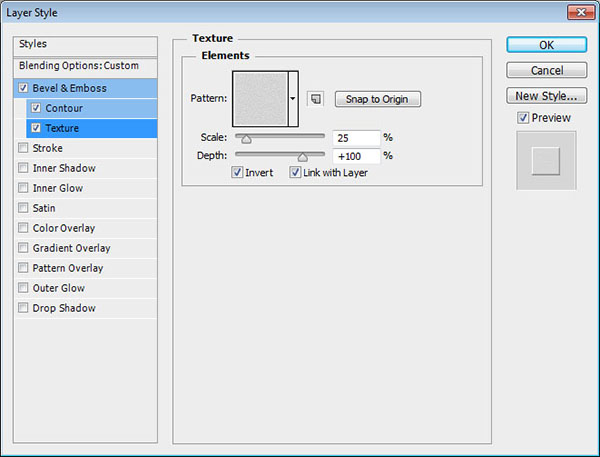
Step 4
This will style the top layer, and add the leather-like effect to the text.

6. Create the Main Grass Rectangle
Step 1
Pick the Rectangle Tool, and create a white rectangle behind the text (below the Text Shadow layer).
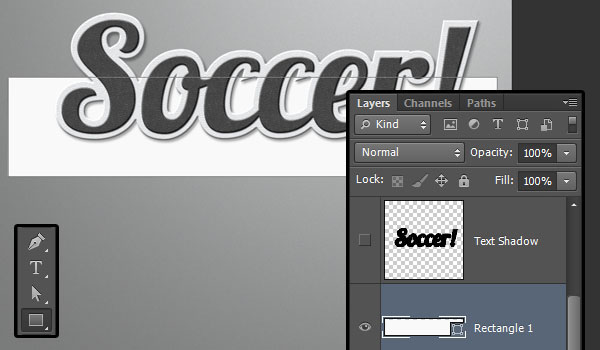
Step 2
Pick the Direct Selection Tool, then click and drag to select the two upper corners of the rectangle.
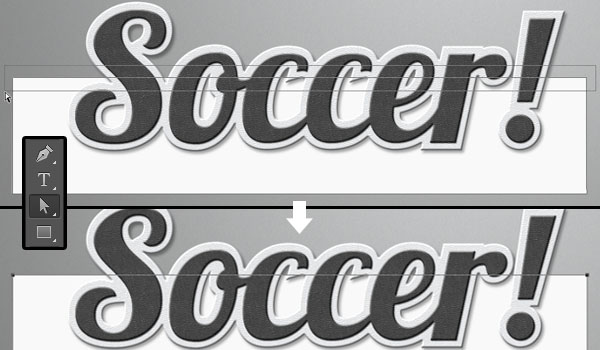
Step 3
Go to Edit > Transform Points > Scale, press and hold the Alt/Option key, then drag one of the rectangle’s sides inwards. The Alt/Option key will drag the other side as well.
You’ll need to drag the points until they are behind the text, creating an illusion of a 3D/perspective effect. Once you’re done, hit the Enter/Return key to accept the changes.
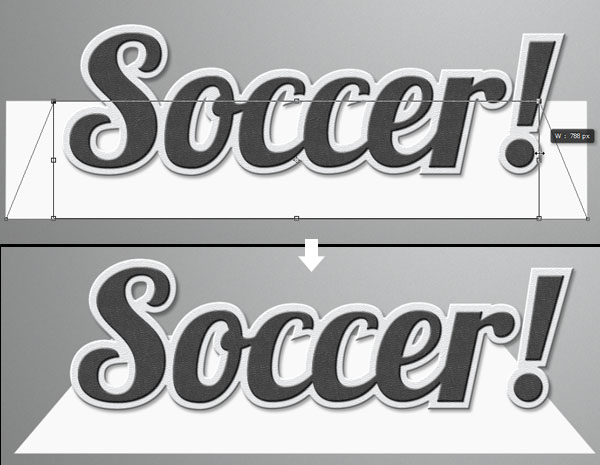
7. Adding the Grass Texture
Step 1
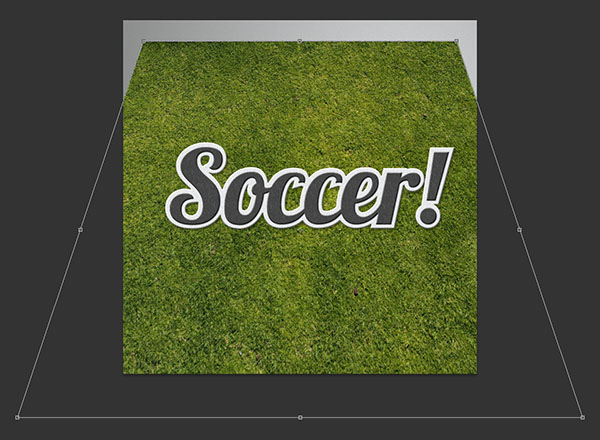
Place the Grass0138_20_M image on top of the rectangle’s layer, then go to Edit > Transform > Perspective, and click and drag one of the upper corners to move them inwards, then hit Enter/Return to accept the changes.
Step 2
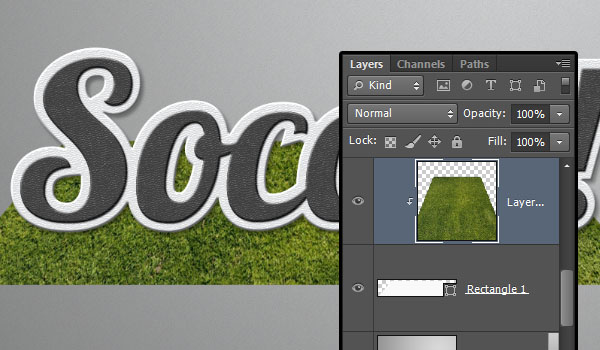
Right click the grass texture layer and choose Create Clipping Mask. You can then use the Move Tool to move the texture inside the rectangle until you like the result.
Step 3
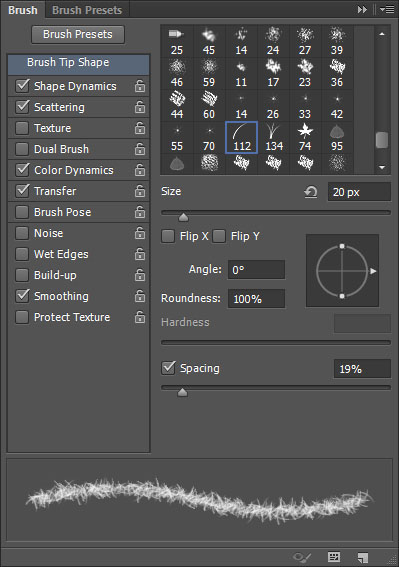
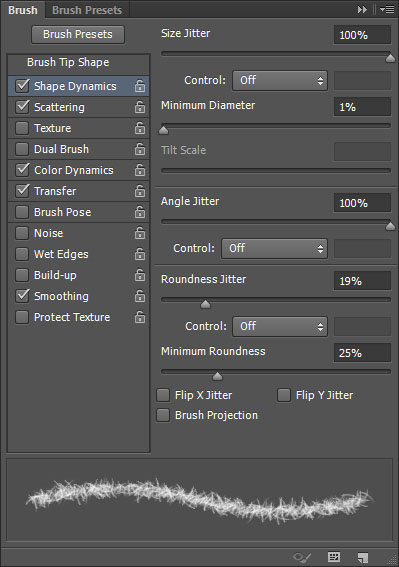
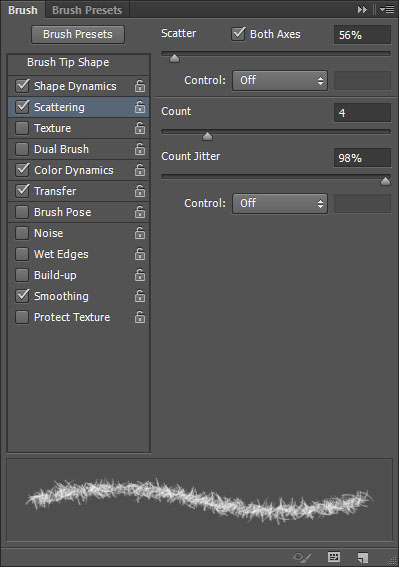
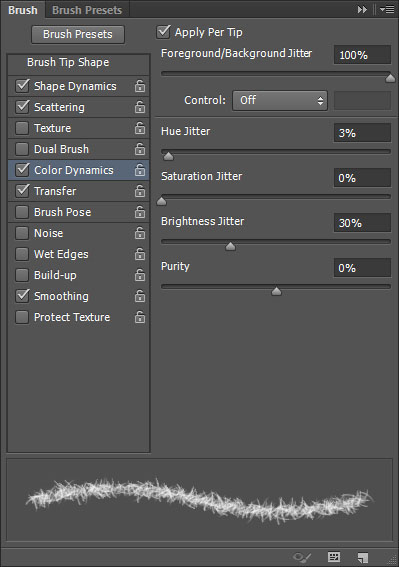
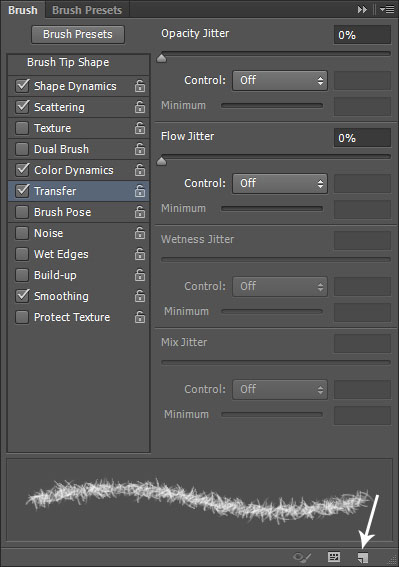
Pick the Brush Tool, open the Brush Panel (Window > Brush), choose the Dune Grass tip, and modify its Settings as shown below.
Once you’re done modifying the settings, click the Create new brush icon down the Brush panel and type in a name for the brush tip. This will add it to the preset so that you can use it later in the tutorial as well.
8. Stroke the Grass Edges
Step 1
Use the Direct Selection Tool to select the grass rectangle shape’s anchor points, then go to Edit > Copy.

Step 2
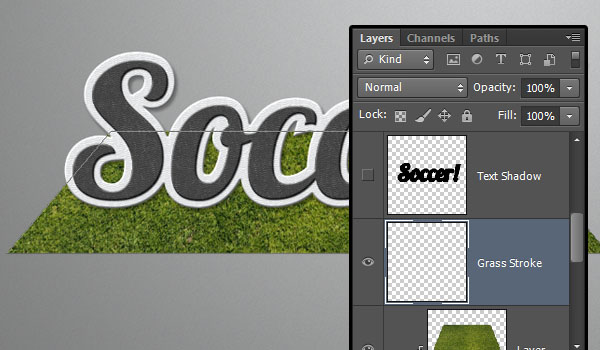
Create a new layer on top of the grass texture layer and call it Grass Stroke, then go to Edit > Paste. This will paste the work path into the document.
Step 3
Pick the Brush Tool once again, then set the Foreground color to #232d05 and the Background color to #7b892a. Hit the Enter/Return key 3 times to stroke the path with the grass brush, then pick the Direct Selection Tool and hit Enter/Return one more time to get rid of the path.
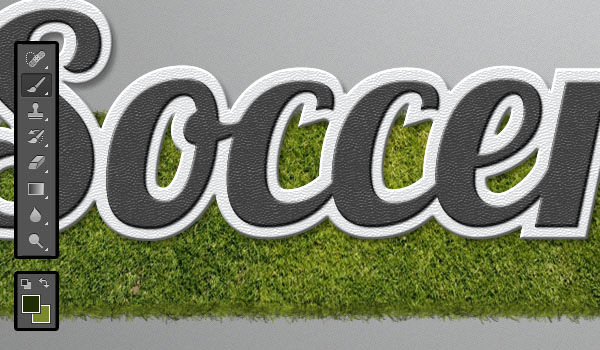
Step 4
Command/Ctrl-click the rectangle layer’s thumbnail to create a selection.
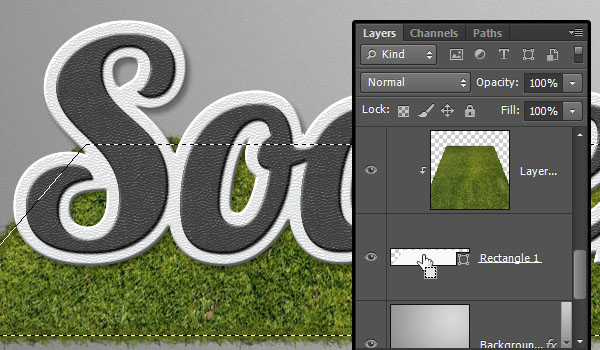
Step 5
Go to Select > Modify > Contract, and type in 2. This will contract the selection 2 px inwards.
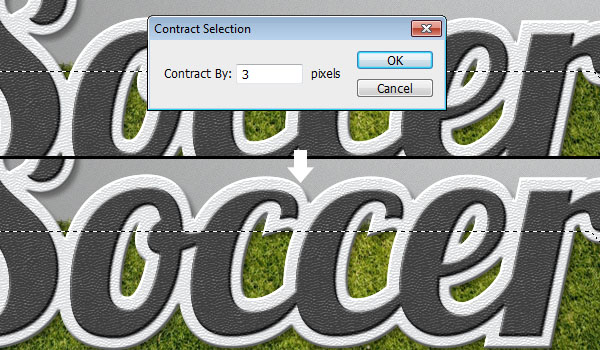
Step 6
Go to Select > Redefine Edge, check the Smart Radius box, and change the Radius value to 3.
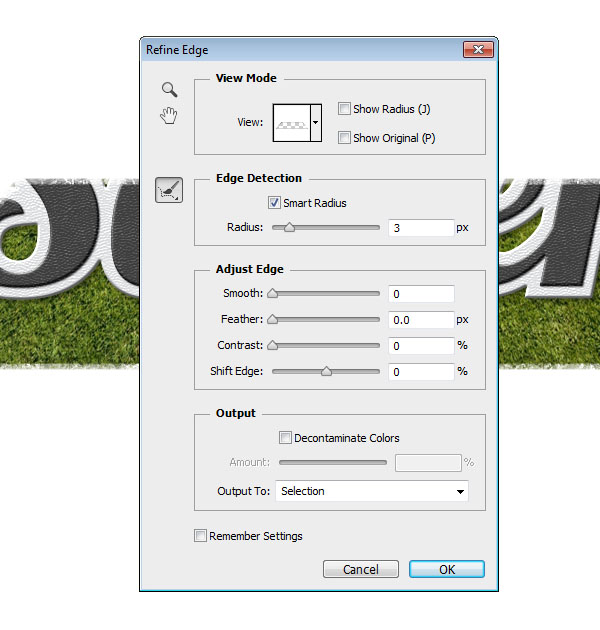
Step 7
Hit the Delete key to get rid of the selected part, then go to Select > Deselect. This will help blend the stroke grass with the grass texture a bit better.

Step 8
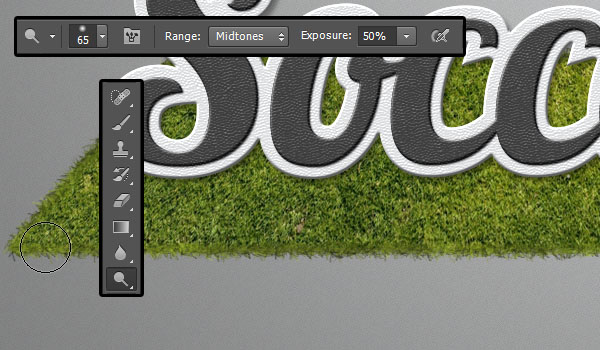
Pick the Dodge Tool, and in the Options bar, choose a soft round 65 px tip, set the Range to Midtones and the Strength to 50%.
Then, start brightening the stroke where it meets with the bright areas of the original texture. Again, this will help with blending both parts more seamlessly.
9. Add the Dirt Below the Grass
Step 1
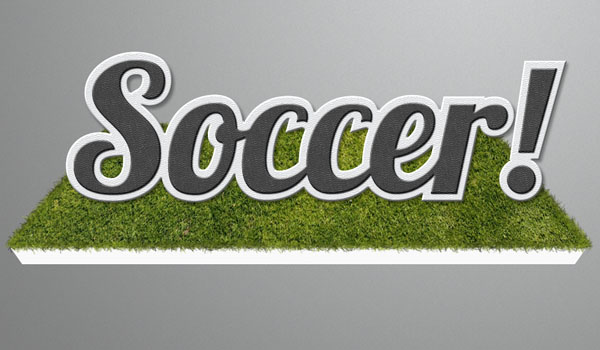
Use the Rectangle Tool to create a smaller rectangle below the grass one, then, following the same steps as before, select the lower two corners to transform them inwards.
Step 2
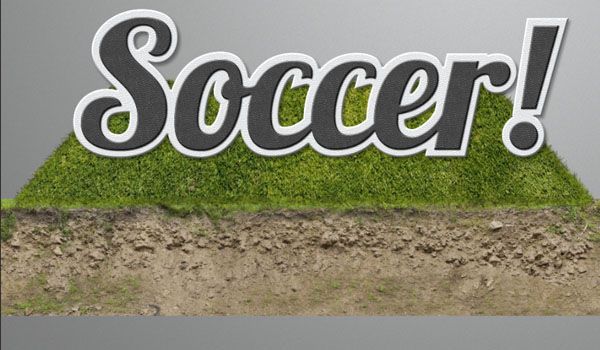
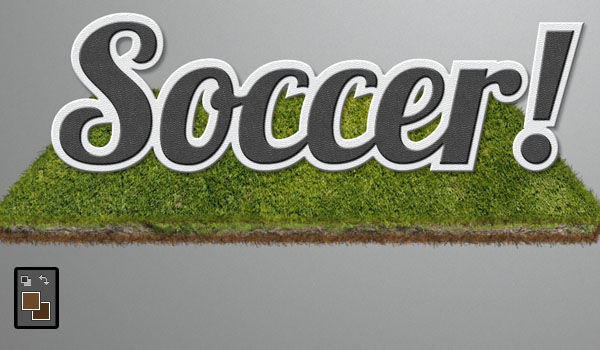
Place the SoilCliff0027_1_S image on top of the small rectangle, making sure to show some of the grass at the top.
Step 3
Command/Ctrl-click the small rectangle layer’s thumbnail to create a selection, then press Command/Ctrl-J to duplicate the selection into a new layer. Delete the original SoilCliff0027_1_S texture layer.
Step 4
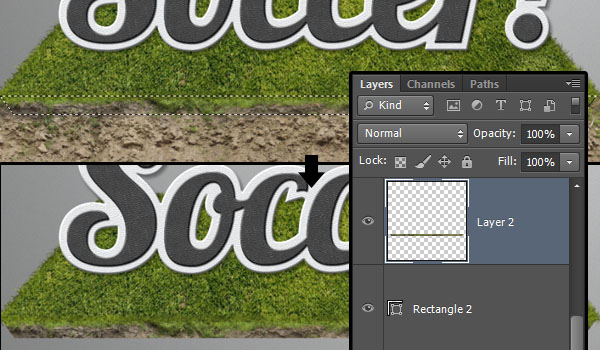
Copy and paste the small rectangle’s work path into the copy SoilCliff0027_1_S layer, set the Foreground color to #6a492b and the Background color to #4e3119, then stroke the path 2-3 times with the same grass brush. Don’t forget to get rid of the path afterwards as well.
Step 5
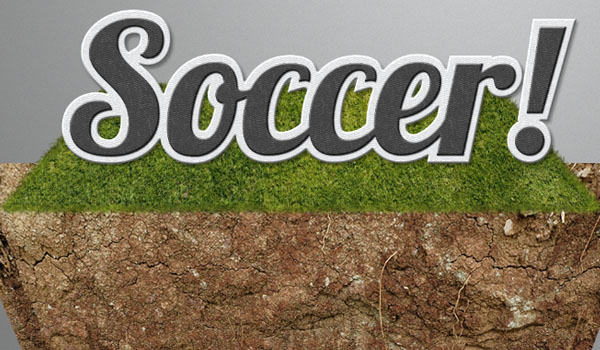
Place the SoilSand0046_1_S image on top of the copy SoilCliff0027_1_S layer, and go to Edit > Transform > Perspective to move the bottom corners inwards.
Step 6
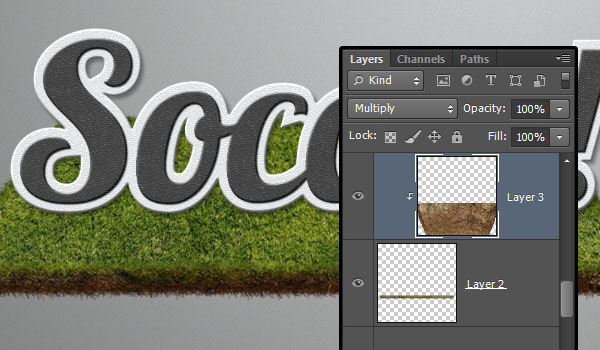
Right click the dirt layer and choose Create Clipping Mask, then change its Blend Mode to Multiply.
Step 7
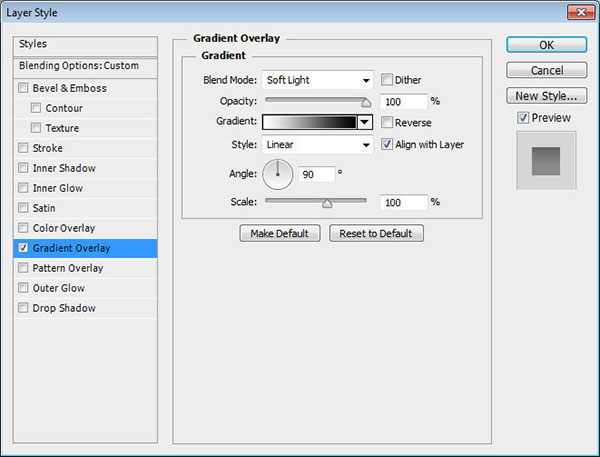
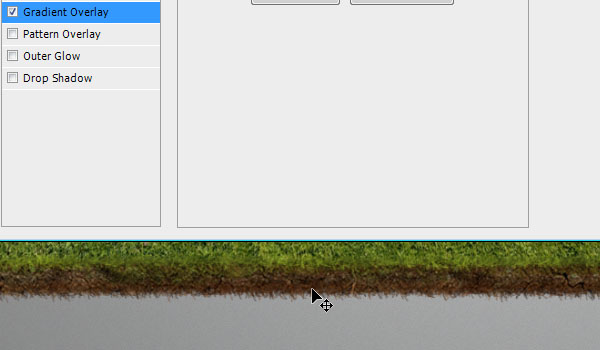
Double click the clipped dirt layer to apply a Gradient Overlay effect, by changing the Blend Mode to Soft Light, and using a White to Black gradient.
Step 8
With the Layer Style box still open, click and drag the gradient in the document to move it around, so that it is darker at the top and lighter at the bottom.
Step 9
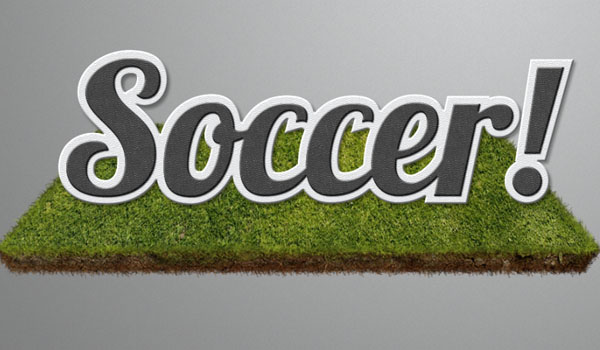
This is it for the dirt part below the grass.
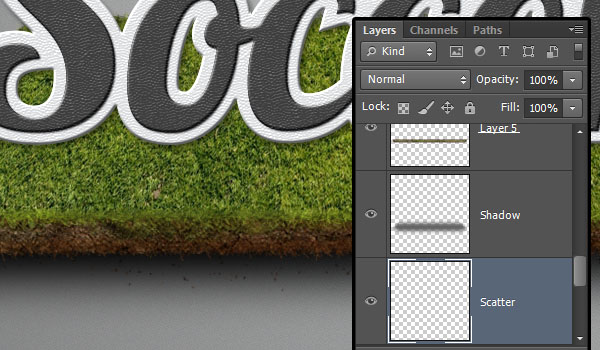
10. Add the Shadow and Scattered Dirt
Step 1
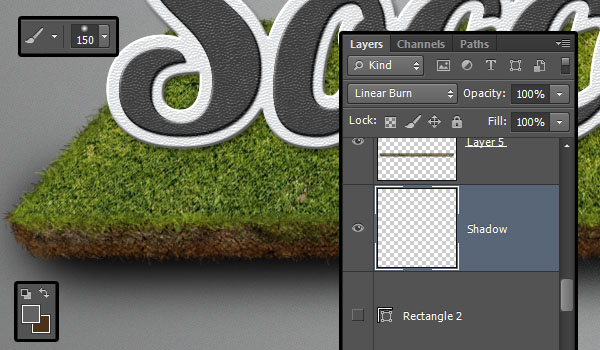
Pick the Brush Tool and choose a soft round 150 px tip, set the Foreground color to #a1a1a, make the small rectangle’s layer invisible, create a new layer on top of it, call it Shadow, and change its Blend Mode to Linear Light.
Place the brush tip on the rectangle’s left front corner so that its center is in the middle of the dirt part, click, and press and hold the Shift key, then drag to the right front corner to create the shadow.
Step 2
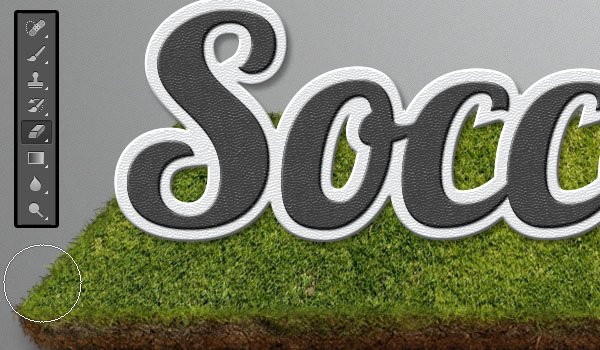
Pick the Eraser Tool, and use a soft round brush tip to erase any extra shadow around the edges.
Step 3
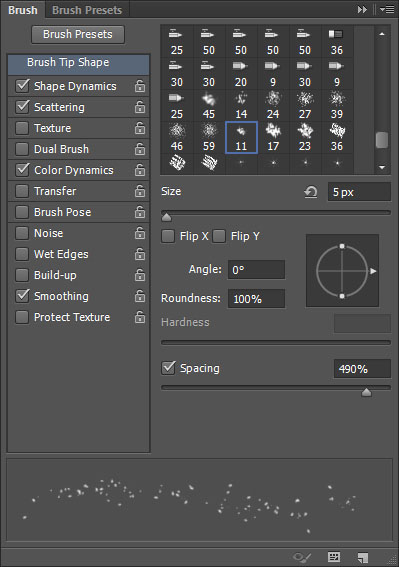
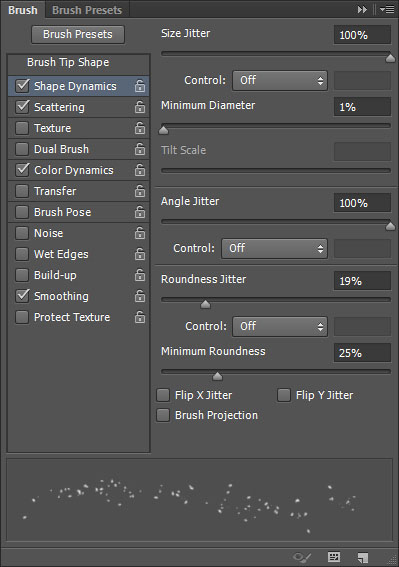
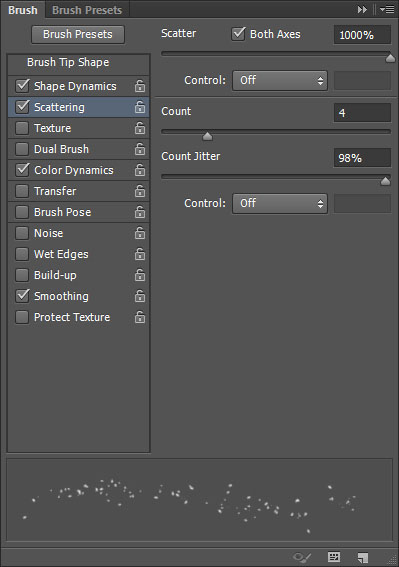
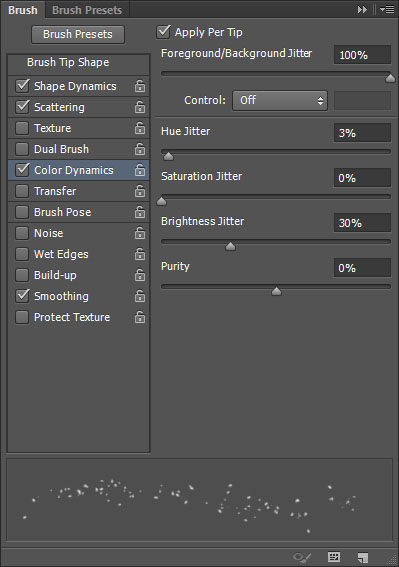
Pick the Brush Tool again, choose the Chalk 11 Pixels tip, and modify its Settings as below:
Step 4
Set the Foreground color to #6a492b and the Background color to #4e3119, create a new layer below the Shadow layer, call it Scatter, then paint along the shadow to add some dirt.
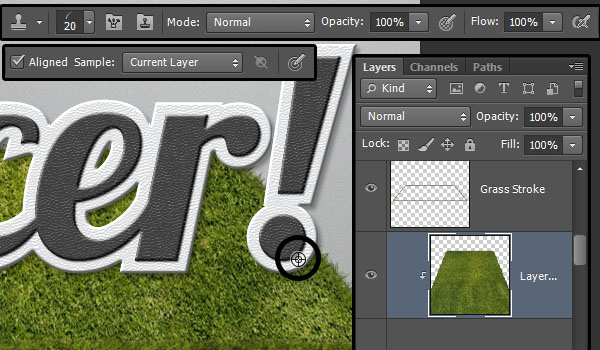
11. Add Grass in Front of the Text; Modify the Shadow
Step 1
Pick the Stamp Tool, select the grass texture layer, press and hold the Alt/Option key, then click where the last letter meets the grass.
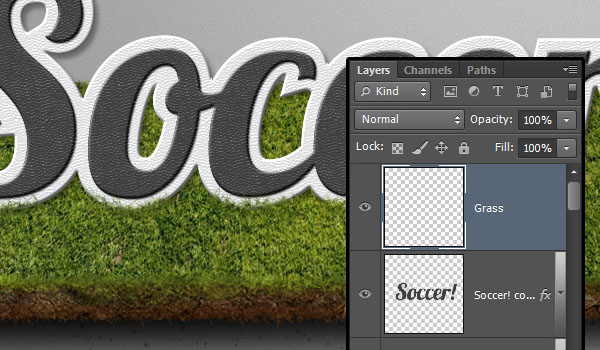
Step 2
Create a new layer on top of all layers, call it Grass, with the Stamp Tool still selected, choose the modified grass brush tip, and start painting some grass at the bottom of the text.
Step 3
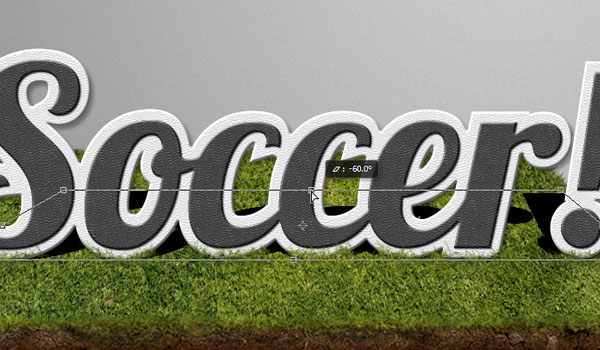
Select the Text Shadow Layer and make it visible by clicking the empty box next to it where the eye was, then go to Edit > Transform > Perspective to move the upper corners inwards.
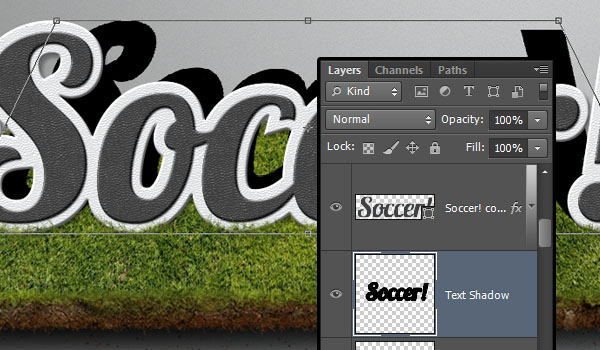
Step 4
Go to Edit > Transform > Distort, then click and drag the upper side downwards to place the shadow on the grass. You can move the corners if needed as well, and once you like the result, hit the Enter/Return key to accept the changes.
Step 5
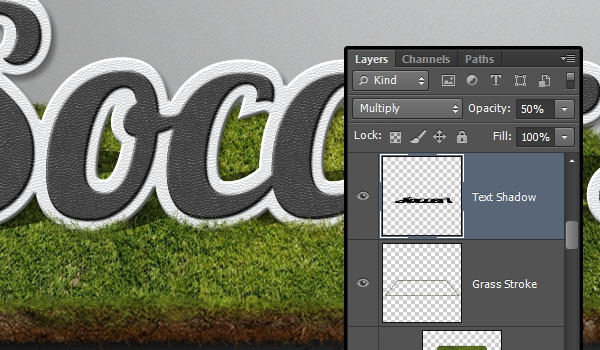
Change the Text Shadow layer’s Blend Mode to Multiply, and its Opacity to 50%.
Step 6
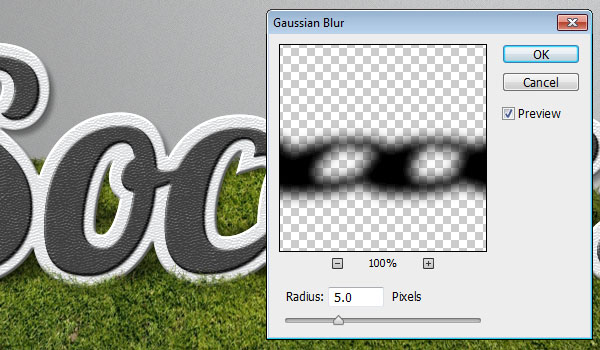
Go to Filter > Blur > Gaussian Blur, and change the Radius to 5.
12. Create the Center Details
Step 1
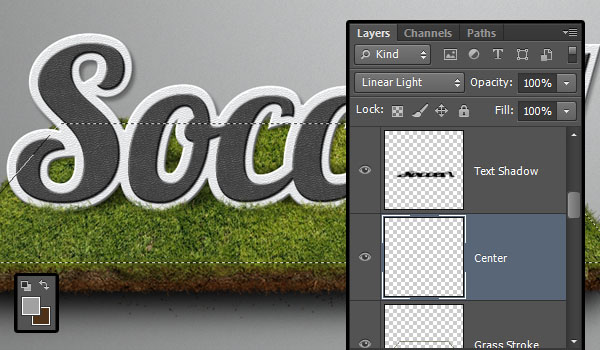
Command/Ctrl-click the big rectangle layer’s thumbnail to create a selection, create a new layer below the Text Shadow layer, call it Center, change its Blend Mode to Linear Light, and set the Foreground color to #a1a1a1.
Step 2
Pick the Brush Tool, choose a 35 px round brush, and set its Hardness to 90%. Click in the middle top of the rectangle, press and hold the Shift key, then drag to the bottom.
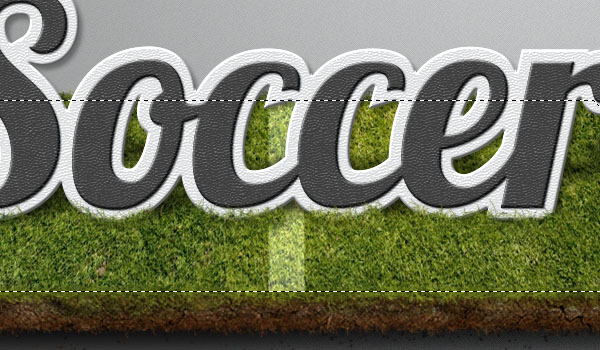
Step 3
Change the Brush Size to 200 px, and the Roundness to 50%, then add the ellipse in the center of the rectangle.
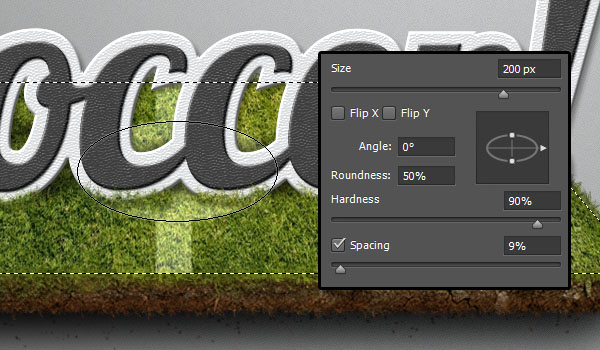
Step 4
Pick the Eraser Tool, use a round brush tip, set the Size to 150 px, the Hardness to 90%, and the Roundness to 50%, then click in the middle of the ellipse you added in the previous step to erase its center leaving an outer stroke only.
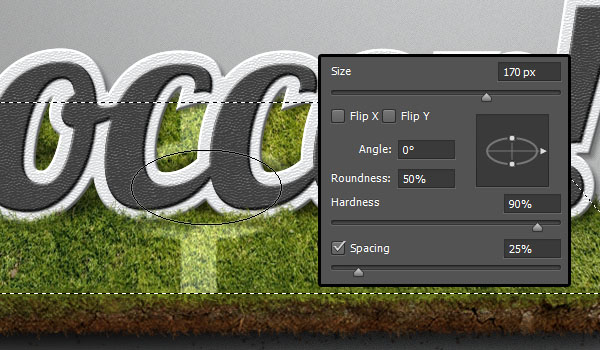
Step 5
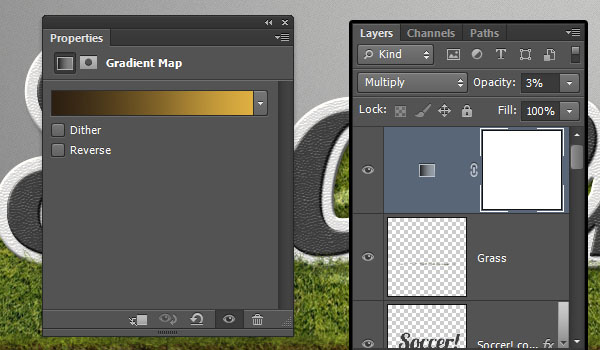
Click the Create new fill or adjustment layer icon down the Layers panel, and choose Gradient Map.
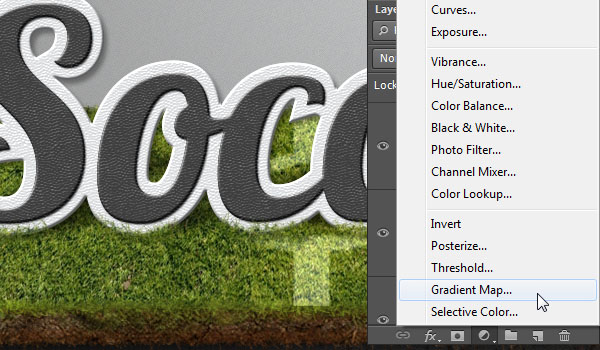
Step 6
Place the adjustment layer on top of all layers, change its Blend Mode to Multiply, and its Opacity to 3. For the Gradient, use the colors #2c1f12 to the left and #deaf41 to the right. This will just add a very subtle color correction to the final result.
Step 7
Don’t forget to remove the Drop Shadow effect (Step 4.3) of the outer stroke.
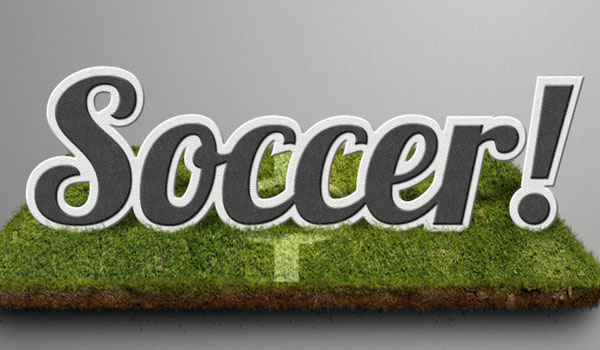
Congratulations! You’re done.
In this tutorial, we showed you how to create a soccer-themed text effect using just a few simple techniques and tools in Photoshop. We began by typing some text, then, we added some layer style effects, added a field of grass, and finally, added a few finishing touches. I hope that you learned something from this tutorial and can apply the techniques that I demonstrated to your own work.
Please feel free to leave your comments, suggestions, and outcomes below.
