
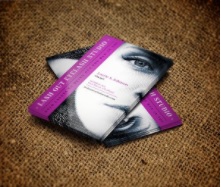
Business cards are one of the top ways to market your company because they’re so versatile and portable. That’s why so many business owners use them—but that makes them kind of hard to stand out. A business card needs to be totally unique so it won’t end up in the trash. And that’s where you come in.
Giving clients a one-of-a-kind design is no easy task, but luckily, there are plenty of ways to make a unique business card. One of the best is to use cool, funky text effects like the one in this design. Not sure how get that done? Fear not! We’ve set up a step-by-step guide to turn text into a work of art.
Here’s what you need to get started:
Step 1
Write your custom text in a text box in Illustrator, and copy the text. Alternatively, use a Lorem Ipsum generator. This is the text that will form the background of the design, so it doesn’t necessarily need to be coherent.

Step 2
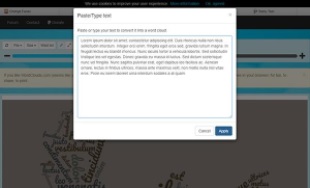
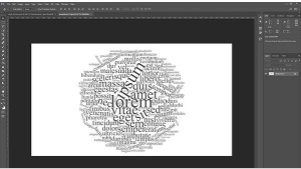
Open WordClouds.com. Select File, then choose Paste/Type Text. Paste text into the text box, and click apply.
Step 3
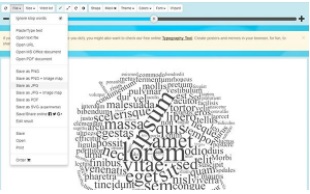
Click Shape, then select the shape you want. For this tutorial, we’re using a square, but you’re free to try out new shapes on your own later. Next, click Font and make your selection. We’ve picked Times New Roman; again, you can play with other fonts later on. Lastly, select Theme and choose the dark gray square in the middle. Click Size and choose 1920×1080.

Step 4
Click File and save your word cloud as a JPEG.
Step 5
Download a business card die cut template.
Step 6
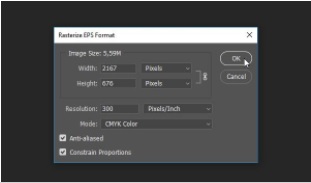
Open Photoshop. Click File, then Open to open the business card template. Keep your
default settings in the Rasterize EPS Format window. Click OK.
Step 7
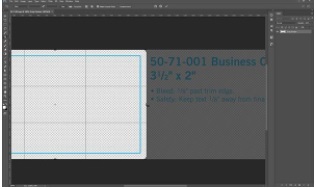
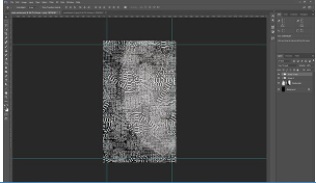
To remove extra information off of the side so that only the template remains, use the Cropping Tool to select the edge of the template on the right side and press Enter.
Step 8
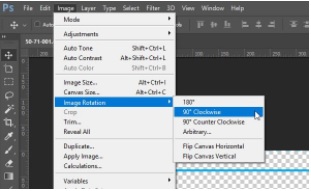
To rotate the image, click Image, then Image Rotation and select 90° Clockwise.
Step 9
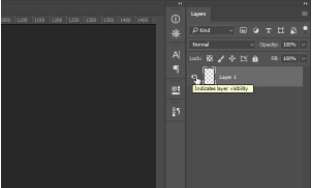
Your template is ready. Click on the Eye icon on the left side of the Layer Name to make it invisible.
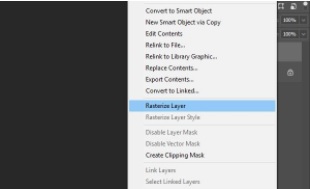
Step 10
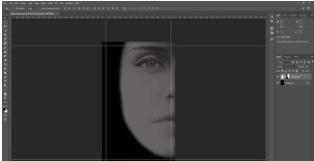
Drag the photo onto the art board, and enlarge it to fill the frame. Press Enter when you are satisfied with the image size. Right click the layer and select Rasterize layer. Next, select Image, Adjustment, and Desaturate. Name the layer as Desaturated by double clicking on the layer name.
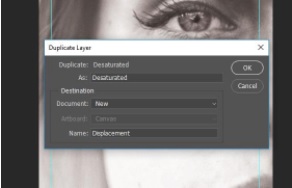
Step 11
Click the Layers Panel menu icon in the right corner of the Layers Panel and select Duplicate Layer (another way to do this is to right click on the Layer and select Duplicate Layer). In the Document dropdown, select New and name the layer “Displacement.” Save it to your computer as a PSD file.
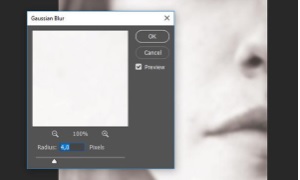
Step 12
Click Filter. Select Blur, then Gaussian Blur. Set the radius to 4.0 pixels and click OK. Use the blur tool to adjust the photo. Save the project to your desktop and close.
Step 13
Select Desaturated layer. Click Select, then Select and Mask in the main menu. Go to the Properties Panel at right, set next values. In the Global Refinement tab, input the following:
- Smooth: 20
- Feather: 10px
- Contrast: 0%
- Shift Edge: 0%
In the Output Settings tab in the “Output to” dropdown menu, select Layer Mask and hit OK.
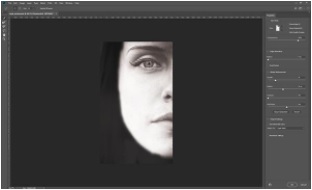
Step 14
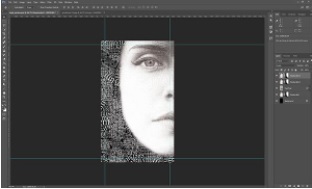
Create a mask of the face. Use the Quick Selection Tool to define the edge of the mask. In Properties Panel at right, click invert. Make any corrections to the edge of the mask as needed. Hit OK when done.
Step 15
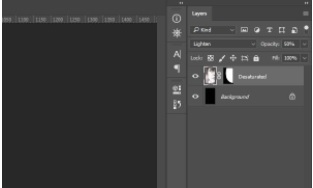
In Layers panel at right, change blending mode to Lighten and Opacity to 50%.
Step 16
Now it’s time to incorporate the word cloud. Open the file containing your text in Photoshop.
Step 17
Click Image. Select Adjustment and Levels. Use the black point set eye drop tool and click on the gray text to make it black. Go to the Channels Panel and press the dotted circle icon at the bottom to make a selection. In the top Application bar, click Select, then Inverse.
Step 18
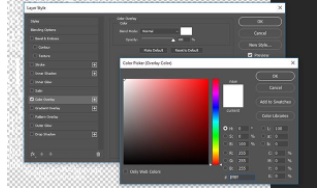
Create a copy of the selected text area on the Layers Panel by pressing Ctrl+J on Windows or Command+J on a Mac. Make the background layer visible by clicking the Eye Icon on the left of the layer thumbnail. Select Layer 1 and press the small FX Icon on the bottom of the Layer Panel. Choose Color Overlay (or double click on Layer 1 to bring up the Layer Style window). Set the color to white in the Layer Style window.
Step 19
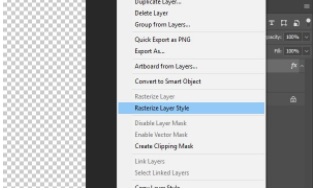
Click on the Layer 1 layer and select Rasterize Layer Style.
Step 20
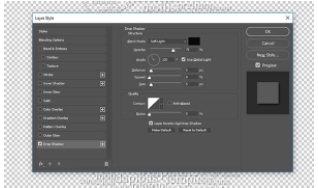
Bring up the Layer Style Window by right clicking on the Layer 1 layer. In the Layer Style Window, select Drop Shadow (or click the small FX Icon on the bottom of the Layer Panel and select Drop Shadow). Input the following settings:
- Opacity: 75%
- Spread: 0%
- Angle: 120
- Distance and Size: 5px
Step 21
Shrink the Layer 1 layer in half by using the Free Transform Tool. Place it in the top left corner, then make a copy of the layer (or right click on the layer and select Duplicate Layer in the dropdown). Place it on the right of the Layer 1 layer, then rotate 90 degrees. Select both layers and copy them. Move them under the previous two layers, then rotate them 180 degrees. Select all four layers and copy them. Move them to the right of the previous four layers.
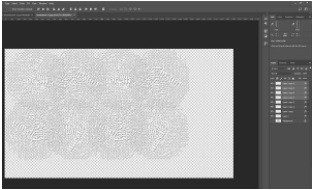
Step 22
Select all eight layers and combine them into one layer group. Drag the group to the file with the business card. Shrink the text box to approximately half the size of the photo, and place it at the top of the image. Copy the group and move it to the bottom half of the image. Click the copy of Group 1 in your layers menu and select Convert to Smart Object. Name it Text Final.
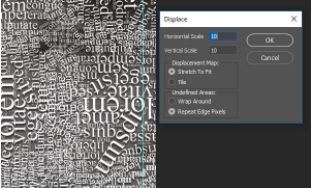
Step 23
Click Filter. Select Distort, then Displace. Make sure the horizontal and vertical scales are at 10. Click OK. Select your displacement file and click open.
Step 24
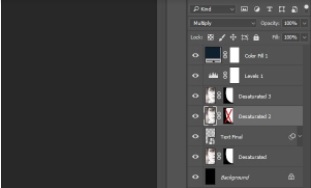
Make a copy of the Desaturated layer, and name it Desaturated 2. Place Desaturated 2 above the Text Final layer and assign Multiply blending mode to it. Make a copy of Desaturated 2, and name it Desaturated 3. Assign Screen blending mode to Desaturated 3, and place it above Desaturated 2 layer.
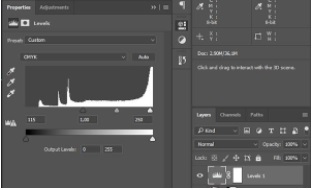
Step 25
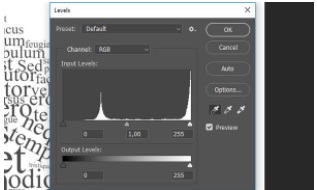
Click Layer, then New Adjustment Layer and select Levels. Set the black slider to the 115 point, gray slider to 1.00 and white slider to 250.
Step 26
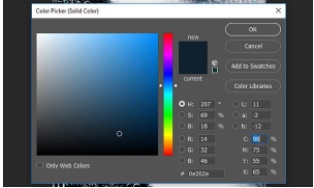
Click Layer, select New Fill Layer, then select Solid Color. Click OK. Change the CMYK levels to 90, 75, 55, and 65, respectively, and click OK.
Step 27
In the dropdown menu in the Layers panel on the right, change Blending Mode to Overlay. Click on the mask icon at the right of the Layer Thumbnail while holding the Shift Button to make the layer mask invisible on the Desaturated 2 layer.
Step 28
Open your project that contains the logo and slogan line. Duplicate your group to the photo and click OK. Go back to the photo and rotate your logo block to vertically align against the left side of the image. We used Nexa Slab font, but you can choose whatever you would like.
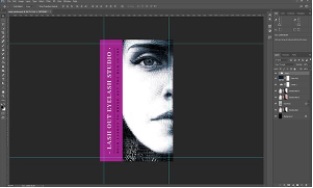
Step 29
Open the project containing the company details and duplicate that group. Incorporate it into the photo and click OK. Go back to your face project and position your block details to complete the design.

And there you have it, a cool text effect that will spice up any business card! Download the final PSD file here. You can also download the mockup to display your finished product. Did you come up with any shortcuts or ways to improve this design? Put them in the comments below.