This article will introduce you to the basics of Unmoderated Usability Testing. We will explain why you should conduct such testing, how to prepare tasks, or how to recruit the right participants.
You are currently reading one of our 101s. This blog introduces you to the basics of Unmoderated Usability Testing. If you are looking for more complete resources, check out our Complete Guide to Usability Testing and how to get the most out of unmoderated tests.
Unmoderated studies are definitely on the rise. The fact that it’s cheaper, faster, and more accessible than a moderated study or in-person research makes it as popular as never before. Nowadays,unmoderated tests are sometimes the only option for UX teams to conduct user research. Let’s take a look at what unmoderated usability testing is and how to master it.
Table of contents
What is an Unmoderated Usability Study?
An unmoderated usability study is where respondents are not guided by a moderator. The test is prepared beforehand, and respondents complete it on their own. With an unmoderated usability study, all you have to do is prepare the study and recruit people to complete it. The advantage of this method is that the number of participants that can participate in the test is unlimited.
What is Unmoderated Usability Testing?
Unmoderated usability testing entails creating your unmoderated tests – usually in an online user testing tool – that allows participants to conduct remote testing. As participants complete the study on their own, no supervisor is needed. As a result, with unmoderated testing, you can collect much more information in a much shorter time at a lower cost.
Usability testing is the process of testing designs with users, used for collecting valuable insights about user experience – how difficult or easy the product is to use. Because the experience of the user is subjective and intangible, it relies on observing how users interact with the product as a way to learn about their experience.
According to the to NNgroup “User Experience encompasses all aspects of the end-users interaction with the company, its services, and its products.”
It is a great way to test and collect valuable feedback on websites or other products. It is frequently used throughout a product’s whole lifecycle and provides feedback from people. Based on the sample size the data can provide a lot of insights into a user’s behavior.
What is Website Testing?
Website Testing is a tool from the UX research platform UXtweak for conducting unmoderated usability tests that also integrates techniques of Session Recording. This gives you the ability to conduct unmoderated tests online and then replay user interactions like a video. Allowing you to pinpoint the exact place and time when usability issues have occured.
What can you find out with Unmoderated Testing?
Unmoderated Testing can help you find answers to questions such as:
- Can people use the website/app for important use cases?
- How do users interact with the website/app? What are they thinking when using the website/app?
- How do users tackle their objectives?
- Is there something that keeps users from fulfilling their objectives?
- Do they take a completely different way than they should have or you expected? Or do they take the correct path but get lost and confused along the way?
Thanks to Unmoderated Testing, you will find out answers to these questions and discover any usability and user experience issues. Knowing how users interact and use your website, will allow you to do informed decision in optimizing furthermore.
When should you use Unmoderated Tests?
The great advantage of Unmoderated user testing is that it is very flexible – meaning that can be used pretty much anytime during the development or design process. You can use Website Testing to test simple HTML prototypes as well as live websites.
All that you need to make it work is a working piece of HTML that’s hosted somewhere public. That way, Website Testing can link to your website, web app, or prototype via URL.
Usability testing using unmoderated testing method is versatile and scalable. You can set up simple unmoderated usability tests with minimum effort in a few minutes, run studies with tens of tasks that cover main use cases, or just a single task. Tests can be conducted on either a few people, or you can collect results from hundreds of respondents. With Unmoderated Testing, you can create tailored studies that suit your needs.
Remote Unmoderated Testing Best Practices
How to conduct remote Unmoderated Usability Testing

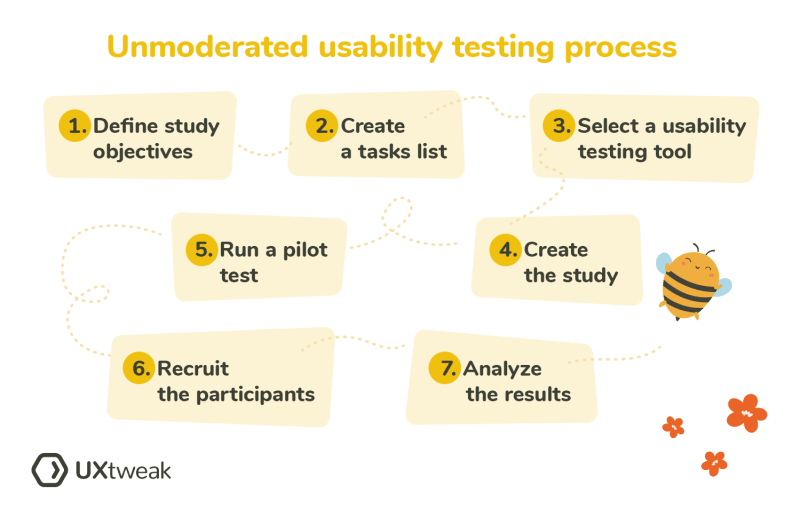
The process of conducting remote unmoderated usability testing can be boiled down to 7 important steps:
- Define study objectives
- Create a tasks list
- Select a unmoderated testing tools
- Set up the study
- Invite participants to test
- Run remote testing and in person testing (if vaiable)
- Analyze feedback from users
Don’t forget to keep these remote testing best practices in mind⬇️
1. Defining your study objectives
During the preparations for your Unmoderated Testing, you should consider asking yourself the following:
What are you going to test?
Obviously, you should start by defining the scope of your usability testing. There will be situations that call for testing of the main use cases of your website or app because you just launched a full redesign, to find out what works and what doesn’t. At the same time, all you need might be more focused testing of a few scenarios that cover the new functionality with a few follow-up questions.
Who should be the respondents?
There should not be any remote user testing without considering your target users. Therefore it is important to choose the right participant panel. If you already have a website or an app, you’re probably well aware of who your target group is. You can use any of your existing user insights, real customer data, or even data from surveys and other sources of feedback you have. Such as audio recordings, video recordings or heatmaps.
The more information about the user behaviors you have, the better. Apart from helping you with the obvious (to recruit respondents who represent your audience), it will also help you prepare the right use cases and formulate relatable tasks that represent the user’s natural way of thinking. For these reasons – keep your users in mind when you start planning usability testing.
2. How to write tasks for Unmoderated testing
At its core, the unmoderated user testing consists of several tasks that the respondents are asked to complete to successfully finish the study. By preparing your tasks carefully, you will increase the chance that your user study will provide good results. Well-defined tasks lead the respondents to try to complete them as naturally as they can.
When preparing keep in mind that you need to:
- Write tasks that cover your objectives
- Write realistic tasks
- Write actionable tasks
- Write tasks without giving away the answer
- Write open-ended questions
Learn how to write good usability testing questions in our guide. For those who are not sure about what tasks to assign to their testers and how to conduct a study, we recommend choosing a template for usability testing and following its lead.
3. Choose the right tool for your unmoderated testing
Choosing the right unmoderated testing tools is crucial for obtaining reliable and accurate results. Here are some factors to consider:
- The type of tasks you want to include – Some tools are better suited for certain tasks than others.
- The user interface – The user interface of the tool should be intuitive and easy to use for both testers and participants.
- Reporting capabilities – The tools should have robust reporting capabilities, allowing for easy analysis and interpretation of the data collected.
Here is a table of the 5 best usability tools of 2024. If you want to dive deeper now, take a look at the top 17 usability testing tools.
|
|
Rating |
Ease of Use |
Quality of Support |
Pricing |
|
UXtweak |
4.8 |
5.0 |
✓ Free plan Plus plan – $80/month Billed annually |
|
|
Userzoom |
4.5 |
4.7 |
✗ No free plan Upon request, starting at $50K/year |
|
|
Lookback |
3.5 |
2.1 |
✓ Free 5 sessions Pro plan – $344/month Billed annually |
|
|
Hotjar |
4.6 |
4.5 |
✓ Free plan Pro plan – $39/month Billed annually |
|
|
UserTesting |
4.4 |
4.4 |
✗ No free plan Upon request, starting at $15K/year |
4. Setting up the study
Setting up the study, once you choose the right usability testing tool, is a matter of inputting all your tasks into the tool and creating testing session.
Be careful to include all the relevant information. Tasks and questions are the core of the study. Unlike in a moderated study, details like welcome message and instructions are the only way how to guide participants through the process. Be sure to include those for convinience of users.
As you have defined the target audience for the test, don’t forget to create a screener question. A screener will filter out the respondents that are not relevant to your study and only let in the ones that will provide valuable information.
5. Run a pilot test
Running a pilot test is a crucial step in unmoderated user testing to ensure that the study is effective, before launching it to the full participant group. The pilot test involves recruiting a small group of participants to go through the study and provide actionable feedback. This feedback can include anything from technical issues to typos or confusing instructions and unclear tasks.
Running a pilot test can help you identify and fix any issues in the study before it is launched to a larger group, ultimately leading to more accurate and reliable results.
6. Recruiting respondents for your test
Once your study setup and pilot tests are completed and you want to launch the test, you need to recruit respondents. Recruiting respondents for unmoderated user testing is easy. Simply share a link to the study with your respondents. You can use social media like Facebook, Twitter, and LinkedIn to get it to your target audience or send the link directly to your testers.
Alternatively, you can order respondents from a User participant panel, based on specific criteria. If you have a list of your own respondents from channels like this, you can also upload them to your Own Database within the research tool – a CRM-like tool to help you manage your participant database and send emails with invitations for user tests.
In UXtweak you can also convert your website visitors to test participants with Onsite Recruitment Widget.
Of course, there is more to recruiting respondents than sending out a link. It is important to prepare a recruitment strategy as a good one will make the difference between learning a lot of valuable information to improve your website to learning nothing at all – wasting a bunch of time and money. It is therefore very important to define who your target respondents are and include a screening question in the study to filter out respondents who do not fit your parameters.
Check out these tips for creating a perfect screener question.⬇️
Questions that should help you with recruiting respondents:
- Whom do I want to recruit?
Your respondent sample needs to be representative of the end-users so you can learn about actual users’ natural behavior. Make sure that you employ participants that share geographic, demographic, psychological and behavioral patterns of your real target buyers. When using the Website Testing Tool by UXtweak this is very easy. You also can make use of UXtweak Recruiting Widget which will allow you to recruit respondents directly from your website.
- How many people do I want to recruit?
According to NNGroup 5 respondents are the optimal number of respondents. With five respondents, you typically figure out most of the main problems in the tested scenarios. We recommend larger sample size at least 20 respondents. With wider range of participants and right online tools you will get stastistically significant results. You can check out our guide, where we analyze several usability testing examples of world-famous brands and their outcomes.
- What information do I want to communicate to the respondents and how?
This will depend on who your respondents are and how you recruited them, but the golden rule is that the respondents should be always well-informed. A well-informed respondent has more value for you than someone who has no clue about what’s going on.

Information we recommend sharing with your respondents before testing:
- How long does it take– e.g. 20 minutes
- What is expected of them– e.g. completing tasks on the e-commerce website of a fashion company
- What is the point of the test– e.g. to make your digital product easier to use
- Why would users want to participate?– you should always keep in mind that respondents are not always willing to give you their time for free, especially if the test takes more than a few minutes. Therefore it is an excellent idea to offer respondents some attractive compensation for participating in the study (could be monetary, a chance to win something if they participate, or a different benefit). Always make sure that they’re well informed about the reward and how they receive it.
7. Analyzing the results
After a successful study, you obtained a lot of data. But you still need to analyze it to make something useful out of it.
Overview
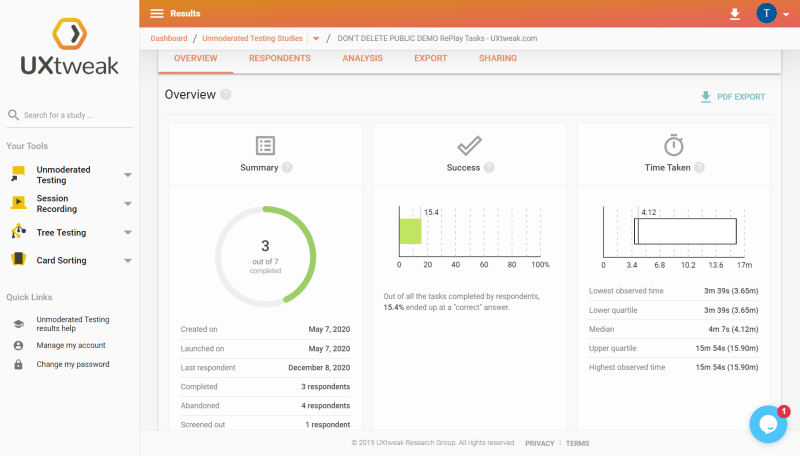
The overview gives you all the information you need to check the state of the study. The first thing in the summary is the dates when your study was first created when it was launched, along with the number of respondents who participated in it. Check the donut chart to see how many respondents completed the study and whether there were any quitters.
Time Taken is a number that tells you how much time the respondents spent doing the study. Checking whether the Time Taken matches the expected completion time is a good way to keep tabs on any unexpected issues so they can be addressed quickly.
The Success score is the percentage of tasks that the respondents completed by submitting the correct page as the answer.

The overview contains a breakdown of various attributes of your users such as:
- Top Locations
- Device Breakdown
- OS Breakdown
- Browser Breakdown
- Screen Resolution Breakdown
Respondents tab
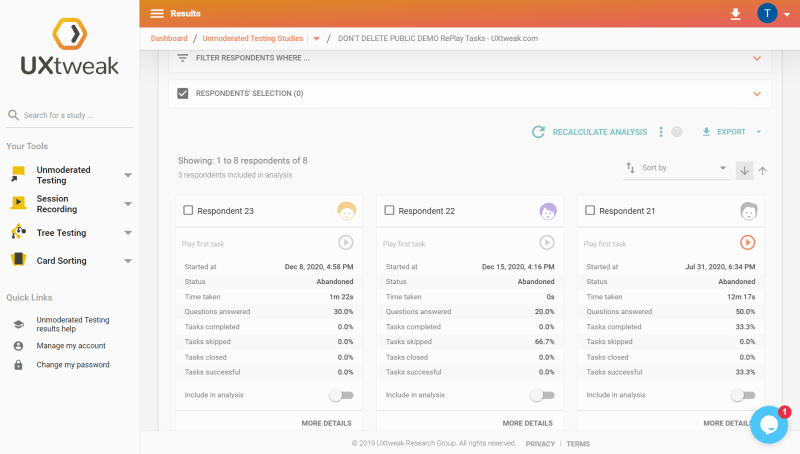
In the list of respondents, you’ll find information about all respondents who participated in your study. It’s here where you can replay the completion of tasks, filter your respondents, and select which ones should be included in the analysis. If you want to learn more, check out Interpreting Website Usability Testing in our Definitive Guide to Website Testing.

Task RePlay
Pressing Play on the task will open up the session player, showing you exactly how the interaction between the tester and the website/app went down. You will see what the respondent was doing while they were trying to complete the task. You can control the session player like any video player. If you read our Session Recording guide, you know that even though it looks and feels like a video, it is a re-interpretation of how the respondent interacted with your website/app.
We also created a complete guide to Setting up a Website Testing study for you to better understand the whole process.
Conclusion: Optimise your website for the world today
Unmoderated usability testing is a simple way to get a lot of information about how your users behave, with relatively low effort and cost. The Website Testing tool gives you the option for recruiting the right respondents that fit your needs easily – by sending them a link or using the recruiter widget.
All results are analyzed after the end of the study, giving you detailed information about tasks, answers to questionnaires, respondents, etc. This helps you to understand the issues on your website and to fix them quickly, easily, and in a budget-friendly way. Try it yourself – register to UXtweak!