
This second tutorial about building static websites with Middleman dives a little deeper into the framework. By the end, you should know enough to build your own project from scratch. We’ll cover topics such as Data Files, Pretty URLs, Project Templates and the Asset Pipeline, so let’s get stuck in!
Data Files
So, having already followed the first tutorial, you’ll already have learned how to play with data; front matter stored in the triple-hyphen-delimited sections of individual pages. You can also write separate data files in YAML or JSON and put them in a “/data” directory. This is useful if you have more complex sites with data that rarely changes, and where you don’t want to maintain that data directly in your HTML.
Let’s say you have the rights to sell all James Bond movies. We could put a list of them in a data file and iterate over them in our view. If we’d need to change or update that data when a new movie is available you’d only need to apply that change in your .yaml or .json data file. I wouldn’t recommend doing that for data that is in any way complex; it’s doable, but feels very iffy and wrong.
For example, here’s what a /data/bond.yaml file might look like:
movies:
- title: "Dr. No"
  year:  "1962"
  text:  "John Strangways, the British Intelligence (SIS) Station Chief in Jamaica, is killed. In response, British agent James Bond—also known as 007—is sent to Jamaica to investigate the circumstances. During his investigation Bond meets Quarrel, a Cayman fisherman, who had been working with Strangways around the nearby islands to collect mineral samples. One of the islands was Crab Key, home to the reclusive Dr. No."
  image: "bond_movie_01.png"
- title: "From Russia with Love"
  year:  "1963"
  text:  "SPECTRE's expert planner Kronsteen devises a plot to steal a Lektor cryptographic device from the Soviets and sell it back to them while exacting revenge on Bond for killing their agent Dr. No; ex-SMERSH operative Rosa Klebb is in charge of the mission. She recruits Donald "Red" Grant as an assassin and Tatiana Romanova, a cipher clerk at the Soviet consulate in Istanbul, as the unwitting bait."
  image: "bond_movie_02.png"
- title: "Goldfinger"
  year:  "1964"
  text:  "Bond is ordered to observe bullion dealer Auric Goldfinger: he sees Goldfinger cheating at cards and stops him by distracting his employee, who is subsequently killed by Goldfinger's Korean manservant Oddjob. Bond is then instructed to investigate Goldfinger's gold smuggling and he follows the dealer to Switzerland. Bond is captured when he reconnoitres Goldfinger's plant and is drugged; he is taken to Goldfinger's Kentucky stud farm and is imprisoned. He escapes briefly to witness Goldfinger's meeting with U.S. mafiosi, who have brought the materials he needs for an operation to rob Fort Knox."
  image: "bond_movie_03.png"
...
Then output as so in source/bond-movies.html.erb:
<h2>Bond movies</h2>
<ol>
<% data.bond.movies.each do |movie| %>
  <li>
  <%= image_tag movie.image %>
    <h3><%= movie.title %></h3>
    <h6><%= movie.year %></h6>
    <p> <%= movie.text %></p>
  </li>
<% end %>
</ol>
One of the advantages of these data files is that they’re secure. Even better, your /data directory with all the YAML or JSON data won’t get pushed to your live server. During the build phase, your data gets injected into your templates localy before it gets deployed. After that, the data in your views is just plain static HTML. Pretty cool!
Naming Conventions
A word about naming conventions here. When you have data files in a “data” directory you get access to a data object. Middleman then creates “objects” for every .yml, .yaml or .json file which you can access through the inital data object by chaining it on. You then have access to the attributes you have stored. In our case, we have a movies YAML “object” with the attributes title, year, text and image.
<%= data.data_file_name.yaml_or_json_object.attribute %>

<%= data.bond.movies.image %>
<%= data.bond.movies.title %>
<%= data.bond.movies.year %>
<%= data.bond.movies.text %>
If you have subdirectories, you just need to tack them on. Let’s say you have your bond movies data file under a spy_movies directory (for example: /data/spy_movies/bond.yaml) You’d now access it like so:
<%= data.spy_movies.bond.movies.title %>
Lastly, I should add that storing it in JSON might be preferable to some people, but all the excess commas, brackets and braces turn me off to be honest. Not only in data files but in frontmatter sections as well. It’s up to you what suits you best of course, see for yourself:
some_file.yaml:
bond_girls:
- Strawberry Fields
- Jill Masterson
- Tiffany Case
some_file.json:
  "bond_girls": [
    "Strawberry Fields",
    "Jill Masterson",
    "Tiffany Case"
  ]
Pretty URLs
If you have a file like source/bond-movies.html.erb it will end up as http://appname.com/bond-movies.html. During the build process we loose the “.erb” file extension and end up with the final “.html” version of that page which is mirrored in the URL. That’s alright, normal stuff. For fancier URLs like http://appname.com/bond-movies we have to work a little.
You need to activate the Directory Indexes extension in your config.rb. This creates a folder for every .html file. During middleman build the finished page ends up as the index file of that folder—meaning that as an index file its extension won’t need to show up in the URL. If you paid attention, you might have already seen this at work with the standard index.html file that gets created for every Middleman project as a landing page. Fire up your server and see for yourself.
In config.rb:
activate :directory_indexes
Let’s see what happened after middleman build to your bond-movies.html.erb file if you’ve activated that extension. Middleman will have created a “build/bond-movies” folder and your original filename will have been changed to index.html (build/bond-movies/index.html).
Here’s the Shell output:
create build/bond-movies/index.html
There is one little caveat though. Before you activated pretty URLs you could rely on using the assets path. Now with directory indexes in place you need to supply assets with their full, absolute path. So calling an image just by its name, for example, won’t fly anymore.
If for some reason you want to override the behaviour of that extension for a particular file you can.
In config.rb:
page "/bond-movies.html", :directory_index => false
Here’s the Shell output if you change it back for bond-movies.html.erb:
create  build/bond-movies.html
remove  build/bond-movies/index.html
remove  build/bond-movies
Now its URL is back to normal for that file again. (http://appname.com/bond-movies.html)
Additionally, you can opt-out of the directory index naming scheme locally in your individual pages’ frontmatter:
---
directory_index: false
---

<h1>Bond movies</h1>
...
If you want to build that structure with folders and their respective index files yourself, Middleman is not going to mess with you. It functions the same way and middleman ignores them if you mix and match that approach.
Asset Pipleline
I’d like to cut to the chase with this one and only show you the pieces that I think are really relevant.
The “asset pipleline” is Rails lingo imported into Middleman. Under the hood, a gem called Sprockets does all the heavy lifting. It helps you with handling dependency management, combining and minifying assets, which helps slim down your assets significantly. A few helper methods to concisely reference assets are also at your disposal. Beyond that, you are also provided with the means to write Sass and CoffeeScript code, right out of the box.
Concatenation
Concatenation is one of the most important features of the asset pipline. Instead of having a lot of separate HTML requests for every CSS and JS file, you can reduce them drastically by concatenating them into one, or a handful of files. The fewer requests you cause the faster your application will load.
JavaScript Concatenation
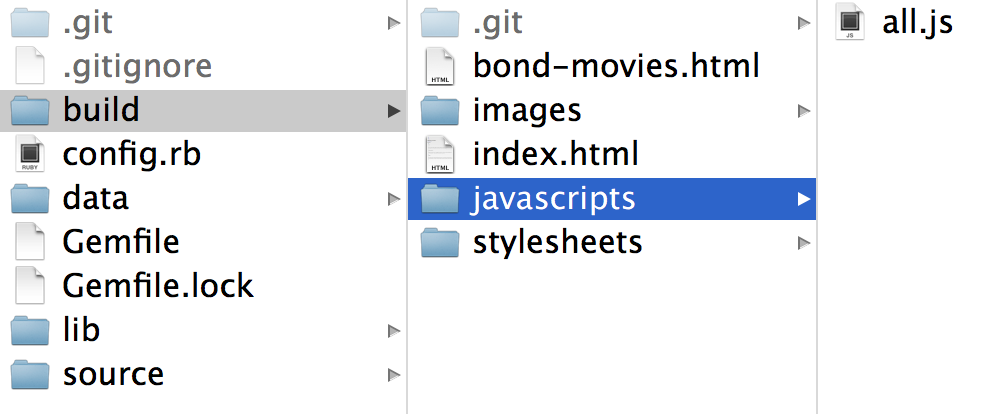
By default, Sprockets will press all JavaScript files into a single .js file. After middleman build, this file will be found under /build/javascripts/all.js. The same goes for your CSS. After the build process, you’ll have all Sass files concatenated together in build/stylesheets/all.css.
You combine your JavaScript assets by using partials (whose filenames start with an underscore) and then require them at the very top in your source/javascripts/all.js file. Files with an added .coffee extension work exactly the same. Order does matter for this process.
Here, for example, is the top of source/javascript/all.js:
//= require "_jquery"
//= require "_lib_code"
//= require "_animations"
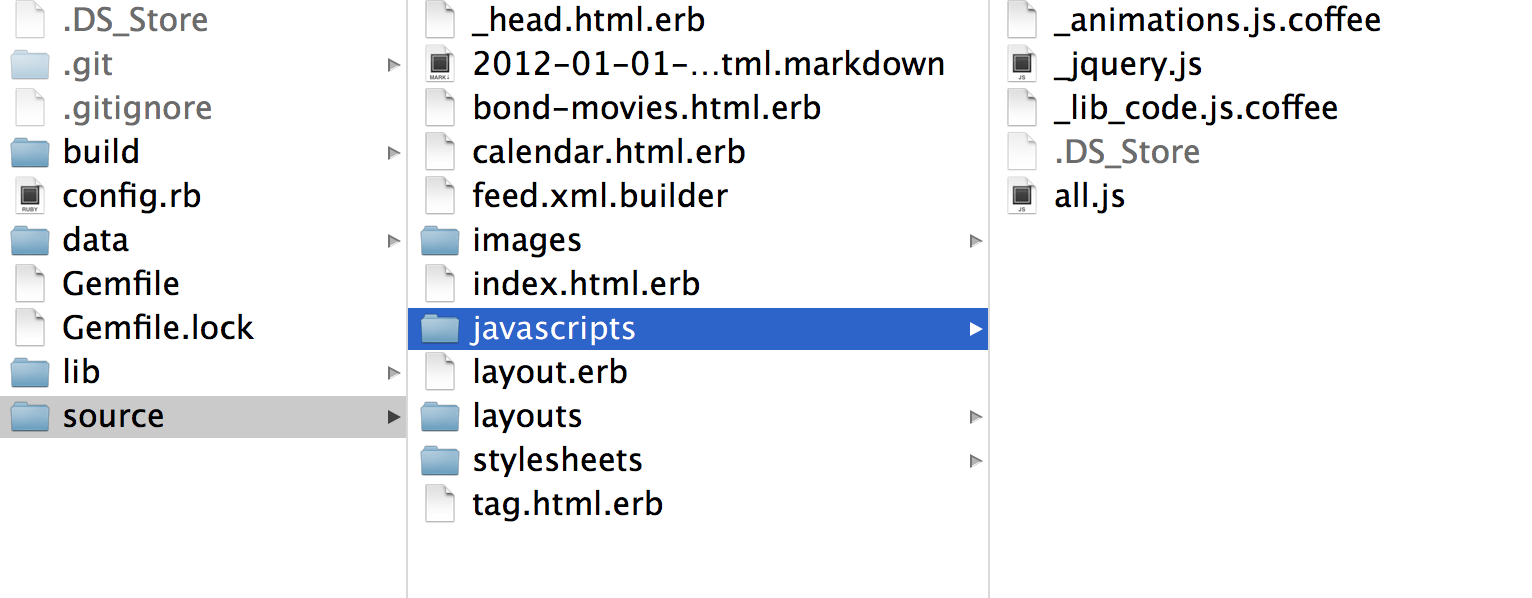
When you take a look in your new /build directory, you’ll only find one .js file under /javascripts.
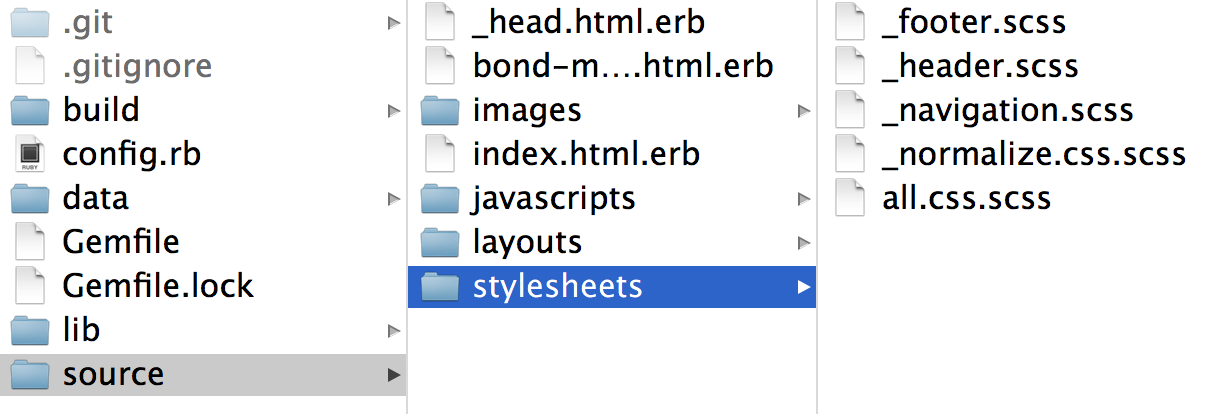
CSS Concatenation
For your Sass code, the story is bascially the same, but you should use Sass’s @import for importing your partials, instead of require from Sprockets. Again, place the “required” files at the very top, this time paying attention to order. Unlike requiring JavaScript partials, you leave off the underscore when you import Sass partials. For example
@import 'normalize';
@import 'header';
@import 'navigation';
@import 'footer';

Compression (Minification)
Another cool feature of sprockets is compression, also called minification. This process cuts out a lot of the fat, like getting rid of unnecessary whitespace and comments. People also call this process uglifying (and of course there is a gem called uglifier which does a beautiful job of this). Compared to JavaScript asset minification, CSS uglification is not that complicated.
To get started you’ll need to add the following to your config.rb file:
configure :build do
  activate :minify_css
  activate :minify_javascript
end
Actually, you just need to uncomment these lines under your :build block. The next time you use middleman build the assets in your /build folder will all be uglified and slim. Below are two small examples how this code actually ends up looking:
Minified CSS under /build/stylesheets/all.css:
bodybackground-color:#d0e4feh1color:orange;text-align:centerpfont-family:"Times New Roman";font-size:20px
Minified JS under /build/javascripts/all.js:
switch((new Date).getDay())case 0:day="Sunday";break;case 1:day="Monday";break;case 2:day="Tuesday";break;case 3:day="Wednesday";break;case 4:day="Thursday";break;case 5:day="Friday";break;case 6:day="Saturday"
Without the asset pipleline you’d have to set up your own thing to write your JavaScript and CSS via higher-level languages like CoffeeScript and Sass.
Asset Pipeline Helpers
For your Sass files you have four helpers at your disposal:
image_path()font_path()image_url()font_url()
As you’ve followed conventions so far, you can use these helpers to prepend the correct directory path to your assets.
In a Sass file, for example:
image_path('logo.png')
# => images/logo.png

image_path('nested_folder/some.png')
# => images/nested_folder/some.png
Import Path
The asset pipeline uses import paths via Sprockets for your assets. By default :js_dir and :css_dir are already added to that path. That means that files put in /source/javascripts and /source/stylesheets are available and automatically imported. On the other hand, if you have assets that you want to keep in other directories you can also add them to the import path by editing config.rb:
sprockets.append_path '/some/other/assets_folder/'
In this example, other assets in source/some/other/assets_folder/other.css are also at Middleman’s disposal via this path. The same goes for .js files as well.
Project Templates
Middleman comes with a couple of handy project templates that you should at least know about. These templates give you a good starting point when you initiate a new Middleman app. You can also add these templates at any time later:
- SMACSS Template
- Mobile Boilerplate Template
- HTML5 Boilerplate Template
- Blog Template(needs extra gem)
You can use them like this, via the command line:
middleman init your_fancy_app --template=smacss
The template will provide you with all the files and folders that it needs. If you already have an app and want to add a template you use the same command without mentioning your app’s name. Same deal:
middleman init --template=smacss
Now comes my favorite part of Middleman. It’s super straightforward to build your own templates and reuse them whenever you like. You start by creating a ~/.middleman folder in your root directory (don’t forget the dot in front of the name). Within that directory you create new folders for your templates. For example /.middleman/podcast would be a podcast template. Then you fill this podcast dirctory with all the files and folders you need. For example, if you want to have additional stylesheets available for your Middleman app, then you need to simulate Middleman’s filepath to make it super easy to use them.
In the screenshot below I have prepared a dummy example which has a couple of files that I might need for every project placed in a “bourbon” folder. Now I have a bourbon template.

Since I simulated Middleman’s file structure, these stylesheets will show up exactly where I need them after I initiated that template. My files are now under /source/stylesheets and also ready to be imported into my /source/stylesheets/all.css.scss file.
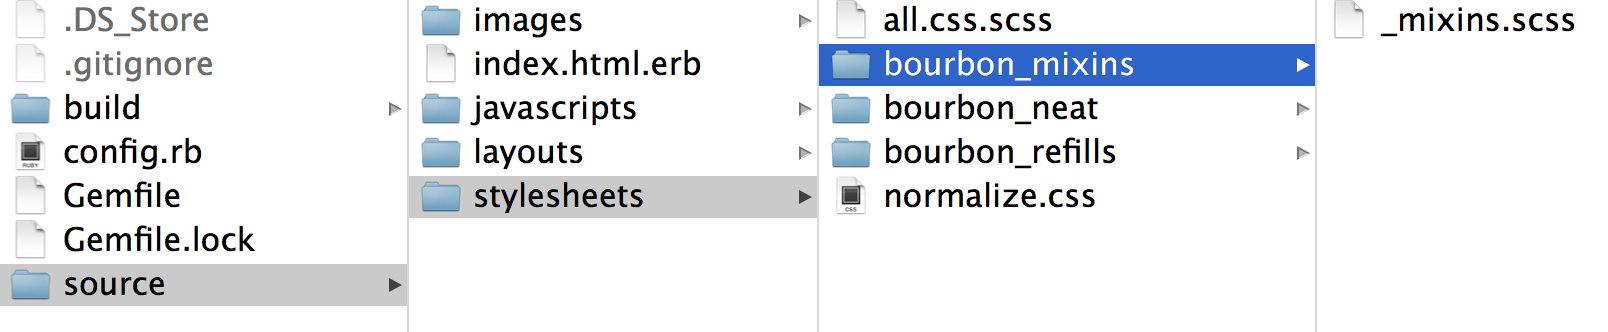
Since I already made my template styles partials, it’s business as usual. Here’s my source/stylesheets/all.css.scss:
@import 'bourbon_mixins/mixins';
@import 'bourbon_neat/grids';
@import 'bourbon_refills/cards';
...
Finished! One thing you should be careful about though: when we use middleman build to create our new build directory these files will get absorbed by all.css and none of the bourbon template folders will show up there. However, if you forget to have a leading underscore in your filenames for these styles, the complete folder will transfer into /build, along with the respective .css files. The @import statements in all.css.scss won’t make a difference in that case either.
Checking for Templates
If you have a ton of templates and want to just check the list for a name, you can use the following command:
middleman init --help

# =>  # Use a project template: default, html5, mobile, smacss, bourbon
In case you want to reinvent the wheel, take a look at these open sourced templates. If you have never played much with templates, I recommend initiating a dummy app and taking them for a spin. See what files get created or overwritten. Poke around a little bit. Then build a dummy folder with a couple of Sass files for a template under ~/.middleman and see what happens when you initiate that template. Nothing beats learning by doing these little experiments along the way!
Final Thoughts
I believe you are now more than ready to start building a little app with Middleman. There are a few things left for you to learn on your own, but I’ve presented you with the most important pieces of the puzzle.
Middleman is a lot of fun and a good choice technology-wise. It’s powerful, easy to use and has a straightforward API which is beginner friendly; that’s all that matters for now. Have fun!