
WooCommerce product attributes are a really useful feature, but by default they’re hidden quite a way down the page, in the Additional Information section. Depending on your theme, they might not be visible until the user clicks on a tab, which means many users may not look at them.
Sometimes it’s more helpful to have them listed in the upper portion of the single product page along with product categories. In this tutorial I’ll show you how to move product attributes from the Additional Information tab to the top section of the page.
What You’ll Need
To follow along, you’ll need:
- A development installation of WordPress.
- A code editor.
- WooCommerce installed and activated.
- Products added—I’ve imported the dummy product data that comes with WooCommerce; for details of how to do this, see this guide.
- One or more product attributes added (the built-in color attribute with the dummy data doesn’t work in the standard way).
- A WooCommerce-compatible theme activated—I’m using Storefront.
To add the attributes nearer the top of the single product page, we’ll do the following things:
- Create an empty plugin and activate it.
- Look at the WooCommerce source code to identify the filter that controls product attributes being added to the tabs towards the bottom of the page.
- Add a function hooked to that filter to remove the tab for attributes.
- Look at the source files again to identify the hook that pulls in content at the top of the page.
- Hook a function to that instead.
Let’s start by taking a look at the way that our product attributes will be displayed by default. I’ve created an attribute called Size and I’ve added three values to it: small, medium and large. Here it is displayed in the Additional Information section at the bottom of a product page:
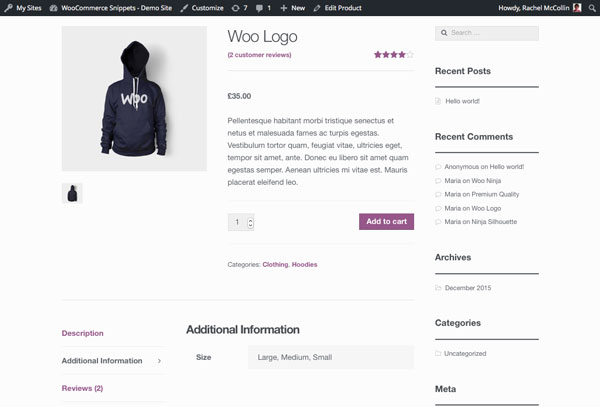
We want to move those product attributes from the bottom of the screen up to the top left-hand side, below the product description.
Creating the Plugin
In your wp-content/plugins folder, create a new file. I’m calling mine woocommerce-prominent-product-attributes.php. Open that file and add the following to it:
<?php

/**
 * Plugin Name: WooCommerce Prominent Product Attributes
 * Plugin URI: http://code.tutsplus.com/tutorials/making-woocommerce-product-attributes-more-prominent--cms-25438
 * Description: Make WooCommerce product attributes more prominent by moving them out of the "more information" tab onto the top of the page on single product pages (requires WooCommerce to be activated).
 * Version: 1.0.0
 * Author: Rachel McCollin
 * Author URI: http://rachelmccollin.co.uk
 * License: GPL-3.0+
 * License URI: http://www.gnu.org/licenses/gpl-3.0.html
 * Domain Path: /lang
 * Text Domain: tutsplus
 */
Save your file and go to the Plugins screen in your WordPress dashboard. Activate the plugin.
WooCommerce Source Code: Product Attribute Display
Let’s start by identifying the function and hook used to output product attributes. This involves journeying through a few of the plugin files:
- The template that outputs the single product page is
woocommerce/templates/single-product.php. - Within that file, there’s a
get_template_part()call to thecontent-single-product.phpfile. - In that file there’s an action called
woocommerce_after_single_product_summary. Three functions are hooked to it: the one we need to look at iswoocommerce_output_product_data_tabs(). - You can find the
woocommerce_output_product_data_tabs()function inwoocommerce/includes/wc-template-functions.php. - The function uses
wc_get_template()to fetch another template part, in this casewooocommerce/templates/single-product/tabs/tabs.php. - In that file (we’re getting there, I promise!) there’s a variable called
$tabs, which is defined asapply_filters( 'woocommerce_product_tabs', array() );. - So to remove the product attributes tab, we need to create a function removing that tab and hook it to the
woocommerce_product_tabsfilter.
Phew! We got there in the end.
Removing Product Attributes From the Tabs Using a Filter
Luckily, the WooCommerce documentation provides guidance on how to remove tabs using this filter, which makes our job a bit easier.
In your plugin file, add this code:
/**
 * Removes the "Additional Information" tab that displays the product attributes.
 *
 * @param array $tabs WooCommerce tabs to display.
 *
 * @return array WooCommerce tabs to display, minus "Additional Information".
 */
function tutsplus_remove_product_attributes_tab( $tabs ) {

    unset( $tabs['additional_information'] );

    return $tabs;

}

add_filter( 'woocommerce_product_tabs', 'tutsplus_remove_product_attributes_tab', 100 );
This function has $tabs as its object because that’s the variable we’re working with. It removes the 'additional_information' tab from the array of values stored by the $tabs variable. Note that I’ve used a high numbered priority of 100 when hooking my function to ensure it fires after the functions that add the tabs in the first place.
Save your file and refresh your product page:
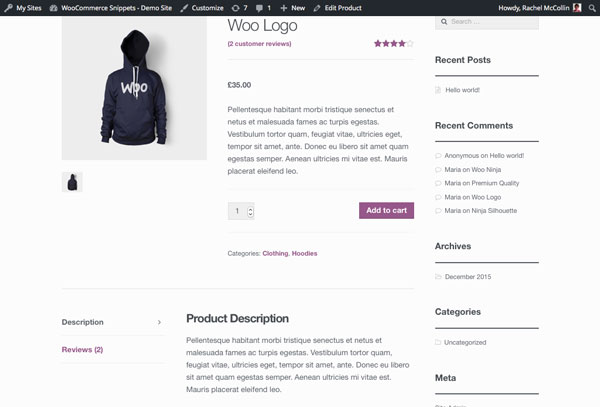
So that’s the tab removed. Now we need to add the product attributes back in at the top of the page.
Finding the Place in the Code to Add Attributes
Once again we need to identify where in the code we need to add a function to display product attributes. In other words, we need to find an action hook.
Going back to the content-single-product.php file, there’s a hook called woocommerce_single_product_summary which is used by seven functions that each output a different bit of data about the product, namely:
- the title
- the rating
- the price
- the excerpt (i.e. the short description)
- the add to cart button
- metadata
- sharing links
I want to add my attributes in the section for metadata, so let’s take a look at the function that outputs that.
The function is in the wc_template_functions.php file, and it uses wc_get_template() to call another include file, woocommerce/templates/single/product/meta.php.
In the meta.php file, there is code to output metadata about the product, with the woocommerce_product_meta_start hook before it and the woocommerce_product_meta_end hook after it. So we can use one of those two hooks to output our product attributes. Let’s use the last one, as that will make the attributes appear after the categories and tags.
Writing a Function to Output Product Attributes
Duplicating the Code Already Provided by WooCommerce
To output a list of taxonomy terms for our product, we can use the function that’s provided by WooCommerce called list_attributes(). You’ll find this function in the templates/single/product/tabs/additional-information.php file.
In your plugin file, add this:
/**
 * Displays product attributes in the top right of the single product page.
 *
 * @param $product
 */
function tutsplus_list_attributes( $product ) {

    global $product;

    $product->get_attributes();

}

add_action( 'woocommerce_product_meta_end', 'tutsplus_list_attributes' );
Note that you don’t need to use a priority as WooCommerce doesn’t have any other functions hooked to that action hook.
Now refresh your product page:
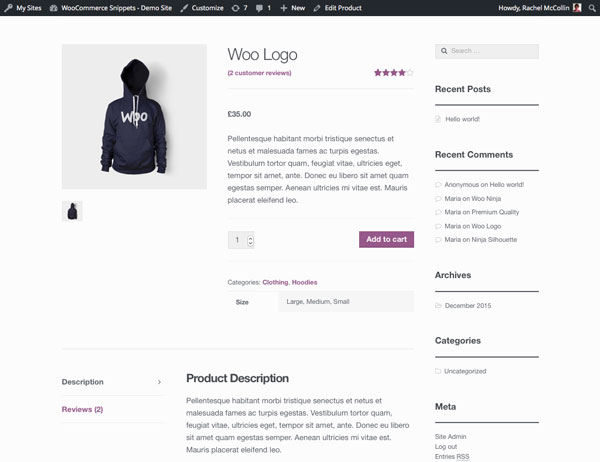
Now the attributes are displayed. They’re using a tab-like interface with the Storefront theme as that’s what’s set up for the default Additional Information tab, and the output HTML uses a table, which provides the default layout.
Alternative Approach Without a Table
That table isn’t ideal: it would be better to have a list of product attributes, to match the list of product categories above it. Let’s do that.
WooCommerce stores attributes as custom taxonomies. The slug you create for each of your attribute values is preceded by a pa_ suffix when the attribute is stored to the database.
However, it doesn’t store these taxonomies in the wp_term_taxonomy table and wp_terms table as you would when registering a normal custom taxonomy in WordPress. Instead, WooCommerce creates tables for the attributes, meaning the data is stored differently. This means that we have to take a more roundabout approach to accessing the label for each taxonomy when outputting that list.
In your tutsplus_list_attributes() function, remove the two lines inside the function. Replace them with this code:
global $product;
global $post;

$attributes = $product->get_attributes();

if ( ! $attributes ) {

    return;

}

foreach ( $attributes as $attribute ) {

    // Get the taxonomy.
    $terms = wp_get_post_terms( $product->id, $attribute[ 'name' ], 'all' );
    $taxonomy = $terms[ 0 ]->taxonomy;

    // Get the taxonomy object.
    $taxonomy_object = get_taxonomy( $taxonomy );

    // Get the attribute label.
    $attribute_label = $taxonomy_object->labels->name;

    // Display the label followed by a clickable list of terms.
    echo get_the_term_list( $post->ID, $attribute[ 'name' ] , '<div class="attributes">' . $attribute_label . ': ' , ', ', '</div>' );

}
Here’s what that code does:
- It defines the global
$productvariable (which is an object of our function). - It uses
$product->get_attributes()to fetch all of the attributes for this product. - If there are none, it does nothing.
- If there are attributes, it opens a
foreachloop for each of them. - In order to fetch the label, it uses the
wp_get_post_terms()andget_taxonomy()functions to fetch the array of data relating to this taxonomy for this post. - It then echoes out the name (or
label) of the taxonomy (or attribute), followed by a list of links to the archives for each of the values usingget_the_term_list().
The attributes are now displayed in a list:
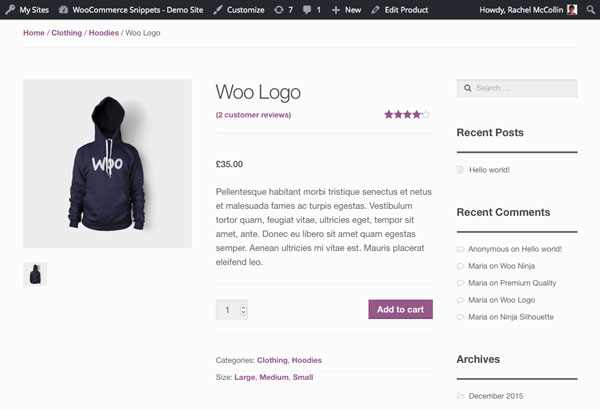
Much better!
Credit: Thanks to Isabel Castillo for the code to display the attribute label.
Summary
Moving product attributes in the product page takes a bit of work delving into the WooCommerce source code and identifying the template files, hooks and functions that play a part in displaying product attributes.
By finding the filter that controls which tabs are output, we were able to remove the Additional Information tab, which removed attributes from the bottom of the screen. Then by adding a new function to a hook higher up in the page, we were able to output them where we wanted.
If you’re interested in incorporating other WooCommerce functionality into your site, check out what’s available in the marketplace, as well.