
Websites often need to let users know about any upcoming events like movie shows, exhibitions and classes. Listing the schedule for upcoming events helps everyone save time and plan their activities. With a good event listing calendar, your users will be able to see upcoming events along with their timing, location, availability and pricing at a single place. This helps you avoid answering a lot of repetitive inquires, and makes users more likely to buy tickets for events.
-
![]()
Whether you need an event calendar plugin, a booking system with payments, or a Google Calendar widget, this list of plugins will have something to improve…
-
![]()
In the digital age, users are online 24/7. Everyone prefers to check availability and make appointments, reservations, or bookings online. They want to do…
-
![]()
In this post, we will review some of the most popular free WordPress calendar plugins that you can start using in your projects.
-
Build a schedule for your website, complete with Google Maps integration, call to action buttons, and a complete automated booking and ticketing system for…


The usefulness of these event calendar and scheduling plugins makes them very popular among website owners. There are a lot of free and paid plugins out there which can help you create such schedules and post them on your website. One of the best is Timetable Responsive Schedule for WordPress, available from CodeCanyon. In this tutorial, I’ll show you how to use Timetable Responsive Schedule to create a weekly schedule to list different courses and their details.
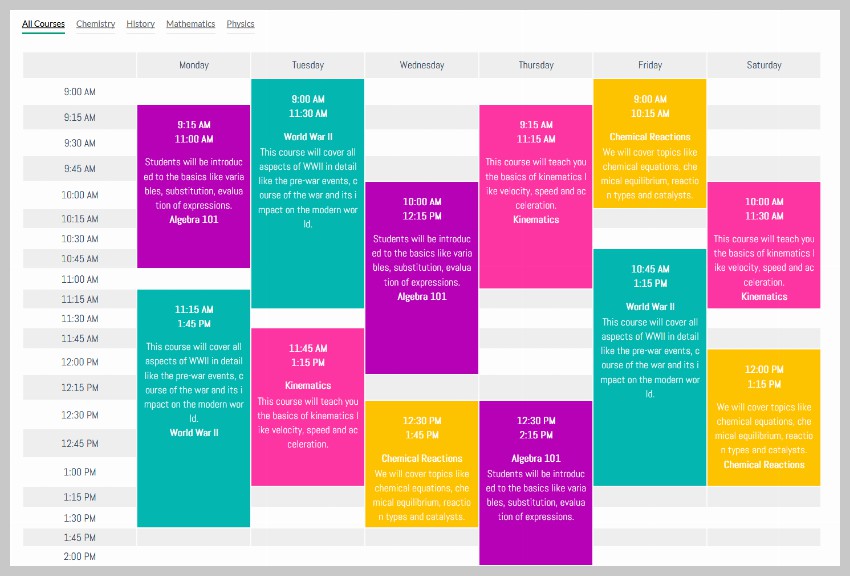
What We’ll Be Building: a Course Timetable
The plugin offers a lot of nice features that we will be using when creating our own course schedule. The image below shows the final result that you will have at the end of this tutorial.
As suggested by the name of the plugin, the timetable that we create will be responsive and look great on all devices. The plugin also provides booking functionality out of the box. This means that users will be able to register for different courses by clicking a button in the schedule itself.
The Basics of Timetable Responsive Schedule
In this section, we will simply cover some of the basics that will help you understand how the plugin works.
After installing the plugin, you will notice that there are four new menu options in your WordPress admin dashboard: Timetable, Timetable Bookings, Timetable Columns, Events.
The Timetable Columns menu option is used to specify the content that goes in the head of our table. It can be anything that you like. For example, you could create columns for months, days, dates, or places.
The Events menu option contains different settings to help you set up and create events. There is an option to create different categories to group events together. Just like the timetable columns, the event categories can also have different values with any names you want. For example, if the events are happening at different places, you could categorize them with locations. If the schedule is for movies currently being shown in different movie theaters, the category could be the movie genre.
There is no right or wrong way to set timetable columns or event categories. The important thing is to group the events together in an organized manner that makes it easier for people to find quickly find information about events that they like.
Right now, we just need to know about these two menu options to create our events and categorize them. We will discuss the remaining options later.
Creating the Course Schedule
After getting familiar with the basics, we can now start creating our responsive schedule.
First, we will create seven columns—one for each day of the week. To do so, simply go to Timetable Columns > Add New. You will just have to fill in the title of the column and click Publish. This will add the weekday to the list of columns. Do this for all seven days of the week to get seven different columns.

Now it is time to define some categories for our courses. We will use the subjects and categories for our courses. For example, both Algebra and Statistics courses will fall under the category Mathematics. Similarly, French Revolution and World War 2 will fall under the category History in our schedule.

Remember that you can create your own categories depending on how you want to organize the courses. As I said earlier, there is no absolute right or wrong here. The aim is to make the information easier to find.
Finally, we can start creating the course schedule that will appear on the website. Just go to Events > Add New and start filling out all the details. Some information that you fill out is shown only when the users click on the event link to read about it in more detail. Other information will appear in the timetable itself.
You can begin by filling the title and description of the course. The title appears in a lot of places like the tooltip, the course schedule as well as on the course details page. Try to keep it short. The description will only appear on the details page.

There are a couple of options below the description like the Subtitle and the background and text colors. The subtitle only appears on the detail page and is located right below the title. In our case, we will use it to specify the name of the instructor who will teach that course.

If you don’t want people to click on the event title and go to the details page, set the value of Disable timetable event URL to Yes. We will leave it as No for our tutorial.
Now, we will set some value for the fields in Event Hours section. Here, we simply provide the basic details of the event along with the exact time when it will take place.
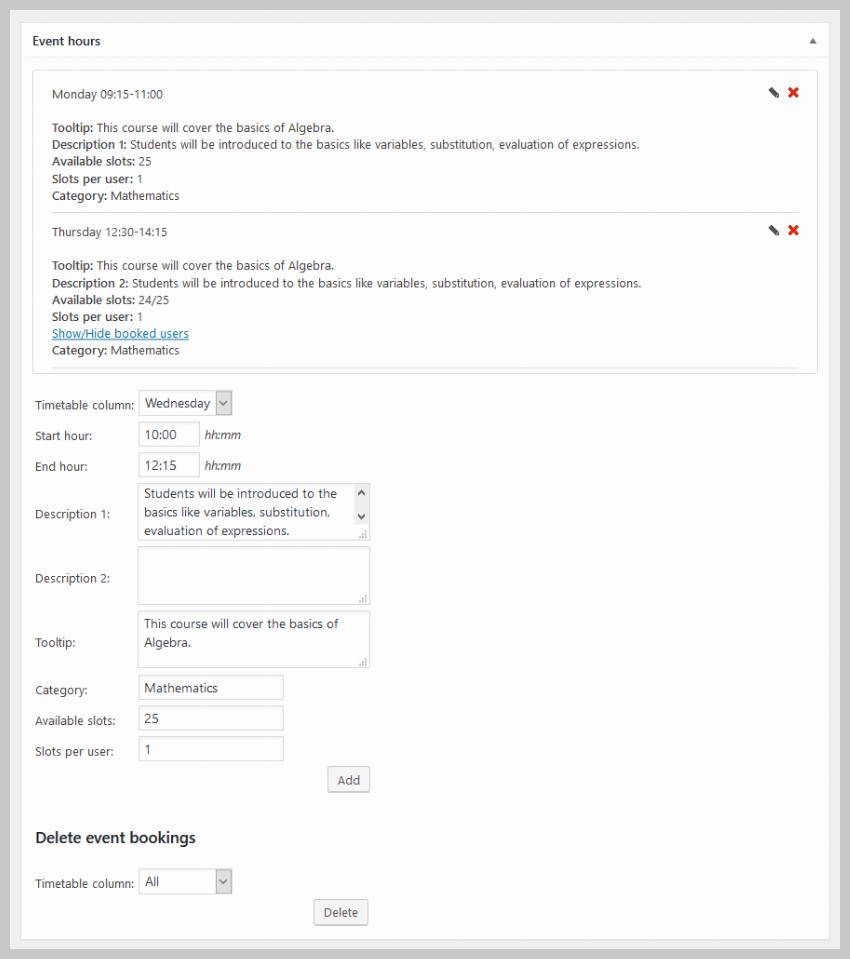
Select one of the weekdays from the dropdown menu next to Timetable column. It will show all the columns that you created earlier. The Start hour and End hour values specify when the classes for the course begin and end. You have to specify them in 24 hour format without adding any AM and PM at the end. This means that 9:00 AM has to be specified as 09:00 and 2:00 PM has to be specified as 14:00. However, the final format in which the date appears in the timetable can still be set to display other formats.
You don’t have to fill out both the description fields. The text inside Description 1 appears before the event title. The text inside Description 2 appears after the event title. The text inside Tooltip appears as a tooltip when users hover over the event.
Set the number of available slots to the maximum number of students who are allowed to take a class. Users will be able to register for a class as long as total registered students are below the specified limit.
Click on the Add button once you have filled out all the details. This will add the event to our schedule. Once you have added all the occurrences of the event, click on the Update button at the top.
Showing the Schedule on the Website
You need to use shortcodes to add the schedule to any page or post on your website. The shortcodes for adding the timetable can get pretty big and complicated when you configure a lot of options. To make sure that you don’t make any mistakes, the plugin comes with a shortcode generator that you can access by going to Timetable > Shortcode Generator.
You need to create a unique identifier for each schedule that you create. In this case, we will enter course-schedule in the shortcode id field.
Under the Main Configuration tab, we can set different options to determine what appears inside our course schedule. In Events, select all the courses that you have created. In Event Categories, select all the categories whose events you want to show in the schedule. You can select specific days for which you want to show the schedule from Columns. I have selected all days of the week except Sunday.
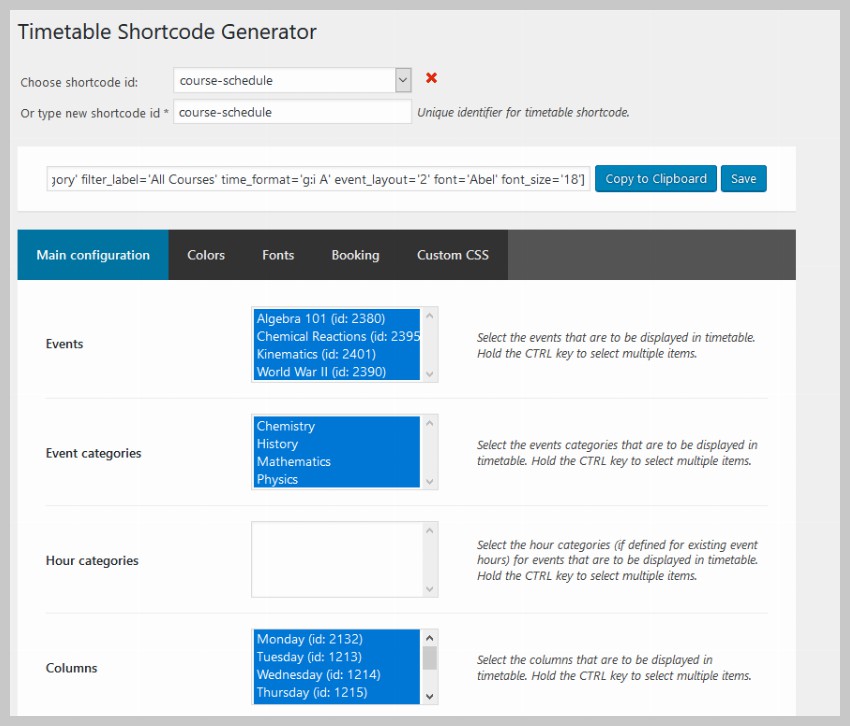
We will allow our users to filter the courses so that they can just see the courses that they want to take. Set the Filter Style to Tabs to show the event categories as tabs at the top of the table. The text inside Filter Label determines what text should users be shown when they want to see unfiltered schedule table. We will set it to All Courses.

These are the most important options under the Main Configuration section. You can leave the rest of the fields to their default values. Now, click on the Save button on the Shortcode Generator page and copy the generated shortcode.
Paste the copied shortcode in any page or post where you want the schedule to appear. You should get a result similar to the image below.
Final Thoughts
In this tutorial, we learned how to use the Timetable Responsive Schedule plugin to create a course schedule. The plugin comes with a lot of features which make it a perfect scheduling solution for many projects. We used the plugin in this tutorial to create a course schedule but you can use it for many other things like scheduling and booking, movie tickets across different movie theaters, or showing the schedule of different exhibits around the city in a week.
You can read about all the features of the plugin on the description page. Buying the plugin will give you access to six months of free support and lifetime updates. How do you plan on using this plugin? Let us know in the comments below.