In this article, you’ll learn how to configure the new Google Auth “Sign in with Google” button in a React.js and Express.js application.
This new method simplifies the way developers implement Google Auth. It brings in some significant advantages, such as allowing users to view a profile picture in order to select the correct Google account — which prevents sign-up mistakes and ensures that your application won’t be affected when Google discontinues the old “Sign In With Google” JavaScript library on March 31, 2023.
It’s worth noting that newly created client IDs are now blocked from using the older Platform Library and that Google Auth must be implemented in this manner.
Here’s the source code for this article: Server and Client.
Generate a Google Client ID and Secret
The first step to take in order to implement Google authentication is to generate a client ID and secret for the application you’re creating.
Step 1
We begin by heading to Google console.
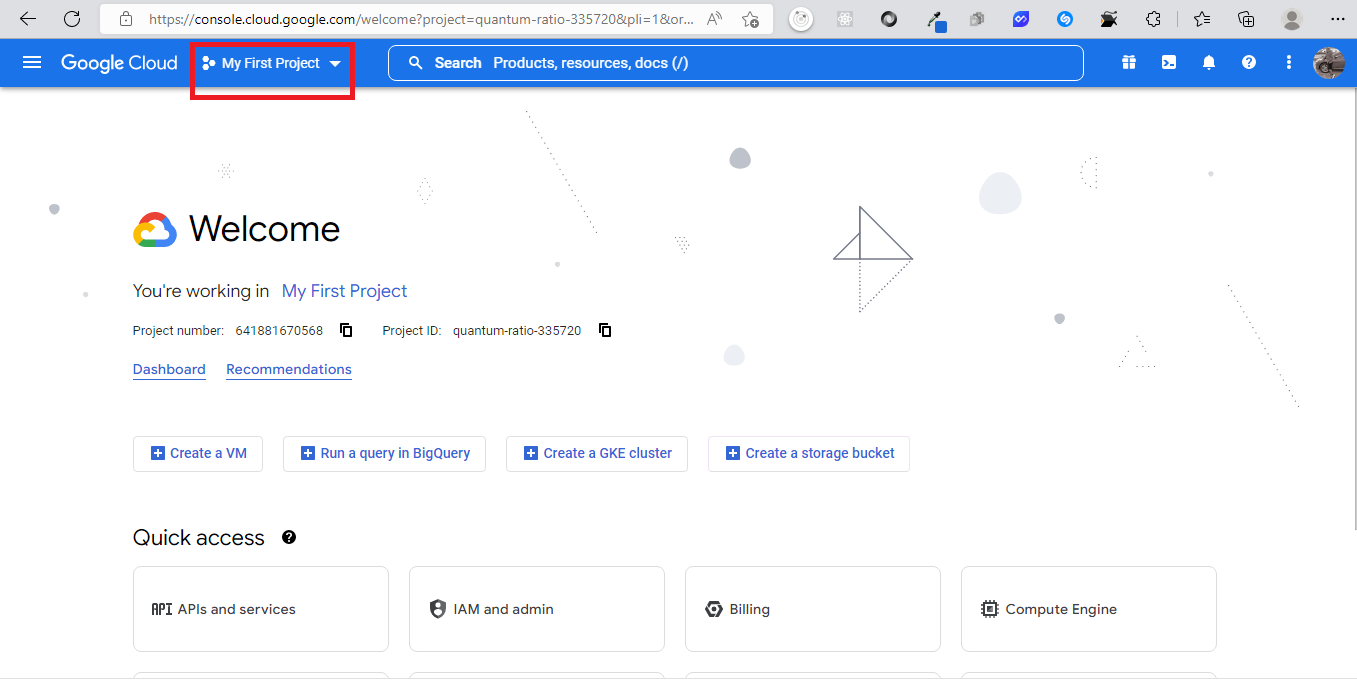
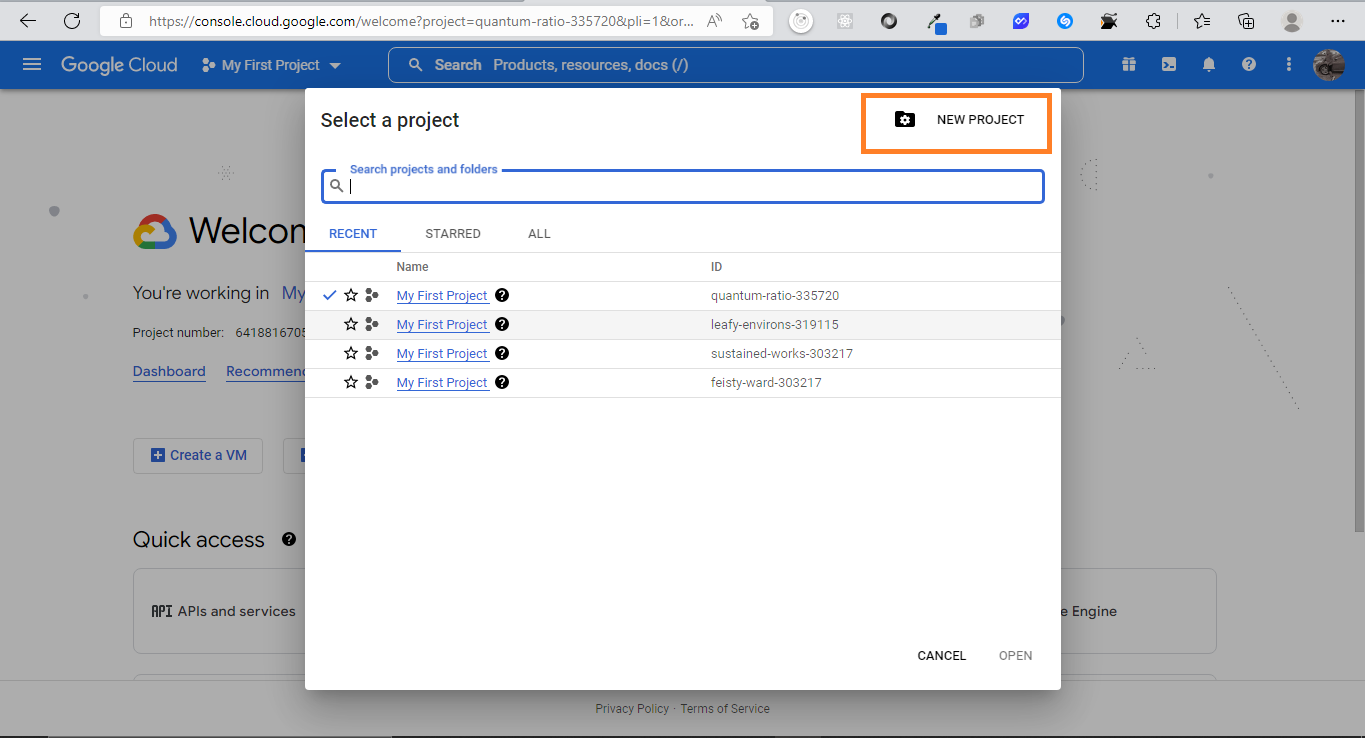
Step 2
Click on the dropdown highlighted above. After that, click on the new project highlighted below.
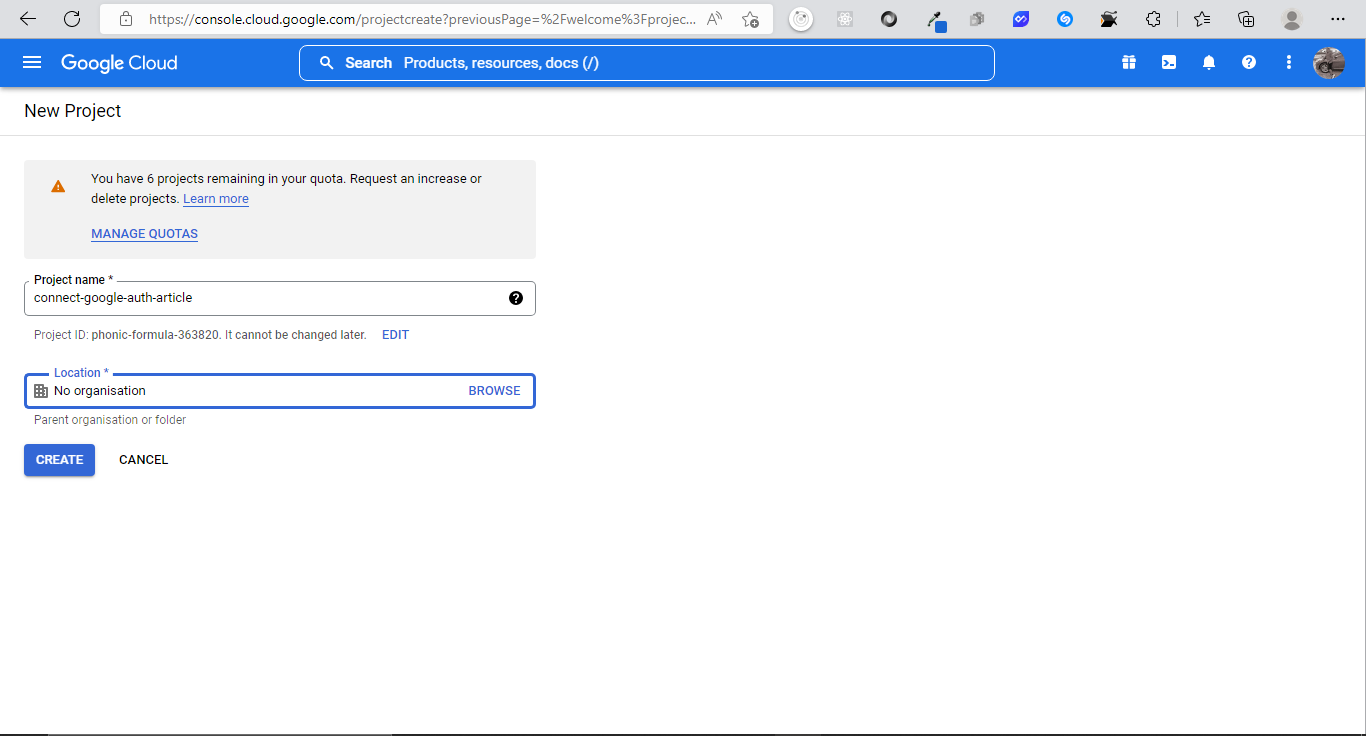
Step 3
Add a project name. I chose connect-google-auth-article.
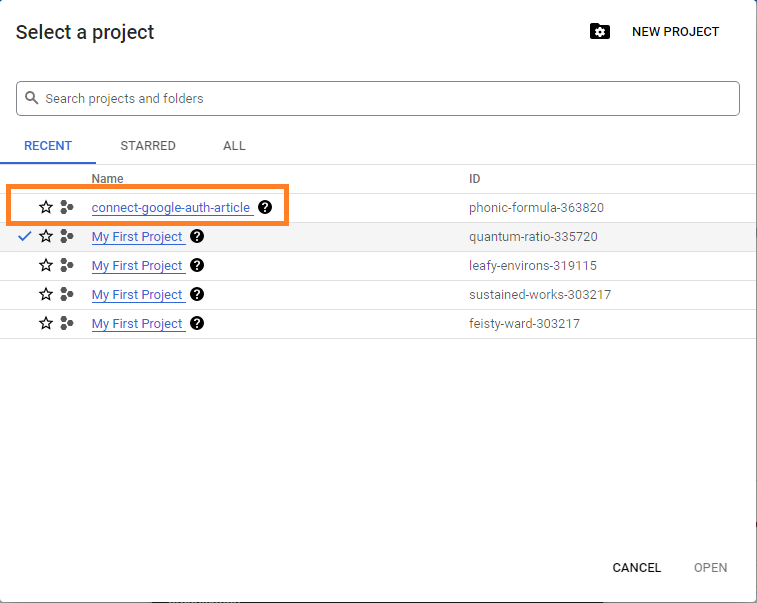
Step 4
Click on the dropdown in step 1 to select the project.
Step 5
The next screen you see should look like the sample below. Then click on the dashboard.
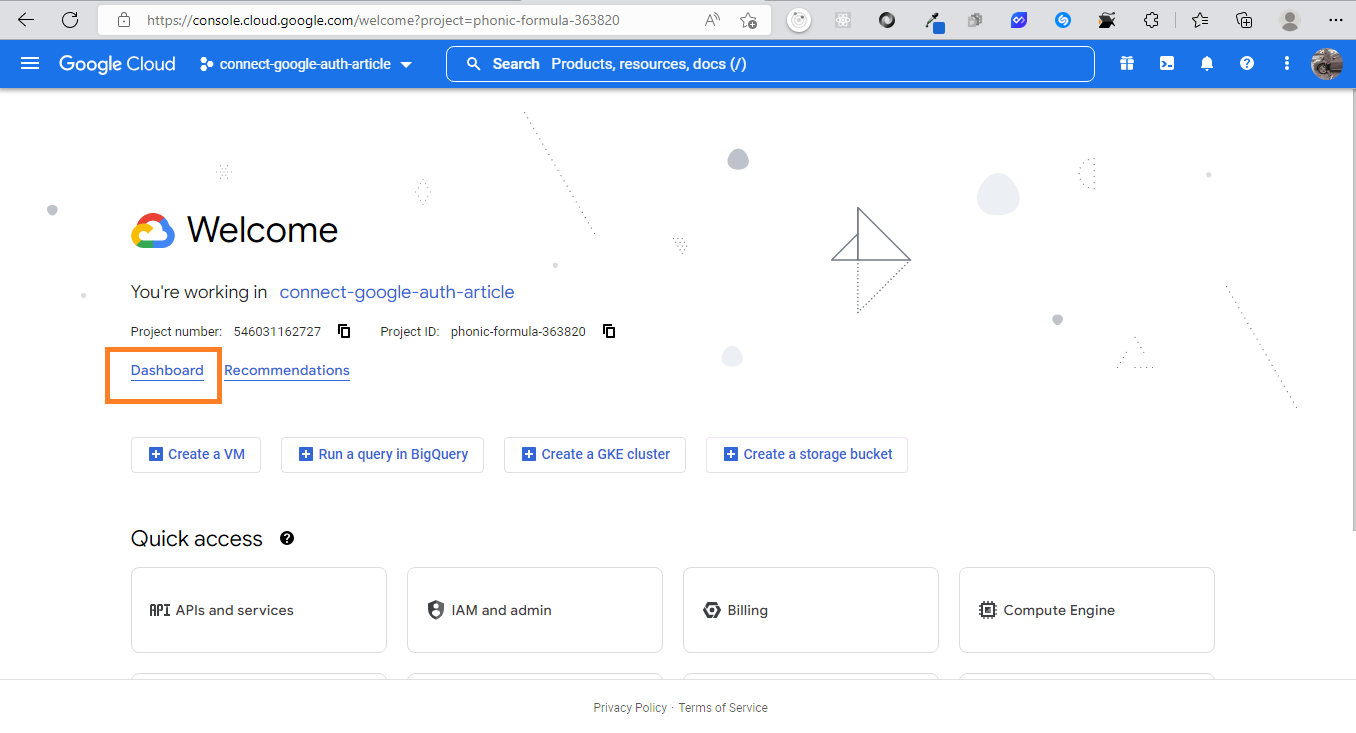
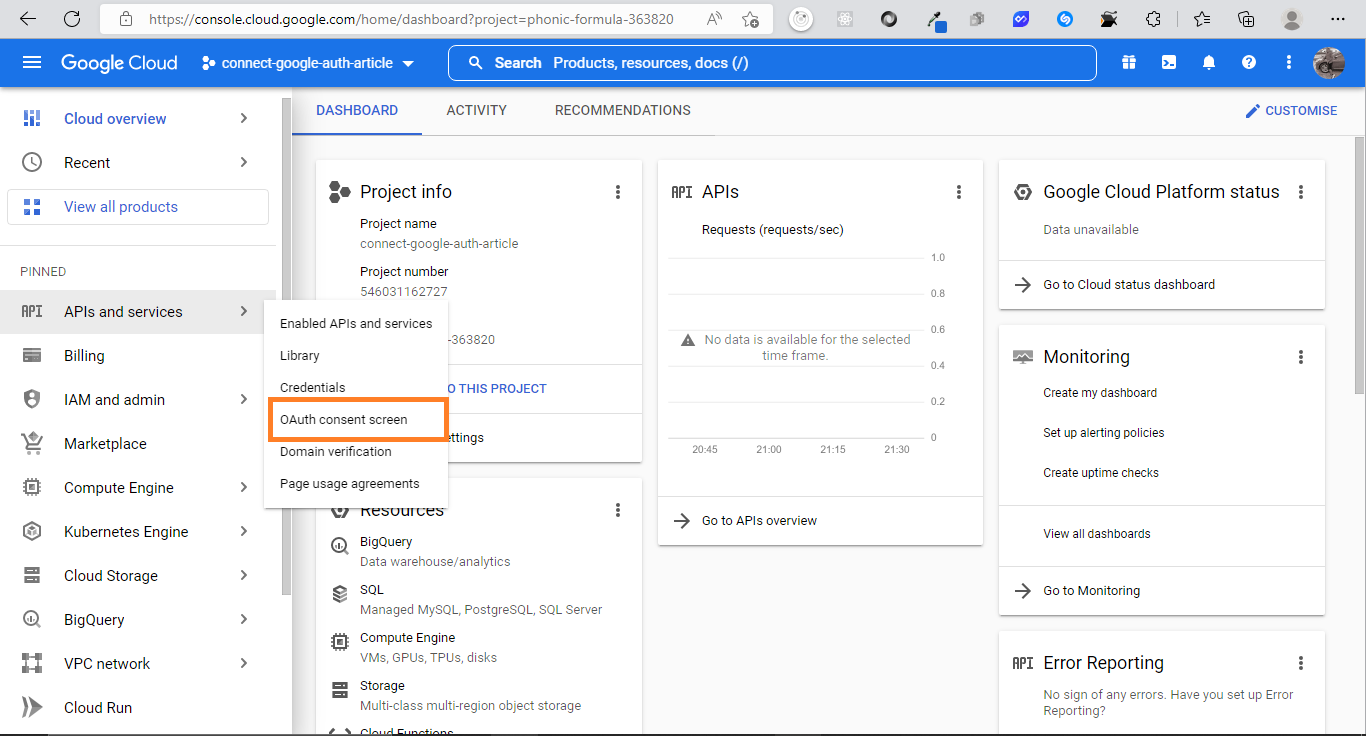
Step 6
The next step is to configure oauth consent. To achieve that, hover on “APIs and services” and click on “OAuth consent screen”.
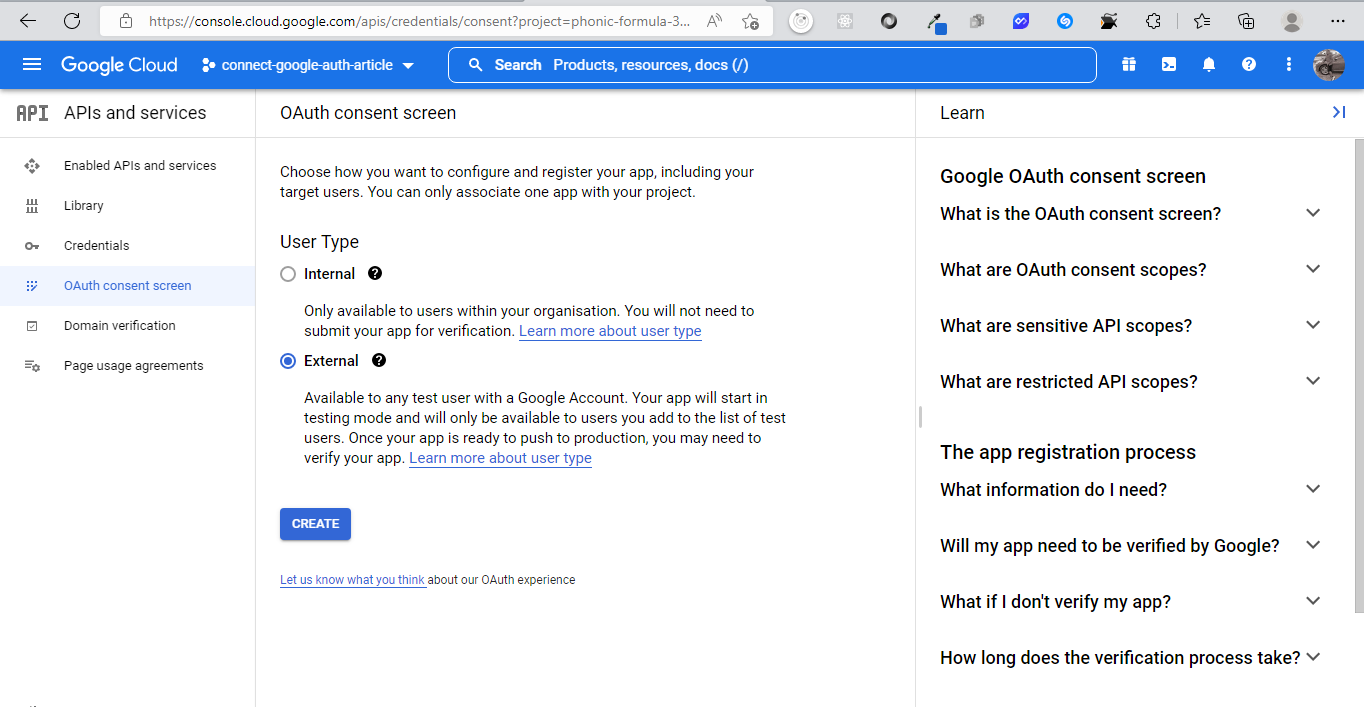
Step 7
Select the type of consent you want. I chose external and hit CREATE.
Step 8
Once consent has been set, click on credentials to set your app details. Since my app is hosted on localhost, I set the details as pictured below.
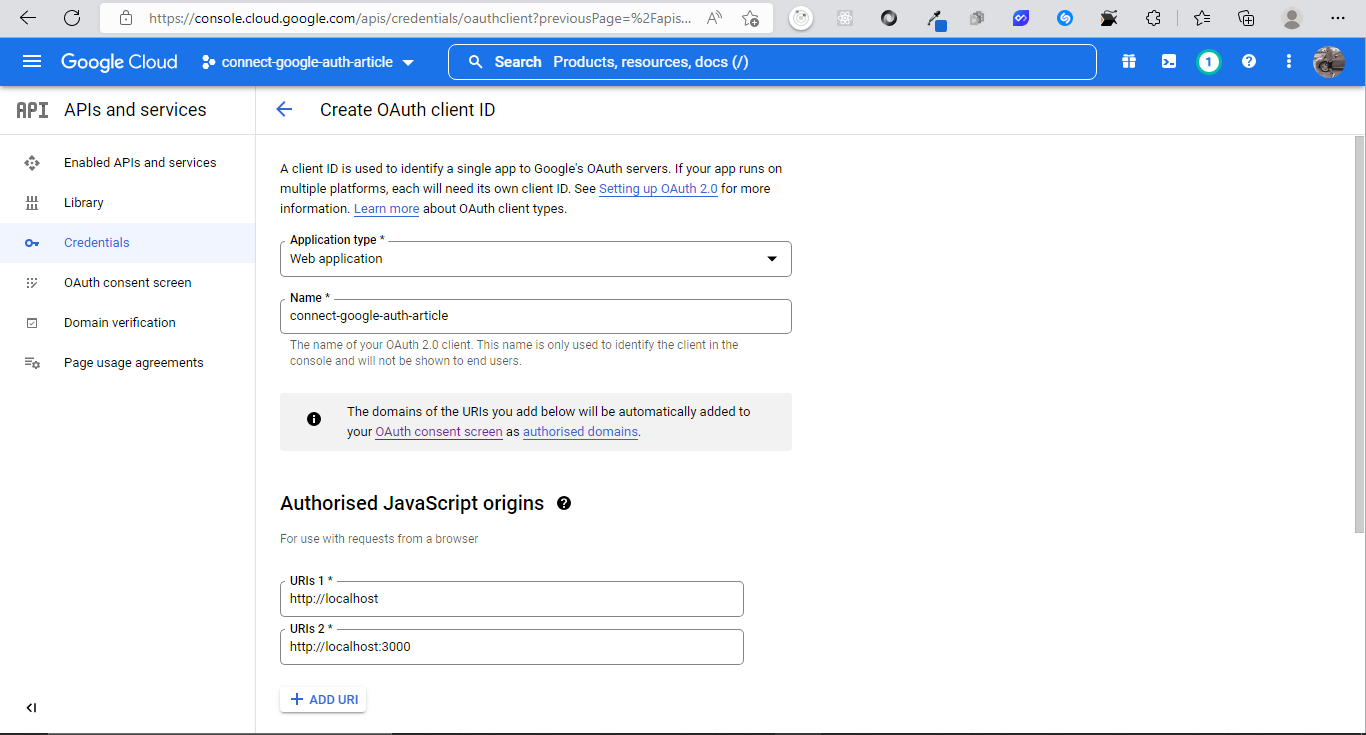
Note: when you’re ready to deploy your application, you should replace the URI1 and URI2 with the domain name you want to use — such as https://example.com.
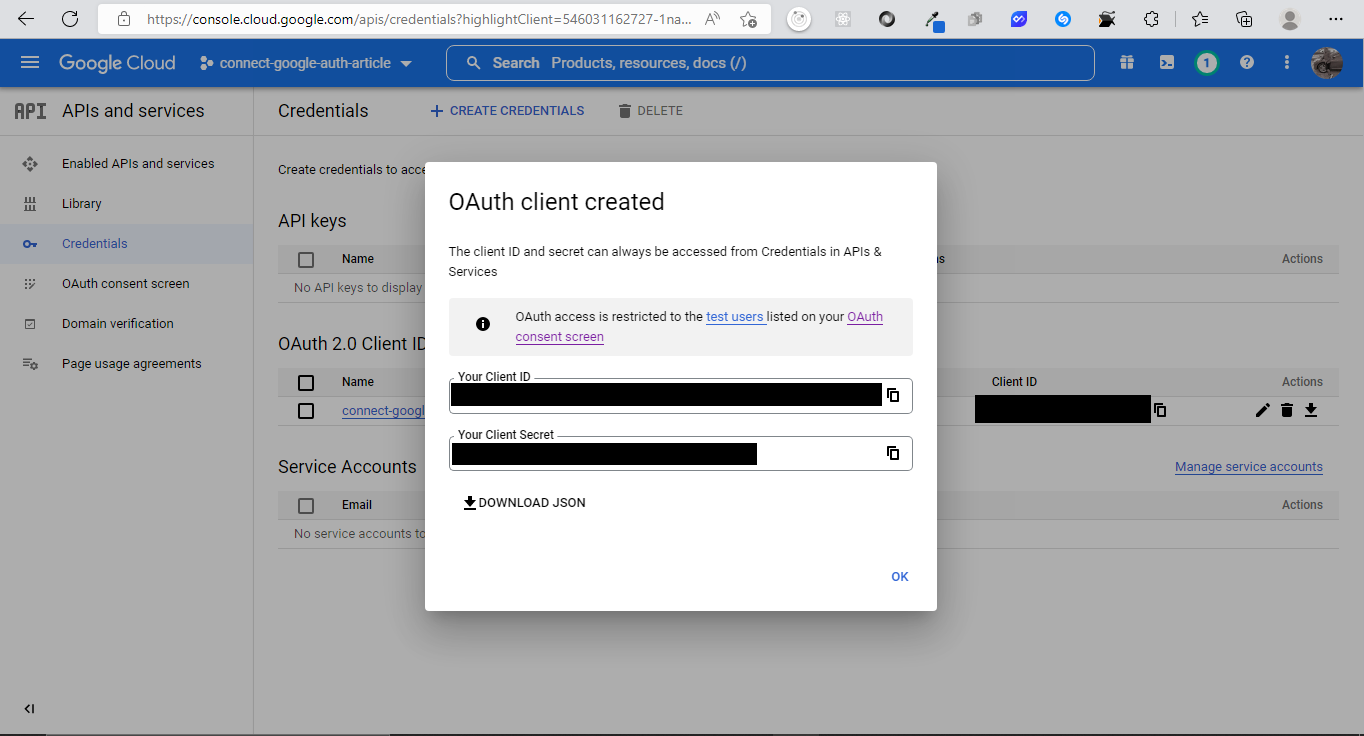
Step 9
Once your credentials have been stored successfully, you can copy or download the generated Client ID and Secret.
Setup React App
The easiest way to bootstrap a React.js app is using Create React App.
Hence, create a folder, name it whatever you want. Then open a terminal and run the following code: npx create-react-app app.
Setting Up the Express Server
Create another folder in the root directory. I’m naming mine server. Then, open a terminal and cd into server: cd server.
After that, create a server.js file before generating a package.json by running npm init -y. Next, install the following packages:
- Express.js: “a minimal and flexible Node.js web application framework that provides a robust set of features for web and mobile applications”.
- CORS: a Node.js package for providing a Connect/Express middleware that can be used to enable cross-origin resource sharing with various options.
- Dotenv: a Node.js package that loads environment variables from
.envfile. - Google-auth-library: Google API’s Authentication Client Library for Node.js.
- Jsonwebtoken: a JSON Web Token implementation library for Node.js.
- Nodemon: a simple monitor script for use during development of a Node.js app.
You can install the packages above running the following command:
npm install express cors dotenv google-auth-library jsonwebtoken nodemon
After that, configure your script by doing this:
  "scripts": {
    "start": "node server.js",
    "dev": "nodemon server.js"
  },
Your package.json should look like this:
{
  "name": "connect-google-auth-article",
  "version": "1.0.0",
  "description": "",
  "main": "server.js",
  "scripts": {
    "start": "node server.js",
    "dev": "nodemon server.js"
  },
  "dependencies": {
    "cors": "^2.8.5",
    "dotenv": "^16.0.2",
    "express": "^4.18.1",
    "google-auth-library": "^8.5.2",
    "jsonwebtoken": "^8.5.1",
    "nodemon": "^2.0.20"
  },
  "keywords": [],
  "author": "",
  "license": "ISC"
}
After that, write the following code in server.js and run npm run dev to start your server:
const express = require("express");
const app = express();
require("dotenv/config");
const cors = require("cors");
const { OAuth2Client } = require("google-auth-library");
const jwt = require("jsonwebtoken");

app.use(
  cors({
    origin: ["http://localhost:3000"],
    methods: "GET,POST,PUT,DELETE,OPTIONS",
  })
);
app.use(express.json());

let DB = [];

app.listen("5152", () => console.log("Server running on port 5152"));
Preparing the React App
To prepare our client app, we’ll add the Google script to the head our public/index.html file:
<script src="https://accounts.google.com/gsi/client" async defer></script>
Our index.html file should look like this:
<!DOCTYPE html>
<html lang="en">
  <head>
    <meta charset="utf-8" />
    <link rel="icon" href="%PUBLIC_URL%/favicon.ico" />
    <meta name="viewport" content="width=device-width, initial-scale=1" />
    <meta name="theme-color" content="#000000" />
    <meta
      name="description"
      content="Web site created using create-react-app"
    />
    <link rel="apple-touch-icon" href="%PUBLIC_URL%/logo192.png" />
    <link rel="manifest" href="%PUBLIC_URL%/manifest.json" />

    <script src="https://accounts.google.com/gsi/client" async defer></script>
    <title>React App</title>
  </head>
  <body>
    <noscript>You need to enable JavaScript to run this app.</noscript>
    <div id="root"></div>
  </body>
</html>
Next, we’ll create two folders in our src: screens and hooks.
The screens folder will contain five files: Home.jsx, Landing.jsx, Login.jsx, Signup.jsx and index.js. The hooks folder will contain only one file: useFetch.jsx.
Configure Client-side Routing
The package we’ll leverage for the client-side routing is react-router-dom. Open a new terminal, cd into the app and run the following code: npm install react-router-dom.
We can then update our App.js to look like this:
import React, { useEffect } from "react";
import { useState } from "react";
import { BrowserRouter, Routes, Route, Navigate } from "react-router-dom";

const App = () => {
  const [user, setUser] = useState({});

  return (
    <BrowserRouter>
      <Routes>

      </Routes>
    </BrowserRouter>
  );
};

export default App;
Creating the Landing Page
The landing page in our case is the only page available for an unauthenticated user. It will contain links to the sign-up and login pages. It will look like this:
import React from "react";
import { Link } from "react-router-dom";

const Landing = () => {
  return (
    <>
      <header style={{ textAlign: "center" }}>
        <h1>Welcome to my world</h1>
      </header>
      <main style={{ display: "flex", justifyContent: "center", gap: "2rem" }}>
        <Link
          to="/signup"
          style={{
            textDecoration: "none",
            border: "1px solid gray",
            padding: "0.5rem 1rem",
            backgroundColor: "wheat",
            color: "#333",
          }}
        >
          Sign Up
        </Link>
        <Link
          to="/login"
          style={{
            textDecoration: "none",
            border: "1px solid gray",
            padding: "0.5rem 1rem",
            backgroundColor: "whitesmoke",
            color: "#333",
          }}
        >
          Login
        </Link>
      </main>
    </>
  );
};

export default Landing;
Let’s break it down:
- The component returns a React fragment element represented by an empty tag.
- The fragment contains two elements:
<header>and<main>. The header returns an<h1>and centers the text in it, while the main element returns two links fromreact-router-domand also centers them. - A different background color is provided for the two links to improve UX.
Next, we can open the screens/index.js file and export the Landing.jsx like so:
export { default as Landing } from "./Landing";
After that, we can import it into the App.js file, where we configure a route for it:
import { Landing } from "./screens";
Also:
<Route
  path="/"
  element={user?.email ? <Navigate to="/home" /> : <Landing />}
  />
Creating a useFetch Hook
A hook in React is a special kind of function that allows you to use React’s functionality. To create a hook, open hooks/useFetch.jsx and add the following code:
import { useState } from "react";

const useFetch = (url) => {
  const [loading, setLoading] = useState(false);
  const [error, setError] = useState("");

  const handleGoogle = async (response) => {
    console.log(response)
  };
  return { loading, error, handleGoogle };
};

export default useFetch;
Creating Sign-up Page
Open the screens/Signup.jsx file and add the following code:
import React, { useEffect } from "react";
import { Link } from "react-router-dom";
import useFetch from "../hooks/useFetch";


const SignUp = () => {
  const { handleGoogle, loading, error } = useFetch(
    "http://localhost:5152/signup"
  );

  useEffect(() => {

    if (window.google) {
      google.accounts.id.initialize({
        client_id: process.env.REACT_APP_GOOGLE_CLIENT_ID,
        callback: handleGoogle,
      });

      google.accounts.id.renderButton(document.getElementById("signUpDiv"), {

        theme: "filled_black",

        text: "continue_with",
        shape: "pill",
      });


    }
  }, [handleGoogle]);

  return (
    <>
      <nav style={{ padding: "2rem" }}>
        <Link to="/">Go Back</Link>
      </nav>
      <header style={{ textAlign: "center" }}>
        <h1>Register to continue</h1>
      </header>
      <main
        style={{
          display: "flex",
          justifyContent: "center",
          flexDirection: "column",
          alignItems: "center",
        }}
      >
        {error && <p style={{ color: "red" }}>{error}</p>}
        {loading ? (
          <div>Loading....</div>
        ) : (
          <div id="signUpDiv" data-text="signup_with"></div>
        )}
      </main>
      <footer></footer>
    </>
  );
};

export default SignUp;
Let’s break it down:
- We extract the available states and functions from the
useFetchhook. We also pass the URL that we’ll be calling to handle our sign-on to the server. - In
useEffect, we check for the availability of Google’s script — handled by the script we put in thepublic.index.htmlfile. - We then use the
initializemethod available in the script to handle the functionality of the authentication button. - We also pass a callback function, which we’ve already defined in the
useFetchhook.
Next, we’ll use the renderButton method to display our authentication button on the screen. The first parameter we pass is the element in which the button will be embedded, using the getElementById method. The next parameters that we can pass are used to customize the look of the button. It has the following required setting:
type: this accepts two values — standard and icon.
Moreover, it has optional settings, inclusing the following:
theme: the button theme. It can accept one of the following:filled_blue,outline, andfilled_black.size: defines the size of the button. It acceptslarge,medium, andsmall.text: defines the button text. It accepts one of the following:signin_with,signup_with,continue_with, andsignin.shape: defines the shape of the button. It acceptsrectangular,pill,circle, orsquare.logo_alignment: defines how the logo will be placed in the button. It can acceptleftorcenter.width: defines the width of the button. It’s worth noting that the maximum width is 400.
Another option is locale, which is used to set for a specific language.
We also check the availability of an error and display it to the user. We also check the loading state.
Creating the Login Page
The login page is similar to the sign-up page. The only difference is the server URL and the button text. The code should look like this:
import React, { useEffect } from "react";
import { Link } from "react-router-dom";
import useFetch from "../hooks/useFetch";


const Login = () => {
  const { handleGoogle, loading, error } = useFetch(
    "http://localhost:5152/login"
  );

  useEffect(() => {

    if (window.google) {
      google.accounts.id.initialize({
        client_id: process.env.REACT_APP_GOOGLE_CLIENT_ID,
        callback: handleGoogle,
      });

      google.accounts.id.renderButton(document.getElementById("loginDiv"), {

        theme: "filled_black",

        text: "signin_with",
        shape: "pill",
      });


    }
  }, [handleGoogle]);

  return (
    <>
      <nav style={{ padding: "2rem" }}>
        <Link to="/">Go Back</Link>
      </nav>
      <header style={{ textAlign: "center" }}>
        <h1>Login to continue</h1>
      </header>
      <main
        style={{
          display: "flex",
          justifyContent: "center",
          flexDirection: "column",
          alignItems: "center",
        }}
      >
        {error && <p style={{ color: "red" }}>{error}</p>}
        {loading ? <div>Loading....</div> : <div id="loginDiv"></div>}
      </main>
      <footer></footer>
    </>
  );
};

export default Login;
Note: the google.accounts.id.prompt() is used to automatically ask the user to sign in immediately they open your web page. It can be placed in the root file or the login page.
Also create a .env.local file in the root folder and add the following:
REACT_APP_GOOGLE_CLIENT_ID=your client id
Next, we export the sign-up and login page from the screens.index.js file:
export { default as Login } from "./Login";
export { default as Signup } from "./SignUp";
After that, we configure their routes in the App.js file:
import { Landing, Login, Signup } from "./screens";
Also:
<Route
    path="/signup"
    element={user?.email ? <Navigate to="/home" /> : <Signup />}
  />
  <Route
    path="/login"
    element={user?.email ? <Navigate to="/home" /> : <Login />}
  />
Updating useFetch
The Google authentication returns a response with JWT credentials. However, to verify its authenticity and also create a session for the user, we’ll be making subsequent calls to the server. We should update our hooks/useFetch file to look like this:
  const handleGoogle = async (response) => {
    setLoading(true);
    fetch(url, {
      method: "POST",
      headers: {
        "Content-Type": "application/json",
      },

      body: JSON.stringify({ credential: response.credential }),
    })
      .then((res) => {
        setLoading(false);

        return res.json();
      })
      .then((data) => {
        if (data?.user) {
          localStorage.setItem("user", JSON.stringify(data?.user));
          window.location.reload();
        }

        throw new Error(data?.message || data);
      })
      .catch((error) => {
        setError(error?.message);
      });
  };
Let’s break this down:
- Our callback function accepts a parameter from Google authentication passed in as a response.
- We then use
fetchto make a request to the server. - When we get the appropriate response, we store the user to the
localStoragein JSON format.
Creating Signup and Login Routes
Open the server.js file. First of all, we’ll create a function that verifies the credentials we’ll be receiving:
const GOOGLE_CLIENT_ID = process.env.GOOGLE_CLIENT_ID;
const client = new OAuth2Client(GOOGLE_CLIENT_ID);

async function verifyGoogleToken(token) {
  try {
    const ticket = await client.verifyIdToken({
      idToken: token,
      audience: GOOGLE_CLIENT_ID,
    });
    return { payload: ticket.getPayload() };
  } catch (error) {
    return { error: "Invalid user detected. Please try again" };
  }
}
Create a .env file in the root folder of the server and add the following:
# .env
GOOGLE_CLIENT_ID=your client id
JWT_SECRET=mySecret
Next, create the sign-up route:
app.post("/signup", async (req, res) => {
  try {

    if (req.body.credential) {
      const verificationResponse = await verifyGoogleToken(req.body.credential);

      if (verificationResponse.error) {
        return res.status(400).json({
          message: verificationResponse.error,
        });
      }

      const profile = verificationResponse?.payload;

      DB.push(profile);

      res.status(201).json({
        message: "Signup was successful",
        user: {
          firstName: profile?.given_name,
          lastName: profile?.family_name,
          picture: profile?.picture,
          email: profile?.email,
          token: jwt.sign({ email: profile?.email }, "myScret", {
            expiresIn: "1d",
          }),
        },
      });
    }
  } catch (error) {
    res.status(500).json({
      message: "An error occurred. Registration failed.",
    });
  }
});
Also create the login route:
app.post("/login", async (req, res) => {
  try {
    if (req.body.credential) {
      const verificationResponse = await verifyGoogleToken(req.body.credential);
      if (verificationResponse.error) {
        return res.status(400).json({
          message: verificationResponse.error,
        });
      }

      const profile = verificationResponse?.payload;

      const existsInDB = DB.find((person) => person?.email === profile?.email);

      if (!existsInDB) {
        return res.status(400).json({
          message: "You are not registered. Please sign up",
        });
      }

      res.status(201).json({
        message: "Login was successful",
        user: {
          firstName: profile?.given_name,
          lastName: profile?.family_name,
          picture: profile?.picture,
          email: profile?.email,
          token: jwt.sign({ email: profile?.email }, process.env.JWT_SECRET, {
            expiresIn: "1d",
          }),
        },
      });
    }
  } catch (error) {
    res.status(500).json({
      message: error?.message || error,
    });
  }
});
Let’s break it down:
- In the routes, we first check that the credentials are passed into the body. We then attempt to verify the credential. If there’s an error, we send it back to the client in JSON format.
- In the sign-up route, we store users’ profiles in the DB array and send a success response with a JWT signed email as a token.
- In the login route, we check if the user exists in the DB and if not, throw an error. If it exists, we also send a success response with a JWT signed email as a token with other parameters.
Updating App.js
In the App.js of the client app, we’ll update the file to check for a user in the local storage with the following code:
 useEffect(() => {
    const theUser = localStorage.getItem("user");

    if (theUser && !theUser.includes("undefined")) {
      setUser(JSON.parse(theUser));
    }
  }, []);
Creating Home.jsx
The Home.jsx file is the page that will be available to the user after a successful signup or login:
import React from "react";

const Home = ({ user }) => {
  const logout = () => {
    localStorage.removeItem("user");
    window.location.reload();
  };
  return (
    <div style={{ textAlign: "center", margin: "3rem" }}>
      <h1>Dear {user?.email}</h1>

      <p>
        You are viewing this page because you are logged in or you just signed
        up
      </p>

      <div>
        <button
          onClick={logout}
          style={{
            color: "red",
            border: "1px solid gray",
            backgroundColor: "white",
            padding: "0.5rem 1rem",
            cursor: "pointer",
          }}
        >
          Logout
        </button>
      </div>
    </div>
  );
};

export default Home;
Next, we’ll export it from the screens/index.js file like so:
export { default as Home } from "./Home";
After that, we’ll import and set up its route in App.js:
import { Home, Landing, Login, Signup } from "./screens";
Also:
<Route
    path="/home"
    element={user?.email ? <Home user={user} /> : <Navigate to="/" />}
  />
Conclusion
Congratulations! We’ve set up the new Google authentication.
Once again, the source code is available here: Server and Client.
Related reading: