I have previously written a tutorial that discusses how to preload images on a webpage using HTML, CSS, or JavaScript. The reason we went to the trouble of preloading images was to provide a better browsing experience to users so that they don’t have to wait for an image to load.
The same philosophy of improving the user experience applies to lazy loading images as well. Images are one of the biggest contributors to page weight when we are browsing websites. Loading them in an optimal manner can improve performance and save bandwidth.
In this tutorial, we will learn about different methods of lazy loading images.
The Need for Lazy Loading Images
We will begin the tutorial by learning why you should bother about lazy loading images at all. Let’s say you are building a portfolio website for a photographer, and they showcase all of their best images on a single page.
Not everyone is going to scroll to the bottom of the page to see all the images. However, the images would still be downloaded by the user’s browser. This is evident in the CodePen demo below:
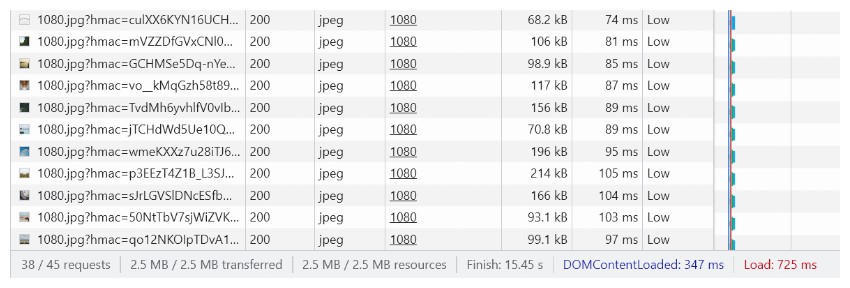
Even if you don’t scroll past the first image in the above demo, you will see that the browser has loaded all the images. The following screenshot of the Network tab from my browser’s developer tools shows that 38 requests were made, with around 2.5MB of data transferred. The browser downloaded a total of 19 images, with redirections doubling the number of requests.
We will now try to improve or optimize the image loading in order to conserve resources.
Lazy Loading Images Using HTML
The easiest way to load images lazily involves the use of the loading attribute. All modern browsers support the loading attribute on images, which can be used to instruct the browser to prevent loading images if they are off-screen and only start loading them when the user has scrolled close enough for them to be visible.
The loading attribute can accept two possible values. The first value is eager, which tells the browser to load the image immediately, even if it isn’t currently within the viewport. This is the default behavior of browsers.
The second value is lazy, which tells the browser to defer loading an image until it has reached a specific distance from the viewport. This distance is defined by the browser. Setting the value of the loading attribute to lazy can potentially save bandwidth for clients.
It is important to remember that browsers only lazy load images that are currently not visible in the viewport. Usually, images on a webpage are placed along with other text that pushes them outside the viewport. You don’t need to do anything special to make sure images load lazily in this case.
However, consider our example in this tutorial where the webpage only contains images. In such a scenario, it becomes important for you to mention the size of images if you want them to load lazily. Otherwise, all the images will have zero width and zero height initially. This will make the browser think that all the images are visible in the viewport, and it will load all of them at once.
Explicitly specifying the image width and height in this case would push some images out of the viewport. You are free to specify the image dimensions by using the width and height HTML attributes or in CSS.
Here is the markup that will load the images lazily:
1 |
<img loading="lazy" src="https://picsum.photos/id/628/1080/1080" width="600" height="600"> |
As I said earlier, you can also specify the image dimensions in CSS and remove the width and height attributes from the markup:
1 |
<img loading="lazy" src="https://picsum.photos/id/628/1080/1080"> |
The corresponding CSS would be:
1 |
img { |
2 |
width: 600px; |
3 |
height: 600px; |
4 |
}
|
The following CodePen demo shows lazy loading in action:
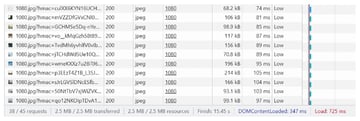
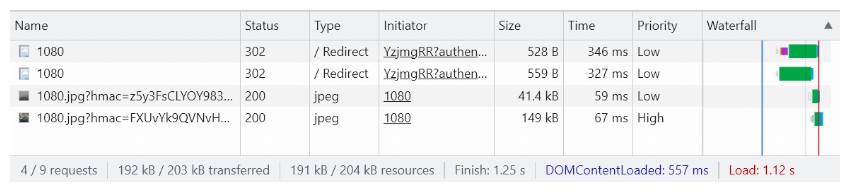
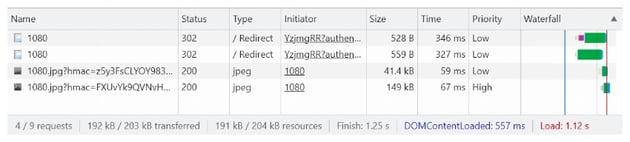
The Network tab in my browser’s developer tools shows that only four images were downloaded this time, with around 450 kB of data transfer. There are a total of 19 images on the page, which means that 15 others will be downloaded lazily. In terms of bandwidth, this translates to savings of around 80%.


One important thing to keep in mind here is that even though there is no scripting involved, lazy loading of images only works when JavaScript is enabled. This is done to prevent tracking of a user’s scroll position by strategically placed images.
How does the browser determine when it should download the images that are supposed to be loaded lazily? The exact conditions that trigger the download of lazy loaded images vary across browsers. However, two primary factors seem to be the distance from the viewport and the network speed.
If you want to control exactly when lazy-loaded images are downloaded, then you will have to use JavaScript.
Lazy Loading Images Using JavaScript
Now we will learn how to use JavaScript to load images lazily. This will give us more control over the whole process. If you think that the default lazy loading is not aggressive enough, you can create your own lazy loading script using the Intersection Observer API.
Before we write any JavaScript, we need to make some changes to our markup:
1 |
<img class="lazy-load" data-src="https://picsum.photos/id/628/1080/1080"> |
Our img tags will now contain a class called lazy-load to help us identify which images need to be loaded lazily. Instead of a src attribute, the img tags will use the data-src attribute to keep track of the image path. This prevents the image from starting the download immediately.
The Intersection Observer API allows us to detect if our target element is intersecting with any of its ancestor elements or the document’s viewport. We will use the IntersectionObserver() constructor to create our IntersectionObserver object. The constructor accepts a callback function as its first parameter and an optional object for customizing the behavior of the observer as the second parameter.
The callback function that we pass to the constructor receives two parameters. The first one is an array of the intersecting element, and the second one is the observer itself. The customization options allow you to specify the root element with which you want to check for intersection, the root margin which adds an extra offset value to the root element, and a threshold to determine when the browser should start reporting the intersection.
Here is the code for our intersection observer object:
1 |
function preload_image(img) { |
2 |
img.src = img.dataset.src; |
3 |
console.log(`Loading ${img.src}`); |
4 |
}
|
5 |
|
6 |
const config_opts = { |
7 |
rootMargin: '200px 200px 200px 200px' |
8 |
};
|
9 |
|
10 |
let observer = new IntersectionObserver(function(entries, self) { |
11 |
for(entry of entries) { |
12 |
if(entry.isIntersecting) { |
13 |
let elem = entry.target; |
14 |
preload_image(elem); |
15 |
self.unobserve(elem); |
16 |
}
|
17 |
}
|
18 |
}, config_opts); |
I have provided a margin of 200 px on all sides of our root element, or viewport in this case. Our intersection observer will become active whenever any image is within 200 px of the viewport. The threshold value is set to 0 by default. A value of zero means that the preload_image() function will be called as soon as a tiny bit of the image is within our specified bounds. The unobserve() method tells the browser to stop observing this particular image for further intersections.
The preload_image() function takes the value of the data-src attribute for our image and applies it to the src attribute. This triggers a download of our image.
All we need to do now is query all the images in our document and then tell the observer to observe them all for intersection. Here is the code that achieves this for us.
1 |
let images = document.querySelectorAll('img.lazy-load'); |
2 |
|
3 |
for(image of images) { |
4 |
observer.observe(image); |
5 |
}
|
Did you notice that we are using the img.lazy-load selector for querying our images? This class helps us easily identify all the images that we want to load lazily. Images without this class will be loaded normally.
Here is a CodePen demo to see if our images are indeed loading lazily or not.
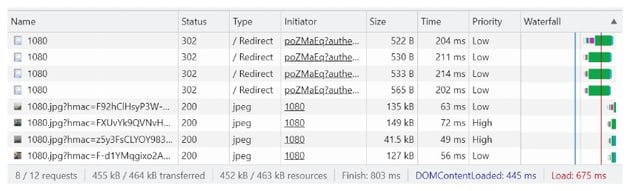
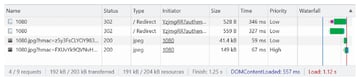
This time, the Network tab in my browser’s developer tools shows that only two images were downloaded beforehand, with a total data transfer of about 192 kB. Our bandwidth savings have now gone up to 92% compared to our original demo.
I will admit that I have made the intersection observer very aggressive to only load images that are very close to the viewport. However, that’s the beauty of implementing the functionality yourself.
Final Thoughts
Loading images lazily is a win-win for everyone. It will reduce the load on your server while saving users’ bandwidth. Remember that data, especially mobile data, is quite expensive in some places in the world.
Now that browsers come with native support for loading images lazily, it is just a matter of making minor changes to your markup to take full advantage of the feature. The browsers are also smart enough to determine the ideal time when they should lazy load an image based on network speed and image location. You can also implement the functionality yourself relatively easily with the use of the Intersection Observer API.
One important thing to keep in mind here is that none of these techniques will work if JavaScript is disabled on the user’s end.