What You’ll Learn in This Tutorial
- How to make the Grand Theft Auto background
- How to make palm trees with brushes in Adobe Illustrator
- How to make a building in perspective in Adobe Illustrator
Tutorial Assets
You’ll need the following resources in order to complete this project:
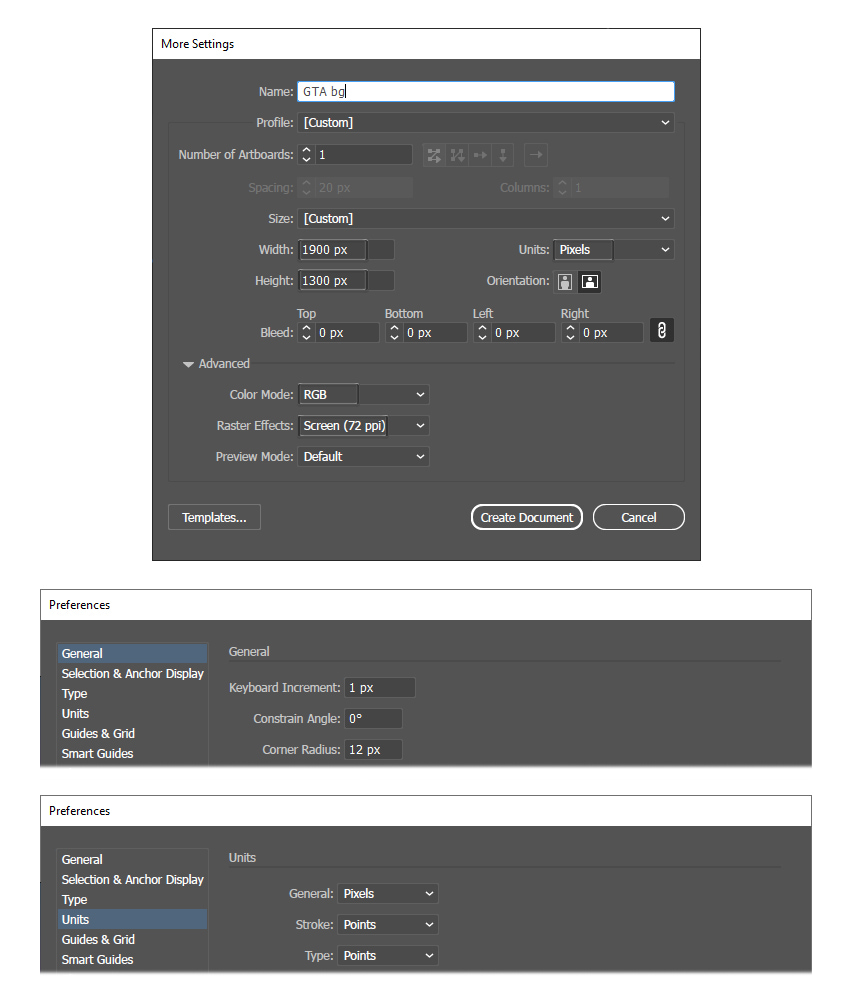
1. How to Make a New Document in Adobe Illustrator
Launch Illustrator and go to File > New to open the New Document window. There, type the name of the document and set up the dimensions as shown. Keep the Units set to Pixels and the Color Mode to RGB. Once you’re done, hit Create Document.
In the image below, you can see the other settings that I prefer to use while working in Illustrator. You can access them by going to Edit > Preferences.
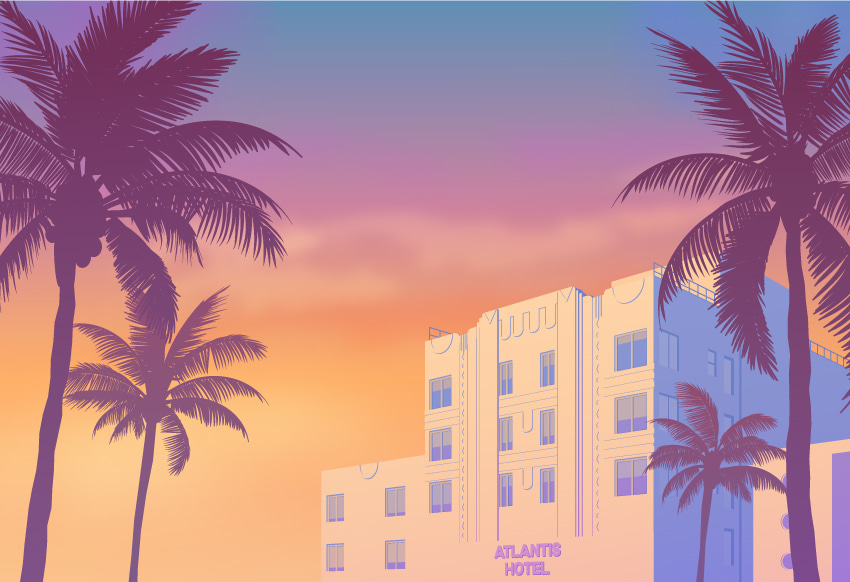
2. How to Make the Grand Theft Auto Background
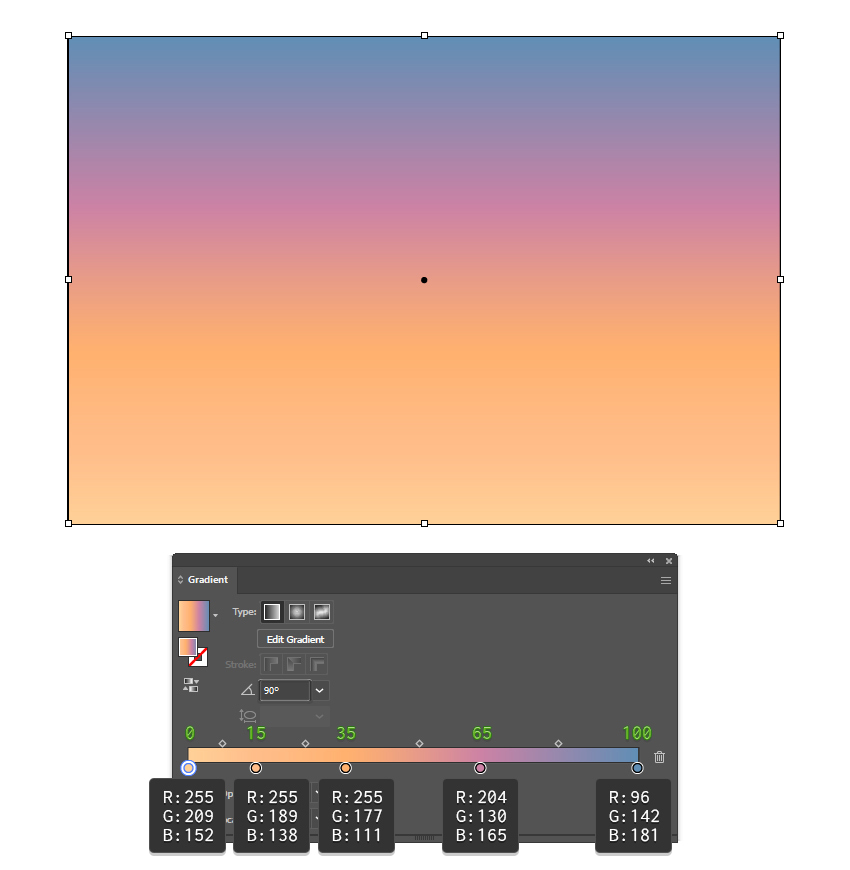
Step 1
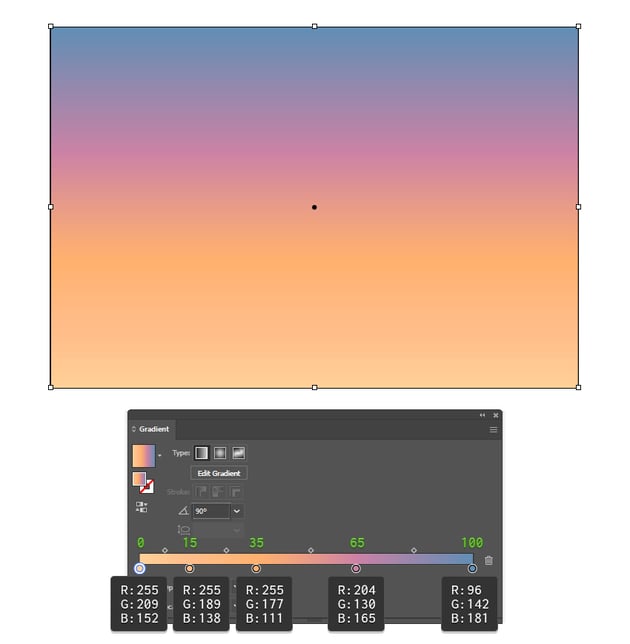
Grab the Rectangle Tool (M) and draw a rectangle the size of your artboard, which is 1900 x 1300 px. Fill it with the multicolor gradient shown below, and set the Angle to 90 degrees.

Step 2
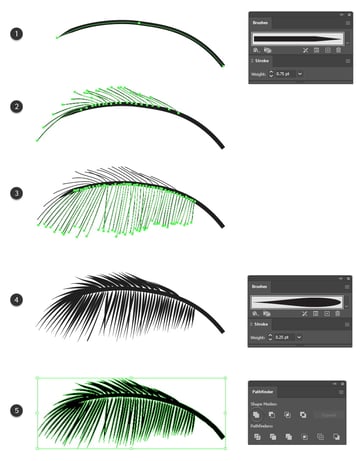
We will add more details to the GTA background later. Now, let’s make the palm trees. The image below features four brush strokes that can be used successfully to make vector palm trees.
First, use the Pen Tool (P) or the Pencil Tool (N) to draw a slightly curved path on your artboard. Now, let’s go over the best brush-stroke options that are available in Illustrator.
With these brushes, you can create pretty realistic palm tree silhouettes in your designs. Let’s start drawing them.
Step 3
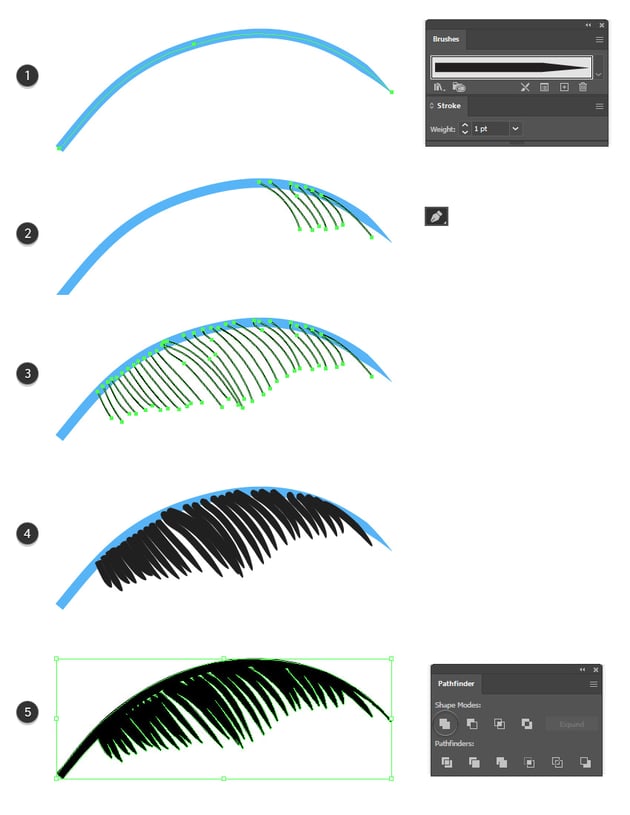
Use the Pen Tool (P) to draw a curved path for the stem of the leaf, and give it a 1 pt Stroke using the Tapered -Sharp Art Brush (1). Find it in the Brush Libraries Menu > Artistic > Artistic_Ink section. The stroke color is not important (1).
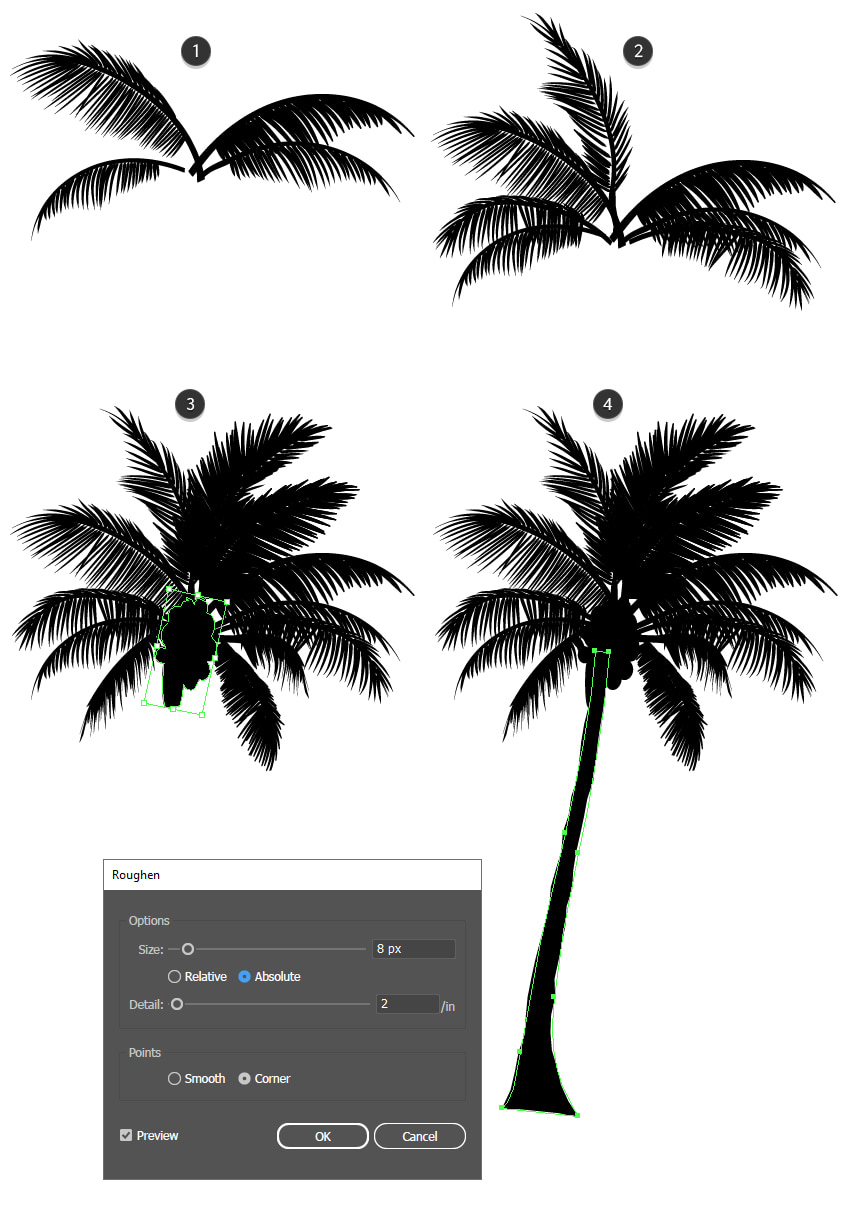
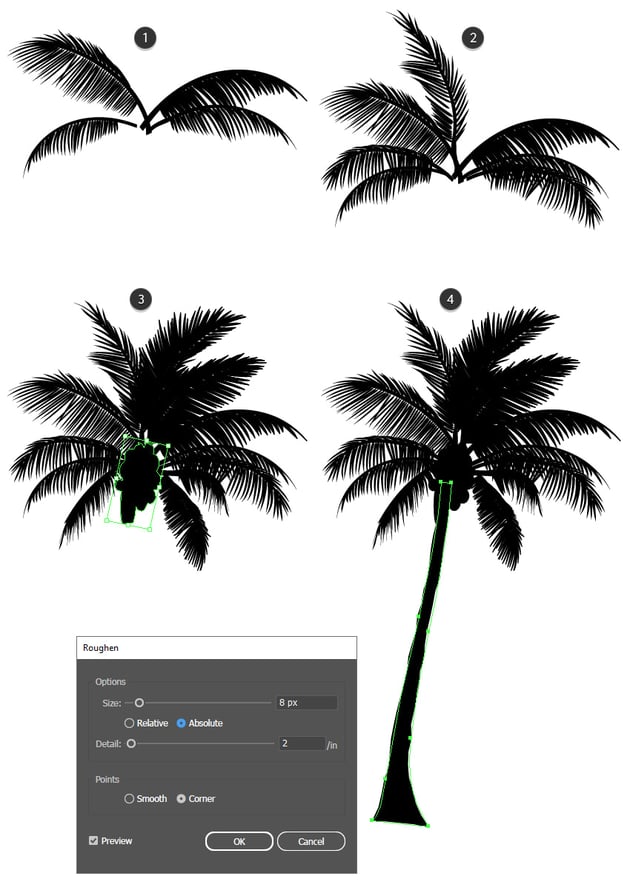
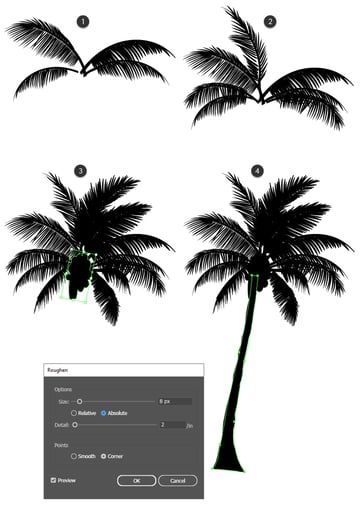
Still using the Pen Tool (P), or the Pencil Tool (N) which is even easier, start to draw a bunch of paths below the stem, from the tip (2) to the other end (3). The more paths you draw, the fuller the leaf will be in the end. It’s totally up to you. Once you’re done, stroke all the paths with one of the options shown in the previous step, or feel free to mix them and create your own unique palm leaf. I used option 2, the Tapered – Round Art Brush to stroke all the paths (4). Next, select the entire leaf and go to Object > Expand Appearance, followed by Unite in the Pathfinder panel (5).


Step 4
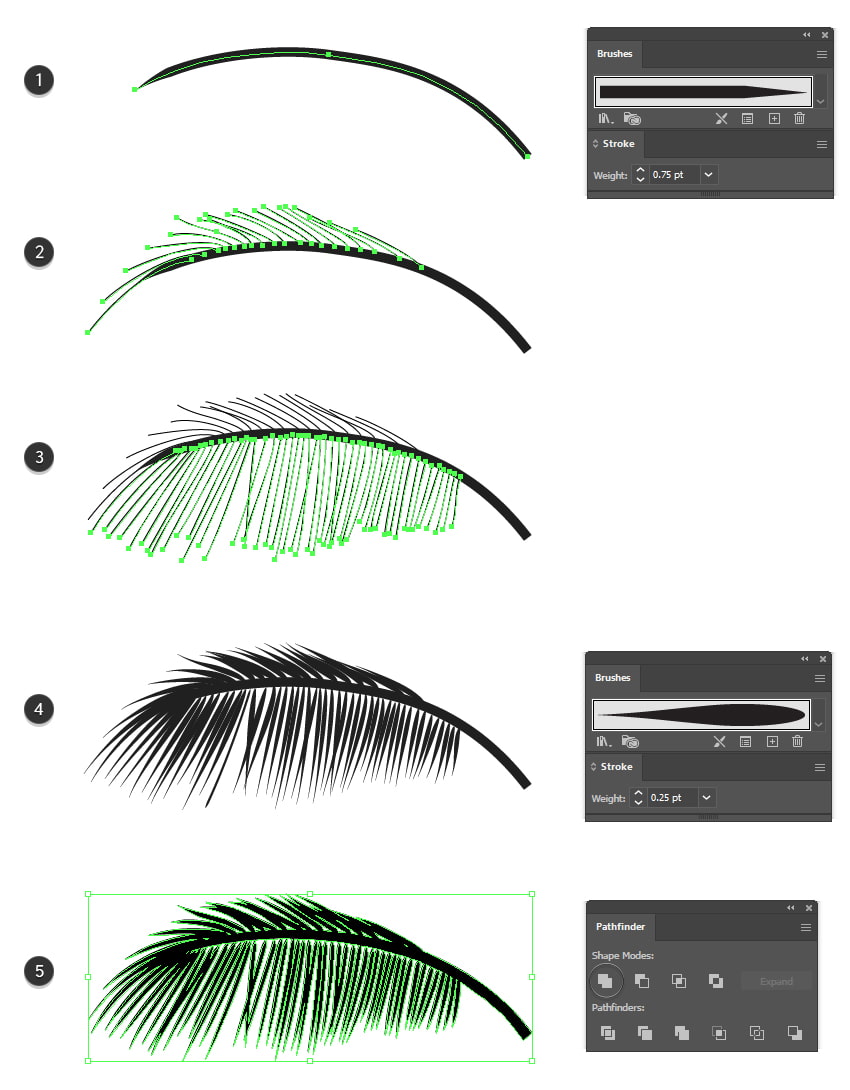
Let’s create another type of leaf. First, use the Pen Tool (P) to draw the stem, and give it a 0.75 pt Stroke using the Tapered -Sharp Art Brush (1). Begin to draw paths above the stem as shown below (2) and then complete the leaf at the bottom (3). Stroke all the paths with option 1, the Drop Up Art Brush, with the Stroke Weight set to 0.25–0.5 pt (4). Once you’re happy with how it looks, go to Object > Expand Appearance followed by Unite in the Pathfinder panel (5).
Step 5
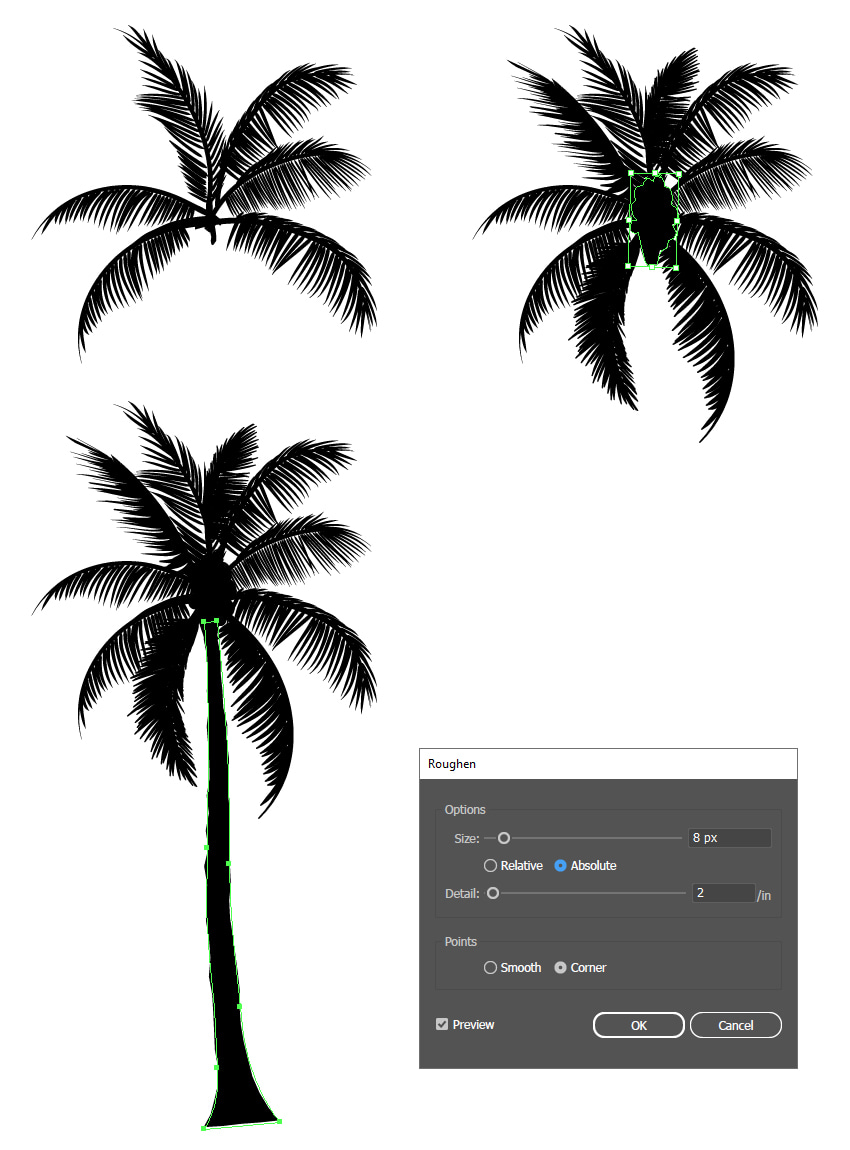
Create more palm leaves in the same way, or duplicate the one you made so far (1). Start to arrange them and compose the palm tree (2). Next, draw the shapes of the coconuts that will cover the ends of all the stems (3) followed by the trunk. To make the shape of the trunk more organic and irregular, go to Effect > Distort & Transform > Roughen and apply the settings shown. Adjust these settings depending on the size of the trunk. Follow up with Object > Expand Appearance (4).
Step 6
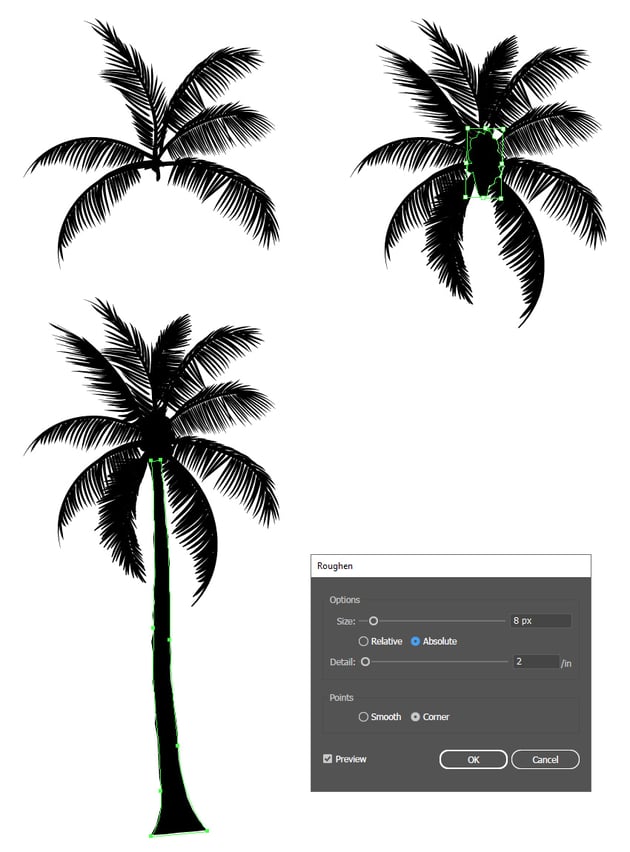
Go ahead and create another palm tree by duplicating the leaves and arranging them in a different way. Once that’s done, draw the shape in the center to cover the stems and add the trunk to finish it.
Step 7
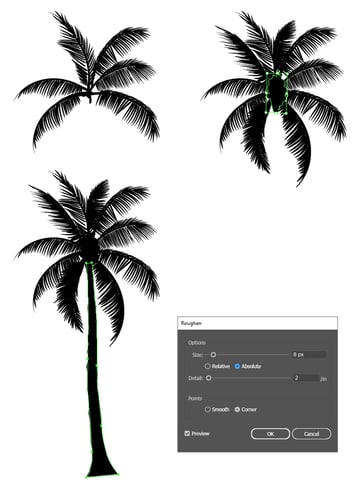
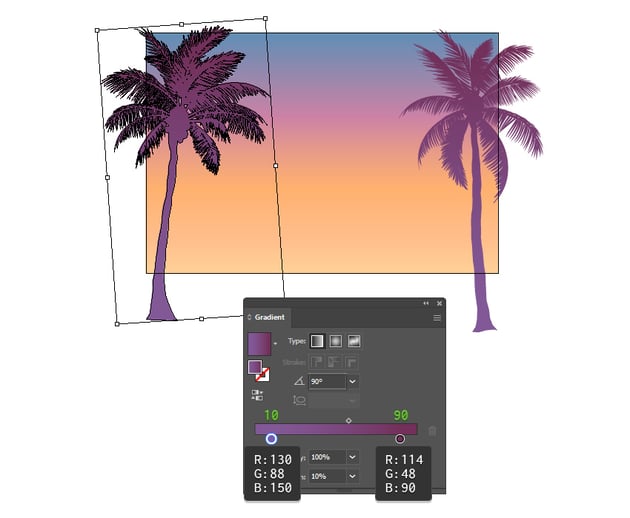
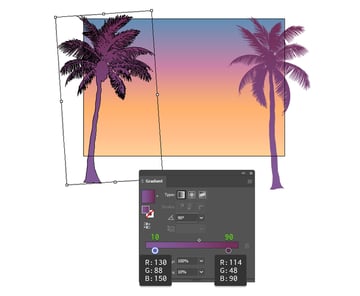
Select all the shapes that make up the first palm tree and click on Unite in the Pathfinder panel followed by Object > Compound Path > Make. Fill the newly obtained palm silhouette with the purple linear gradient shown and set the Angle to 90 degrees. Scale it, if needed, and position it on the left side of your GTA background.
Do the same thing with the second palm tree and position it on the right side of the artboard.

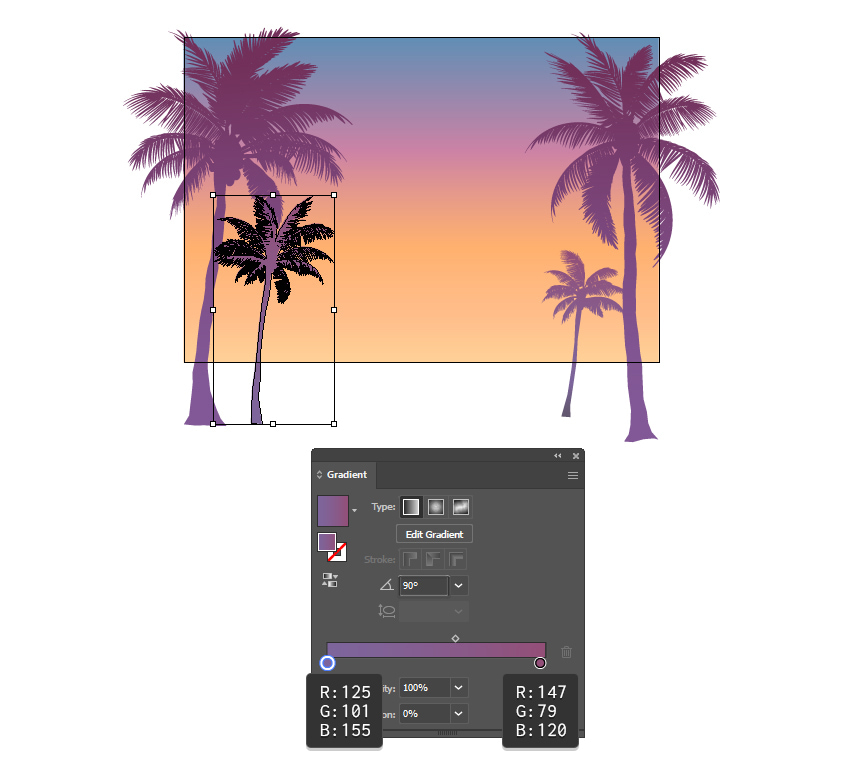
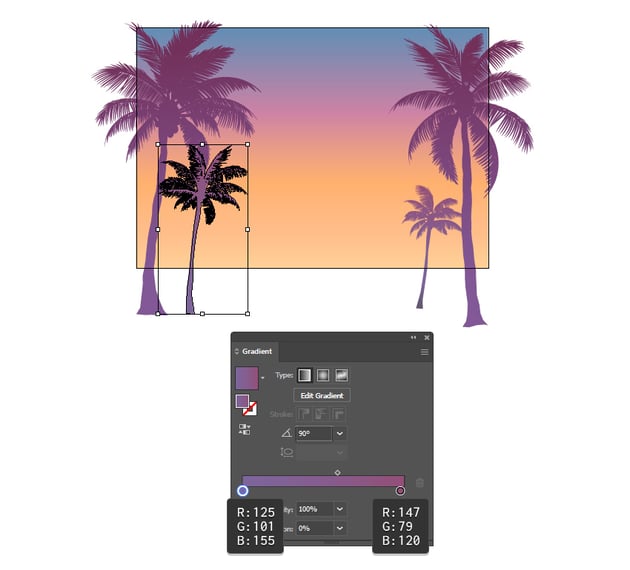
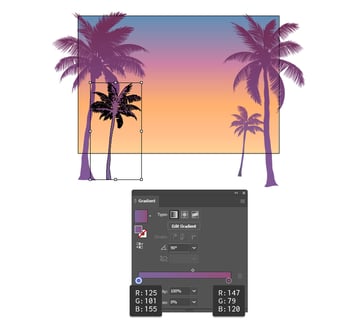
Step 8
Add two more palm trees, but smaller. Color them with the linear gradient shown at a 90 degree Angle.
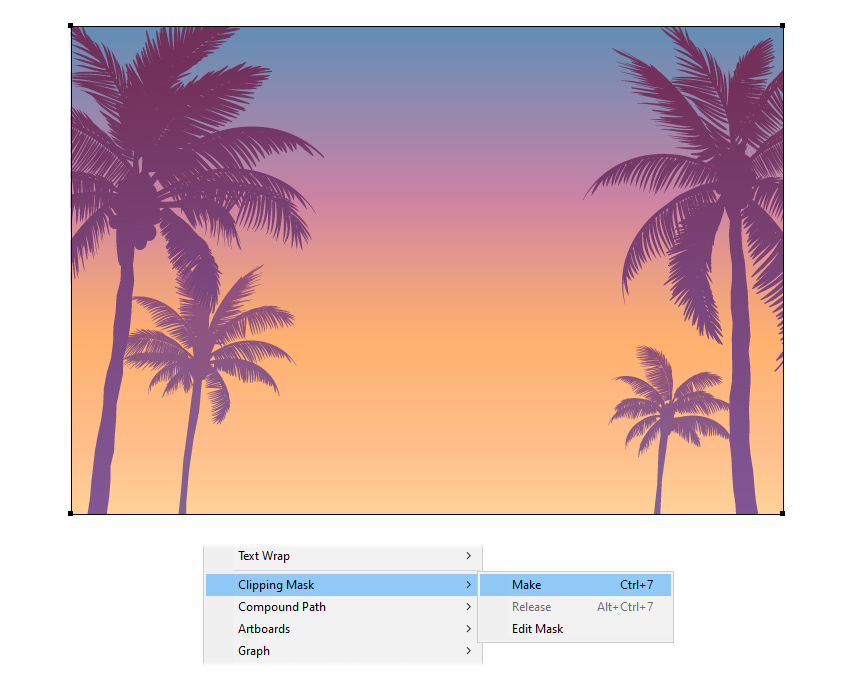
Step 9
Copy and Paste in Place (Shift-Control-V) the background and remove the gradient fill. Select the four palm trees along with the copy and go to Object > Clipping Mask > Make.


Step 10
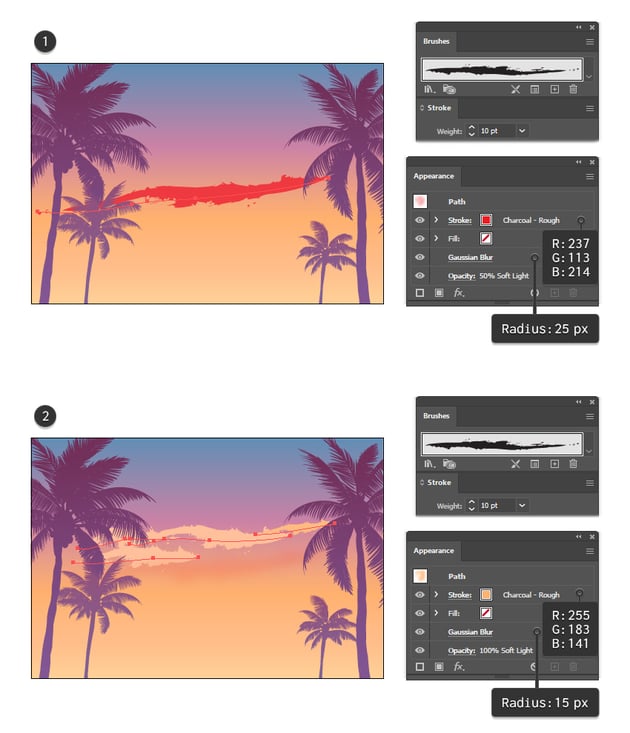
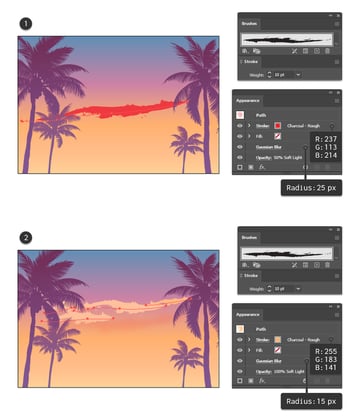
Improve the look of your Grand Theft Auto background by adding a few brush strokes to the sunset sky. Use the Pen Tool (P) to draw a path as shown in the image below, going almost through the middle of the artboard. Give it a 10 pt Stroke using red and the Charcoal – Rough Art Brush that you can find in the Brush Libraries Menu > Artistic > Artistic_ChalkCharcoalPencil section. Next, go to Effect > Blur > Gaussian Blur and apply a Radius of 25 px; then set the Blending mode to Soft Light and 50% Opacity (1).
Draw four more paths of different lengths above the red path. Give them a 10 pt Stroke using orange and the Charcoal – Rough Art Brush. Apply a 15 px Gaussian Blur and then set the Blending mode to Soft Light (2).

Step 11
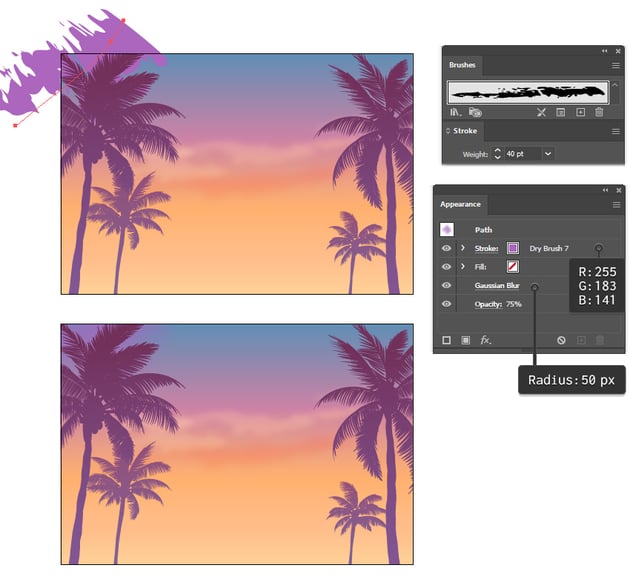
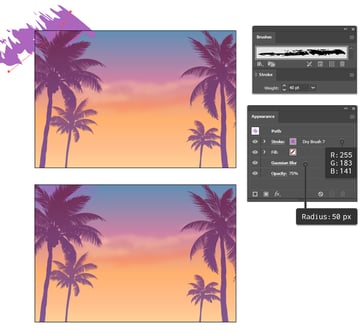
Draw a new path in the upper left corner of the artboard. Give it a large 40 pt Stroke using purple and the Dry Brush 7 that you can find in the Brush Libraries Menu > Artistic > Artistic_Paintbrush section. Apply a 50 px Gaussian Blur and reduce the Opacity to 75%.
Feel free to add as many of these stroked paths as you want, depending on how many details and clouds you want in your GTA 6 background. Make it your own.

3. How to Make a Building in Perspective in Adobe Illustrator
Step 1
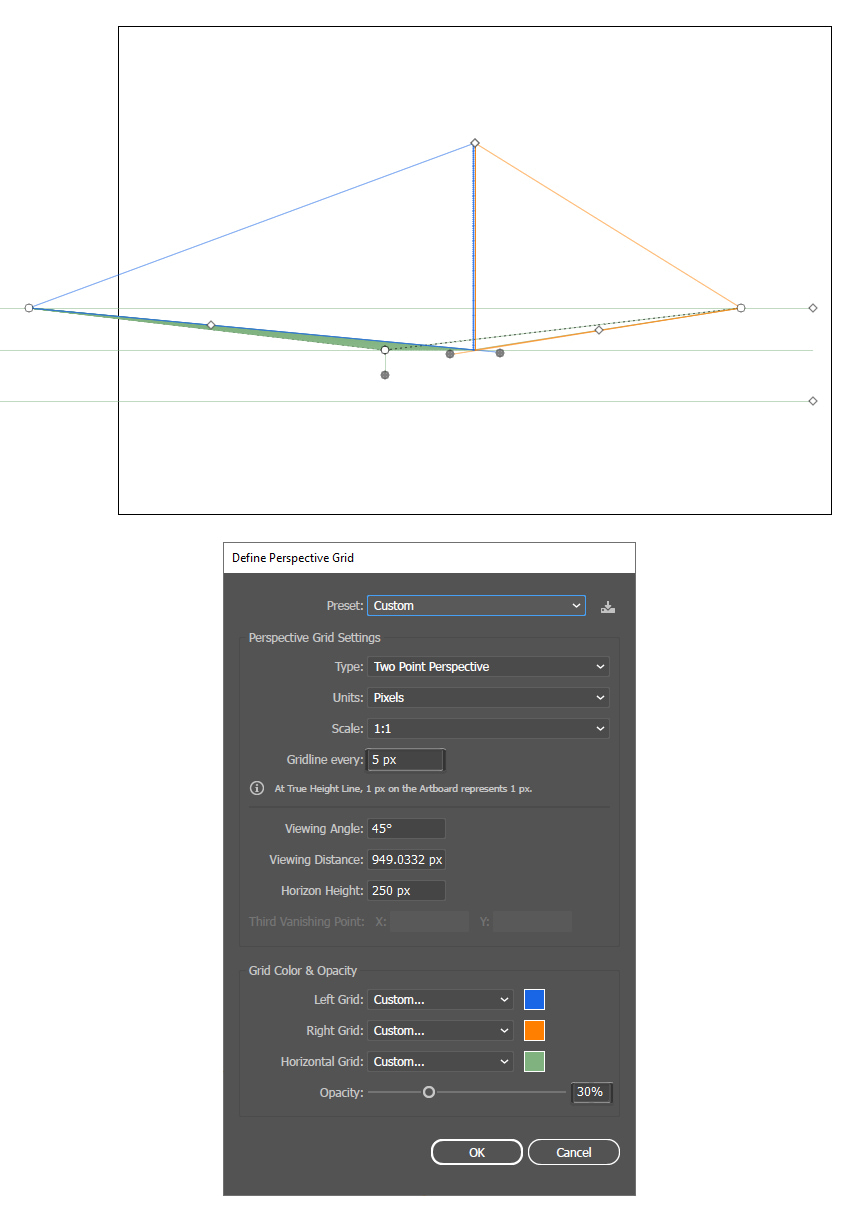
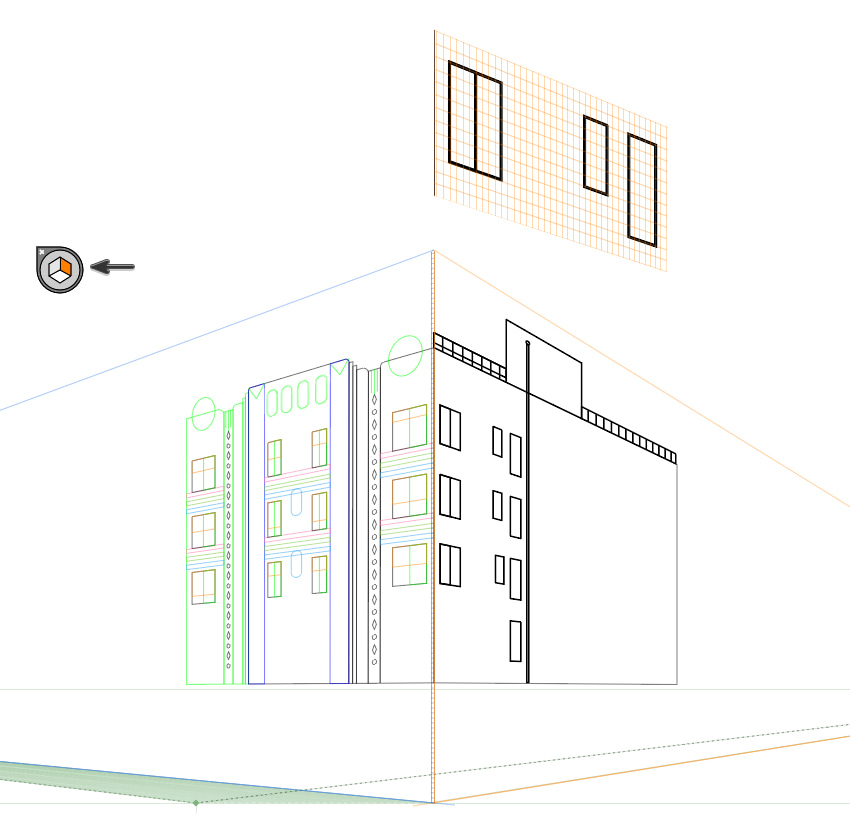
Locate the Perspective Grid Tool (Shift-P) in your Toolbar and grab it. Also, notice the Perspective Selection Tool (Shift-V), which we’ll use too. The grid will appear on your artboard as shown in the image below. If you can’t see the grid, go to View > Perspective Grid > Show Grid. Also, make sure to check Snap to Grid.
The grid can be set up and changed to meet your needs. Let’s take a closer look at the different handles and the grid itself.
- To change the height of the perspective grid, move the top handle (highlighted with red) up or down.
- To change the bottom perspective, move the bottom handle (highlighted with purple) upwards.
- To change the perspective itself and the viewing angle, slide the handles highlighted with blue and orange left or right.
- To change how far your grid extends into the distance, slide the two diamond handles highlighted with yellow.
- To change the number of squares that you have on your grid, move the diamond handle highlighted with green up or down. Use large squares for simple drawings and smaller squares for more detailed drawings.
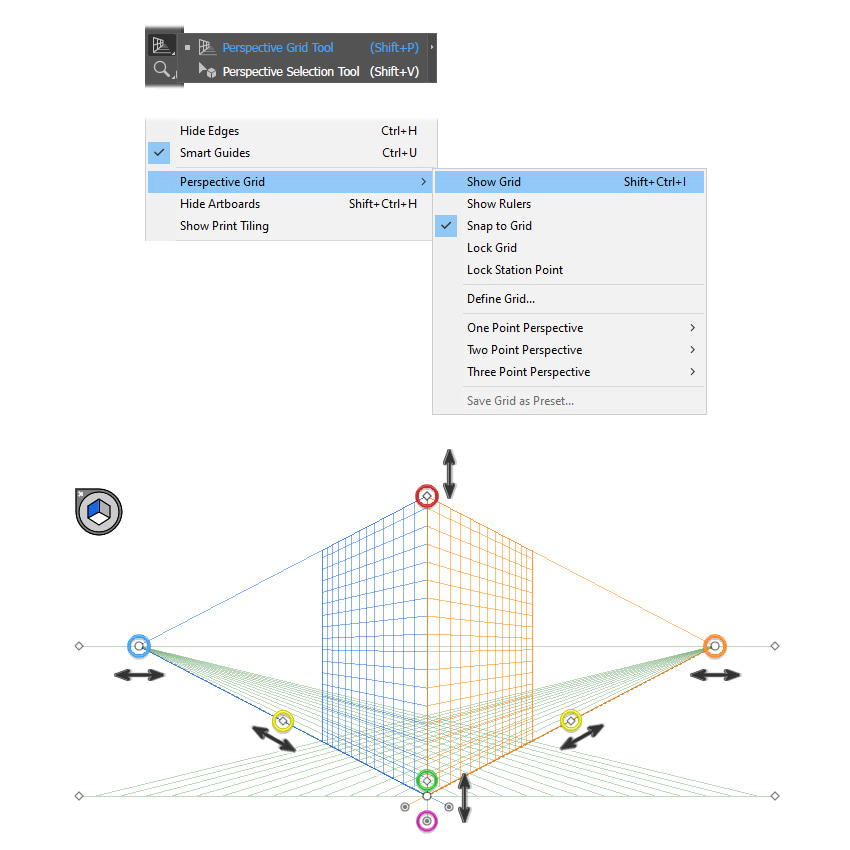
The Perspective widget appears on your artboard too, and you need it while drawing. It’s the cube symbol that shows you on which side of the perspective grid you are actively drawing: the Left Grid (Blue), Right Grid (orange), or Horizontal Grid (green bottom). Switch between them with the Perspective Grid Tool (Shift-P).
Step 2
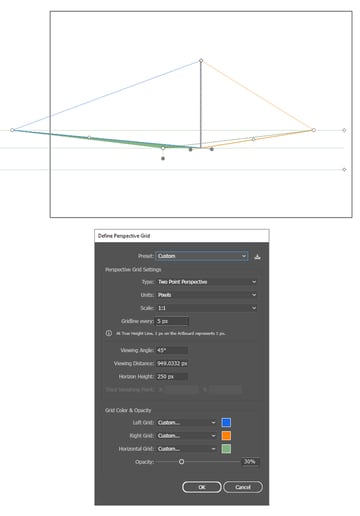
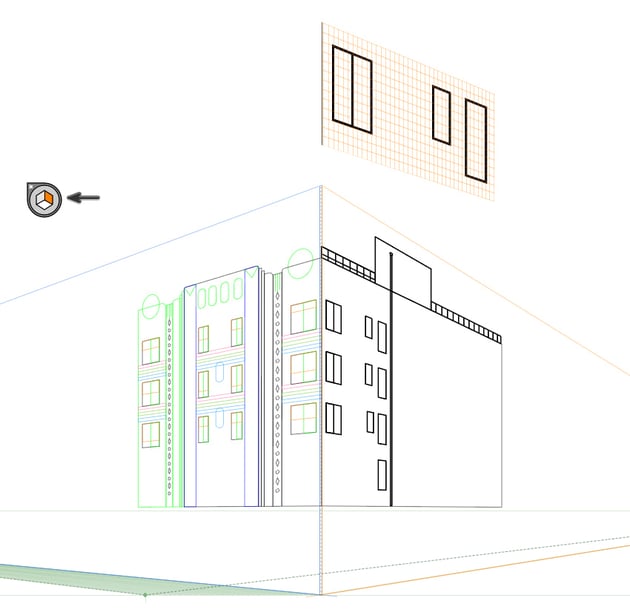
In the image below, you can see how I set up my grid. I’ve moved both the left and right handles further away and raised the bottom perspective.
You can also see more settings by going into the perspective grid menu. Open it by going to View > Perspective Grid > Define Grid. Here, you can manually change the Type, Units, Scale, Viewing Angle, the colors of the grid, and much more. What I set up here is:
- Gridline every: 5 px
- Opacity: 30%

Step 3
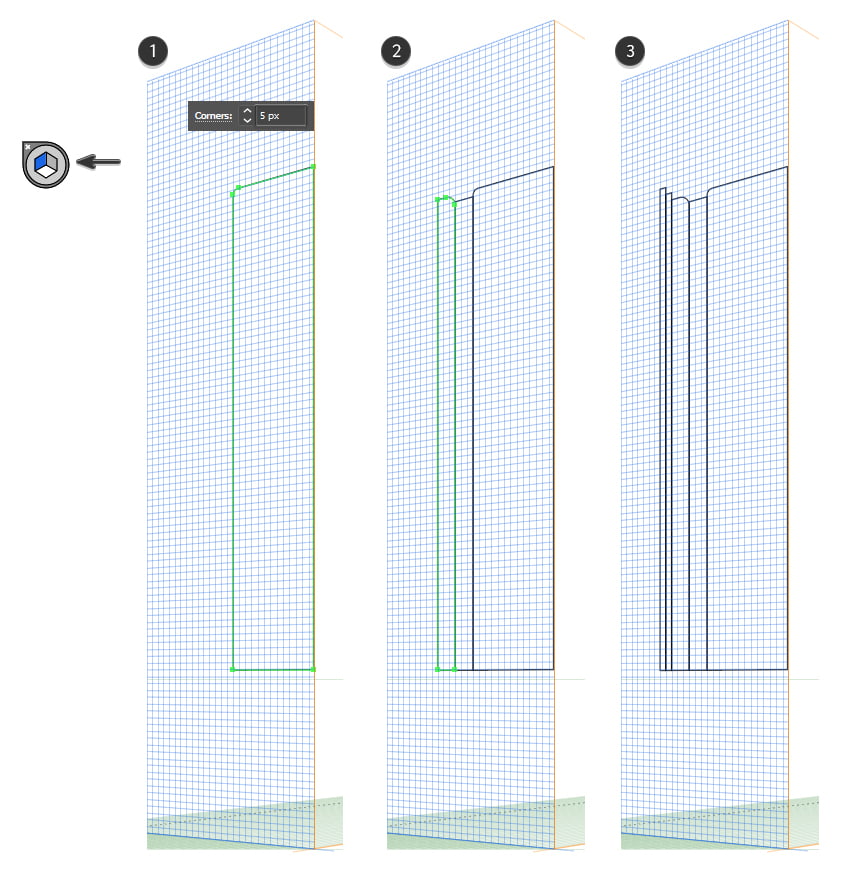
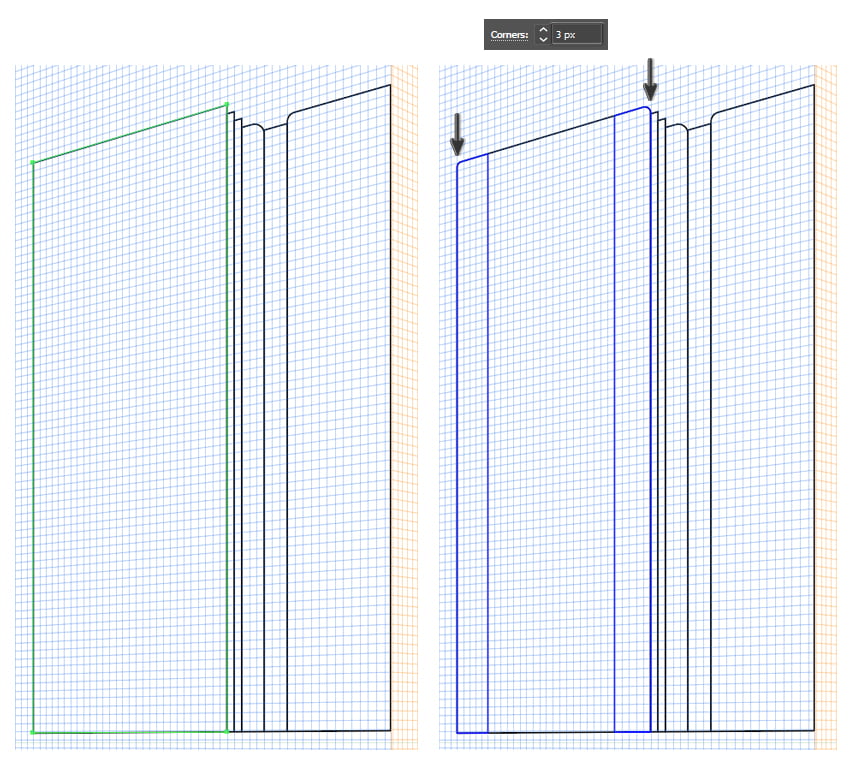
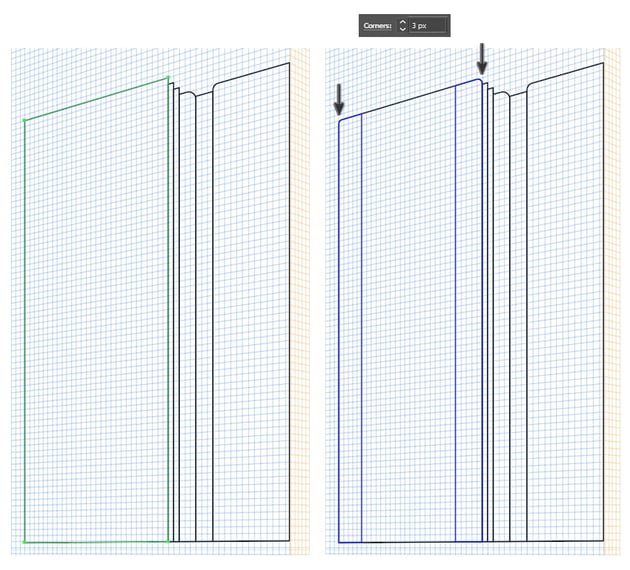
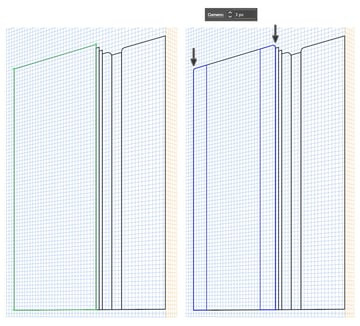
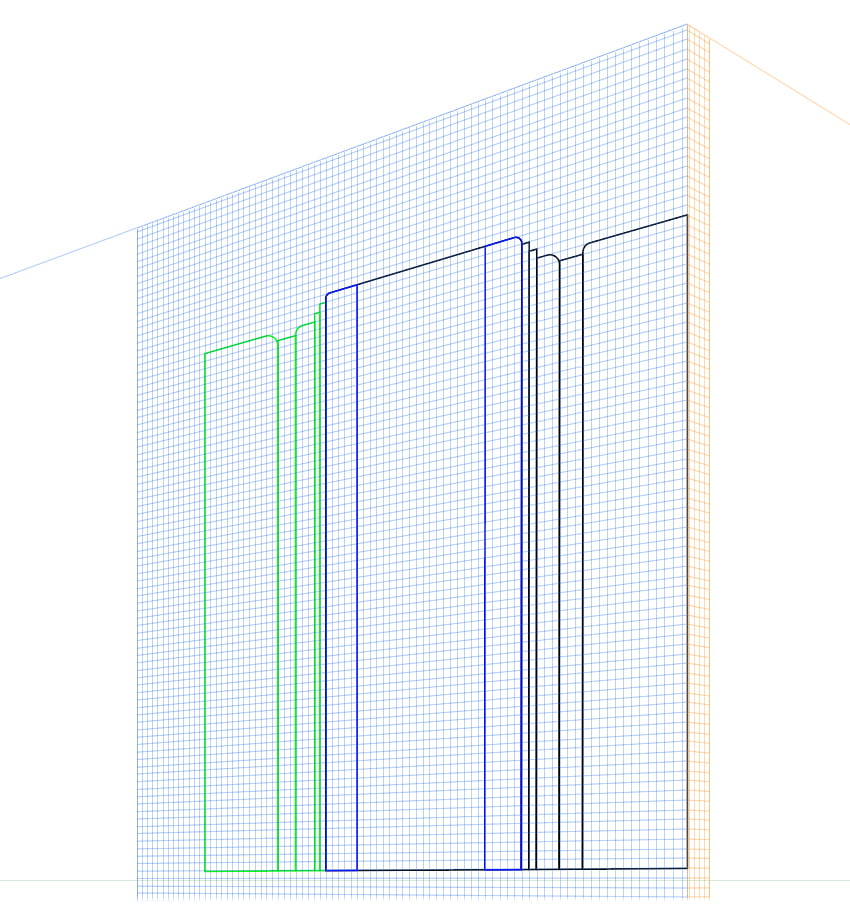
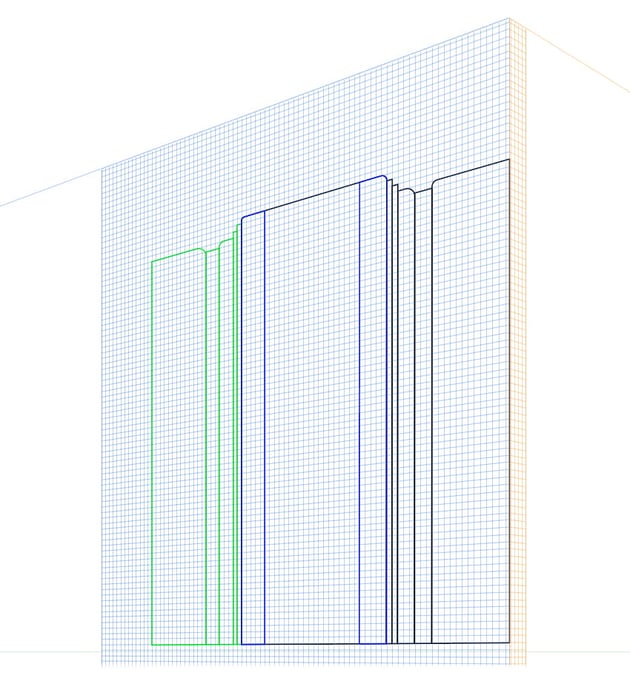
While you’re on the Left Grid (blue side), take the Rectangle Tool (M) and draw the first shape of the building. Make it 13 squares wide. Next, select only the top-left corner point using the Direct Selection Tool (A) and type 5 px in the Live Corners field located up in the Control panel (Window > Control) to make it rounded (1).
Draw the next two rectangles, 3 squares wide. Select only the top-right corner point of the third shape with the Direct Selection Tool (A), and round it by 5 px as well (2). Continue to draw two thin rectangles, 1 square wide, which are taller than the others, as shown below (3).

Step 4
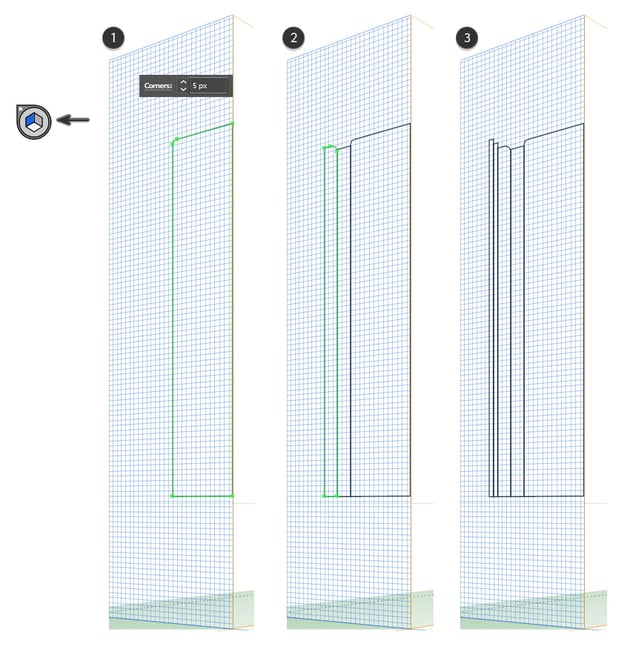
The next big rectangle is the front of the building and is 29 squares wide. On the right and left sides of this rectangle, draw smaller rectangles of 5 squares width that overlap it (the blue shapes). Switch to the Direct Selection Tool (A), use it to select only the top corner points, and round them by 3 px.
Step 5
Now, draw the left side of the building in the same way and following the same sizes. This is basically a reflection of the right side, but unfortunately you can’t flip it. All the shapes have to be drawn according to the perspective grid.

Step 6
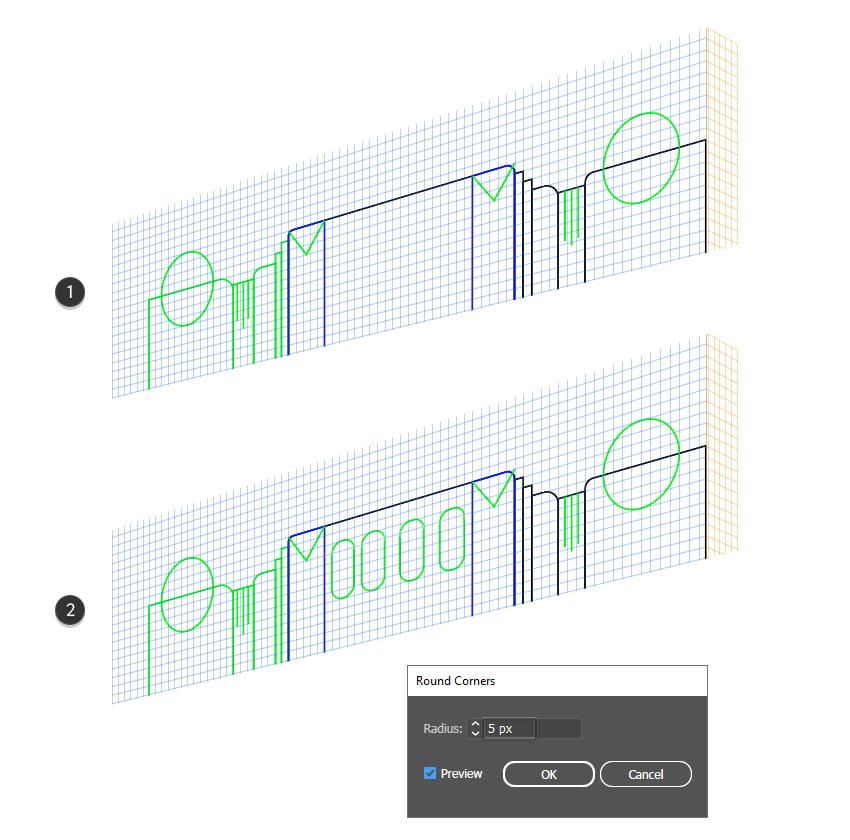
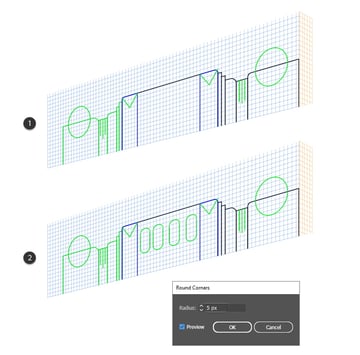
Focus on the top of the building, and let’s add some decorative elements. Use the Ellipse Tool (L) to draw two circles on the first and last shapes, and then switch to the Pen Tool (P) and use it to draw three straight paths on the second and second to last shapes. Also add two V-like paths at the top of the blue rectangles (1).
Next, using the Rectangle Tool (M), draw four rectangles that are 6 squares in height in the top middle of the facade. Go to Effect > Stylize > Round Corners and apply a Radius of 5 px to make them rounded. (2).

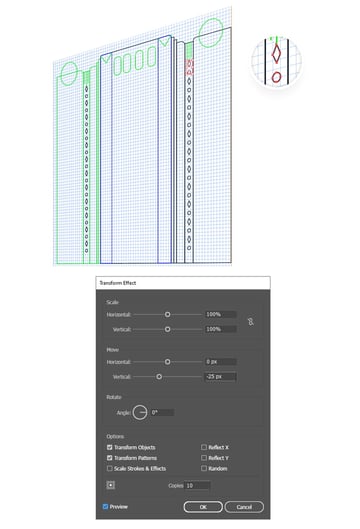
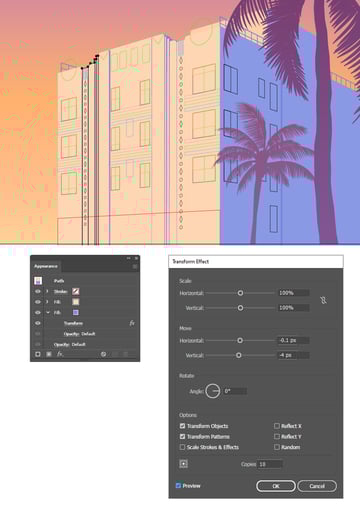
Step 7
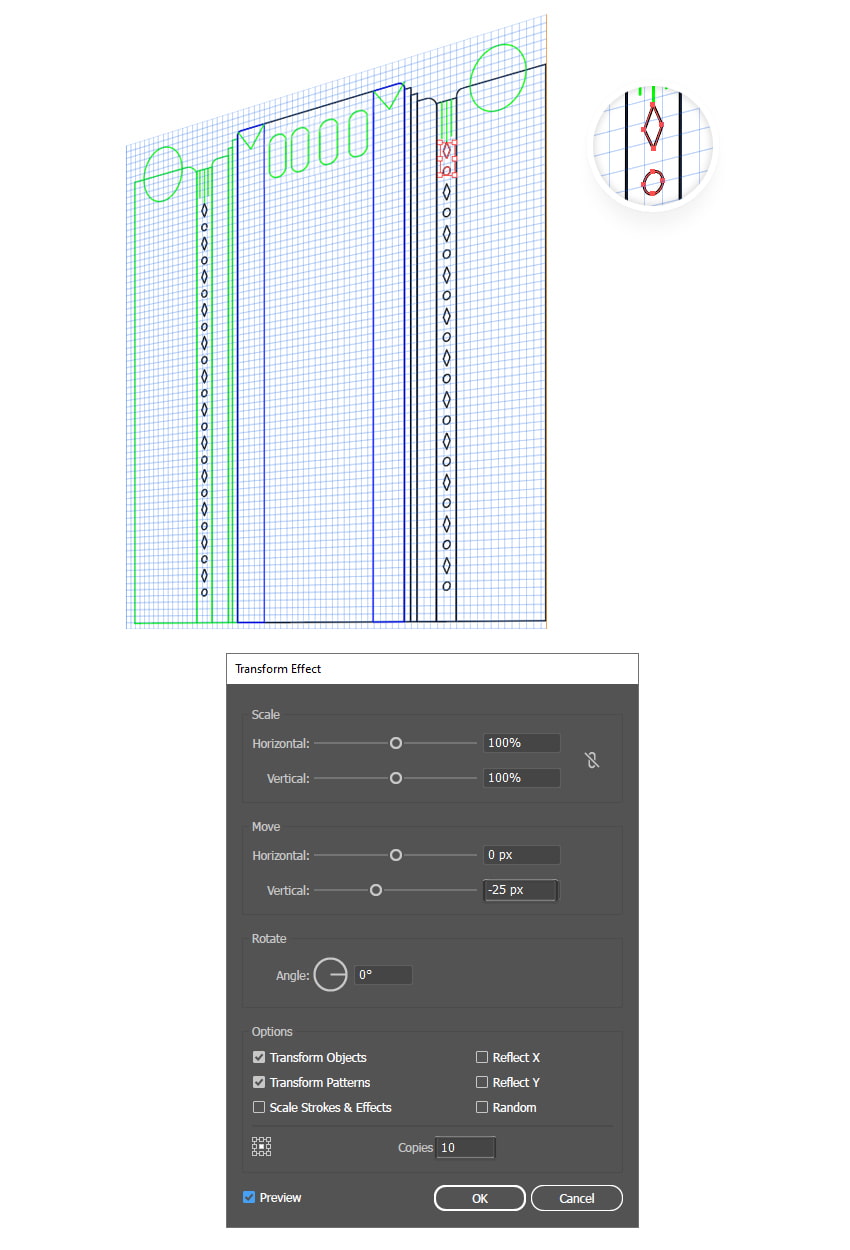
Zoom as much as needed on the top of the second building shape and draw a diamond shape using the Pen Tool (P) and a circle using the Ellipse Tool (L). While the two shapes stay selected, go to Effect > Distort & Transform > Transform and apply the settings shown. This will multiply the shapes vertically. Follow up with Object > Expand Appearance.
Repeat the same process for the corresponding building shape from the left side.

Step 8
It’s time to draw the windows in perspective. Use the Rectangle Tool (M) to draw the big shape of the window, then the green rectangle that is half its size, followed by the shape of the window blind at the top. Also, add three long rectangles of 1 square in height under the window (the red, green, and blue shapes).
Draw the rest of the windows in the same way, and also add two rounded rectangles in the center of the building for decorative purposes, just like the ones at the top.
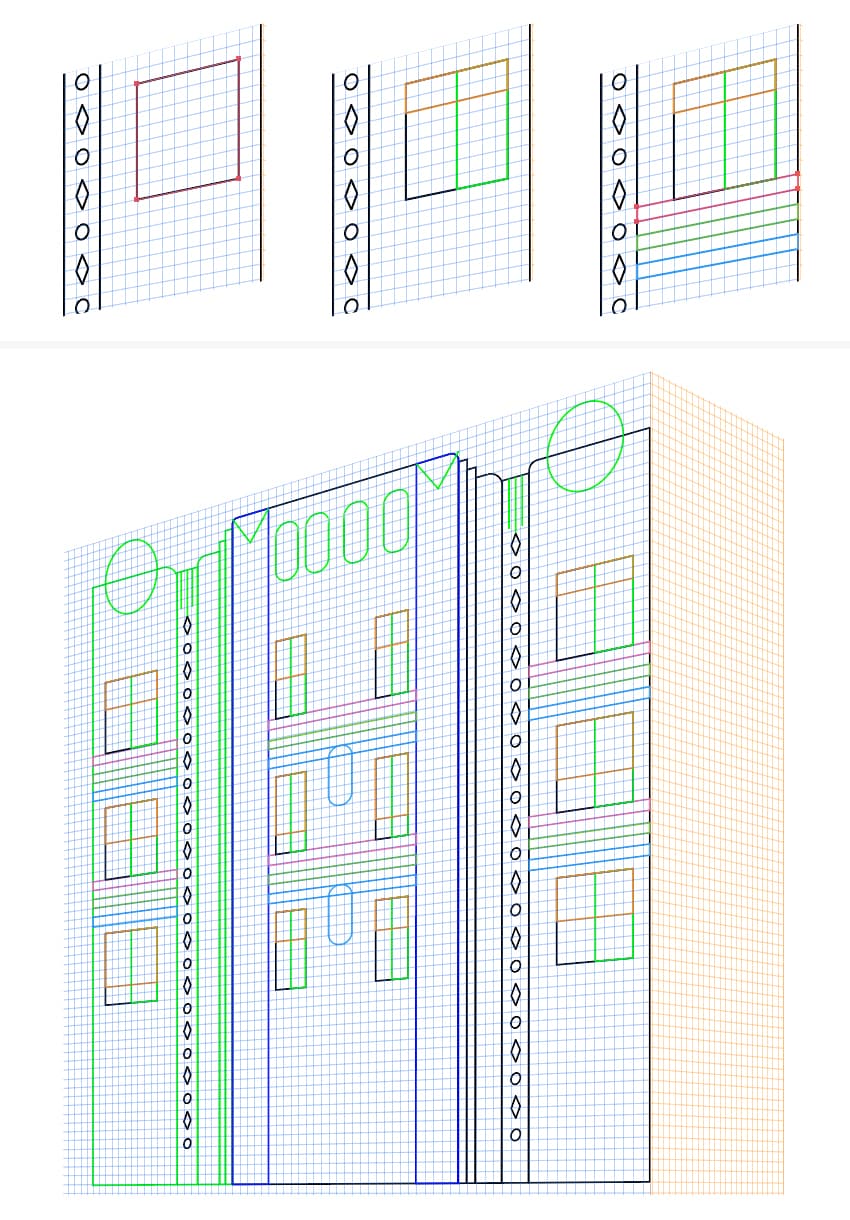
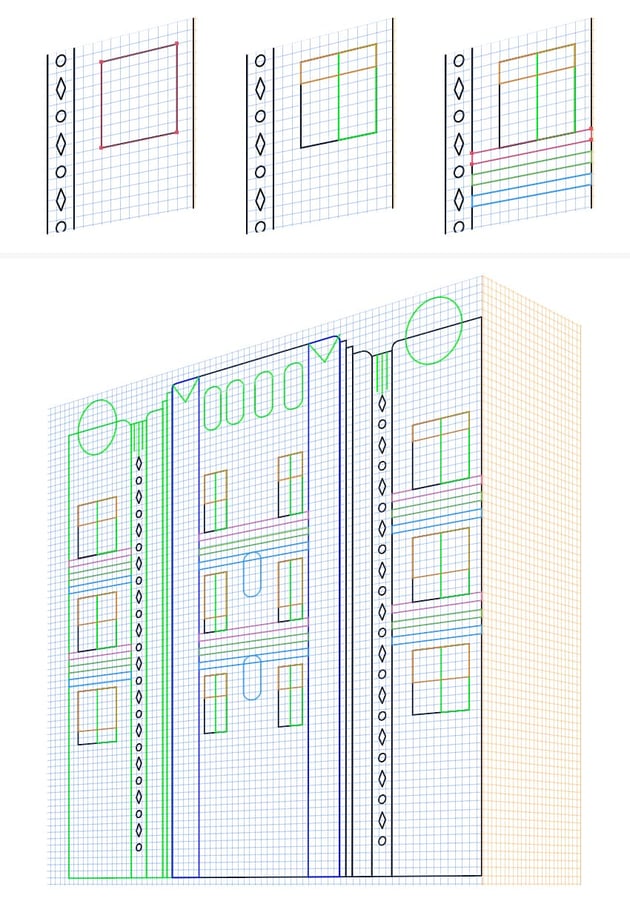
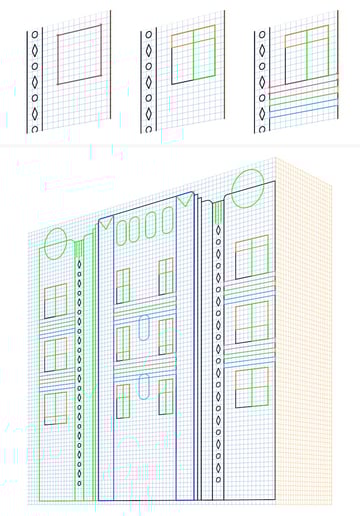
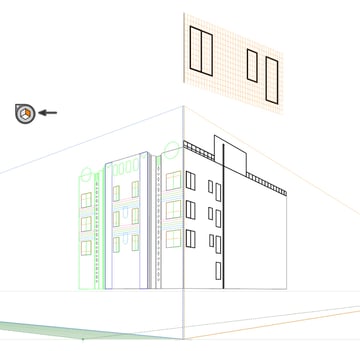
Step 9
At this point, the front of the building is done, and we’ll continue with the side. First, grab the Perspective Grid Tool (Shift-P) and activate the Right Grid (orange). Everything that you draw from now on will match and snap to the orange grid. As you’ve done so far, use the Rectangle Tool (M) to draw basic shapes like the wall, the windows, and the railing.
Step 10
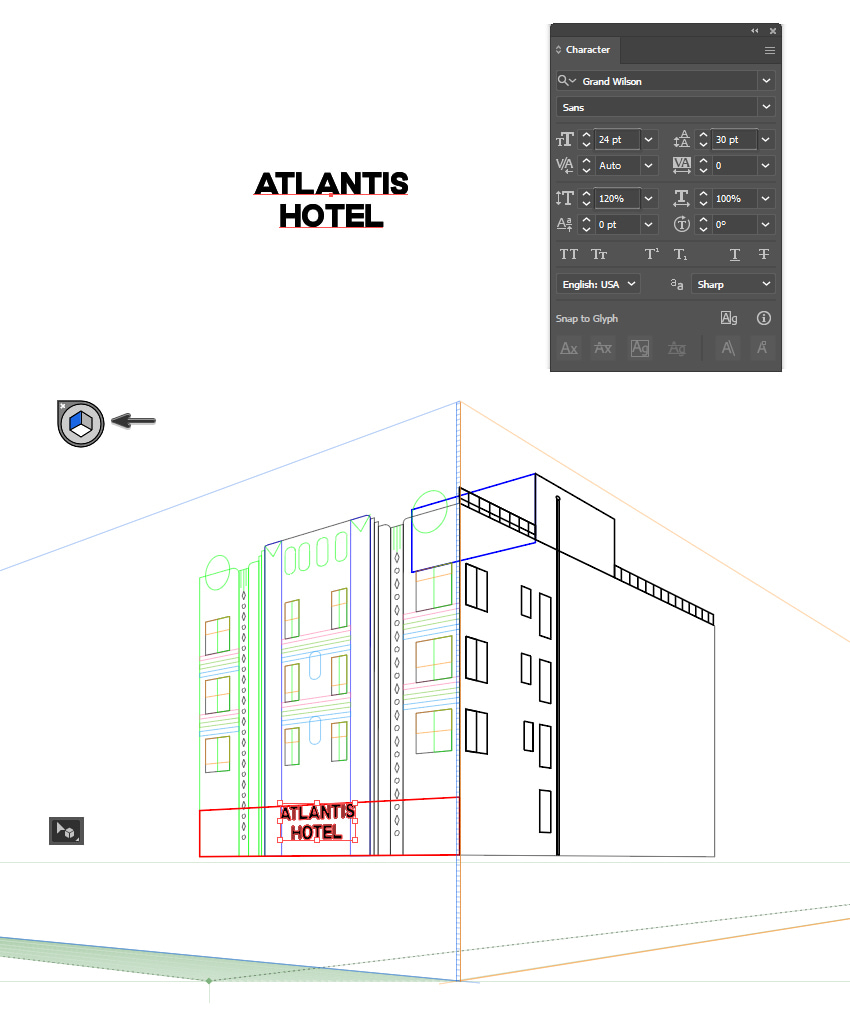
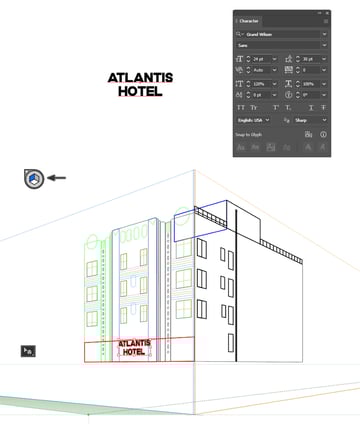
Switch back to the Left Grid (blue) with the Perspective Grid Tool (Shift-P). Draw the blue rectangle at the top of the building and make sure to send it to the back by going to Object > Arrange > Send to back (Shift-Control-[). Next, draw the red rectangle at the bottom, which will be in front of everything.
To add the name of the hotel, first take the Type Tool (T) and write ATLANTIS HOTEL on your artboard using the Grand Wilson font. Here are the settings I used:
- Size: 24 pt
- Set the leading: 30 pt
- Vertical scale: 120%
Next, grab the piece of text with the Perspective Selection Tool (Shift-V) and drag it onto the red rectangle, centered. The tool will magically transform it into perspective text.

4. How to Color the GTA 6 Building
Step 1
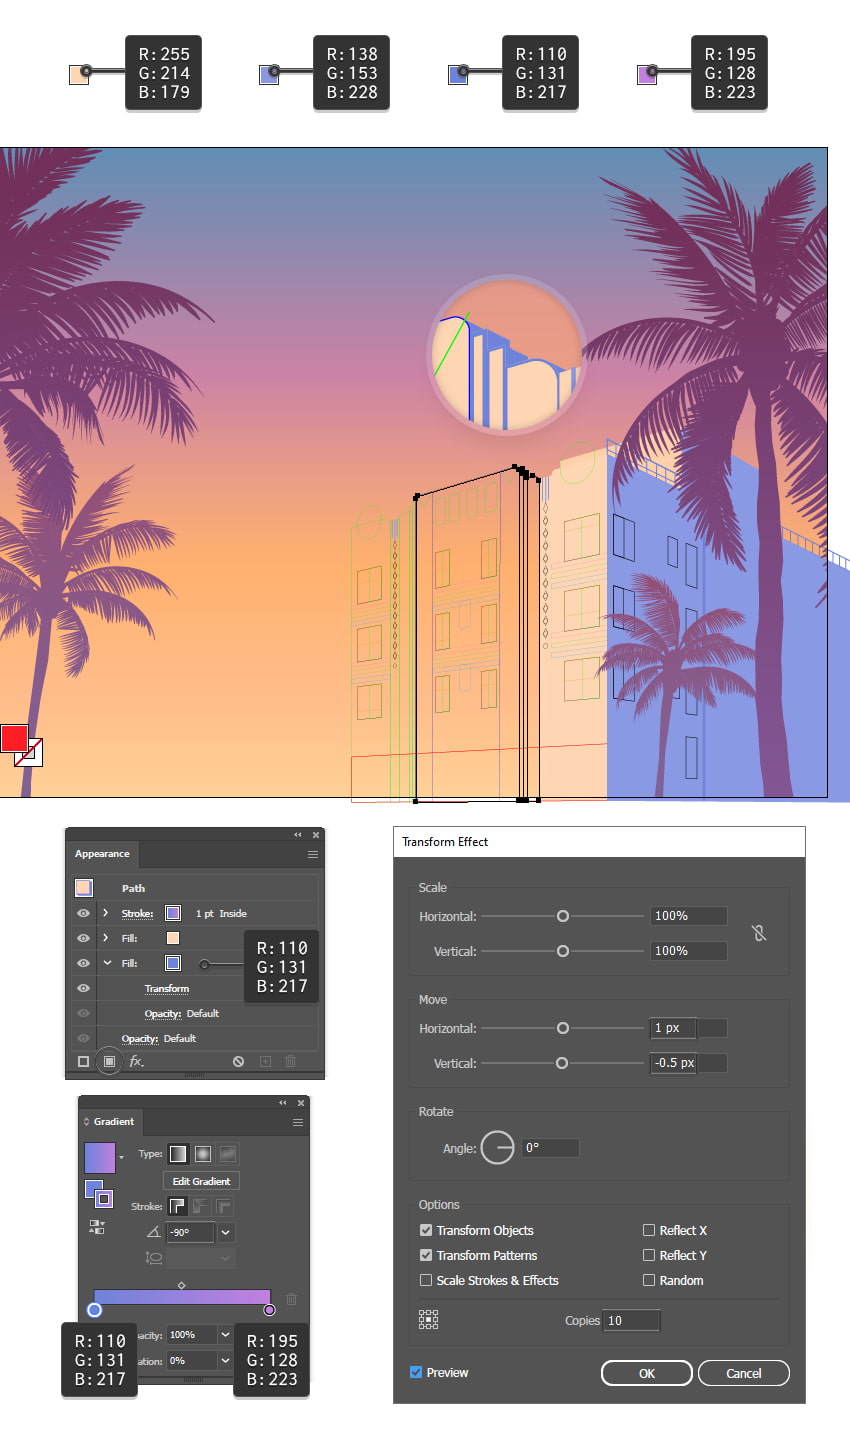
The drawing of the building is done, and now we can color it. In the image below, you can see the color scheme used in the coloring process of the building: a beige color, two shades of blue, and purple. Use these colors and start filling the shapes.
For the four shapes selected in the image below, apply the beige fill, and then add a second blue fill underneath by clicking on the Add New Fill icon at the bottom of the Appearance panel. While this Fill attribute stays selected, go to Effect > Distort & Transform > Transform and apply the settings shown. Hit OK. As a result, you will obtain the appearance of a 3D extrusion, making the building look three-dimensional. Also, apply a 1 pt Inside Stroke using the linear gradient shown. This will create the blue-to-purple shading that you see in the original GTA 6 graphics.


Step 2
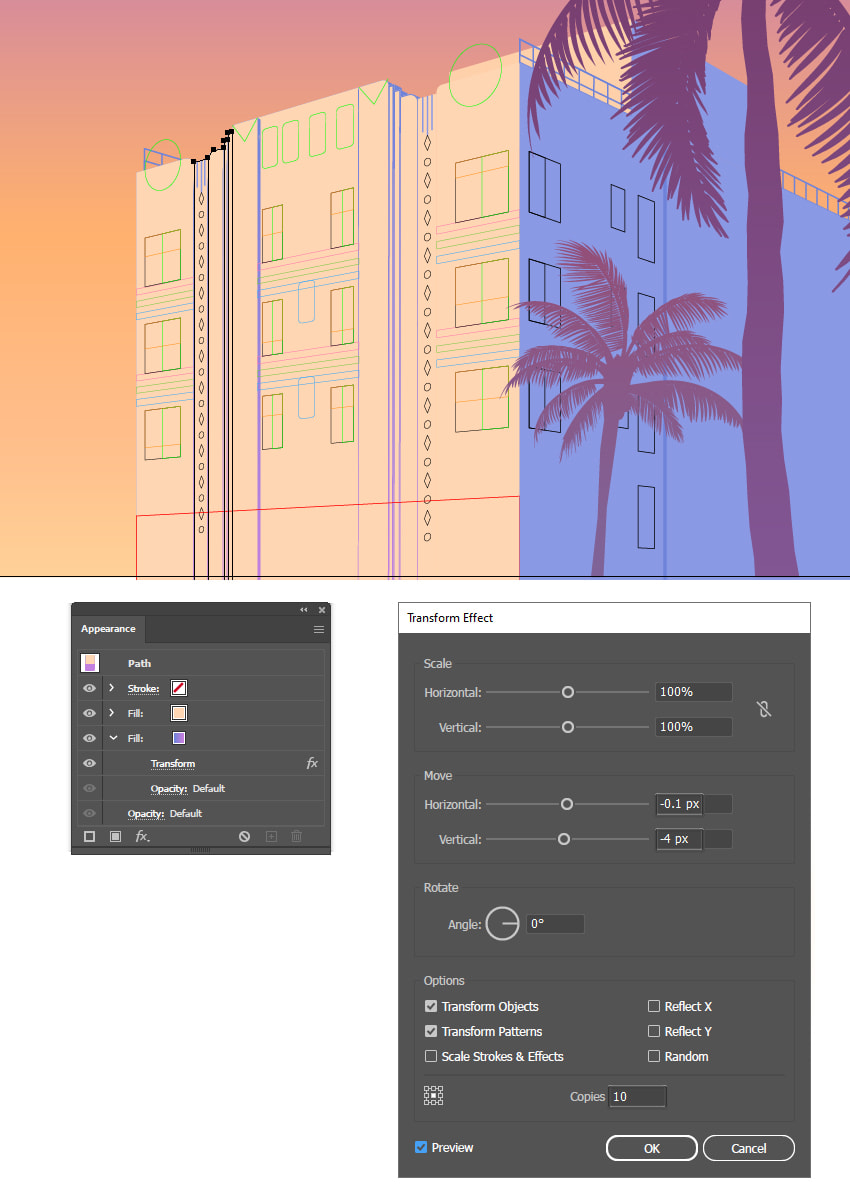
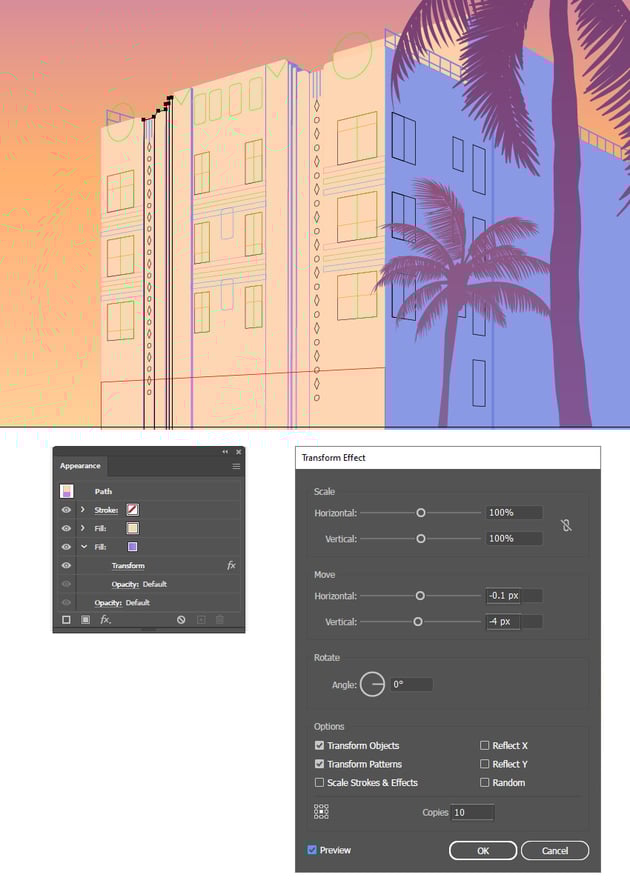
Now, color the corresponding building shapes from the left side in a similar way. First, apply the beige fill color. Add a second fill underneath, and use the same blue-to-purple linear gradient from the previous step; then apply a Transform effect as shown.
Step 3
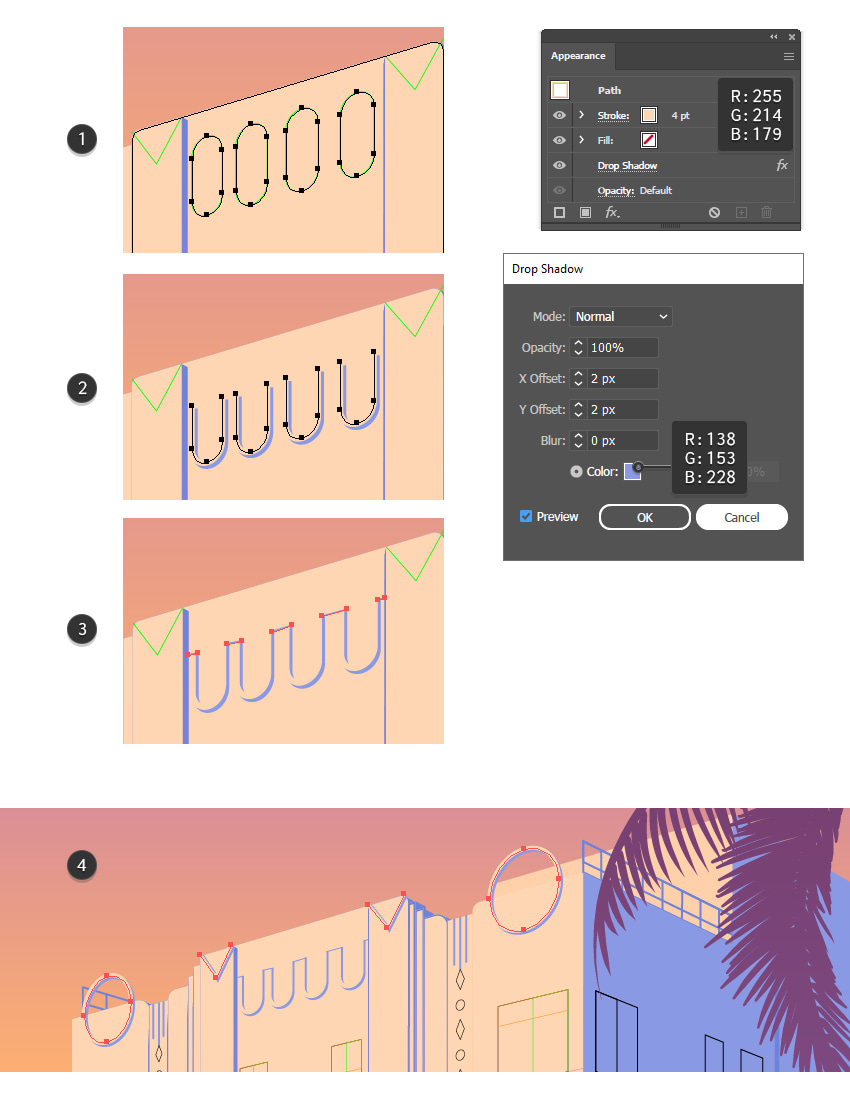
Focus on the four rounded rectangles at the top of the facade. Go to Object > Expand Appearance to expand the Round Corners effect (1); then use the Direct Selection Tool (A) to select only the top points, and delete them by pressing the Delete key on your keyboard.
Apply a 4 pt Stroke to the newly created U paths using beige and a blue shadow by going to Effect > Stylize > Drop Shadow (2). Complete the design by drawing short paths to connect the end points. Give them a 1 pt blue Stroke (3).
Apply the same settings for the two circles and the V paths (4). After that, mask each shape using the corresponding building shape from underneath.

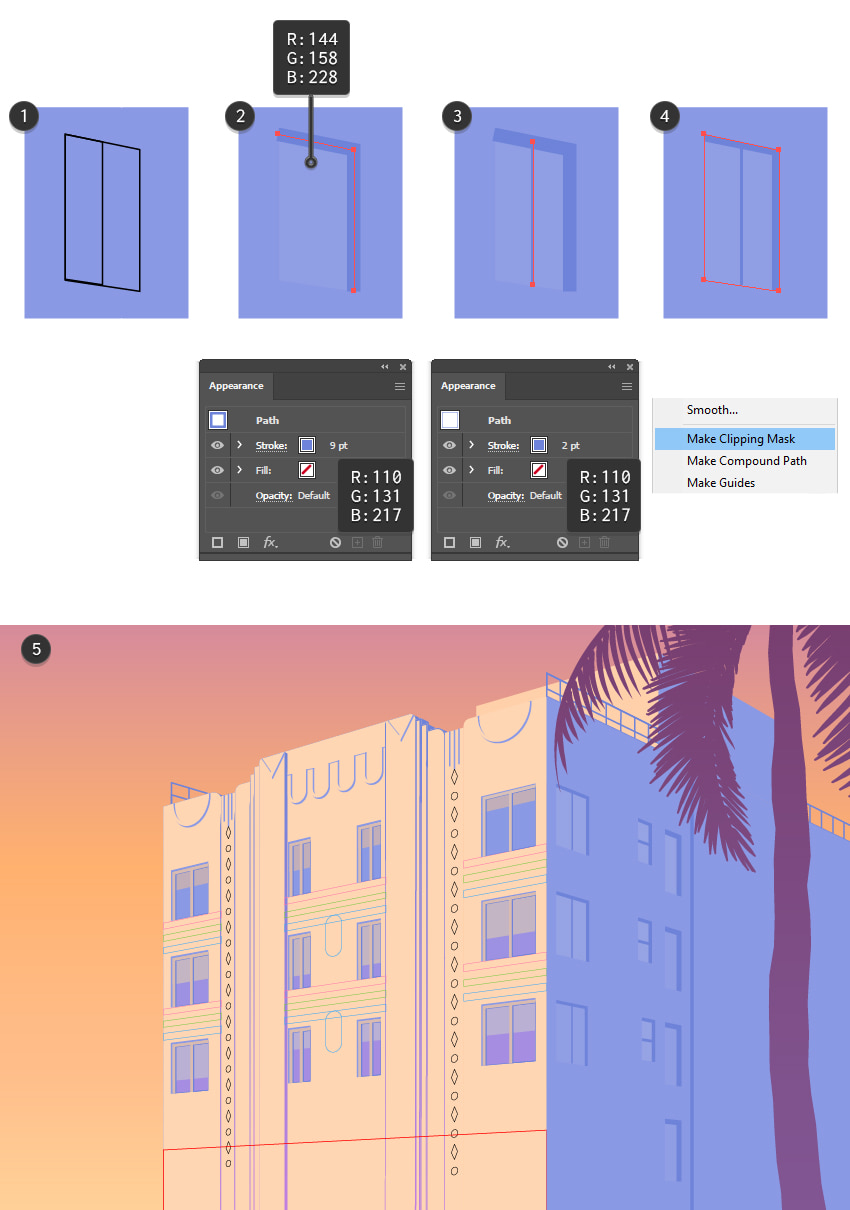
Step 4
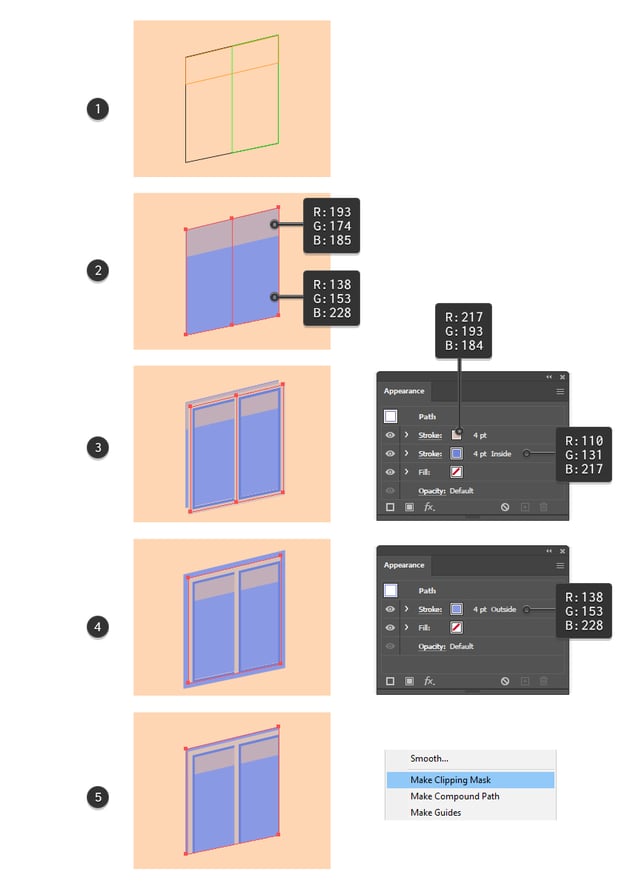
It’s time to color the windows of the building. Select the big shape of the window along with the green half (1) and color them with blue. For the blind, choose a dark beige/taupe color (2). Copy and Paste in Place (Shift-Control-V) the two blue shapes and remove the existing fill color. Apply a 4 pt Stroke using beige and a 4 pt Inside Stroke using blue. Move these two copies 4 px to the right and 4 px downwards by pressing the arrow keys on your keyboard. These will be the frame of the window (3).
Next, Copy and Paste in Place (Shift-Control-V) the big shape of the window and change the blue fill to a 4 pt Outside Stroke. Move this copy 2 px to the right and 2 px downwards to create a shadow. Let’s mask everything by making another copy in place of the big window shape; then select all the shapes that make up the window and go to Object > Clipping Mask > Make (5).


Step 5
Apply the same style and settings for the rest of the windows. Also, change the fill color of the window shapes from blue to a purple shade as you make the first-floor and second-floor windows.
Step 6
The windows on the side wall are even easier to make. First, select the bigger window shape along with the half shape (1) and color them with a lighter tint of blue. Copy the bigger window shape and Paste in Place (Shift-Control-V), and then using the Direct Selection Tool (A), select only the bottom-left corner point and delete it. Apply a 9 pt Stroke using the darker blue in the color palette as the shadow (2). Next, draw a straight path through the middle of the window with the Pen Tool (P) and give it a 2 pt Stroke (3). Finally, Copy and Paste in Place (Shift-Control-V) the bigger window shape, select all the window components, and go to Object > Clipping Mask > Make (4).
Apply the same style to the other windows on the side wall (5).


Step 7
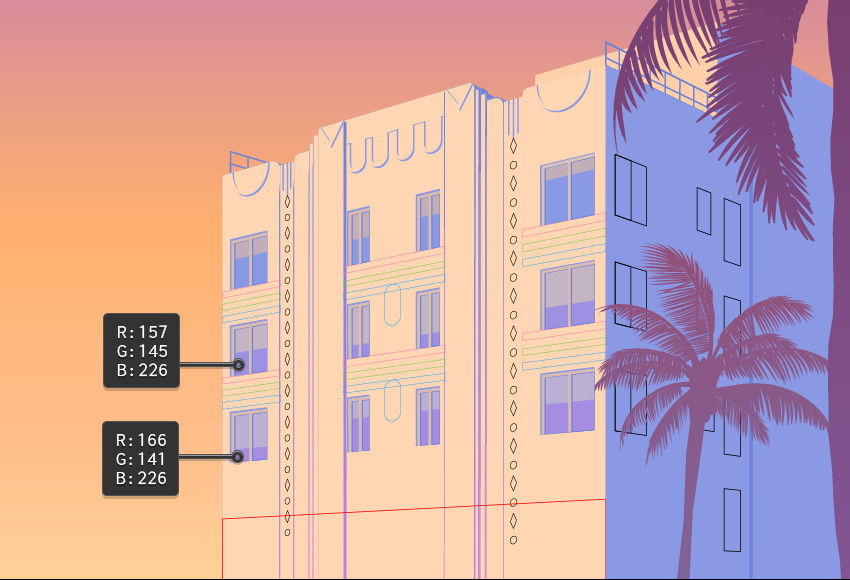
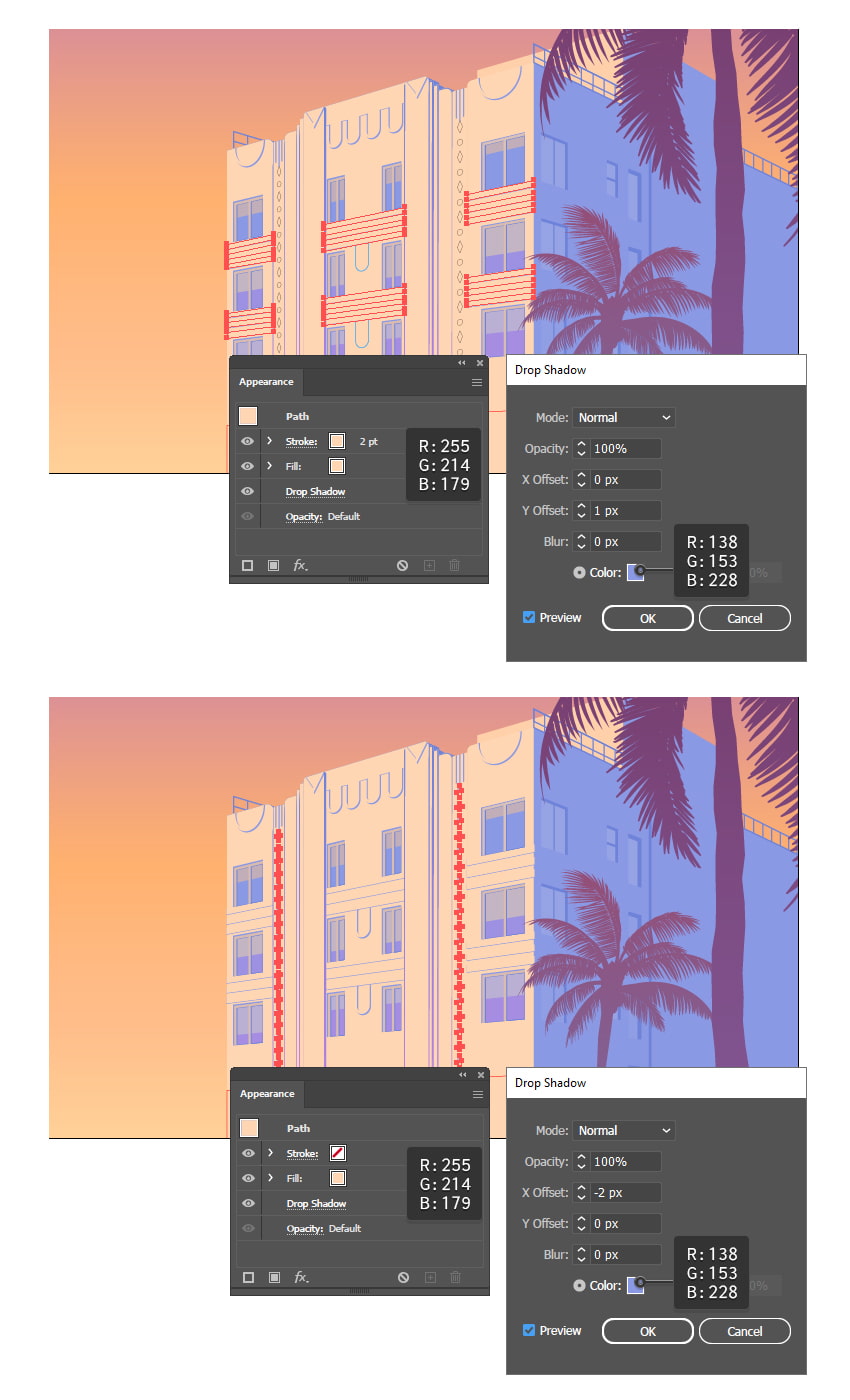
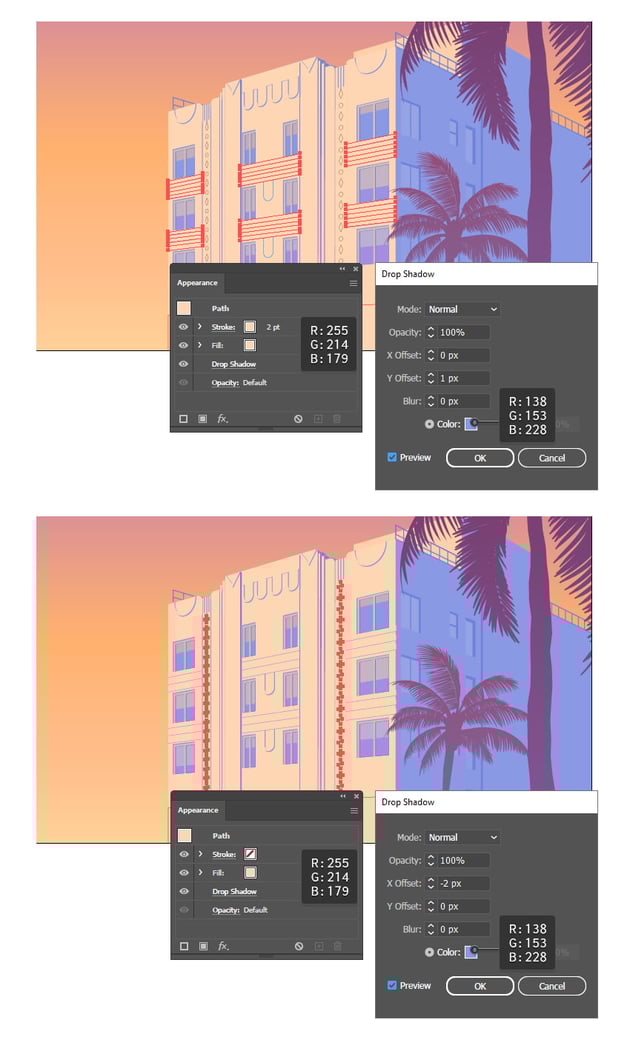
Let’s go back to the facade of the building and color the remaining elements. Select the three stripes under each window and color them with beige. Apply the same color as a 2 pt Stroke. Next, go to Effect > Stylize > Drop Shadow and apply the settings shown.
Now, select the “diamonds and circles” group. Apply a beige fill color and the Drop Shadow effect to add the blue shadow that is specific to the GTA 6 building design.

Step 8
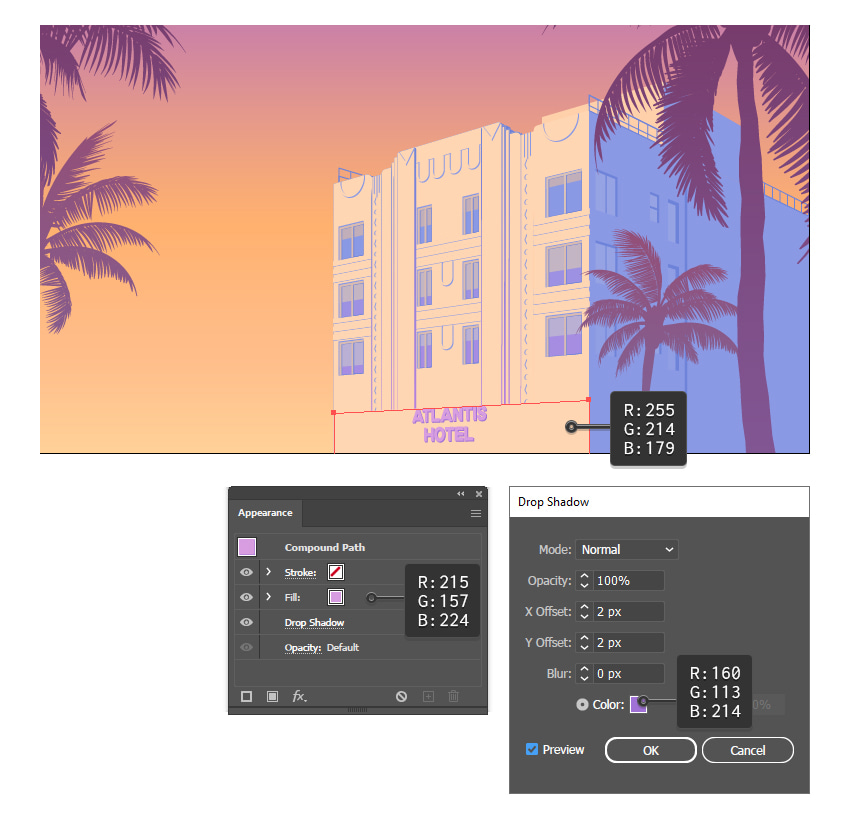
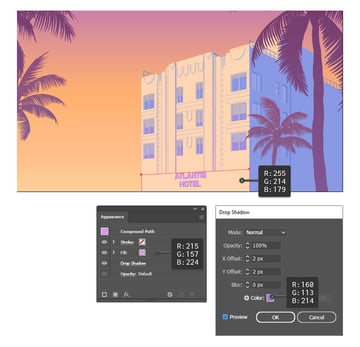
Color the red shape at the bottom of the building with the same beige color. Next, select the hotel name and color it with light purple. Apply a Drop Shadow effect to create a darker purple shadow.

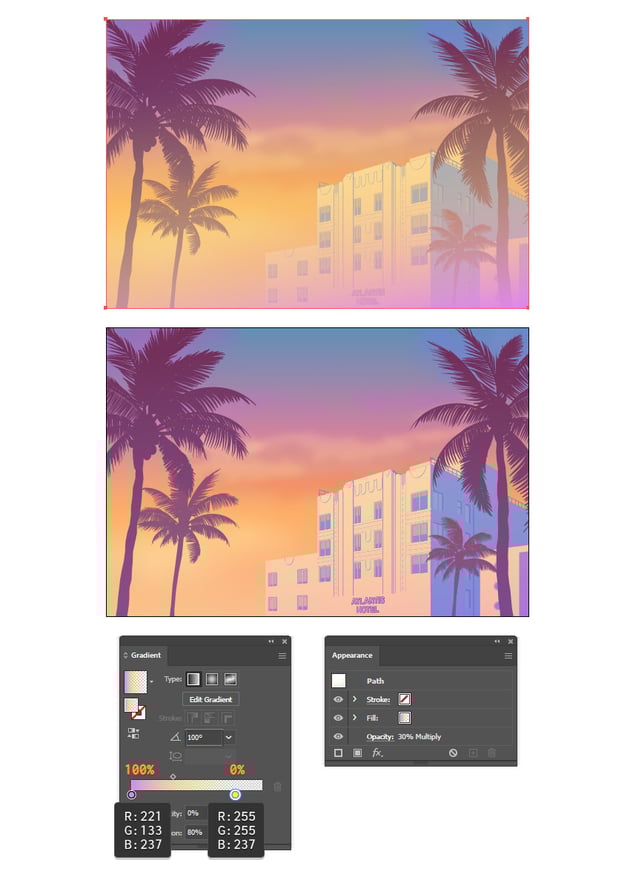
Step 9
The final thing to add is an overall gradient. Notice how the original GTA 6 teaser illustration has a purple tint added? Let’s go ahead and make that too.
Copy the background shape and Paste in Place (Shift-Control-V). Replace the existing gradient with a purple-to-yellow linear gradient. Set the yellow stop color to 0% Opacity and the Gradient Angle to 100 degrees so the purple color falls only in the bottom-right corner of the illustration. Change the Blending mode to Multiply and about 30% Opacity.


Congratulations! You’re Done
You have successfully learned how to recreate the beautiful artwork that’s used in the GTA promos. Feel free to apply the same techniques to create other perspective illustrations in your future projects.
You can find a lot of sources of inspiration and resources ready to be used at Envato Elements, from graphics to fonts, photos, effects, logos, and so much more. They will surely help you to improve your work.


Want to Learn More Skills?
We have loads of tutorials on Envato Tuts+ that teach many other useful techniques. Here’s a list of tutorials specially made for you. Take a look!