Ever wanted to easily convert your InDesign layouts to eBooks? With the right know-how, it’s super-simple to do. In this tutorial we’ll look at three different ways you can quickly turn your designs into interactive PDFs or EPUBs, ready for sharing or selling online.
There are a few different eBook formats to suit different purposes. An interactive PDF is not strictly an EPUB format, but it can be shared easily with others and includes interactive elements that differentiate it from a standard EPUB. Interactive PDFs can be read on most (but not all) eReaders, tablets, laptops, phones, and computers.
However, if you’re looking to sell your eBook via one of the mainstream online stores, such as the Amazon Kindle Store or Google Play, these marketplaces often require you to provide the eBook in EPUB (‘electronic publication’) format. There are two forms of EPUB—reflowable and fixed layout, the former of which we’ll look at creating in section 2 of the tutorial, below. First, let’s take a look at how you can export your InDesign document as an Interactive PDF.

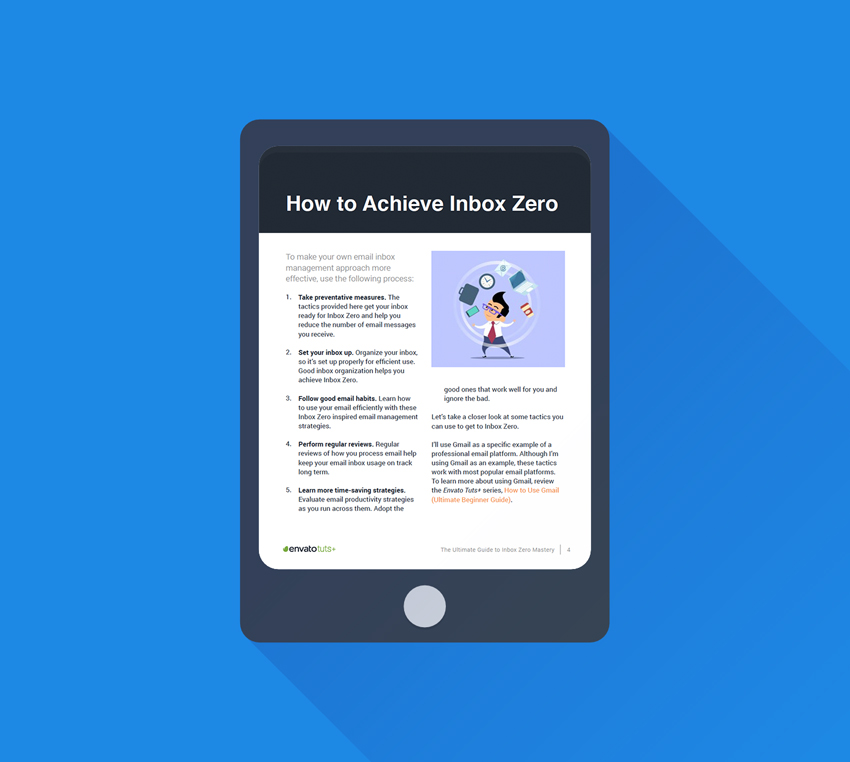
I’m going to be using the free Tuts+ Business eBook, The Ultimate Guide to Inbox Zero Mastery, to demonstrate the exporting process. It’s based on the lessons from this tutorial:

Whether you have created a long book document in InDesign or a short multi-page document like this one, the process will be largely the same, with some small variations depending on the version of InDesign software you are using (here I am using InDesign CS6).
You’ll also find a selection of easy-to-edit eBook templates on GraphicRiver to help you get started if you’re new to ePublishing.
1. How to Export Your InDesign Document as an Interactive PDF eBook
I’m a big fan of Interactive PDFs—they allow you to retain the original layout of your InDesign document, along with your choice of fonts, text formatting, and master content. You can also add a dash of interactivity, such as hyperlinks, cross-references to other pages, movies, and page transition effects.
Let’s walk through the steps of adding one example of interactivity to your InDesign document, before we go ahead and export.

Step 1
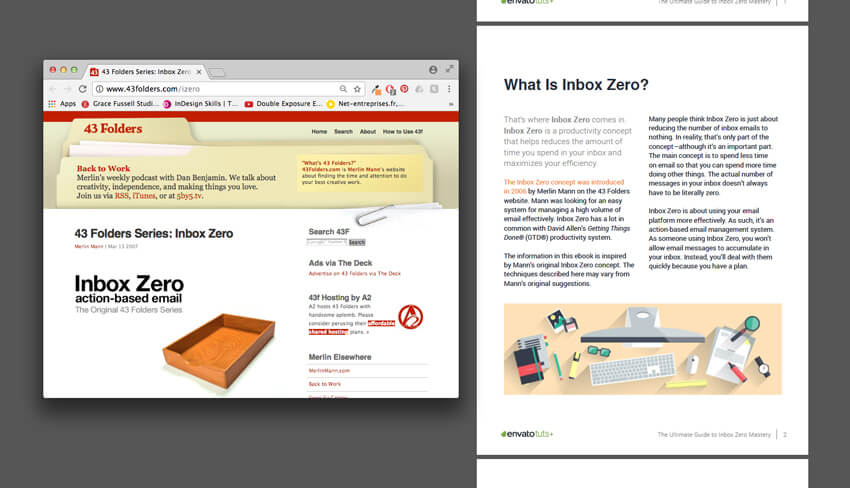
On this page (Page 6), I want to add a clickable cross-reference link, which will take the reader straight over to Page 10 of the eBook. I’ve already added a simple hyperlink to a couple of text phrases above (see highlighted in orange in the image below) by Right-Clicking (Windows) or Control-Clicking (Mac) and choosing Interactive > New Hyperlink. We can use a similar process to apply a cross-reference.
Highlight the text you want to use as your cross-reference link. You may want to pull this out in a different color (Window > Color > Swatches) to make it clear to the reader that this is clickable text.

With the text still highlighted, Right-Click (Windows) or Control-Click (Mac) > Interactive > New Hyperlink Destination.

In the window that opens, choose Page from the Type menu at the top. Under Page, choose the page you would like the eBook to skip forward to, in this case 10.

You can also specify the zoom settings of the destination page. Fixed is usually a sensible pick, but you can adapt the zoom specifically depending on your preference. Click OK to apply the cross-reference and return to the InDesign document.

Step 2
Once you’ve prepared your interactive elements, like hyperlinks and cross-references, you’re ready to export your document as an interactive PDF.
Head up to File > Export. Give your eBook a suitable name and save to a folder you can easily find. From the Format menu, choose Adobe PDF (Interactive) and click Save.

Step 3
In the Export to Interactive PDF window that opens, ensure that Pages is set to All (unless you want to export only a selection of pages from your document).
If your document is set up to single-page spreads, as is my Inbox Zero eBook, you can check Pages. If you’ve created a document made up of facing pages, like a conventional print book, you have the option of choosing whether to export the document as pairs of facing Spreads, retaining the look of your original design. This can look very nice, but note that smaller devices like eReaders, tablets and phones will make the layout appear even smaller, which can make for an uncomfortable reading experience.
Check View After Exporting to preview your design after export. You also have the option to Open in Full Screen Mode, which allows the focus to be completely on your eBook. Note that this can be inconvenient for users of multi-media devices like laptops and computers, who may want to browse other things and open other programs while the eBook is open.
It’s often worth turning on Create Tagged PDF if you’re planning to allow readers to copy and paste sections of your book’s text perfectly. By doing this, your eBook will tell the PDF viewer that sections of text are arranged as a paragraph or whole word, and not simply units of disorganized text, so when text is pasted from your PDF it will retain its original structure.
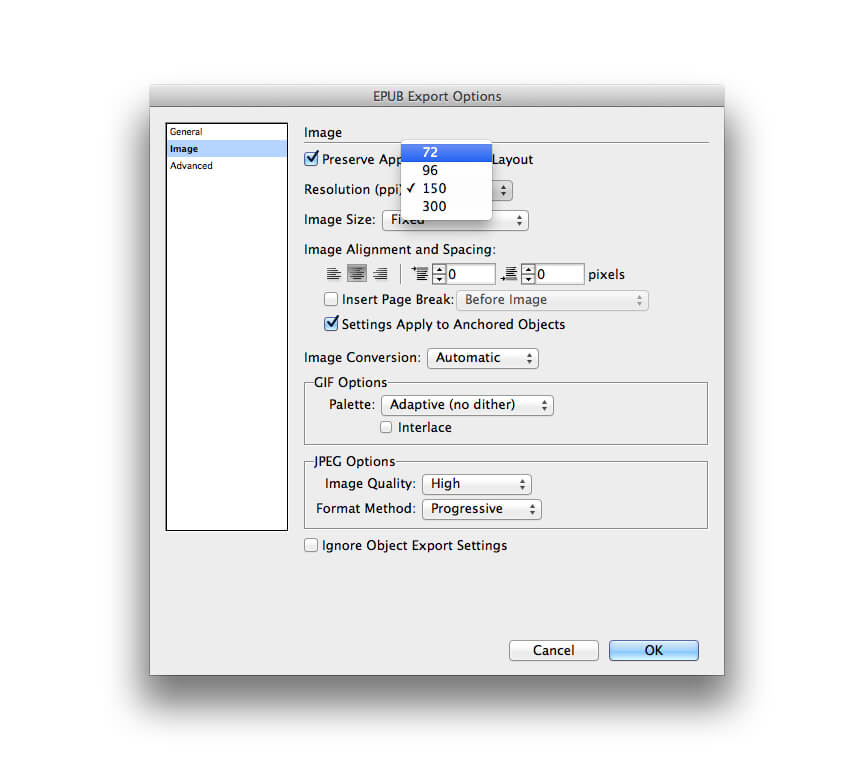
In the Image Handling section you can adjust the quality of images in your PDF, to either maximize image quality for a polished result or compress image quality to save on file size. For eBooks to be circulated online, a High JPEG Quality and 72 ppi Resolution should be sufficient, but you can increase either or both of these if you want to minimize blurring or pixelation.

Step 4
You can also add optional security settings to your eBook. This won’t be appropriate for all scenarios, but can be useful if you’re sharing your eBook with a limited pool of people or wish to retain confidentiality. Click on the Security button at the bottom-left of the window to set a password for opening the document, or a password to restrict editing (a handy little feature if you want to share a draft document with others).
Click OK to exit the Security window. Finally, click OK to create your eBook.

Your interactive PDF will open up in Adobe Acrobat with your interactivity settings preserved. Make sure to test your hyperlinks and cross-references to make sure everything has been set up correctly, before sharing your eBook with others. Great work!
2. How to Export Your InDesign Document as a Reflowable EPUB
Reflowable EPUBs are just that—the text isn’t fixed to the page, allowing the content to adapt to different devices. The reader also has the flexibility of enlarging font size to improve legibility, as well as being able to highlight and copy sections of text and insert bookmarks. If you’ve set up your book as a standard text-only layout, this will be easily adapted to EPUB format.
If, like my Inbox Zero book, your layout is more detailed, with images, irregular text-flow, columns and color, the final EPUB result will be more predictable if you take the time to simplify your book design.
Another option is to export your book as a fixed layout EPUB. I won’t cover how to do that in this tutorial, as it’s an ever-changing process at the moment. Adobe InDesign CC has capabilities to export to fixed layout, but the results can be a bit unpredictable. If you want to preserve the formatting of your design-heavy book, I would recommend exporting your design as an interactive PDF or investing in an InDesign plug-in or specialist fixed layout conversion app. There are more of these appearing on the market, and they’re improving all the time, so that’s well worth looking into if you want to create an EPUB file with the design benefits of a PDF.
For now, let’s look at how we can adapt a mixed media book, like the Inbox Zero layout, to a simpler design that’s perfectly prepped for exporting to a reflowable EPUB format.
Step 1
I’m going to redesign the Inbox Zero document to make it suitable for EPUB export. If you’ve created a simple book design with text only, the only thing you need to make sure to do is apply Paragraph Styles (which we’ll look at in more detail in Step 2, below) to all of your text, and set up a ToC (Table of Contents), which we cover in Step 4.
Let’s start by creating a new InDesign document for our eBook redesign. In InDesign, go to File > New > Document. in the window that opens, set the Intent to Digital Publishing (or Web if your InDesign version doesn’t have DP available). Deselect Facing Pages to create a single-page layout.
For the Page Size, set the Width to 612 px (8.5 in) and Height to 792 px (11 in). Different devices will require slight variations in size, but this 8.5 by 11 inch setup is a pretty failsafe option.

Click OK to create your new document.
Step 2
Now we can start moving some of the original book’s text over into our new layout. EPUBs are designed to be flexible, with readers able to set their own font choices if they wish. So don’t worry about preserving the perfect text formatting in your design. What’s more important is to retain a sense of hierarchy in your text, with headers, subheadings and body text differentiated in size and/or weight.
It will make your life much easier if you define these different portions of text as Paragraph Styles, allowing you to create a ToC without a headache.
Highlight or place your cursor into a paragraph you want to define as the body text style, and then head up to Window > Styles > Paragraph Styles.
Click on the Create New Style button at the bottom of the panel, and double-click on the new style to open the Options window. Name the style ‘Body Text’, and click OK.


Repeat the process for sub-heading text, creating a new Paragraph Style and naming this ‘Sub-heading’.

Do the same for the headers in your document, creating a new style and naming it ‘Header’.

Ensure that all the text in your book has a Paragraph Style applied to it—you can do this by highlighting text and clicking once on the style name in the Paragraph Styles panel.
Step 3
If you want to insert images into your layout, you will need to ensure they are anchored in place on the page. If, for example, you want to sandwich an image between two paragraphs of text, you will have to fix the image to this spot to avoid InDesign pushing the image to the end of the section by default when the EPUB is exported.
Place your Type Tool (T) cursor between two paragraphs where you would like the image to be anchored. Then go to File > Place, choose your image, and Open it. InDesign will drop the image into the text frame and anchor it in the process, symbolized by a small anchor symbol at the top right of the image.

You can shuffle the text around the image to give it some breathing space and adjust the image size without affecting the position of the image in the final EPUB.
Step 4
You will need to set up a ToC for your book, even if you have already created a contents page. The EPUB will navigate through your document using a Style-based ToC.
Go to Layout > Table of Contents. In the window that opens, you can set the Title of your ToC. Here I’ve used the default ‘Contents’ name. You can also set the Style of your title; here I’ve opted for the Header style I use throughout the book.

You want the ToC to automatically create a full list of contents based on the headers in your book. So click on Header in the Other Styles list and click Add to drag it into the Include Paragraph Styles list.

You can also adjust the settings for the Entry Style. Here I’ve chosen my Body Text Paragraph Style to keep the text sizing consistent throughout the book.

When you click OK, InDesign will load your cursor with the prepared table of contents.

Create a blank page at the start of your document using the Pages panel (Window > Pages) and click once onto the page to drop the ToC onto the page.

If you want to update your contents page after this, you can do this easily by going to Layout > Update Table of Contents.
Step 5
You’re now ready to export your document as an EPUB. Go to File > Export, name your eBook, and choose EPUB from the Format menu. Click Save.

Step 6
In the Export Options window, you can set the EPUB Version from the top of the General section. EPUB 2.0.1 is suitable for older eReaders and devices, while EPUB 3.0 is the more recent version (this is also the version now preferred by most large eBook stores).

You can also choose a Cover for your EPUB under the Setup options. Choose to rasterize an image from your first page, or click on Choose Image to add a separate cover image file.

-
![]()
The downside of the explosion in digital publishing is the fact that the market is becoming increasingly saturated, and it can be difficult to make your…

Step 7
You’ll find more options for your EPUB under the Image and Advanced tabs in the left-hand menu. You can adjust the Resolution of your images. Pulling them down to 72 ppi will help to reduce the size of your EPUB and will be perfectly fine for most reading devices.
When you’ve tweaked the options, go ahead and click OK. If you checked the View EPUB after Exporting button, the EPUB will open in a default program (as I use a Mac, it opens in iBooks). Otherwise, you can navigate to the folder where the EPUB is saved and open it from there. You might want to test the settings you have specified on an eReader or tablet before uploading the file to an eBook store.


Conclusion
You can now kick back and admire your shiny new eBook. Awesome work! Perhaps you’ve opted for an interactive PDF to maintain the layout of your original book design, or a reflowable EPUB format to adapt to current eBook selling standards. Either way, you’ll have a file that’s perfectly tuned for viewing on digital devices.
If you want to check your work against the original, check out the free Envato Tuts+ eBook, The Ultimate Guide to Inbox Zero Mastery.
eBooks are a great way to get your content out to a wide audience quickly and cheaply, and the process of designing, exporting and selling can be really fun. In this tutorial we’ve looked at two main ways of creating an eBook using InDesign. Let’s take a quick recap:
- Interactive PDF—this format preserves the layout of your original design, which makes it great for books with non-traditional designs, like handbooks, picture books, portfolios or magazines. You can also insert interactive elements, like cross-referencing and hyperlinks, to add a special touch to your design.
- EPUB—here we’ve looked at how you can create a reflowable EPUB, which is suitable for eReaders and tablets. Readers have the flexibility to enlarge text, bookmark pages and highlight text, which makes it a sought-after format for avid eBook readers.
Looking for a little more help with your eBook designs? Check out these tips for creating your own digital magazines and books:
-
![]()
Books and magazines are continuing to flourish in the digital age by adapting to EPUB and eMagazine formats. This exciting new medium presents both new…

You can also find a range of great eBook templates on GraphicRiver to help you get started if you’re new to ePublishing.
