
In this new tutorial we’ll learn how to create a sticky (or fixed) toolbar—also referred to as a vertical navigation menu—with animated tooltips that you can use on your sites for all sorts of things.
For example, if you are a store owner, you can use it to include a quick links feature for promoting products on sale, featured categories, wishlist and contact pages, etc. Similarly, if you are a theme author, your toolbar could include theme and language switchers, social media links, a search box, quick accessibility options such as increasing the site’s font size, and so on.
We’ll build this component using straightforward HTML and CSS. We’ll only use a bit of JavaScript for toggling a CSS class to make the toolbar visible and hidden. But, if you’re feeling adventurous and would like to try building this stuff without using any JavaScript, have a look at one of my previous tutorials.
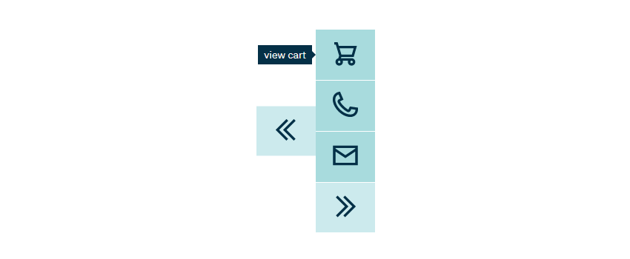
Our Sticky Toolbar Demo
Check our finished component:
1. Begin With Some Icons
For the purposes of this tutorial we’ll use some SVG UI icons by TanahAirStudio taken from Envato Elements. TanahAirStudio have a huge range of icon sets, so if the one you’re looking for isn’t in the 25 you see below, you can bet you’ll find it in one of the other related sets.
2. Define the HTML Markup
We’ll define a wrapper element that will contain:
- The button for opening the toolbar.
- The toolbar itself. Inside it, we’ll place three links along with their icons and the button for closing the toolbar. Each link will have the
data-tooltipattribute that will appear as we hover over the target link.
By default, the toolbar can be either visible or not. In our example, initially, it will be hidden. However, we can alter this state by appending the show-toolbar class to the outer container.
Here’s the required structure for our toolbar:
<div class="sticky-toolbar-container">
  <button aria-label="open toolbar" type="button" class="open-toolbar toggle-toolbar">
    <svg aria-hidden="true" xmlns="https://www.w3.org/2000/svg" xml:space="preserve" width="40" height="40" viewBox="0 0 24 24">
      <path d="M12.293 20.707 3.586 12l8.707-8.707 1.414 1.414L6.414 12l7.293 7.293z" />
      <path d="M18.293 20.707 9.586 12l8.707-8.707 1.414 1.414L12.414 12l7.293 7.293z" />
    </svg>
  </button>

  <div class="sticky-toolbar">
    <a aria-label="go to the cart page" href="" data-tooltip="view cart">
      <svg aria-hidden="true" xmlns="http://www.w3.org/2000/svg" xml:space="preserve" width="40" height="40" viewBox="0 0 24 24">
        <path d="M17 16H8.387l.334-1h10.034l2.571-9H6.644l-.9-3H3v2h1.256l2.695 8.984-.708 2.125A2.995 2.995 0 0 0 4 19c0 1.654 1.346 3 3 3s3-1.346 3-3c0-.352-.072-.686-.184-1h4.369A2.943 2.943 0 0 0 14 19c0 1.654 1.346 3 3 3s3-1.346 3-3-1.346-3-3-3zm1.674-8-1.429 5H8.744l-1.5-5h11.43zM8 19c0 .551-.449 1-1 1s-1-.449-1-1 .449-1 1-1 1 .449 1 1zm9 1c-.551 0-1-.449-1-1s.449-1 1-1 1 .449 1 1-.449 1-1 1z" />
      </svg>
    </a>

    <a aria-label="give us a call" href="" data-tooltip="call us">
      <svg aria-hidden="true" xmlns="http://www.w3.org/2000/svg" xml:space="preserve" width="40" height="40" viewBox="0 0 24 24">
        <path d="M15.894 22.239c-3.018 0-6.569-1.602-9.551-4.582-4.758-4.759-6-10.971-2.828-14.143a5.89 5.89 0 0 1 3.392-1.696l.76-.11 2.797 6.522-2.797 1.398c.648 1.228 1.63 2.497 2.919 3.786 1.229 1.229 2.497 2.204 3.77 2.896l1.314-2.573 6.483.926.038.827c.095 2.059-.495 3.786-1.706 4.996-1.184 1.184-2.793 1.753-4.591 1.753zM6.461 3.972a3.9 3.9 0 0 0-1.532.958c-2.3 2.299-1.004 7.48 2.828 11.313 3.834 3.833 9.014 5.126 11.314 2.828.766-.766 1.042-1.776 1.11-2.67l-3.367-.481-.646 1.294a1.974 1.974 0 0 1-1.186 1.01 2.044 2.044 0 0 1-1.583-.157c-1.44-.783-2.863-1.873-4.228-3.238-1.43-1.43-2.529-2.859-3.268-4.248a2.008 2.008 0 0 1-.14-1.561 1.989 1.989 0 0 1 1.012-1.182l1.106-.553-1.42-3.313z" />
      </svg>
    </a>

    <a aria-label="go to the contact page" href="" data-tooltip="email us">
      <svg aria-hidden="true" xmlns="http://www.w3.org/2000/svg" xml:space="preserve" width="40" height="40" viewBox="0 0 24 24">
        <path d="M2 4v16h20V4H2zm18 2v.465l-8 5.333-8-5.333V6h16zM4 18V8.869l8 5.334 8-5.334V18H4z" />
      </svg>
    </a>

    <button aria-label="close toolbar" type="button" class="close-toolbar toggle-toolbar">
      <svg aria-hidden="true" xmlns="http://www.w3.org/2000/svg" xml:space="preserve" width="40" height="40" viewBox="0 0 24 24">
        <path d="m11.707 20.707-1.414-1.414L17.586 12l-7.293-7.293 1.414-1.414L20.414 12z" />
        <path d="m5.707 20.707-1.414-1.414L11.586 12 4.293 4.707l1.414-1.414L14.414 12z" />
      </svg>
    </button>
  </div>
</div>
3. Specify the Main Styles
Let’s now concentrate on the core styles.


Here are the notable things:
- The toolbar container will be a fixed positioned element placed in the center-right position of the screen and have a fixed width of 80px.
- The button that opens the toolbar will be absolutely positioned and placed in the middle of its parent. As we discussed earlier, the toolbar will initially be out of the screen, thanks to the
transform: translateX(100%)property value. - The tooltips for the toolbar links will initially be hidden and appear as we hover over the associated link. To create them, we’ll use their
::beforeand::afterpseudo-elements. Both will be absolutely positioned with properrightvalues and havepointer-events: noneto ignore pointer events. The::beforepseudo-element will show the tooltip text as derived from thedata-tooltipattribute of its parent link, while the::afterpseudo-element will function as a decorative element for creating a triangle.
The corresponding styles:
:root {
  --white: #fff;
  --cyan: #cce9eb;
  --darkcyan: #a8dadc;
  --darkblue: #023047;
}

.sticky-toolbar-container {
  position: fixed;
  top: 50%;
  right: 0;
  transform: translateY(-50%);
  width: 80px;
  z-index: 2;
  text-align: center;
}

.sticky-toolbar-container .toggle-toolbar {
  background: var(--cyan);
}

.sticky-toolbar-container .toggle-toolbar.open-toolbar {
  position: absolute;
  top: 50%;
  right: 0;
  width: 100%;
  transform: translateY(-50%);
}

.sticky-toolbar-container .sticky-toolbar {
  display: flex;
  flex-direction: column;
  transform: translateX(100%);
}

.sticky-toolbar-container .toggle-toolbar.open-toolbar,
.sticky-toolbar-container .sticky-toolbar {
  transition: transform 0.2s;
}

.sticky-toolbar-container svg {
  fill: var(--darkblue);
}

.sticky-toolbar-container .sticky-toolbar > *,
.sticky-toolbar-container .toggle-toolbar.open-toolbar {
  padding: 12px;
}

.sticky-toolbar-container .sticky-toolbar a {
  position: relative;
  display: inline-block;
  margin-bottom: 1px;
  background: var(--darkcyan);
}

.sticky-toolbar-container .sticky-toolbar a::before,
.sticky-toolbar-container .sticky-toolbar a::after {
  position: absolute;
  top: 50%;
  transform: translateY(-50%);
  opacity: 0;
  pointer-events: none;
  transition: opacity 0.2s;
}

.sticky-toolbar-container .sticky-toolbar a::before {
  content: attr(data-tooltip);
  right: calc(100% + 5px);
  font-size: 14px;
  white-space: nowrap;
  padding: 4px 8px;
  color: var(--white);
  background: var(--darkblue);
}

.sticky-toolbar-container .sticky-toolbar a::after {
  content: "";
  right: 100%;
  width: 0;
  height: 0;
  border-top: 5px solid transparent;
  border-bottom: 5px solid transparent;
  border-left: 5px solid var(--darkblue);
}

.sticky-toolbar-container .sticky-toolbar a:hover::before,
.sticky-toolbar-container .sticky-toolbar a:hover::after {
  opacity: 1;
}
4. Add the JavaScript
Each time we click on the .toggle-toolbar buttons, we’ll toggle the visibility of the open toolbar button and the toolbar itself via the show-toolbar class.
Here’s the required JavaScript code:
const toggleToolbar = document.querySelectorAll(".toggle-toolbar");
const stickyToolbarContainer = document.querySelector(
  ".sticky-toolbar-container"
);

toggleToolbar.forEach(function (element) {
  element.addEventListener("click", function () {
    stickyToolbarContainer.classList.toggle("show-toolbar");
  });
});
And the relevant styles:
.sticky-toolbar-container.show-toolbar .open-toolbar {
  transform: translateY(-50%) translateX(100%);
}

.sticky-toolbar-container.show-toolbar .sticky-toolbar {
  transform: none;
}
Conclusion
In this quick tutorial we created an animated sticky toolbar that aims to pique visitors’ interest and serve information that needs to be immediately accessible. Hopefully, you’ve found some interest in this implementation and you’ll include it in one of your upcoming projects.
As an exercise, you can extend this demo by isolating the toggle behavior only on desktop devices and following a different approach on mobile ones. For example, by showing all tooltips by default.
Before closing, let’s remind ourselves of what we built today:
As always, thanks a lot for reading!