
Previously I wrote a tutorial on how to make a mobile navigation for responsive design, now I’ve discovered a new technique to produce a responsive menu without having to use Javascript. It uses clean and semantic HTML5 markup. The menu can be aligned left, center or right. Unlike the previous tutorial where it is clicked to toggle, this menu toggles on hover which is more user friendly. It also has an indicator to show the active/current menu item. It works on all mobile and desktop browsers including Internet Explorer!
The Purpose
The purpose of this tutorial is to show you how turn a regular list menu into a dropdown menu on smaller display.

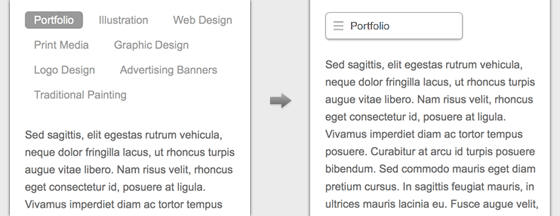
This trick is more useful on navigation with a lot of links like the screenshot below. You can condense all the buttons into an elegant dropdown.
>
Nav HTML Markup
Here is the markup for the navigation. The <nav> tag is required to create the dropdown with the css property absolute position. I will explain this later in the tutorial. The .current class indicates the active/current menu link.
<nav class="nav">
<ul>
<li class="current"><a href="#">Portfolio</a></li>
<li><a href="#">Illustration</a></li>
<li><a href="#">Web Design</a></li>
<li><a href="#">Print Media</a></li>
<li><a href="#">Graphic Design</a></li>
</ul>
</nav>
CSS
The CSS for the navigation (desktop view) is pretty straight forward, so I’m not going to get into the details. Note that I specified display:inline-block instead of float:left for the nav <li> element. This allows the menu buttons to be able to align left, center or right by specifying text-align on the <ul> element.
.nav {
position:relative;
margin:20px 0;
}

.nav ul {
margin:0;
padding:0;
}

.nav li {
list-style:none;
display:inline-block;
margin:0 5px 10px 0;
padding:0;
}

.nav a {
text-decoration:none;
color:#999;
line-height:100%;
padding:3px 12px;
}

.nav a:hover {
color:#000;
}

.nav .current a {
background:#999;
color:#fff;
border-radius:5px;
}
Center and Right Alignment
As mentioned above, you can change the alignment of the buttons by using text-align property.
.nav.right ul {
text-align:right;
}

.nav.center ul {
text-align:center;
}
Internet Explorer Support
HTML5 <nav> tag and media query is not supported by Internet Explorer 8 or older. Include css3-mediaqueries.js (or respond.js) and html5shim.js to provide fallback support. If you don’t want to add html5shim.js, replace the <nav> tag with a <div> tag.
<!--[if lt IE 9]>
<script src="http://css3-mediaqueries-js.googlecode.com/files/css3-mediaqueries.js"></script>
<script src="http://html5shim.googlecode.com/svn/trunk/html5.js"></script>
<![endif]-->
Responsive
Now here comes the fun part – making the menu responsive with media query! Read my previous articles on responsive design and media query if you are not familar with responsive design.
On 600px breakpoint, I set the nav element to relative position so I can place the <ul> menu list on top with absolute position. I hide all <li> elements by specifying display:none, but keep the .current <li> displaying as block. Then on the nav hover, I set all <li> back to display:block (this will produce the dropdown list result). I added a check icon graphic on the .current element to indicate it is the active item. For the center and right alignment menu, use left and right property to position the <ul> list. View the demo to see the final result.
@media screen and max-width 600px{
.nav {
position:relative;
min-height:40px;
}

.nav ul {
width:180px;
position:absolute;
top:0;
left:0;
border:solid 1px #aaa;
background:#fff url(images/icon-menu.png) no-repeat 10px 11px;
border-radius:5px;
box-shadow:0 1px 2px rgba(0,0,0,.3);
padding:5px 0;
}

.nav li {
display:none;
margin:0;
}

.nav .current {
display:block;
}

.nav a {
display:block;
text-align:left;
padding:5px 5px 5px 32px;
}

.nav .current a {
background:none;
color:#666;
}

.nav ul:hover {
background-image:none;
}

.nav ul:hover li {
display:block;
margin:0 0 5px;
}

.nav ul:hover .current {
background:url(images/icon-check.png) no-repeat 10px 7px;
}

.nav.right ul {
left:auto;
right:0;
}

.nav.center ul {
left:50%;
margin-left:-90px;
}
}