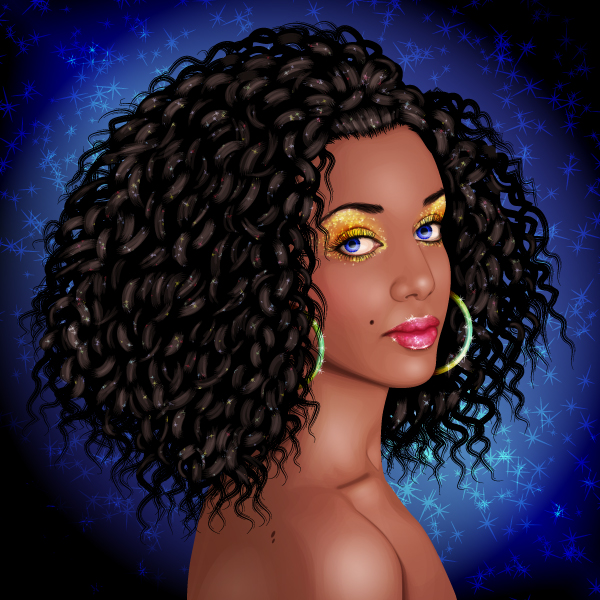
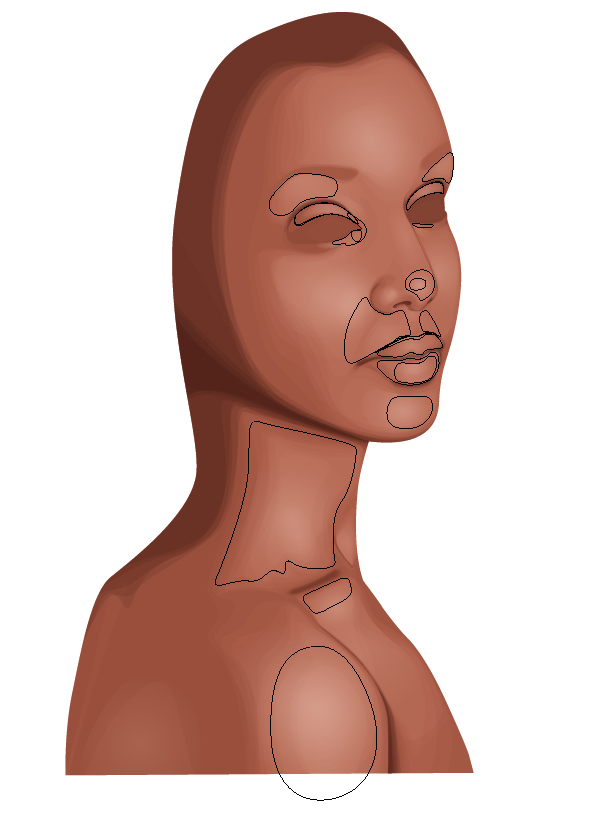
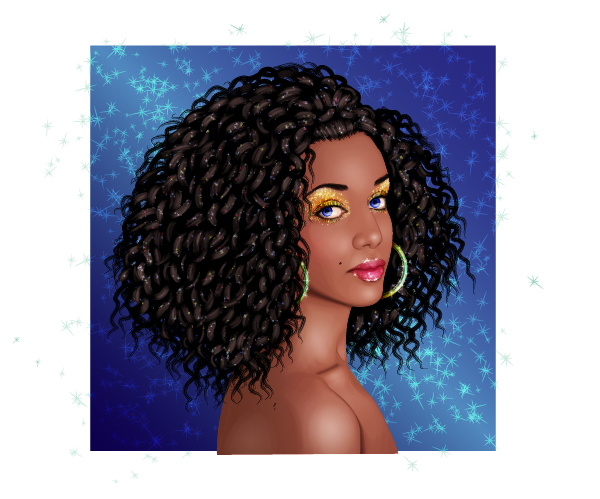
An innocent vector portrait based on a stock image from Photodune became a battleground of sparkles and glitter. As requested, people wanted to see a portrait tutorial which used a lot of glitter! Who was I to not take up such a challenge?
In today’s tutorial I’m going to show you how to create a sparkling portrait. I’ll show you how to create your own skintone palette, render flawless skin, create hair from brushes and of course… add a good handful of glitter, all in Adobe Illustrator. There’s no blurs, meshes or raster effects in this tutorial, it’s 100% vector and 100% fabulous! So let’s get on with it…
1. Sample Colors From a Stock Image
Step 1
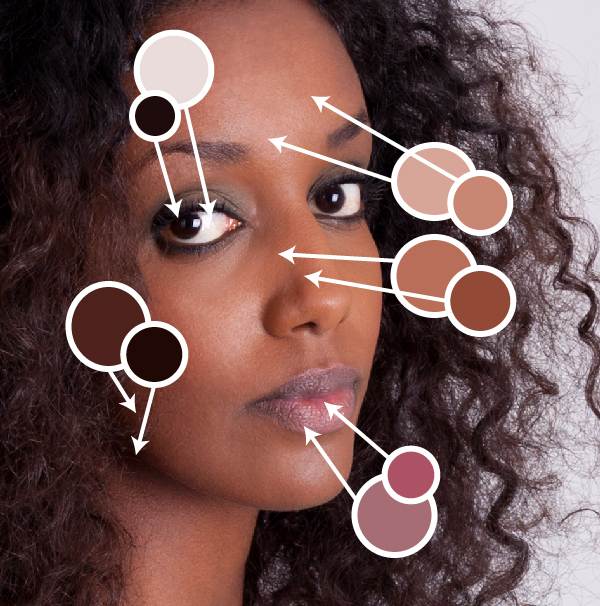
There are many ways in which you can create your own palettes for portraits. You could use the default swatch palettes available in Illustrator, however sometimes you may not get the tones you specifically want.
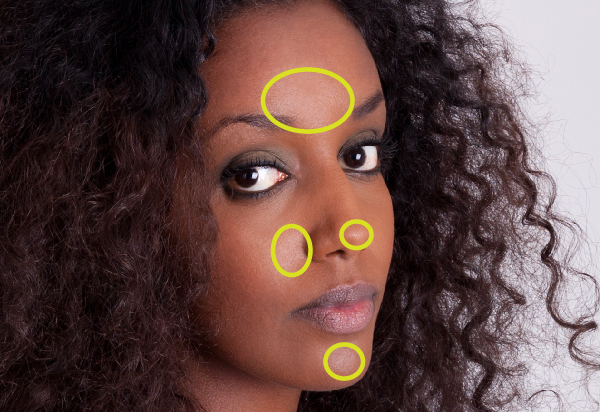
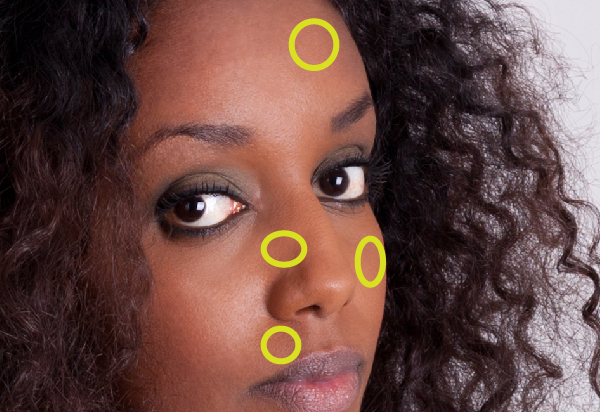
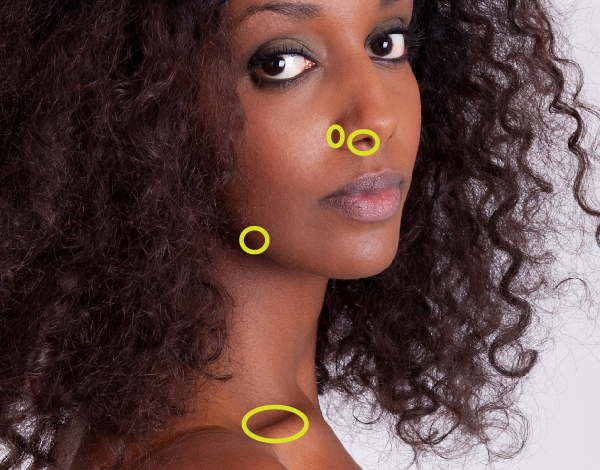
So before constructing a portrait, I use the Eyedropper Tool (I) to sample areas from the original stock image to get the colors I want to use. Here I’m looking at sampling the highlight color. You can get this from the most shiny areas such as the nose tip, cheek, chin and forehead.
Step 2
For a midtone, aim for areas where the skin is not in shadow, nor is it in highlight. Typically these colors can be sampled from the forehead, side of the nose, upper lip and cheek. Avoid areas too close to either shadow and highlight to make sure you’re not picking the wrong colors.
Step 3
For sampling the shadows, you’ll need to look at two types of shadow – one which is deeper than the other. You can get these colors from the side of the nostril, inside the nostril, the chin/jaw area and collar bone cavity.
Step 4
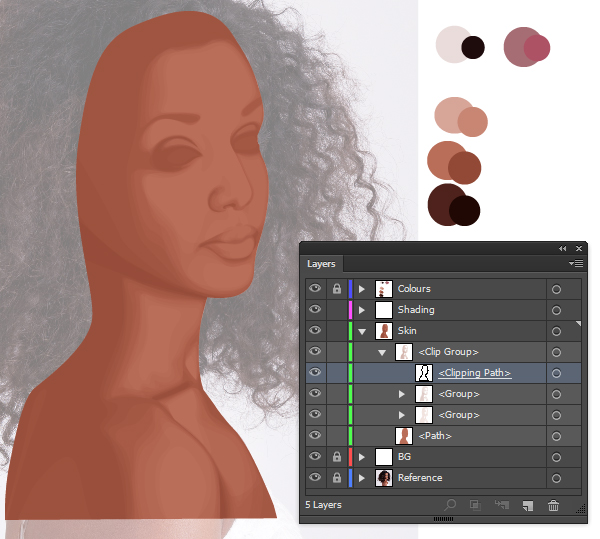
Pick up two colors from each of the areas, so you’ve got a variety of tones to use in your portrait. This helps add texture and variation in your skin tones. Here I’ve gotten colors for the skin, lips and eyes using the methods illustrated above. Once you’ve finished, add them to your Swatch panel for easy referencing later on.
2. Render the Skin
Step 1
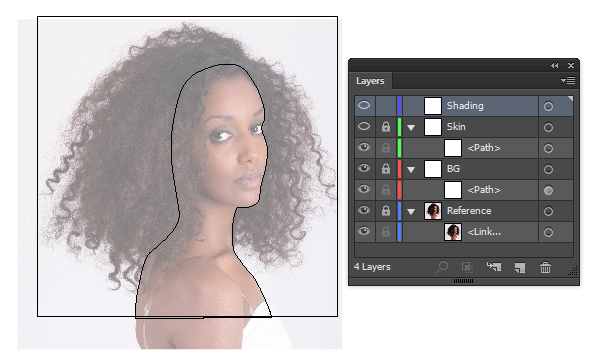
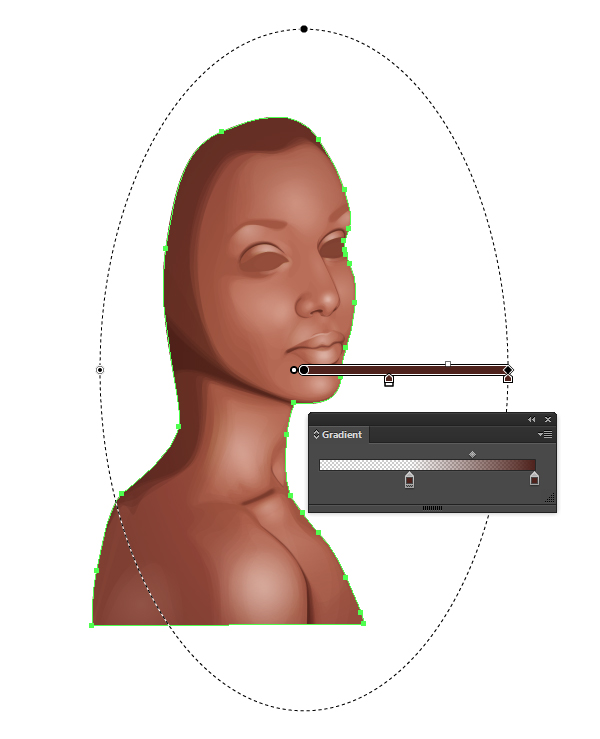
Let’s start by rendering the skin. I first like to draw an initial base for the skin with a midtone skin fill. I’ll then use this as a base for my other shapes to be drawn upon at low opacity. This helps give a softer look and less of the hard edges of vector. So for now, draw the base, copy it and lock it for now.
Step 2
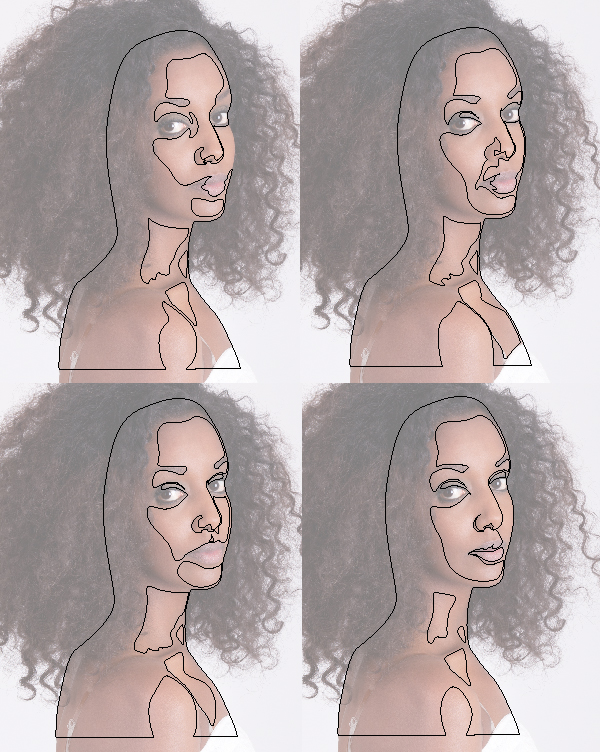
Paste the duplicate of the skin base into a layer above the skin base. Duplicate it several times and keep the original skin midtone color. Using the Pen Tool (P), draw shapes which are the lightest on the skin and use Pathfinder > Minus Front to remove each of these shapes from a duplicate of the skin base. In this case, I’ve done this four times and you can see the shapes I’ve created below.
These specific shapes have been set to Blending Mode Multiply, Opacity 5%. Modify the Opacity depending on how dark your colors are. The darker the skin tone, the smaller the Opacity may be required.
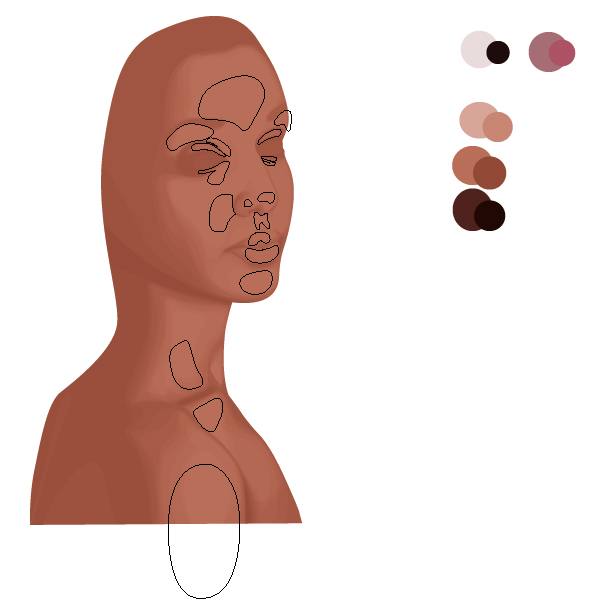
Step 3
Using a shadow fill color, use the Pen Tool (P) to add shapes which are in shadow. Don’t worry about going beyond the skin base as this will be remedied next. Set these shapes to Blending Mode Multiply, Opacity 5%. You’ll notice that the lips are rendered in the shading throughout. This is because the lips are part of the skin and shouldn’t be rendered separately, unless it’s modifying the colors. If you shade them separately, you would create a problem with consistency and they may appear to be just floating on top of the skin.
Step 4
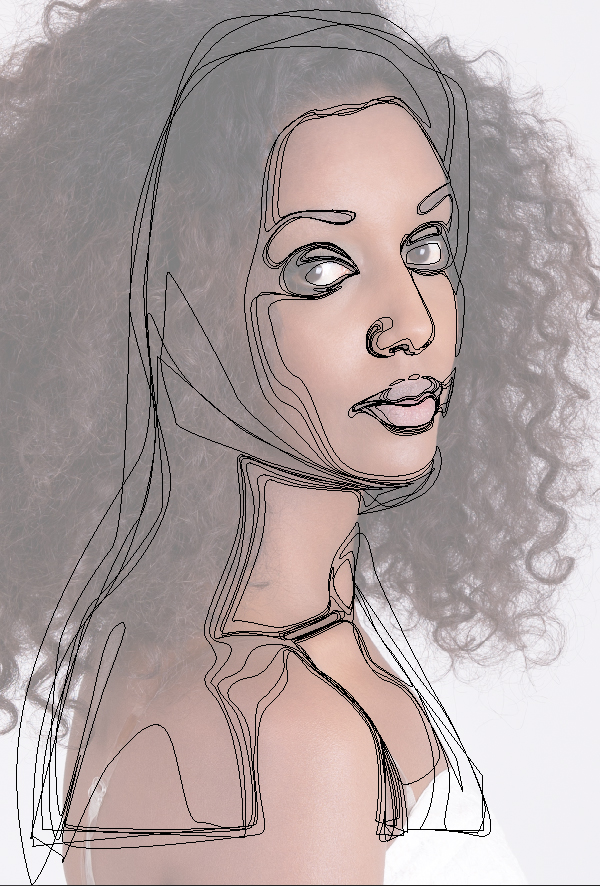
Duplicate the skin base and Group (Control + G) all your skin shading shapes. Use the duplicate skin base to create a Clipping Mask (Control + 7). This will hide the overlapping shapes.
Step 5
Using one of the highlighting colors, create a transparent Radial Gradient. Use this to fill shapes to highlight areas on the skin. Set these shapes to Blending Mode Screen, Opacity 15%.
Layer the shapes to create more intense highlights and build up a more 3D effect. Focus smaller shapes on the key areas of highlight, the forehead, nose, cheek, shoulder and lips. Group them once done and add them to your clipping mask group.
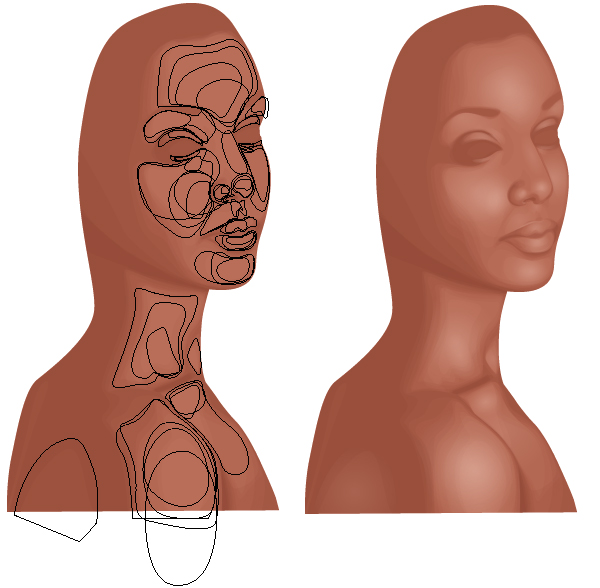
Step 6
Now let’s use one of the darker shades. The darker the color, the smaller the size you’ll be drawing. These shapes will be set to Blending Mode Multiply, Opacity 10%. As before, once done, add them to your clipping mask group.
Step 7
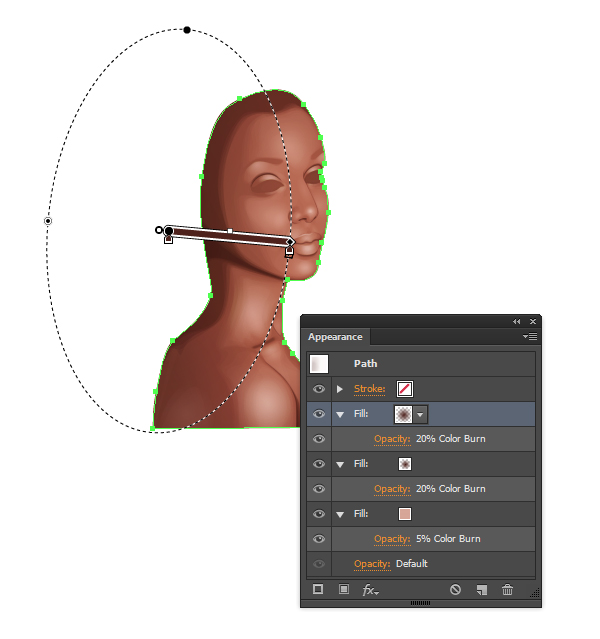
I’m going to balance the deep shadows with more highlights to the skin. Think of it as adjusting the contrast and making sure the features of the face aren’t getting lost. I’m using the same highlighting gradient and setting them to Blending Mode Color Dodge, Opacity 20%. If at any point you find that a shape is too strong or too faint, adjust the Opacity as required.
Step 8
When balancing the colors, you may find it more easier to add shadow by way of a gradient covering the entire base. In this case, I’ve duplicated the original skin base and used on of the deep shadow colors to create an inverted transparent Radial Gradient. I’ve placed this shape below all the shading layers and above the base, then set it to Blending Mode Color Burn, Opacity 20%.
Then via the Appearance panel, I’ve added further colors to enhance the shadows and shading of the skin.
Step 9
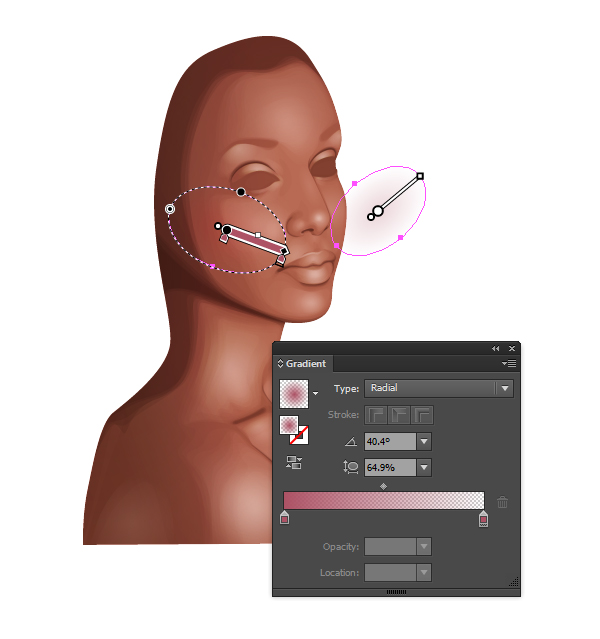
Now to add a dash of color to the cheeks by way of adding two Radial Gradients with tones picked from the lips. These are set to Blending Mode Soft Light, Opacity 50%.
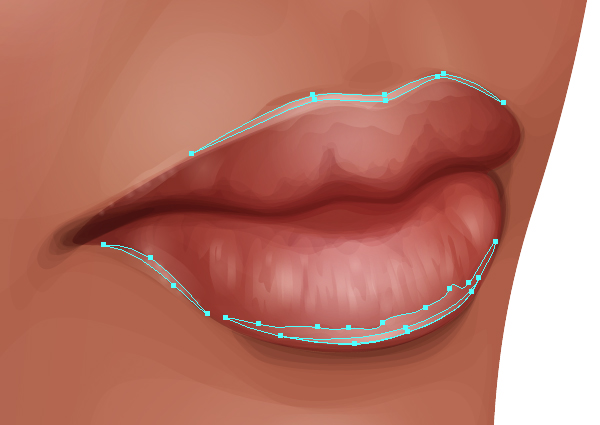
3. Add Color and Texture to the Lips
Step 1
Let’s add some color to the lips. Use the pink/rose swatch colors you’ve previously sampled throughout these stages. First darken them by using an inverted transparent Radial Gradient. This is set to Blending Mode Multiply, Opacity 50%.
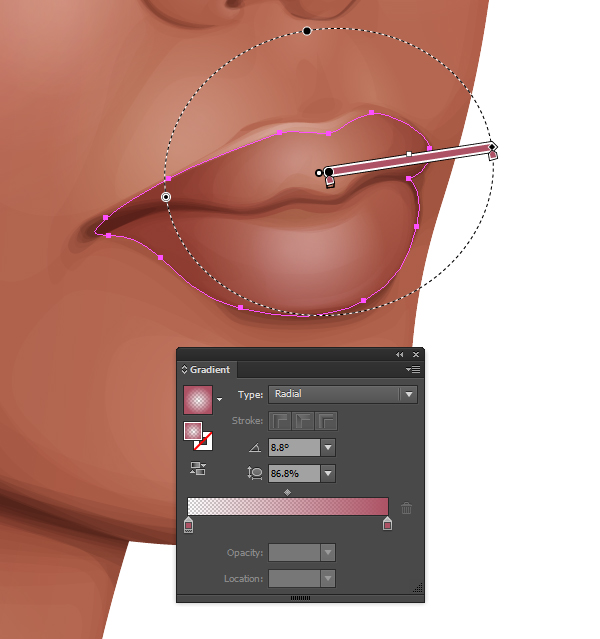
Step 2
Draw another shape and fill it with a transparent Radial Gradient set to Blending Mode Soft Light, Opacity 100%. To help create a softer edge to areas such as the lips, avoid duplicating shapes and disable Smart Guides. Draw each shape separately and the subtle overlapping edges of the shapes will create a softer look.
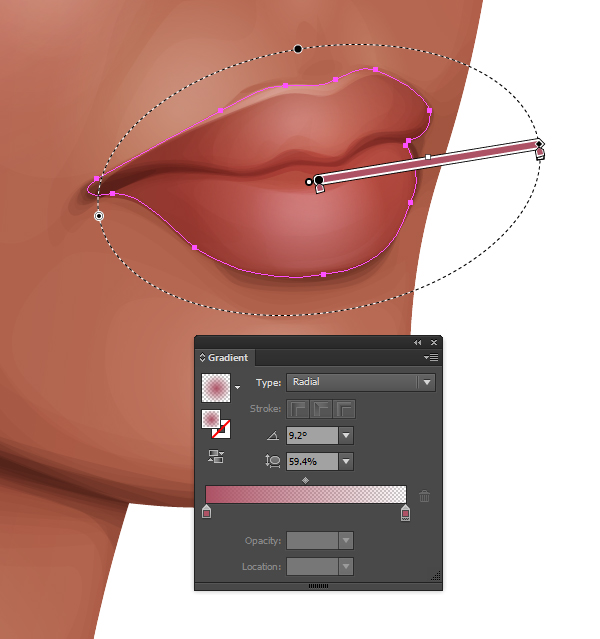
Step 3
Let’s add some texture to the lips by drawing shapes with the Pencil Tool (N). This is more of a freehand approach to the shapes and it will help you create softer edges which are less uniform, as they would be when created with the Pen Tool. These shapes use a rose fill at to Blending Mode Multiply, Opacity 10%.
Step 4
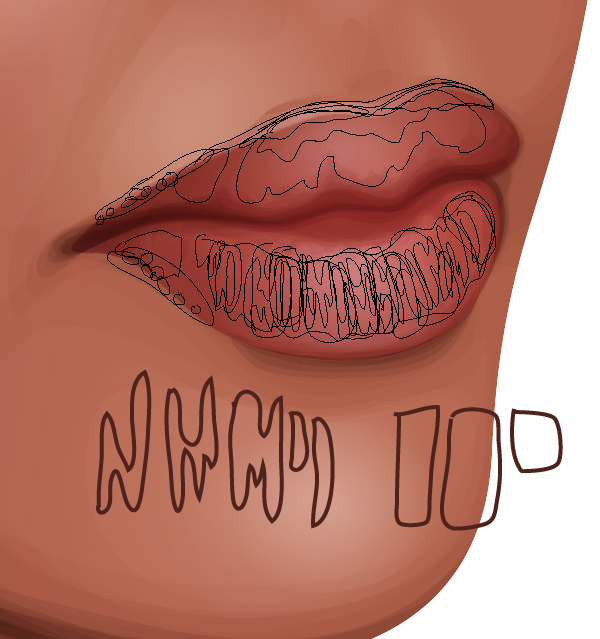
Use the highlighting skin gradient to add highlighted texture to the lips. Using the Pencil Tool, draw shapes similar to “M” “N” “H” and “I” across the bottom lip to add small creases. Finish off with more block shapes to help soften the edges of the shape. Don’t forget to add highlighting shapes to the top of the lip and the edges. These shapes are set to Blending Mode Screen, Opacity 20%.
Step 5
Add more intense highlights to the edges of the lips with the same gradient. This time set to Blending Mode Screen, Opacity 50%.
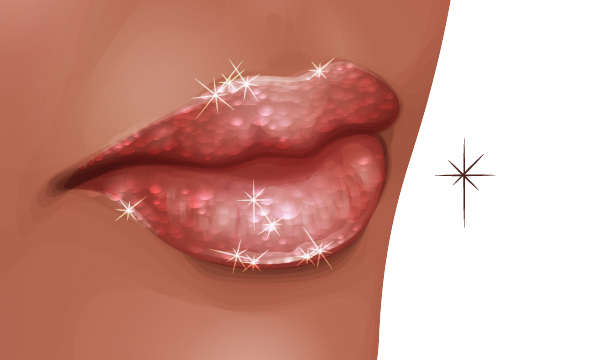
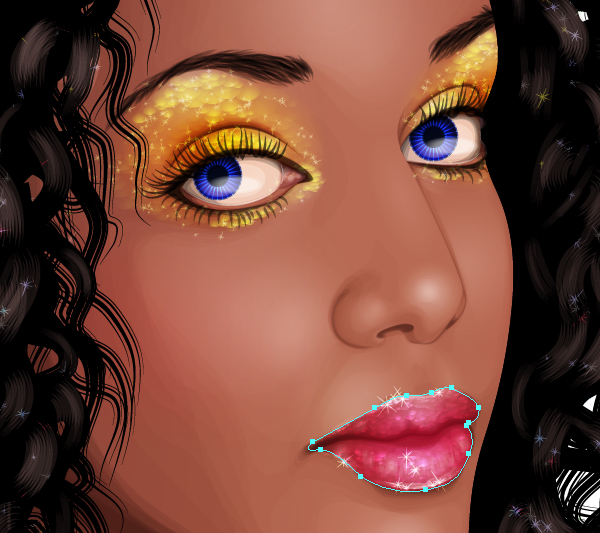
4. Add Glitter to the Lips
Step 1
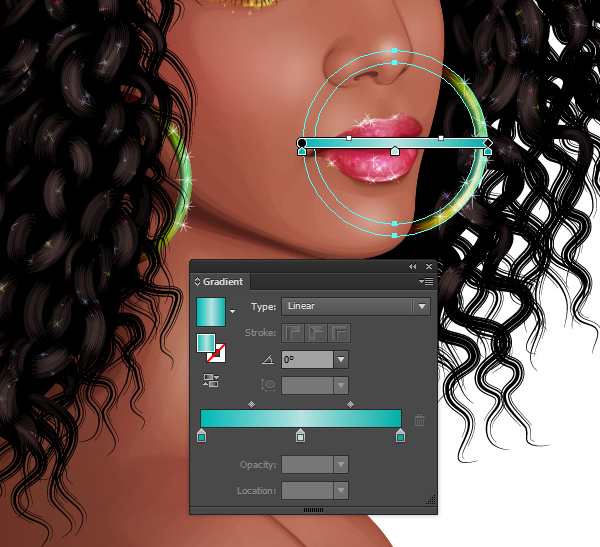
Here comes our first instance of adding glitter to the portrait. Let’s start with a soft glitter effect by drawing several even circles with the Ellipse Tool (L). Fill them with a rose transparent Radial Gradient with the source positioned at the bottom of the circle. Then set these shapes to Blending Mode Color Dodge, Opacity 30%.
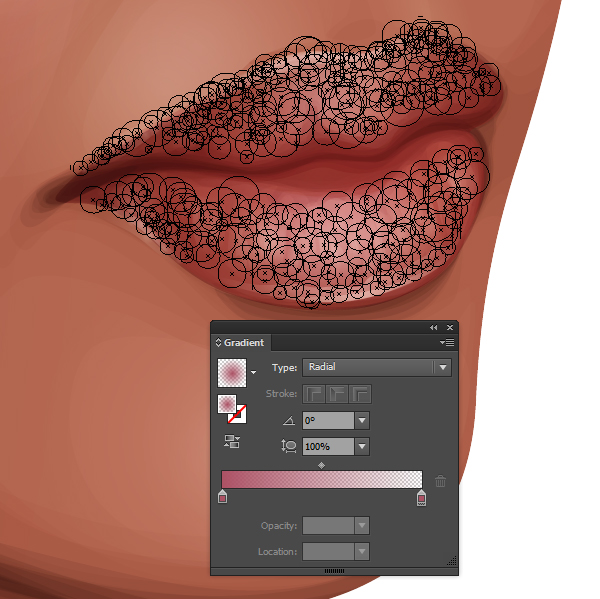
Step 2
Draw some additional circles on the lips, although not as condensed as before. Use the same source positioning and gradient, however this time set them to Blending Mode Color Dodge, Opacity 100%.
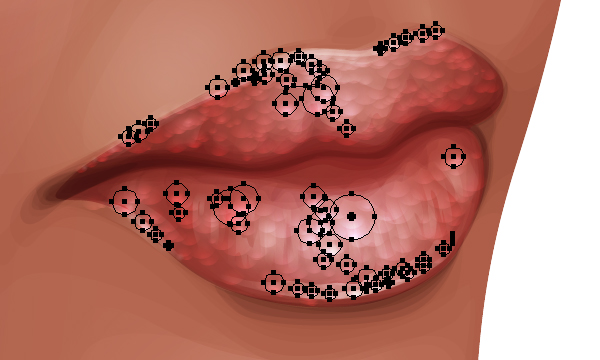
Step 3
Draw an eight pointed star using four strokes at to Stroke Weight 0.25pt with Width Profile 1 applied. Duplicate the stars across the lips to highlight the brighter glitter patches and set them to Blending Mode Color Dodge, Opacity 70%.
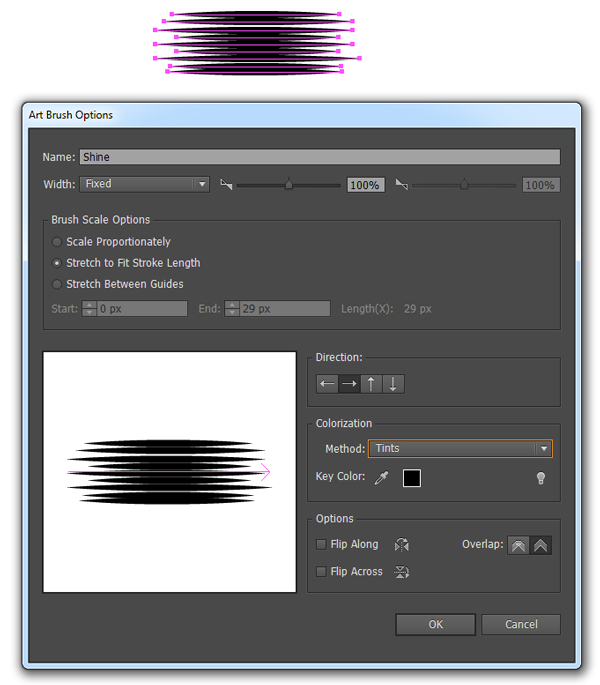
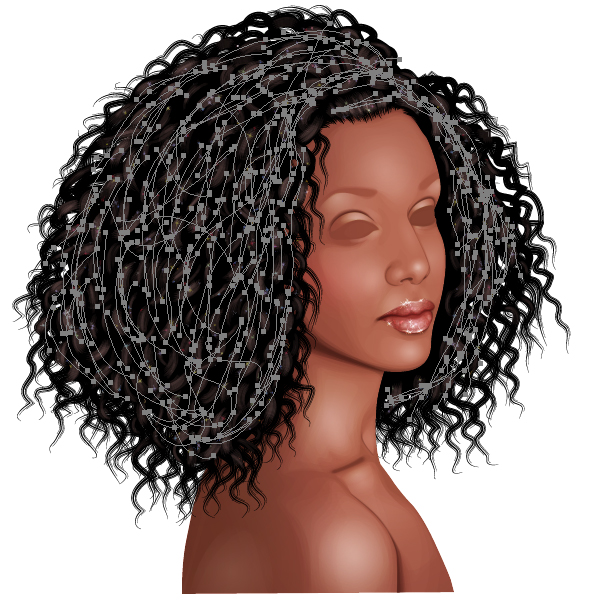
5. Create the Hair
Step 1
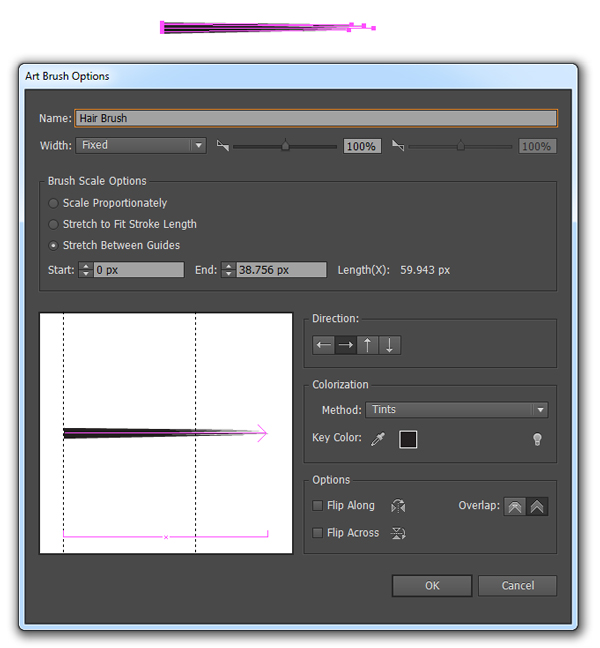
One thing I love about afro hair is that it’s so thick and full of ringlets. However to draw the hairs individually is not only time consuming but let’s be honest, pretty monotonous and boring. So to help make light of this task ahead, let’s create an Art Brush. Draw four horizontal strokes of varying thicknesses with the Line Segment Tool (\). Give them a black stroke color and apply the tapered Width Profile 4. Group them together and then create a New Art Brush via the Brushes panel.
Step 2
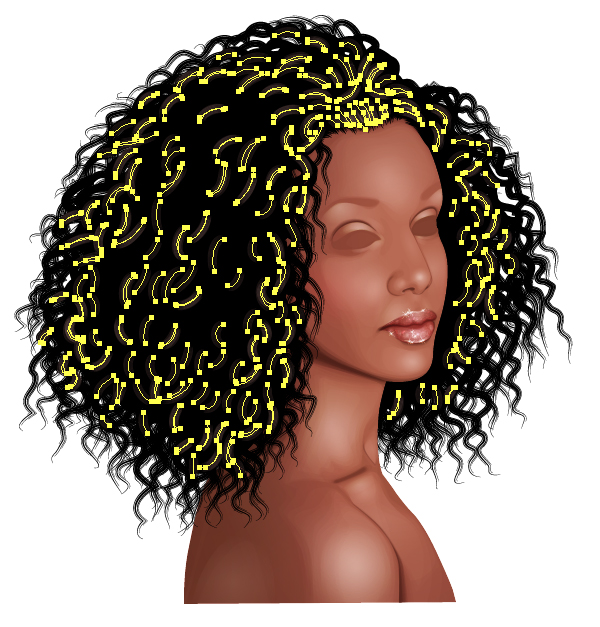
Loosely follow the reference image to create the hair behind the skin shading layers. Draw a variety of waves, using the Paintbrush Tool (B) and try to overlap them as much as possible towards the end of the hair mass.
Step 3
After adding the strokes of hair, use the Pen Tool (P) to fill in the rest.
Use the Direct Selection Tool (A) to modify the points to give a less smooth and sleek shape.
Step 4
Use the brush with a thinner Stroke Weight to help hide the edges of the shape you created to fill in the gaps of the hair mass. The more this is showing, the less natural the hair form will appear.
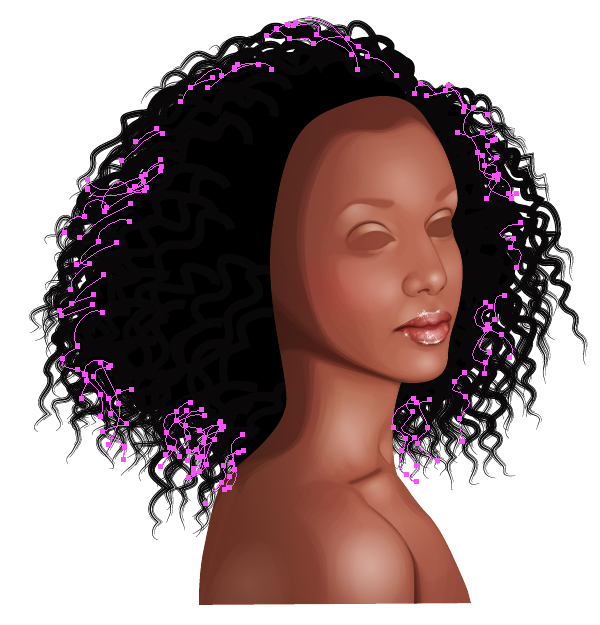
Step 5
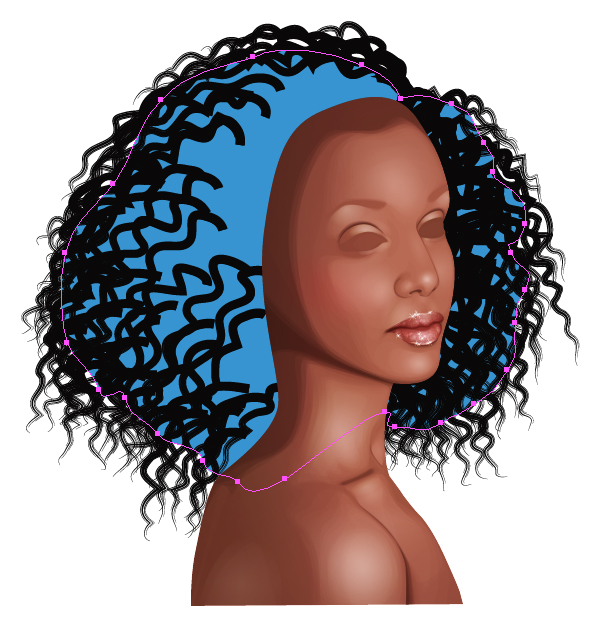
Use the same process to create the hair which overlaps the skin. This time, you want to give a clear gap near the hair line so this can be illustrated separately.
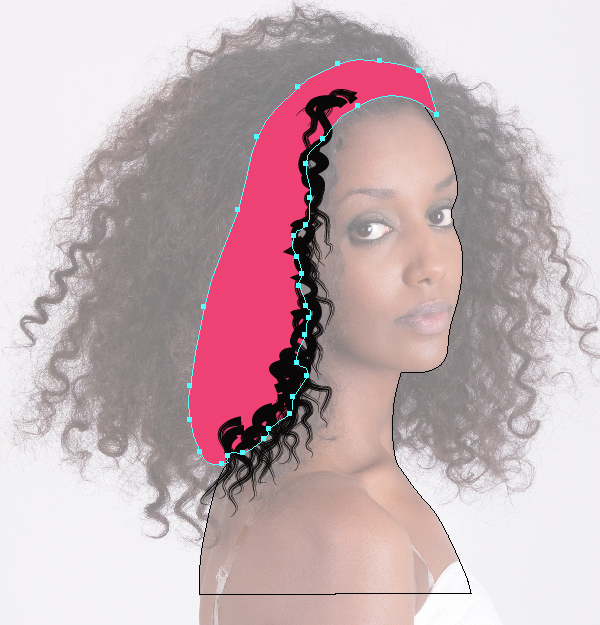
Step 6
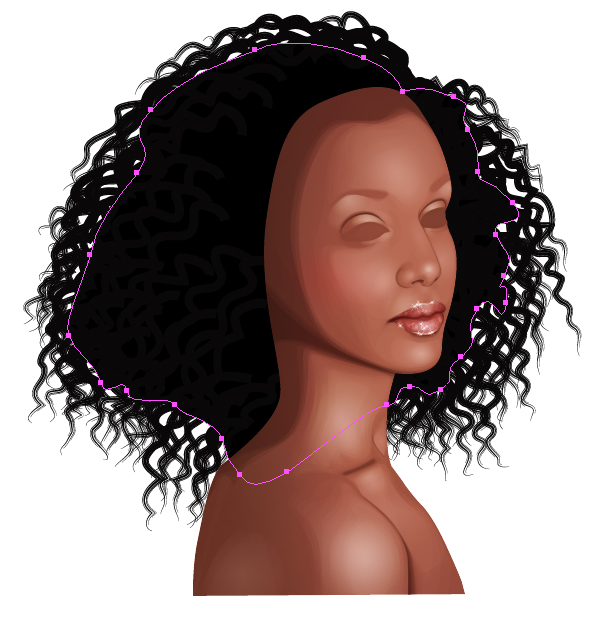
Hairlines are another tedious task, however with a thinner Stroke Weight and shorter strokes, the same brush can be used to create the hairline.
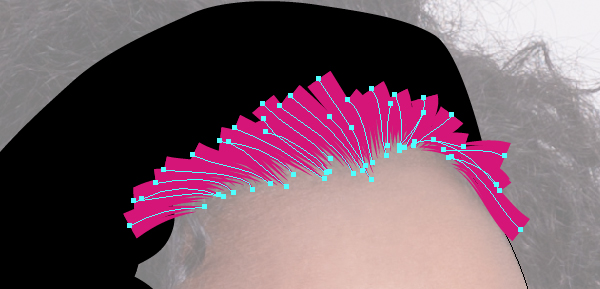
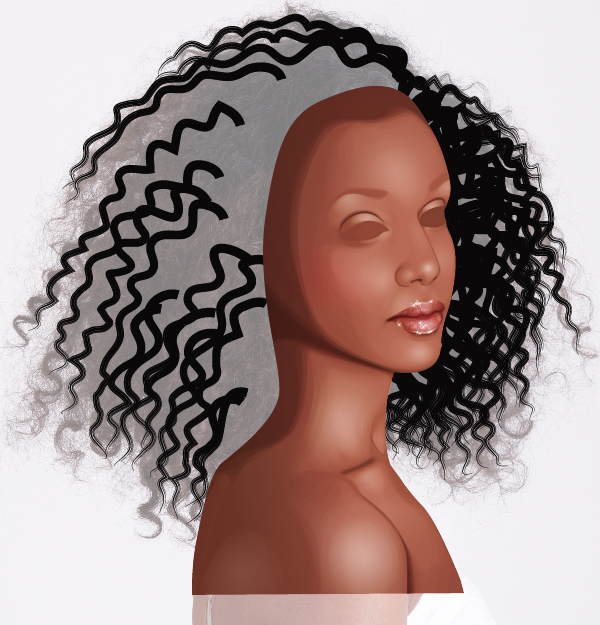
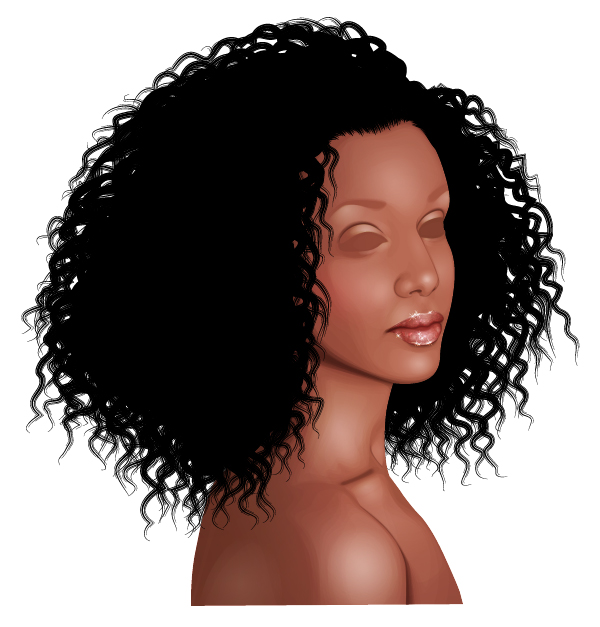
Now you have your mass of fabulous afro hair while still maintaining the look of individual curls and strands of hair.
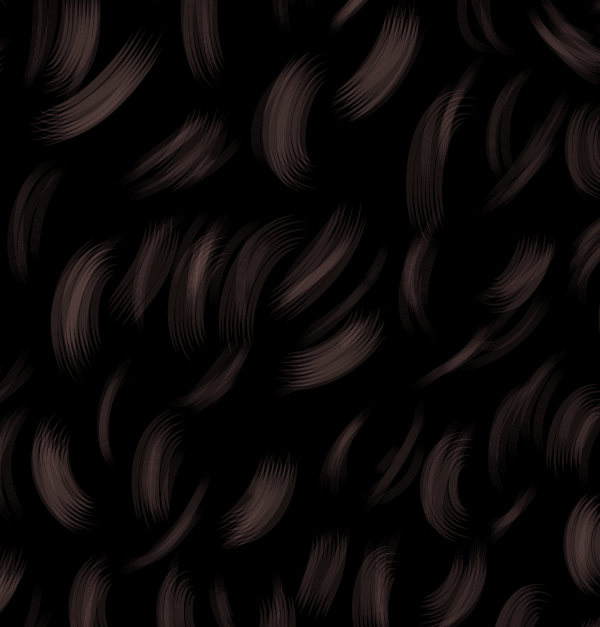
6. Add Shine and Texture to the Hair
Step 1
Let’s add some texture and shine to the curls as we don’t want flat looking hair. I’m going to create another Art Brush for this using Width Profile 1 and the settings below.
Step 2
Use the Paintbrush Tool (B) to draw arcs over where you’d like to place the shine in the hair. Set them to Blending Mode Screen, Opacity 70% and double over areas you wish to add more intense shine to.
Step 3
Then with a thinner Stroke Weight, using the same brush, add smaller highlights to the hair. This will also give more texture and show individual curls. Here’s a close up of the texture you should be aiming to achieve.
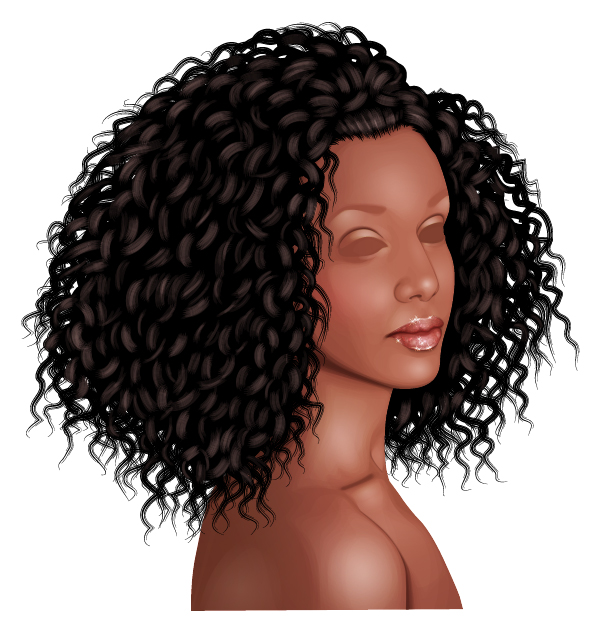
And here is the whole portrait with our newly shined and textured hair. For me, rendering this hair with brushes took under 30 minutes, where as doing it with individual strokes would have taken hours.
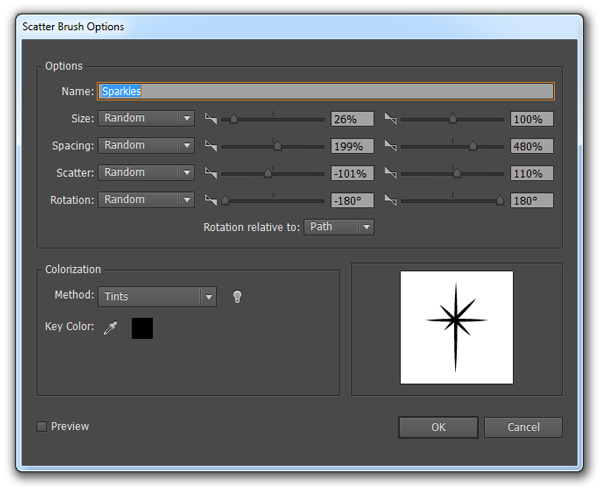
7. Let’s Add Some Hair Glitter
Step 1
More glitter? Why not! Let’s add some sparkles directly to the hair to create the illusion of glittered hairspray. I’m not going to approach it in the same way with gradients, however I am going to create a star Scatter Brush using a star used on the lips. I’ve used the below settings for this Scatter Brush.
Step 2
Then draw several strokes across the hair with the Paintbrush Tool (B). Let’s go for the multicolored hairspray glitter look, so change your stroke colors as you’re going along to create this. Set these strokes to Blending Mode Color Dodge, Opacity 40%. Due to the Blending Mode, the sparkles will only appear on the lighter areas of the hair (the curls you’ve enhanced). This is perfect, as technically light wouldn’t be accessing the internal curls of the hair and thus the glitter would not be catching the light to sparkle!
Step 3
Duplicate all the sparkle strokes and reduce the Stroke Weight and give it a white color. Change the Opacity to 20%. this will give a subtle neutral white sparkle to enhance the multicolored glitter. Here’s a close up of the final effect.

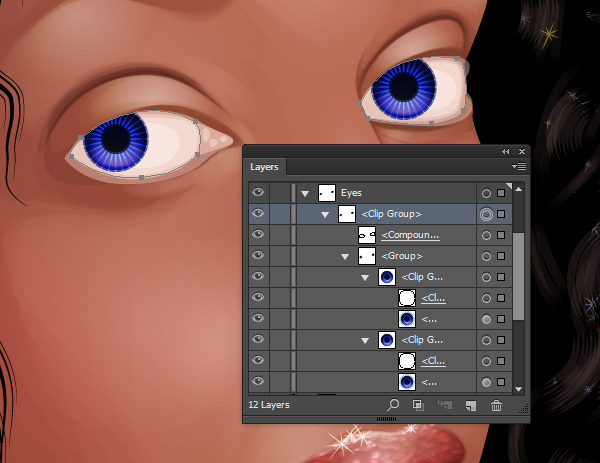
8. Vector the Eyes
Step 1
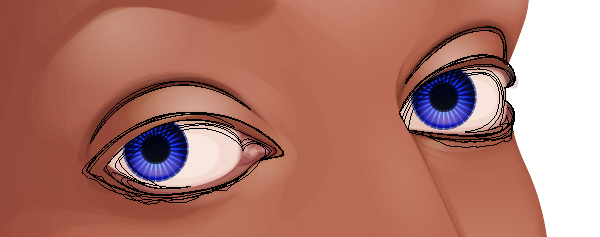
Now for one of my favorite parts, rendering the eyes! To ensure both eyes look the same, be sure whatever you do to one eye, you do to the other. This will keep a consistent style to the eyes.
Let’s start by shaping the eyeball. Use the highlighting skin color, not white, to create the shapes and highlights around the eye. Set these to Blending Mode Screen, Opacity 40%.
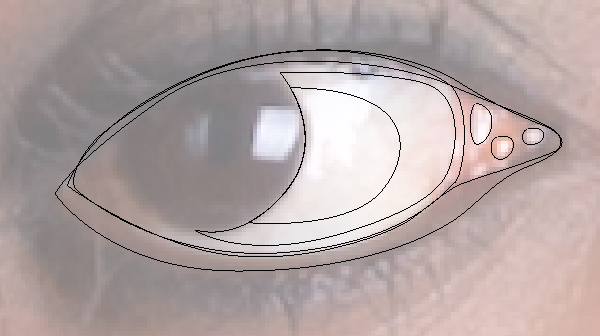
Step 2
Duplicate the shapes for the actual eyeballs and create a Compound Path of them (Control + 8). This will be used later on.

Step 3
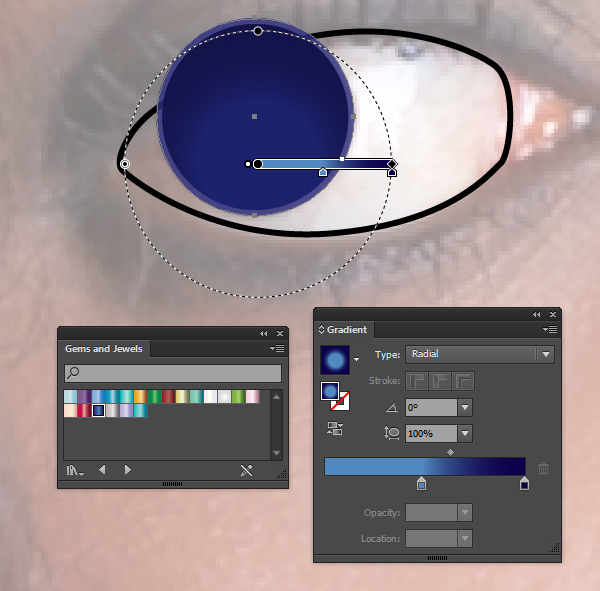
I’m going to give our glitter portrait blue eyes. Did you know that blue eyes are thought to be an ancient genetic mutation? Although they aren’t as common with black skin tones, they do exist nonetheless. So let’s give her some piercing blue eyes to make her a rare glitter goddess!
I’m using colors from the many gradients found in the “Gems and Jewels” Swatch Library found within Adobe Illustrators default libraries. First let’s draw a single even circle with the Ellipse Tool (L). In the Appearance panel, duplicate the fill and Offset Path by -0.5. Reduce the Opacity to 80% of the original fill and this will give the shape a soft edge.
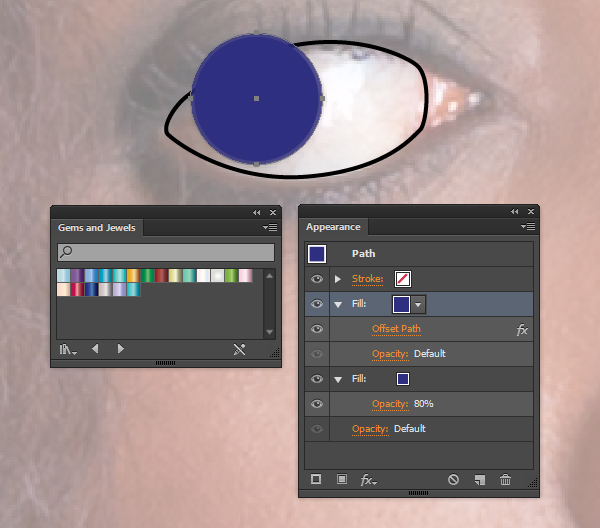
Step 4
Using the gradients from the library, I’ve removed one of the Gradient Sliders and turned it into a Radial Gradient. With the Gradient Tool (G) I’ve moved the source to the bottom of the circle. I’ve done this several times to create an intense transition of color and create a shine at the bottom of the iris.
Step 5
After offsetting several fills to create a soft edge to the pupil, I’ve added a Zig Zag star burst behind them to create a textured look to the iris.
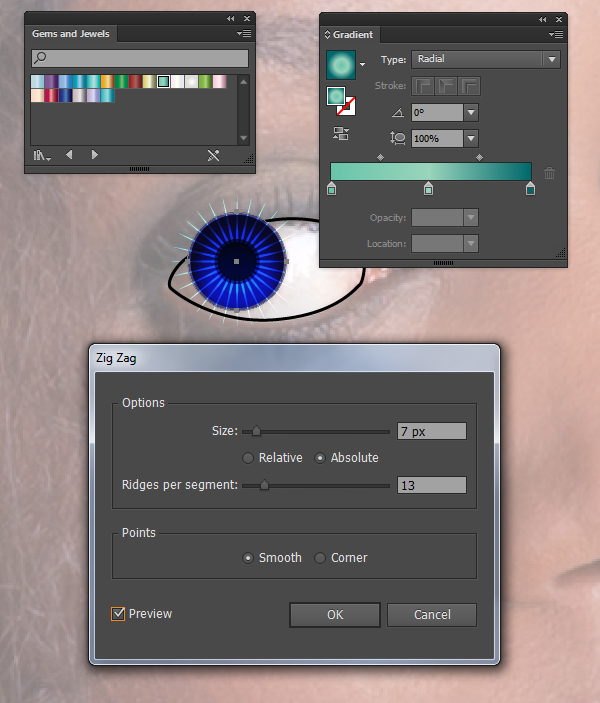
Step 6
I’ve then finished off with a golden gradient at the bottom of the iris, set to Blending Mode Screen, Opacity 50%.
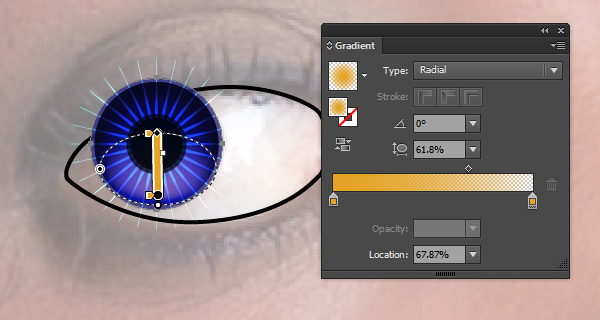
Step 7
Duplicate the circle for the eye and use it to create a Clipping Mask (Control + 7) to trim off the edges of the star burst. Then duplicate the clipping mask group to use it as the other eye. Group both of these together (Control + G) and use them with the duplicate of the eyeball created earlier on, to trim the edges of the eyes within another Clipping Mask.
Step 8
Use the rose of the lips to add shading and color around the eye line and corner of the eye. Set these shapes to Blending Mode Multiply, Opacity 30%.
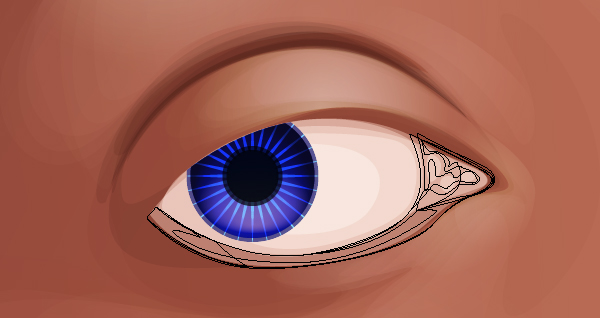
Step 9
With an off black color, add shading around the eye and eyelid crease. This will create a subtle eye line effect. Set these shapes to Blending Mode Multiply, Opacity 20%.
Step 10
Using the Paintbrush Tool (B) and a brush I created from my Width Profile brush tutorial, use the “Width Profile 1” brush to draw strands of hair for the eyebrows. I’ve used the same color as the hair so it matches and set it to Blending Mode Multiply, Opacity 30%.

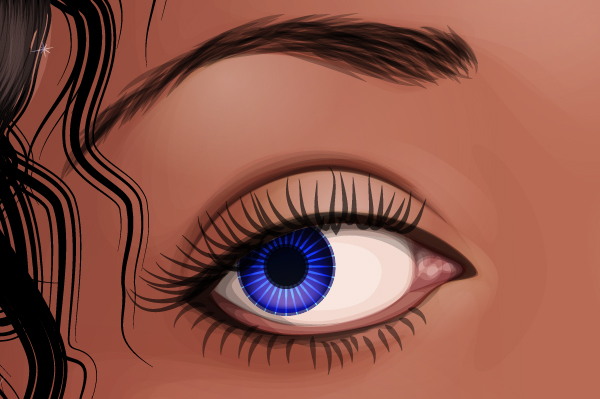
Step 11
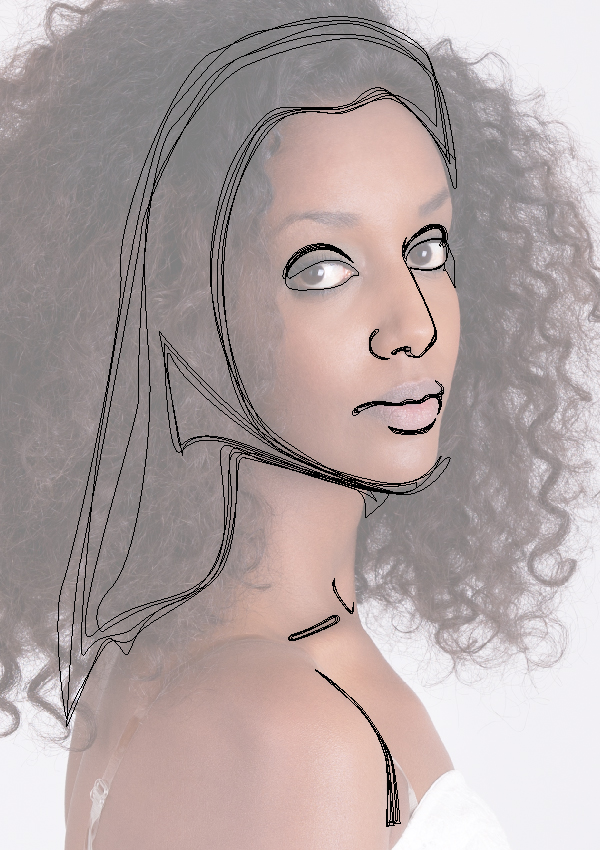
Although the majority of the time I’m confident with the placement of things such as the eyes, shading and hair… the eyelashes are an area I like to refer back to the stock image. I just need help in the direction the eyelashes should be going. So I hide the skin layers and make the eye visible on top of the stock image. This is so I can see the edges of the eyelashes and know where to draw them.
With the same brush and color I used for the eyebrows, I draw each of the eyelashes. Make some the top lashes overlap the eyeball. I draw shapes in the shape of a “J” for this as it creates the overlap needed. The lower eyelashes are created in a similar way, however reduce the Opacity slightly as they aren’t as bold.
9. Add Color and Glitter to the Eyeshadow
Step 1
Did I hear right, you want more glitter? OK, let’s add some to the eyeshadow. First we need a base color to work from. I’ve modified a golden gradient from the “Gem and Jewels” library. I’ve used the Appearance panel to add a more vibrant effect to them and then included them in the skin shading clipping mask group.
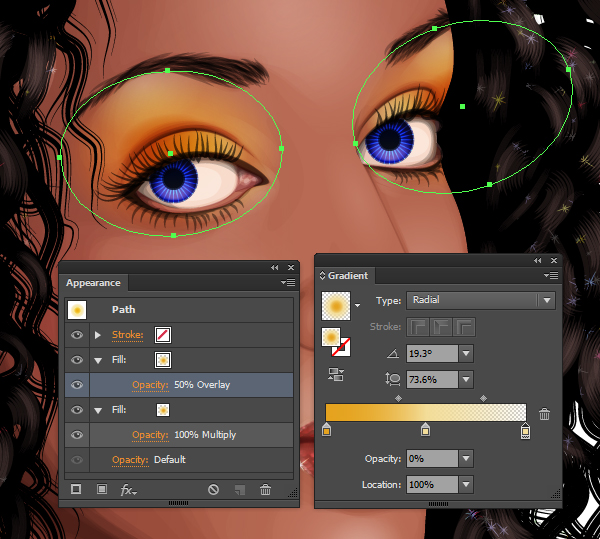
Step 2
I’m going to use the same technique as the lip glitter, by adding gradients with the source displaced at the bottom of the circles all over the eyes. Of course this time, fill with a golden gradient – the same as the one used for the eyeshadow.
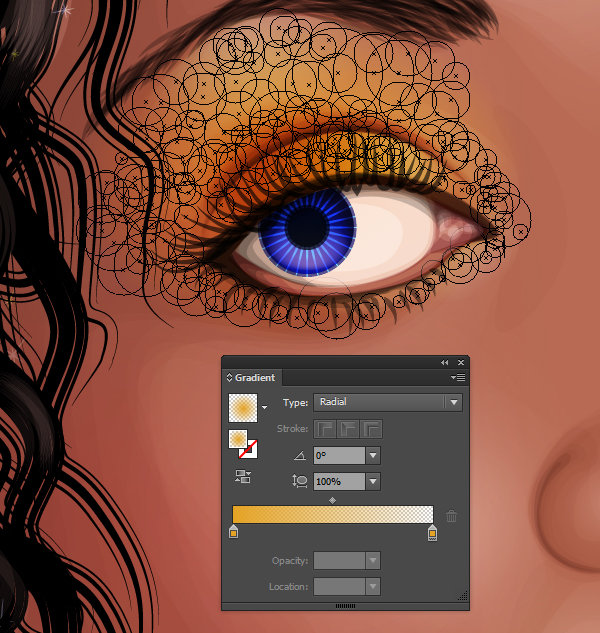
Step 3
I’ve focused the higher Opacity circles along the brow bone, eyelid, corner of the eyes and directly below the shine on the eyelid below the eye.
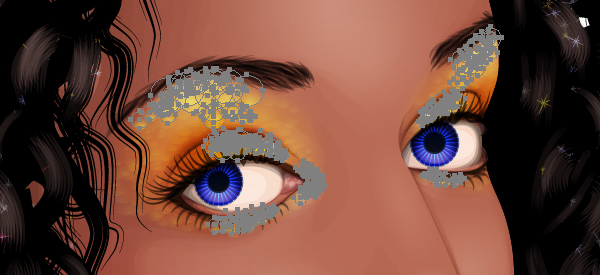
Step 4
Then use your sparkle Scatter Brush to add golden sparkles to the eyeshadow. Remember to add them all over the eyelid, brow bone and corner of the eyes. No such thing as too much glitter right?!
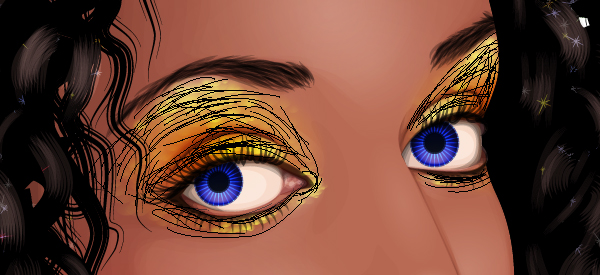
10. Refine the Eyes and Lips
Step 1
I’m going to add a gradient to the eyes with a shifted source to create the shine on the eyeball. Then I’ll add a line to the corner of the eye and along the water line. I’ll use an off white color for this, set to Blending Mode Screen, Opacity 100%.

Step 2
I duplicate the shape for the lips and change the gradient to a more magenta pink. This is to help create a more vibrant lip color to match the bold colors in the eyes and eyeshadow.
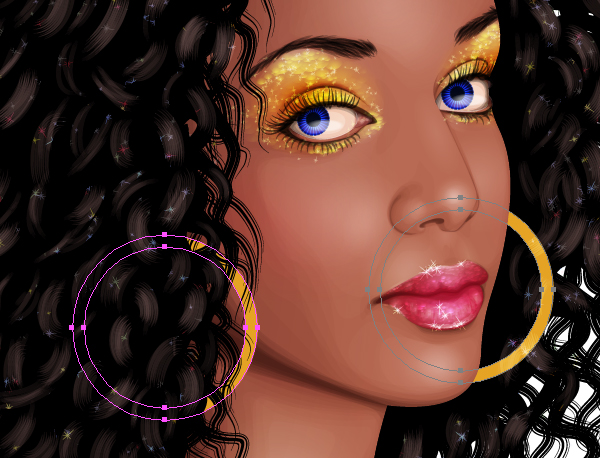
11. Create a Pair of Hoop Earrings
Step 1
I’m a fan of hoop earrings, I wear them myself. The bonus is they are incredibly easy to render in an effective manner.
Draw a single even circle with a 10pt Stroke Weight and a golden fill. Then Object > Expand it to a compound path. Duplicate the shape and place it behind the skin and in front of the hair in the back.
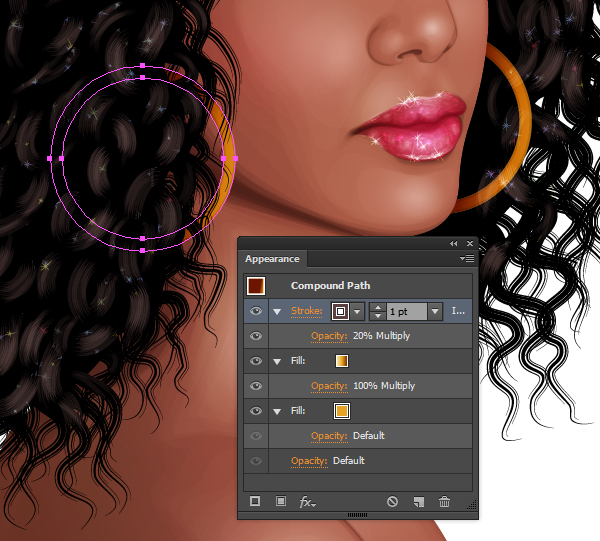
Step 2
Again using a gradient from the “Gem and Jewels” library, I’ve added a gradient fill to the hoops. I’ve modified the direction of the gradient using the Gradient Tool (G) and I’ve added an internal stroke.
Step 3
Oh is this another opportunity to add sparkles? Why not! First let’s use the “shine” Art Brush we created for the hair to add some off white strokes to the earrings. This will create an intense shine and texture to the hoops. Set these to Blending Mode Color Dodge, Opacity 20%. Then contain them within a Clipping Mask (Control + 7) of the earrings.

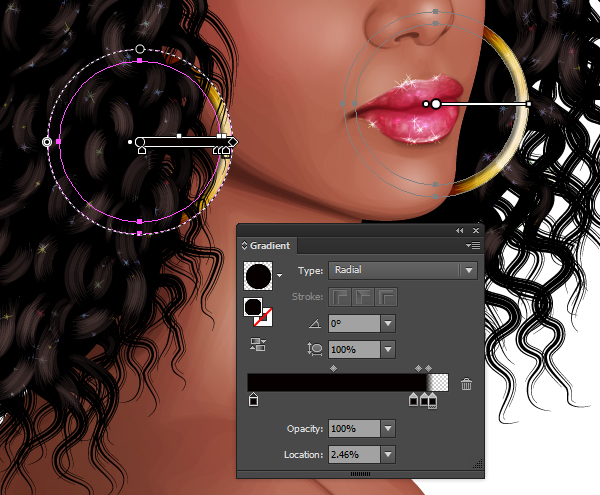
Step 4
Use a black Radial Gradient to add a slight contrast in color to the hoops. This should add a subtle shadow to the edge and create a more 3D effect.
Step 5
Add sparkles to the hoops by duplicating some of the stars from the lips to the earrings. Remember to resize and rotate them with the Free Transform Tool (E). As we want a more controlled look to the sparkles, duplicates of the stars works better than using the Scatter Brush.
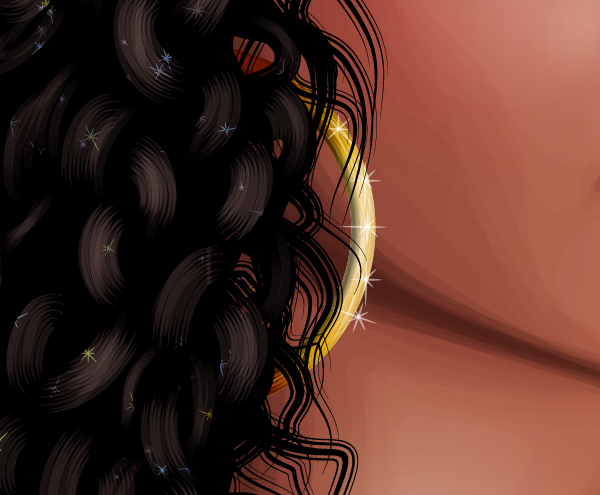
Step 6
Let’s make the hoops more colorful by adding a light blue gradient and setting it to Blending Mode Color Burn, Opacity 50%. You can play around with the gradients and Blending Modes to create some unique looking combinations. I’ve opted for this as it add a subtle green tinge as there is no green in the rest of the colors in the portrait.
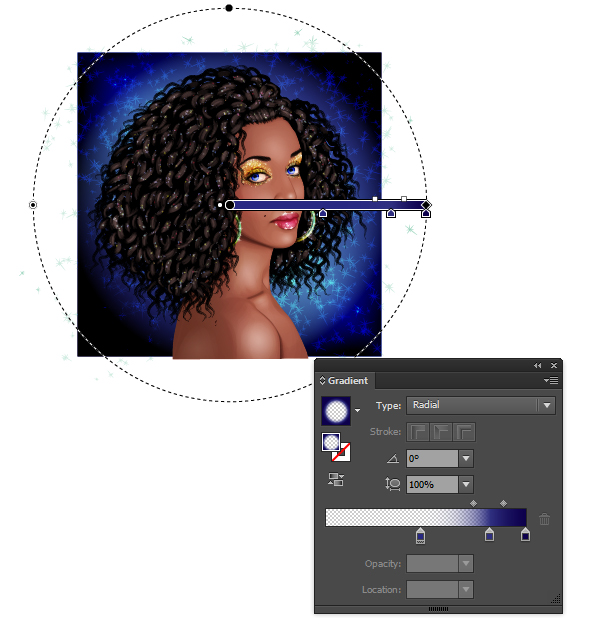
12. Add a Sparkling Background
Step 1
I’m going to add a bold, sparkling background to the portrait. I think I’ll use the same colors of her eyes to help make them pop. So using the sapphire gradient as a fill, I draw a square behind the portrait.
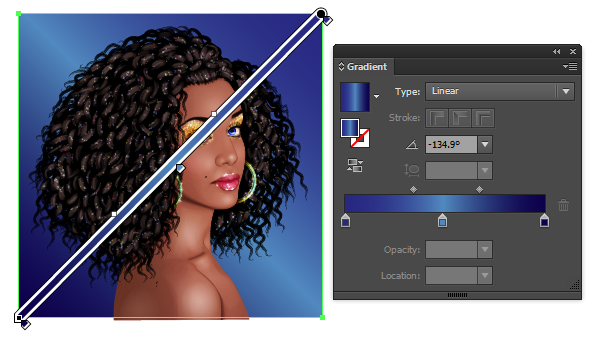
Step 2
Then it’s time to draw loads of strokes with the sparkling Scatter Brush behind the portrait. I’ve set these to Blending Mode Overlay, Opacity 100% so they are more prominent over the bright section of the gradient.
Step 3
Using an inverted transparent Radial Gradient set to Blending Mode Multiply, create a quick vignette effect around the background.
Step 4
Finally, use the Artboard Tool (Shift + O) to create the boundaries to your portrait.
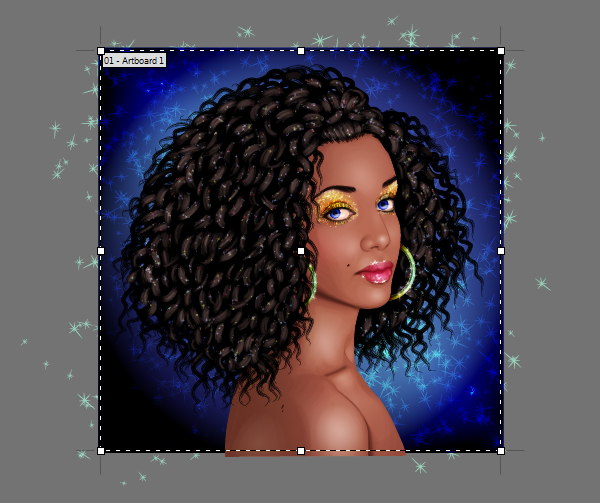
No Such Thing as Too Much Glitter!
The people who “liked” my Facebook page are to blame for the overdosing of glitter in this tutorial, although I have to agree, that there is no such thing as too much glitter! I hope you’ve enjoyed this portrait tutorial and are able to add loads of glitter and sparkles to your own creations.