
People like pictures. They like looking at them, they like clicking on them. So it makes sense to use them in the navigation for your site.
You may already use featured images in your archive pages, letting users get a greater insight into what a post is about and making your archive pages look better. The nice big clickable image also makes the process of navigating through to a page or post more intuitive.
But there are other places where you can use featured images to aid navigation to parts of your WordPress site. In this two-part tutorial, we’ll show you how to create a grid of images which link to the child pages of a given page in your site, or to the child pages of the current page.
In this first part, I’ll demonstrate how to write the PHP to fetch the pages and output their titles and featured images, inside links. And in the second part, Ian Yates will show you how to add CSS to turn your list into a great-looking grid.
What You’ll Need
To follow along with this tutorial, you’ll need the following:
- A development installation of WordPress—don’t add this to your live site until you’ve tested it.
- A theme which either has action hooks for you to add content or which you can edit. If it’s a third-party theme without hooks, create a child theme and edit that.
- A code editor.
Deciding on Your Approach
The first thing to do is decide which pages you want to output. In this tutorial, I’ll demonstrate two options:
- A list of the child pages of the current page, with images.
- A list of the child pages of a specific page, with images. This can display anywhere in your site, not just on the parent page.
Getting Started
The starting point is the same for both approaches.
Start by creating a plugin in your wp-content/plugins folder. You’ll need to create a folder for your plugin because in the second part of this tutorial, you’ll be adding a stylesheet as well as the main plugin file.
Once you have your folder, create a PHP file for your code. I’m calling mine tutsplus-child-pages.php.
Now set up your plugin file with the commented-out text at the top:
/**
 * Plugin Name:  Tutsplus List Child Pages
 * Plugin URI:   https://github.com/rachelmccollin/tutsplus-list-child-pages
 * Description:  Output a list of children of the current page or a specific page with featured images.
 * Author:       Rachel McCollin
 * Author URI:   https://rachelmccollin.com
 * Version:      1.0
 * Text Domain:  tutsplus
 * License:      GPLv2.0+
 */
This tells WordPress what your plugin is and what it does.
Now, if you haven’t already, go ahead and create some pages. I’ll create some pages with child pages, including a Locations page as the parent for my specific page list.
Here are my pages in the admin:

Now it’s time to write the function to output the list.
Outputting a List of Children of the Current Page
Let’s start with this option. This will output a list of all of the children of the current page, with images, links, and the title.
This is a useful approach if your site has a hierarchical page structure, and you want to encourage people visiting top-level pages (or middle-level pages, if you have them) to visit the pages beneath them in the structure.
Start by creating a function in your plugin file:
function tutpslus_list_current_child_pages() {

}
Now, inside that function, check if we’re on a page. Everything else will go inside that conditional tag:
if ( is_page() ) {

}
Next, set up the $post global variable and define the parent page:
global $post;

// define the page they need to be children of
$parentpage = get_the_ID();
After that, define the arguments for the get_pages() function:
// define args
$args = array(
    'parent' => $parentpage,
	'sort_order' => 'ASC',
	'sort_column' => 'menu_order',
);

$children = get_pages( $args );
You may want to change some of those arguments. I’ve used menu_order for sorting so I can manually adjust this, but you could use date, title, or any other sortable parameter.
The next task is to set up a foreach loop using the results of that get_pages() function:
if ( $children ) { ?>

    <div class="child-page-listing">

		<h2><?php _e( 'Learn More', 'tutsplus' ); ?></h2>

		<?php //foreach loop to output
		foreach ( $children as $post ) {

			setup_postdata( $post ); ?>

			<article id="<?php the_ID(); ?>" class="child-listing" <?php post_class(); ?>>

				<?php if ( has_post_thumbnail() ) { ?>

					<a class="child-post-title" href="<?php the_permalink(); ?>">
						<?php the_title(); ?>
					</a>

					<div class="child-post-image">
						<a href="<?php the_permalink(); ?>">
							<?php the_post_thumbnail( 'medium' ); ?>
						</a>
					</div>

				<?php }	?>

			</article>

		<?php } ?>

	</div>

<?php }
Let’s run through that code:
- First, we’re checking if the
get_pages()function has returned any results, i.e. if$childrenis populated. - Then we start a
foreachloop for each child page as the$postvariable. - Within that loop, we open an
articleelement. - We check if there’s a featured image (or post thumbnail) and output it inside a link to the page.
- We then output the title of the page inside a link to it.
- Finally, we close our elements and conditional checks and the foreach loop itself.
I’ve added CSS classes to each element so we can style these in the second part of this tutorial.
Adding the Code to the Theme
Now you have your function. The next step is to add it to your theme, so that it can be output in the correct place.
If your theme has action hooks, you can hook your function to one of those. So if mine had an after_content hook, I could add this code in my plugin, outside the function:
add_action( 'after_content', 'tutpslus_list_current_child_pages' );
However, I’m using the Twenty Sixteen theme for this demo, which doesn’t have action hooks like this. So instead I’ll need to add my function directly in a template file.
If you’re working with your own theme, you can add this into the page.php file at the point where you want the list to be displayed.
But if you’re using a third-party theme, you mustn’t edit it, because all your changes will be lost next time you update the theme. Instead, create a child theme. Create a copy of the page.php file from your parent theme (or a copy of the loop file for page.php) in the new child theme and edit that instead.
Identify where in your page you want the list to be output and add this to your theme template file:
tutpslus_list_current_child_pages();
I’ve added it after the loop in my child theme’s page.php file.
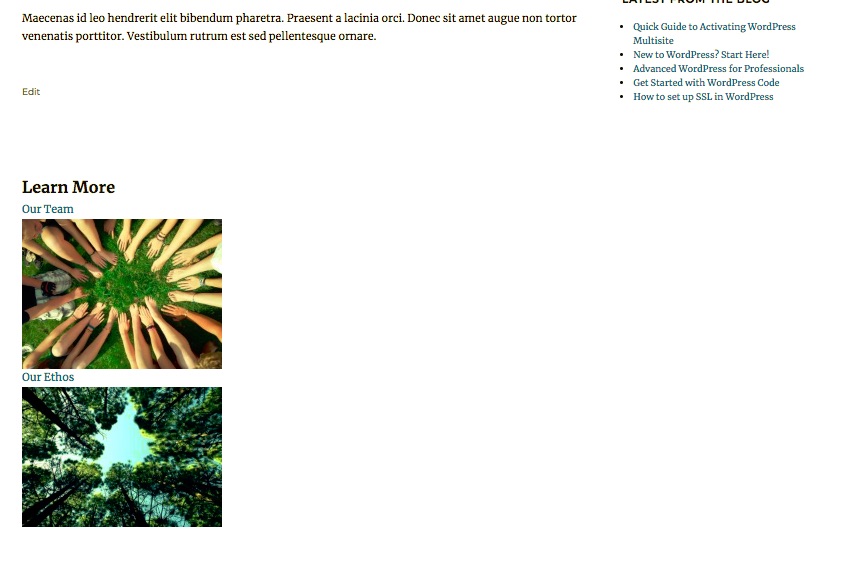
Now let’s take a look at the site. Here’s my About Us page with its child pages:

So that’s how you add links to the child pages of the current page. But what if you want to add links to the children of one specific page? Let’s tackle that next.
Outputting a List of Children of a Specific Page
The code for this is almost identical to the code for the children of the current page. The difference is in defining the parent page you will use when running get_pages().
Make a copy of the first function in your plugin file and edit the function name so they’re different.
Find the conditional check for being on a page and remove that. Don’t forget to delete the closing braces of that check too.
Now find the line that reads:
$parentpage = get_the_ID();
Replace it with this:
$page = get_page_by_path( 'locations', OBJECT, 'page' );

$parentpage = $page->ID;
You’ll see that this uses the get_page_by_path() function, with its first parameter being the slug of the target page. Edit this so it uses the slug of the page you want to target in your site.
It’s also good practice to edit the CSS classes in this function so they’re distinct from those in the first function. That way, if you use both, you can use different styling for each.
Here’s the function in full after making these edits:
function tutpslus_list_locations_child_pages() {

	global $post;

	// define the page they need to be children of
	$page = get_page_by_path( 'locations', OBJECT, 'page' );

    $parentpage = $page->ID;

    // define args
	$args = array(
		'parent' => $parentpage,
		'sort_order' => 'ASC',
		'sort_column' => 'menu_order',
	);

	//run get_posts
	$children = get_pages( $args );

	if ( $children ) { ?>

		<div class="child-page-listing">

			<h2><?php _e( 'Our Locations', 'tutsplus' ); ?></h2>

			<?php //foreach loop to output
			foreach ( $children as $post ) {

				setup_postdata( $post ); ?>

				<article id="<?php the_ID(); ?>" class="location-listing" <?php post_class(); ?>>

					<?php if ( has_post_thumbnail() ) { ?>

						<a class="location-title" href="<?php the_permalink(); ?>">
							<?php the_title(); ?>
						</a>

						<div class="location-image">
							<a href="<?php the_permalink(); ?>">
								<?php the_post_thumbnail( 'medium' ); ?>
							</a>
						</div>

					<?php }	?>

				</article>

			<?php } ?>

		</div>

	<?php }

}
Adding the Code to the Theme
Once again, you’ll need to add your code to your theme. In this case, you won’t just want your list to output in static pages, and you may want to put it in a different place.
If your theme has action hooks, you can use one of those in your plugin file, in a similar way to before:
add_action( 'before_footer', 'tutpslus_list_locations_child_pages' );
I’m going to add it to the footer of my theme, again creating a duplicate of footer.php in my child theme and editing that.
Here’s the code in my footer.php file, immediately inside the opening of the footer element:
<?php tutpslus_list_locations_child_pages(); // list locations pages ?>
And here’s the list output in my footer. This is at the bottom of a single post:

Tip: You might want to avoid outputting this list in your Locations page if you have both functions running, to avoid duplication. Try adding a conditional tag using the page id to achieve that.
Next Steps
You now have two lists of pages: one of the child pages of the current page and another of the child pages of a specific page.
Right now, the images are all shoved over to one side of the page, and the titles don’t look so good. In the next part of this two-part tutorial, you’ll learn how to style the images to create a grid with a CSS grid layout, and how to integrate the title text into that grid.