You’re creating a video to share with your social networks. And you want to add cartoon effects. But there’s a problem – you’re not a professional designer, or perhaps you don’t have access to advanced animation apps. So what are your options?
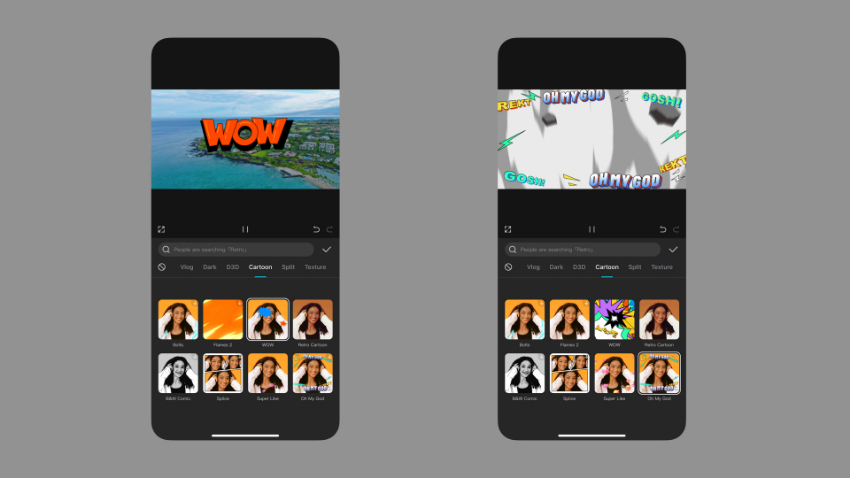
Thanks to CapCut, it’s easy to create cartoon effects in a video. That’s the focus of this guide! In this tutorial, you’ll learn all about cartoon effects in CapCut. At the touch of the button, you can add cartoon effects to any video. Then, you can instantly export and share directly to your favorite social media platforms. Let’s learn how!
Cartoon effects in CapCut: Why should I use them in a video?
You’ll soon see that CapCut has a vast array of cartoon video effects to choose from. But what are the advantages to using them? How can they help your videos become more stylish and fun to watch?
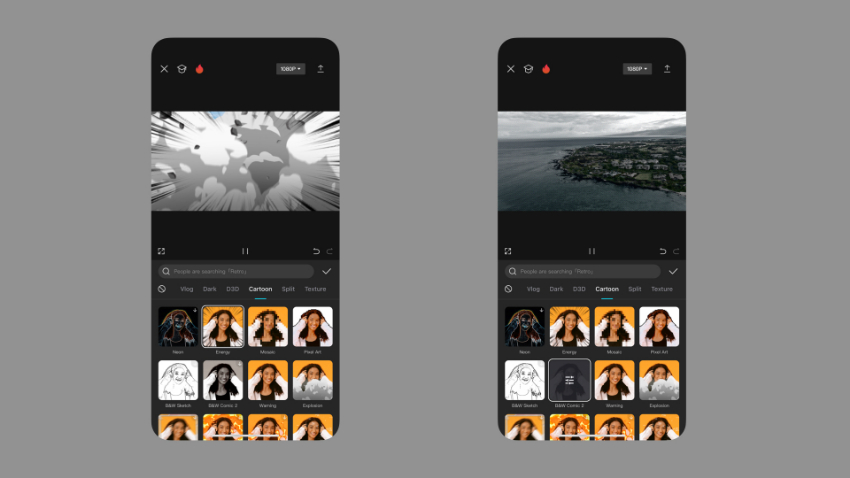
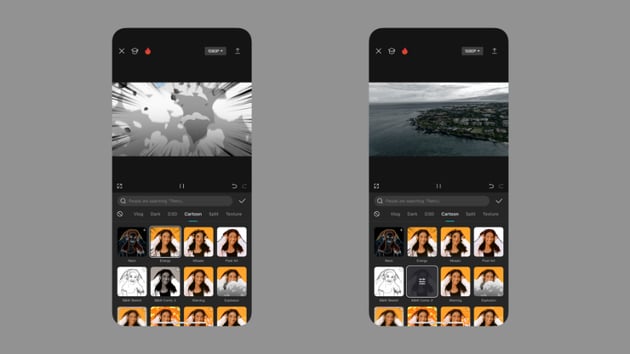
The benefits are many. As you think about whether to use CapCut cartoon effects, consider this:
- Cartoon effects are a creative edit. Cartoon styles add an element of creativity not often seen in everyday videos.
- You can boost visual appeal. The trick to producing a successful video is to keep it engaging and exciting. The shortcut to success here is making every video more visually interesting. Cartoon effects are definitely eye-catching! Consider them if your goal is to boost engagement and drive up your view count.
- Cartoon styles help you build distinctive videos. Remember: with CapCut, you’re often sharing directly to social media. It can be very tough to stand out. Using designs from the library of cartoon effects helps you do exactly that.
- They’re quick and easy to add. CapCut has an intuitive, simple interface. This has two advantages. One is that you don’t have to be an expert editor to start using CapCut right away. The other is that edits are incredibly quick to make. In CapCut, you won’t suffer through any complex workflows or tough editing steps.
It’s clear to see: CapCut cartoon effects are a great edit to enhance your videos. Let’s now dive in and learn how to apply them to any video, step by step.
How to use cartoon effects in CapCut (step-by-step guide)
CapCut is a multi-platform app. That means you can use it on your preferred mobile device or desktop computer. For this tutorial, I’ll be using CapCut on an Apple iPhone running iOS 17. If you’re an Android fan, no problem. You can download CapCut from the Google Play Store for free. Plus, desktop versions are always available for Mac and Windows.
We’ll learn to use cartoon effects in CapCut by using a stock video clip from Envato Elements. Want to follow along in real time? Click here to download the clip in moments.
1. Launch a CapCut project to edit
CapCut’s working video files are called projects. Projects group all of your multimedia together in one place. And they give you instant access to style edits and effects. In short, an open project is CapCut’s main editing workspace.
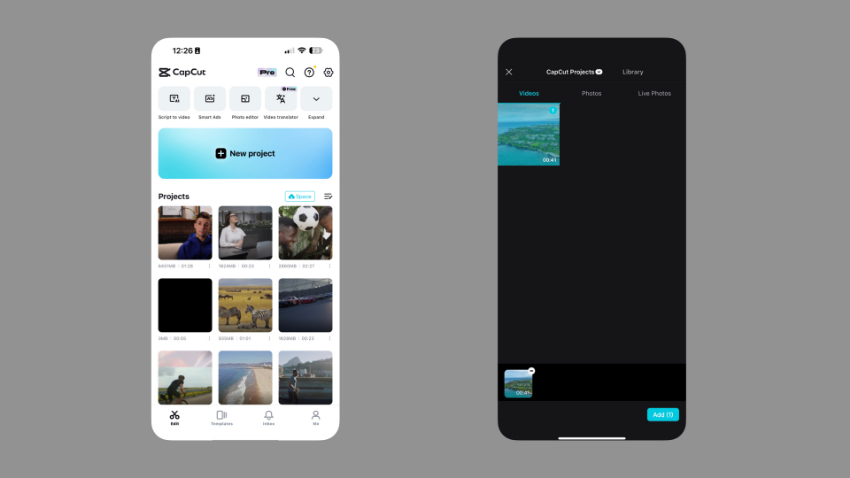
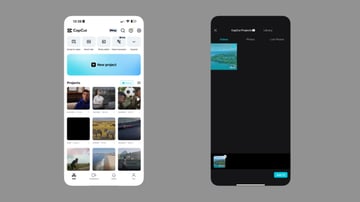
To begin adding cartoon effects to a CapCut video, add or open a project. When you open CapCut, you’ll see four menu options across the bottom of your screen. These are labeled Edit, Templates, Inbox, and Me. Choose Edit, and you’ll be on CapCut’s project screen. You can choose an existing project, or make a new one. Here, let’s start from scratch by tapping New project.
When you tap New project, your Camera Roll will open. Here, you can choose from one or more videos to add to the project. On each thumbnail, select the bubble in the upper right corner. When you’ve made your video choices, tap the blue Add button in the lower right corner. CapCut will import your videos!
2. Open the Effects panel
When your CapCut project is open, check out the layout onscreen. At the top is the video preview panel. Here, you’ll see each clip preview in real time. As you make edits or add effects, they’ll appear instantly. This way, you don’t have to export a finished copy of your video to see how changes will look.
Below the video preview is the Timeline. This panel becomes important later in the tutorial! What it does is control the timing and sequence of your video clips and effects. You can rearrange clips and media, plus alter their duration.
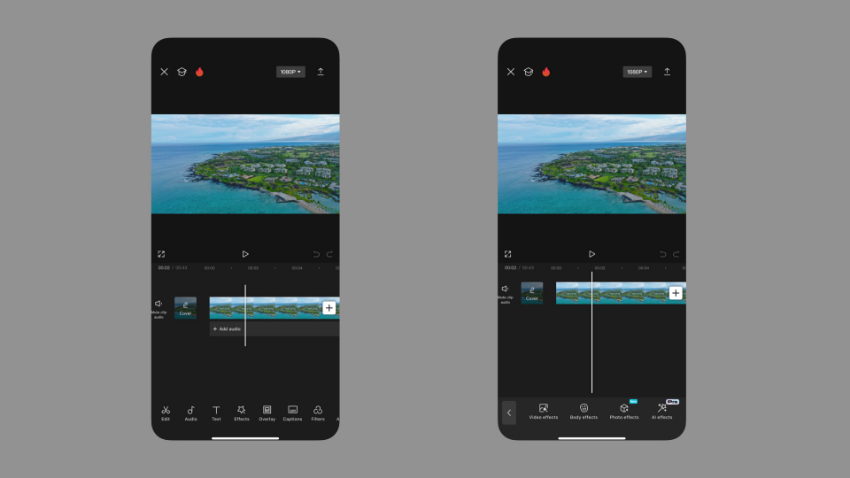
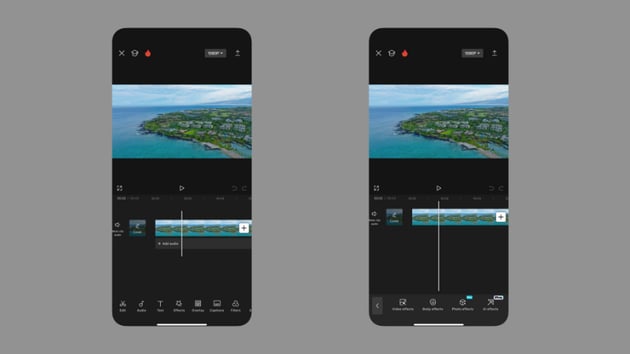
At the very bottom of your CapCut screen is the toolbar menu. It appears as a row of buttons. Each of these buttons launches a new set of tools and features to edit videos. Look at the options from left to right: Edit, Audio, Text, Effects, Overlay, and more. To apply cartoon styles to your CapCut video, choose Effects.
When you choose Effects, watch the toolbar menu transform with new options. For cartoon effects, you’ll need to tap the first button on the left: Video effects. CapCut’s vast Video effects gallery panel will launch.
3. Find and browse cartoon effects in CapCut
CapCut offers hundreds of built-in video effects. You’ll see them on the Video effects panel. By default, the panel opens on the Trending category. These video effects are those that are currently the most popular on CapCut. Thus, they’ll change when you look at the app again on another day.
Beside the Trending category, you’ll see buttons for many other video effect styles. Scroll across these options by dragging your finger right to left. Near the end of the list, you’ll come to the Cartoon tab. Tap Cartoon.
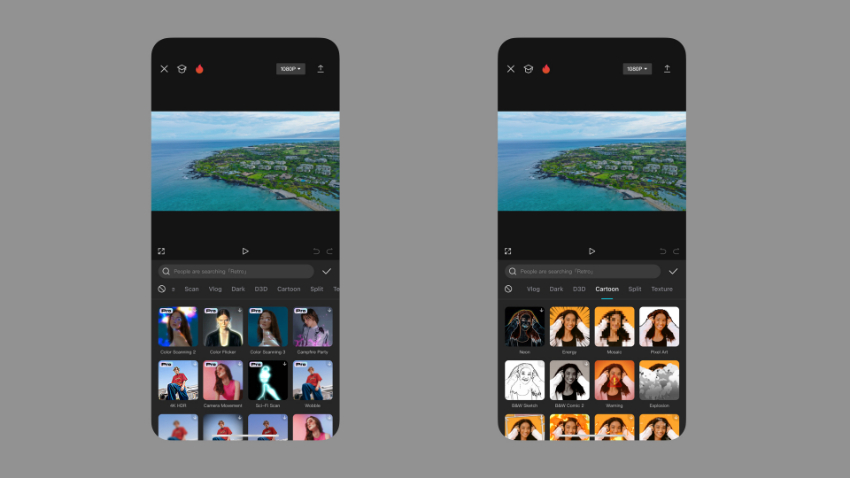
You’ll now see CapCut’s enormous collection of cartoon video effects. Each one is previewed below with its own thumbnail. You can also look up specific effects by opening the Search box and keyboarding in effect names.
Scroll through the cartoon video effect designs to check out your options. CapCut gives you a live preview of every one. Look at individual effect thumbnails, and you’ll see each individual effect previewed live, in real time.
4. Add and adjust effects for full customization
When you find an effect that interests you, it’s time to add it to your video. Always remember: all edits in CapCut are non-destructive. What does that mean? Just that no change you make to a video in CapCut is permanent. You can always undo your changes, or swap for a different effect. Your original source footage will forever remain untouched.
This gives you complete creative flexibility: you’re free to explore new options without committing to edits.
When you find a cartoon effect in CapCut that you’d like to use, tap on its thumbnail image to apply the effect. On the Video preview, you’ll instantly see the effect applied to your footage.
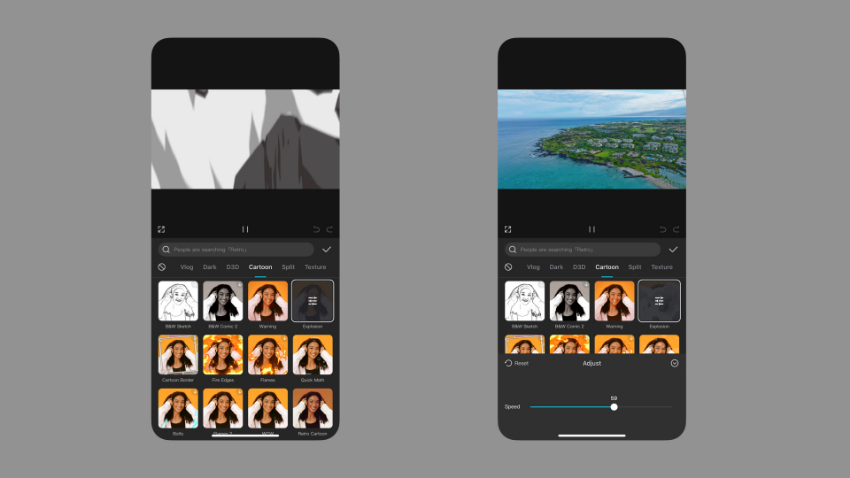
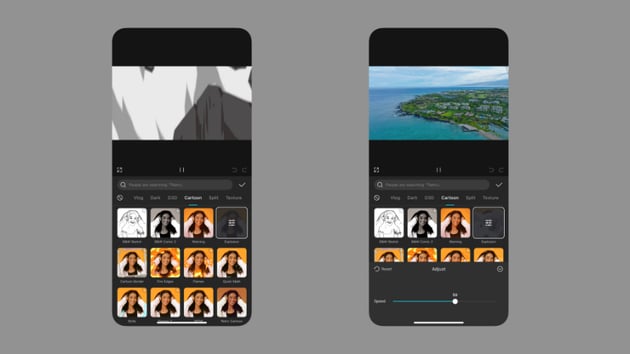
Often, this initial setting adds cartoon designs just as you had envisioned. But with CapCut, you gain more creative control. Notice what happens when you select a cartoon effect thumbnail. It now becomes an adjustment menu panel. This is how CapCut lets you control each individual video effect. Easy to forget you’re using a free mobile app, right?
Tap the thumbnail of a cartoon effect again, and you’ll see at least one slider menu appear. Depending on the individual effect, these will vary. What they do is let you control the magnitude or intensity of any cartoon effect. You can move the sliders left or right to make effects very subtle or very dramatic.
The best option here is to explore what each effect can do. Try out different settings to decide what looks best. As always with CapCut, you can change your mind and make adjustments later on.
When you’ve chosen the relevant effect settings, tap the Checkmark icon on the center right side of the Video effects panel. CapCut will add your cartoon video effect. You’ll be transported back to the main Edit view.
5. Control the effect duration for complete coverage
On the Edit view, look once again to the CapCut Timeline. As a reminder, this sits directly below the video preview that you’re seeing front and center. The purple bar that you see on the Timeline is your CapCut cartoon video effect.
Notice, though, that it may only cover a portion of your complete footage. If that’s your goal, then you are good to go! But if you want to change the duration, sequence, or timing of the effect, this is easy to do. Let’s briefly explore how to do that.
To change when an effect in CapCut starts or stops, tap the effect to select it on the Timeline. Video effects, including cartoon effects, are shown as purple horizontal bars right below your video clips. To move an effect on the Timeline, press and hold the purple bar with your finger. Once it’s selected, you can move the effect to the left or right. Going to the left starts the effect earlier in your video. Going right ends the effect later.
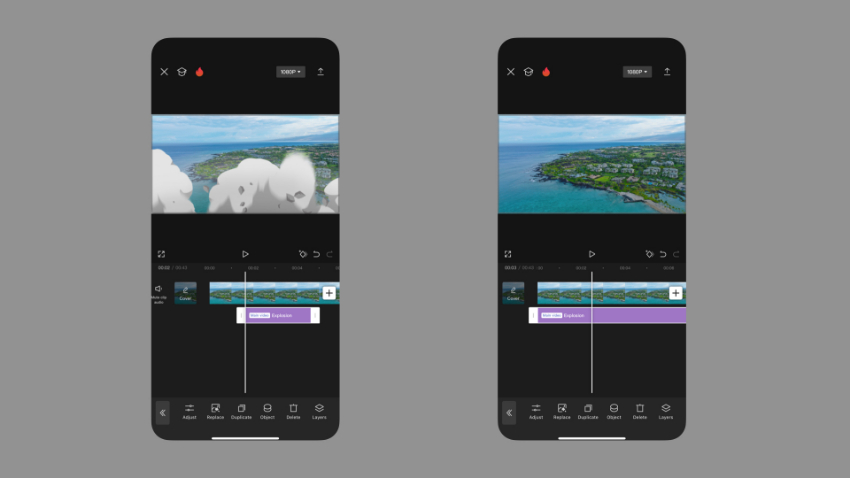
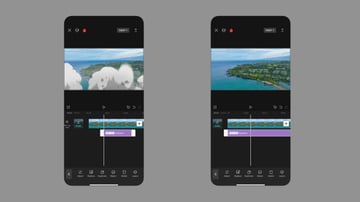
It’s also amazingly easy to adjust the overall duration of a cartoon effect in CapCut. To do that, tap once on the effect to select it on the Timeline. You’ll see white handles appear on each end of the effect clip. To lengthen – or shorten – a cartoon effect, drag these handles to the left or right.
For example, you can shorten an effect so it only briefly appears in your project. And you can expand the style to cover the full length of a video clip! If you do that, you’ll see the effect clip snap to equal length when you near the end of your video track.
As always, you can adjust these settings as much as you want. You’ll never be stuck using your first try. Just like that, you’ve learned how to use cartoon effects in CapCut videos.
Learn more CapCut tips and tricks for better edits
CapCut’s cartoon effects are one of many amazing editing tools the app has to offer. Are you ready to expand your CapCut skills and grow your knowledge even more? Here at Envato Tuts+, we’ve got you covered.
Below are trending tutorials from our library. With these, you can learn tons more about CapCut in just moments. Check them out today:
Explore CapCut’s cartoon effects and use them today
In this tutorial, I showed you how to browse and add cartoon effects in CapCut. It’s clear to see: cartoon effects are easy to use. Launch CapCut’s Video effects, and navigate to the Cartoon tab. Browse effect thumbnails, and tap on your favorite to apply the effect. Then, you’re free to adjust its duration and intensity to keep full creative control.
Start thinking about how cartoon effects can boost your video’s style. You now have the skills to add those effects right away! Try them out today.