
Regardless of whether you’re typing a search query into Google, YouTube, Amazon or any other major website, live search has become an essential element of modern web design.
Live search is when you see a list of suggested search terms that updates as you’re typing, and it can be a valuable addition to any website. Today many users simply expect every website to feature live search, and you may discover that very few people are willing to hunt through your website manually.
By helping visitors find the content that matters to them, you can keep them on your site longer, provide a better user experience and may even be able to generate some extra revenue, by making it easier for visitors to discover relevant products and services.
In this article, I’ll show you how to replace the standard WordPress search bar with a powerful search engine using the Ajax Search Pro plugin. Out of the box, this live search bar will be capable of searching any content type, including WooCommerce content.
Once you’ve created your live search bar, I’ll show you how to enhance it with some powerful extra features, including taxonomies and custom filters.
-
![]()
Want to know the coolest and most useful new addons and extensions available for the WPBakery Page Builder? Here’re a list of the 20 best of 2019.
-
Whether you want to show off customer testimonials, your latest blog posts, your best images, or just celebrate the members of your team, there is a…
-
![]()
Whether you need an event calendar plugin, a booking system with payments, or a Google Calendar widget, this list of plugins will have something to improve…
-
![]()
If you’re looking for fresh and interesting ways to encourage visitors to opt in to your email subscribers list, this awesome list of over 20 WordPress popup…


Downloading the Ajax Search Pro Plugin
The first step is purchasing the Ajax Search Pro plugin, which is available via CodeCanyon:
If you haven’t already registered, then create your free Envato Market account. Head over to the CodeCanyon website, click the Sign In button in the upper-right corner, and then enter your Envato account details.
Once you’re logged into your account, go to the Ajax Search Pro listing, click Buy Now and then follow the onscreen instructions to complete your purchase. Download the plugin when prompted. Unzip the Ajax plugin; the subsequent folder should contain an ajax-search-pro zip file, which you’ll need to upload to your WordPress account.
Adding Plugins to Your WordPress Site
Once you’ve downloaded the Ajax Search Pro plugin, you’ll need to install it:
Log into your WordPress account, if you haven’t already. Select Plugins from WordPress’ left-hand menu, followed by Add New. Select Upload Plugin.
Scroll to the If you have a plugin in a .zip format section, and select Choose file. Select the ajax-search-pro file you just downloaded. Select Install Now.
The Ajax Search Pro plugin will now be uploaded to your WordPress account. After a few moments, you should see a Plugin installed successfully message; select the accompanying Activate Plugin button.
Assuming the plugin was installed successfully, a new Ajax Search Pro item should now be visible in WordPress’ left-hand menu.
Creating Your Live Search Bar
Let’s start by adding Ajax Search Pro’s default search bar to our website, which requires us to create a search instance:
- In WordPress’ left-hand menu, select Ajax Search Pro.
- On the subsequent screen, give your search instance a name; I’m using testSearch.
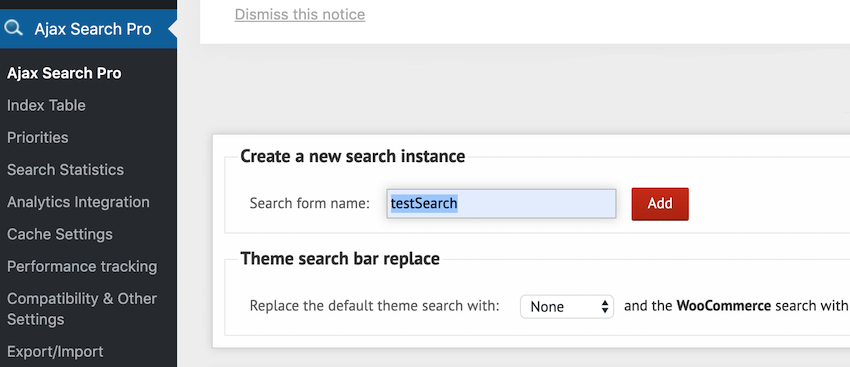
Now click the Add button. This generates a shortcode that you can use to place the search bar on your website. Click Save.
And that’s it! You’ve just created a basic live search bar that’s completely functional and ready to use.
Widgets, Shortcodes, and Menus: Displaying Your Search Bar
There’s a few different ways that you can position this search bar on your website:
- Using the WordPress editor.
- Generating a shortcode.
- Creating a search widget.
- Adding the search bar to an existing menu.
Note that WordPress also provides a Replace the default theme search with… dropdown that you can use to select your Ajax search instance. However, this method isn’t compatible with all WordPress themes, so I won’t be covering it in the following sections.
1. Using the WordPress Editor
You can quickly and easily add the search bar to your site, using the standard WordPress editor. However, this method only adds the search bar to a single page or post at a time, which can be time-consuming if you want to display the search bar across your entire site, and it doesn’t allow you to control where the search bar appears within your chosen webpage. If either of these factors are deal-breakers, then you may find it easier to use one of the methods discussed in the following sections.
To insert your search bar using the WordPress editor, navigate to the page or post where you want to display your search bar, and open it for editing.
In the toolbar, make sure the Visual tab is selected. Select the new ASP button. If this button isn’t displayed as part of the WordPress toolbar, then skip ahead to the following section for a workaround.

Select Search box, followed by the name of the search instance you just created. Save your changes, by clicking Update.
Select View post. The search bar should now be displayed on your chosen page or post.

If you want to display the search bar on any additional webpages, then repeat the above steps.
Can’t Find the ASP Button?
If the ASP button isn’t appearing in your WordPress toolbar, then you may need to switch to WordPress’ Classic Editor.
To make it easier to switch between WordPress’ Classic Editor and the default Block Editor, I’d recommend installing the free Classic Editor WordPress plugin:
In WordPress’ left-hand menu, select Plugins > Add New. Search for Classic Editor. When the Classic Editor plugin appears, select Install Now.

- Once the Classic Editor plugin is installed, select Plugins > Installed Plugins from WordPress’ left-hand menu.
- Find Classic Editor and click its accompanying Settings link.
- Scroll to Default editor for all users and select Classic Editor.
- In the Allow users to switch editors section, select Yes.
- Click Save Changes.
- Navigate to the page or post where you want to position your search bar, but don’t open it for editing just yet.
- Hover over your chosen page or post, and then select the Edit (Classic Editor) link when it appears.

The WordPress toolbar should now contain an ASP button that you can use to insert your search bar into this page or post. Note that you can switch between the Classic Editor and Block Editor at any point, by hovering over the item that you want to edit and then selecting the Classic Editor / Block Editor link when it appears.
2. Generating Search Bar Shortcode
If you need to control exactly where the search bar appears on an individual webpage, then you can generate a shortcode that you can then copy/paste into any page or post.
This is one of the most flexible ways of displaying the search bar, but you will need to manually paste the shortcode into every location where you want the search bar to appear, so this method can become time-consuming if need to display the search bar across multiple webpages.
To generate the shortcode:
- In WordPress’ left-hand menu, select Ajax Search Pro.
- Find your search instance, and select its accompanying Settings icon.
- At the top of the screen, click to expand the Toggle shortcodes section.
- The Simple Shortcodes section should contain a Search shortcode. Copy this shortcode.
You can now paste this shortcode anywhere on your website; I’m pasting it into my Hello World homepage:
- Navigate to the page or post where you want to place your search bar, and open it for editing.
- Click to select the block where you want the search bar to appear.
- Select the three-dotted icon, followed by Edit as HTML.

- Paste your shortcode into the exact location where you want the search bar to appear.
- Save your changes, by clicking Update.
- Select View post. Your search bar should now be displayed in the exact location where you pasted the shortcode.

3. Using the Ajax Search Pro Widget
To provide a consistent user experience, you may want to display the search bar across multiple webpages in the same location, such as your website’s sidebar or footer.
You can use the Ajax Search Pro widget to add a search bar to any widgetized area, and that search bar will then appear on every webpage that contains this widgetized area. Widgets are an easy way to implement a website-wide search bar, although they don’t allow you to customize where the search bar appears on an individual webpage.
To add the search bar to a widgetized area:
- In WordPress’ left-hand menu, select Appearance > Widgets. You should see several new widgets, including an Ajax Search Pro widget.
- Towards the right-hand side of the screen you’ll find a list of all your “widgetized” areas. Decide which widgetized area you want to use, such as Blog Sidebar or Footer 1, and then drag and drop Ajax Search Pro onto your chosen area.

- Click to expand the Ajax Search Pro widget.
- Give this search bar a descriptive title.
- Open the Select the search for… dropdown and select the search instance that you want to use.
- Click Save.
Spend some time navigating your website, and you should notice that the search bar is now appearing in your chosen area, across multiple webpages or even potentially across your entire website, depending on your WordPress theme.
4. Adding the Search Bar to Your Menu
Finally, you can add the search bar to your website as a menu item.
If you already have a menu in place, then this can be a way to implement a search bar without disrupting your website’s content or design. If the menu is used across your entire site, then this can also be a quick and easy way to implement a website-wide search bar.
To add a search instance to a menu, you’ll need to have copied the search instance’s shortcode:
- Select Ajax Search Pro from WordPress’ left-hand menu.
- Find the search instance in question, and select its Settings icon.
- Click to expand the Toggle shortcodes section.
- Copy the Search shortcode value.
We’re now ready to add this search instance to our menu:
- In WordPress’ left-hand menu, select Appearance > Menus.
Open the menu that you want to edit. If you haven’t previously created a menu, then you can create one by entering a title in the Menu Name field and selecting Create Menu. You can then add items to this menu using the Edit menu tab, and specify where this menu should appear using the Manage Locations tab. Don’t forget to save your changes once you’ve finished!
Now, under Add Menu Items, find the Custom links section and click to expand.

- Enter any value in the URL field, I’m simply using a . character.
- Paste your search instance shortcode into the Link Text field.
- Click Add to menu. You should notice that your shortcode has now been added to Menu structure.
- To save your changes, click Save Menu.
Navigate to any post or page where this menu is displayed, and your search bar should now appear as part of that menu.

Seeing Double? Removing the Default WordPress Search Bar
If your WordPress theme already contains a search bar, then at this point you may have multiple website-wide search bars.
To remove the search bar that’s included as part of your WordPress theme:
- In WordPress’ left-hand menu, select Appearance > Widgets.
- Towards the right-hand side of this screen, find the widgetized area where your original search bar is still being displayed, and click to expand the Search Bar section.
- Click Delete. The original search bar will now be completely removed from your website.
Save Some Space: Switching to the Compact Search Bar
Up until this point, we’ve focused on ways to add Ajax Search Pro’s default search bar to your website. However, depending on your website’s theme, content and general layout, the default search bar may not be the best fit.
Perhaps you’re struggling to find enough space for the default Ajax search bar, or it clashes with your website’s look and feel. In these scenarios, it may help to convert the default search bar into a compact search bar, which appears as a small magnifying glass icon.

When the visitor clicks this icon, the search bar will expand and they’ll be able to type their query into the search bar, as normal.
To transform the default search bar into a compact search bar:
- In WordPress’ left-hand menu, select Ajax Search Pro.
- Find the search instance that you want to convert into a compact search bar, and click its accompanying Settings icon.
- Select Layout options.
- Select Compact box layout.
- Find the Compact layout mode slider, and push it into the On position.

- Scroll to the bottom of the screen and click Save all tabs.
This is all you need to setup the compact search bar, so head over to any webpage where the search bar appears—it should now have transformed into a compact search bar.
If required, you can change the compact search bar’s alignment so that it’s displayed to the right or the left of its assigned space. Note that depending on your website’s theme, and where the search bar is positioned, changing the alignment can have a dramatic effect, or it may be difficult to tell whether the search bar has moved at all!
To change the search bar’s alignment:
- Navigate to Ajax Search Pro > Settings > Layout options > Compact box layout.
- Find the Compact layout alignment section and open its accompanying dropdown; choose Right or Left.
- Click Save all tabs.
You can now check your changes, by navigating to any webpage that features the search bar. If you’re unhappy with its new alignment, then you can restore the search bar to its original position:
- Navigate to the Compact box layout screen (Ajax Search Pro > Settings > Layout options > Compact box layout.)
- Open the Compact layout alignment dropdown and select No floating.
- Save your changes, by clicking Save all tabs.
On the Compact box layout screen, you can also change the size of the compact search bar, using the Position values fields. You can specify its size as a percentage of the parent element, although depending on your WordPress theme these percentages may not work as expected. If changing the percentage values doesn’t have any impact on the size of your search bar, then you may get better results by switching to pixel (px) values.
More Powerful Searches: Adding Taxonomy Filters
For many websites, a search bar is essential for helping visitors locate interesting and relevant content, but you can often improve the user experience by adding filters to the standard search bar.

By default, the Ajax Search Pro plugin offers a number of built-in filters, which are referred to as taxonomies in the WordPress user interface.
Let’s start by exploring these built-in filters, before moving on to creating customized filters:
- In WordPress’ left-hand menu, select Ajax Search Pro.
- Find your search instance, and click its accompanying Settings icon.
- Select the Frontend Search Settings tab.
- Select Categories & Taxonomy Terms.
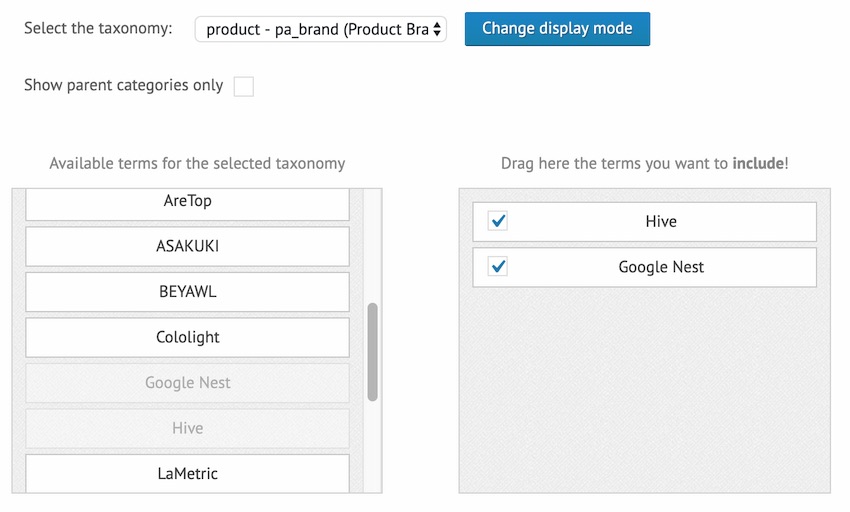
Open the Select the taxonomy dropdown and choose from the available taxonomies. I’ve previously used WooCommerce to create an Amazon Affiliate store, so I’ll be giving visitors the option to filter products by brand, using the product – pa_brand (Product Brand) taxonomy.
Once you select a taxonomy, all of that taxonomy’s terms will be displayed. You can use any of these terms as a filter, so grab one or more terms and drop them into the following box: Drag the terms you want to include!
At this point you can preview how your search bar will look once it’s configured with the current settings, by clicking the Show button in the floating window that appears towards the bottom of the screen.
The floating window will now expand into a Preview box; click Refresh to see your current settings applied to the search bar. Once you’re happy with your filters, you can publish them by clicking Save all tabs!
Displaying Your Filters: Adding a Search Settings Switch
Once you’ve configured your filters, you can specify whether they appear automatically as part of the standard search dialogue, or inside a menu that the user has to explicitly launch.
To access these settings, navigate to Ajax Search Pro > Frontend Search Settings and make sure the General tab is selected. From here, you can choose from the following:
- Set the search settings to be visible by default. Your filters will appear automatically as soon as the visitor interacts with your search bar.
- Show search settings switch on the frontend. This adds a switch that the visitor must click, in order to launch the filter dialogue. If the user doesn’t require any filters, then they can simply click inside the search bar and type their query, without ever touching the search settings switch.

Filters Not Appearing?
If you’ve completed all the above steps and your filters still aren’t appearing on your website, then it may help to toggle the Show search settings… checkbox.
Make sure you’ve saved any changes you’ve made to your taxonomy settings (by giving the Save all tabs! button a click) and then:
- Navigate to Ajax Search Pro > Frontend Search Settings.
- Make sure the General tab is selected.
- Find the following section Set the search settings to visible by default? This slider should be in the On position; toggle it off and then back on again.
- Use the accompanying Show/Hide preview panel to check whether this has coaxed your filters out of hiding.
If this workaround isn’t successful, then you may also get positive results by toggling the Show search settings switch on the frontend? switch, which you’ll find towards the top of the screen.
Customizing Your Filters
Once you’ve added some filters, you may want to tweak the search bar’s filtering functionality, or alter its appearance to better suit your website’s theme.
To customize your filters, navigate to Ajax Search Pro > Frontend Search Settings and then select the Change display mode button, which launches a popup.
In this popup, you can make the following changes:
Adding a Title: Change the “Box Header”
You can change the taxonomy header that appears in the filter dialogue, by finding the taxonomy in question and then editing its Box header field. For example, since I’m using Product Brand, I’m going to customize its header by scrolling to Terms from product – Product Brand (pa_brand) and then editing the text that appears inside the Box header field.

Checkboxes, Dropdown, Multiselect or Radio?
By default, the Ajax Search Pro plugin displays its filters as checkboxes. Alternatively, you can open the Display as dropdown and choose from the following:
1. Drop-down
This displays all the available filters as a dropdown menu.
When you select Display as: Drop-down, you’ll get access to some additional settings:
- Choose One/Any option. The user will only be able to select a single filter from the dropdown menu.
- First item. The first filter in the dropdown menu will be selected by default.
- Last item. The last filter in the dropdown menu will be selected by default.
- As defined. This allows you to specify which filter should be selected by default. To get specific, type the desired filter into the accompanying As defined field, and then select that filter when it appears.

Pick the Choose one/Any option. You can use this setting to add some text to the top of the dropdown menu. Enter the text that you want to use, and then select the accompanying checkbox.
2. Drop-Down With Search
If you have a long list of possible filters, then your audience may appreciate the ability to search for a filter by name.

3. Multiselect With Search
This setting allows you to select multiple filters simultaneously. By default, every filter is selected but the user can exclude a filter from their search by clicking that filter’s accompanying x icon.

4. Radio
This displays each filter as a radio button.
If you select the radio button option, then you’ll gain access to the same settings as the drop-down display mode:
- Choose One/Any option
- First item
- Last item
- As defined
Supercharge Your Searches: Creating Custom Filters
In addition to its default filters, the Ajax Search Pro plugin lets you create custom filters, which can add powerful, unique filtering functionality to your website.
When displaying your filters, you can choose from the following layouts:
- Radio buttons.
- Dropdown menus
- Checkboxes
- Slider.s
- Range sliders—for example a price range slider for your online store)
- Date filters—for example if you’ve created an online ticketing system and want to filter events by date
You can create filters for WordPress’ standard pages and posts, but I’ll be using this functionality to develop a custom search engine that filters my website’s Amazon Affiliate products based on product categories similar to how the Department filters function on Amazon.com. This will require me to create a custom field (smarthome_category) which I’ll apply to all the smart home products in my store, and then assign each product a value, such as Thermostat, Lock Cylinder, or Water Detector.

Note that for the purposes of this tutorial, I’ve already setup WooCommerce and built my Amazon Affiliates store.
If you want to create custom filters for pages or posts instead, then the steps will be largely the same, for example you might want to allow visitors to filter your blog based on subject, or when the content was posted.
- Navigate to the page, post or product that you want to tag with a custom filter, and open it for editing.
- Scroll to the Custom Fields section. If your screen doesn’t contain this section, then scroll to the top of the screen, and select Screen options followed by Custom Fields.
- To create a custom field, click Enter new and then type the name of the field that you want to create; I’m naming my custom field smarthome_category.
The product I’m currently editing is the Nest Learning Thermostat, so in Values I’m going to type Thermostat. To create this category and assign the Thermostat value to the current product, click Add Custom Field. Note that you’ll need to manually enter this value for all products that fall into the Thermostat category, so it may help to make a note of it, particularly its exact capitalization and punctuation.

Don’t forget to save your changes, by clicking Update.
Now we’ve created a custom field, so we can apply it to any product, page or post.
- Navigate to the item in question, and open it for editing.
- Scroll to Custom Fields.
- Open the Name dropdown and select the custom field you just created, which in my instance is smarthome_category.
- In the Values field, enter the value that you want to assign to this item. I’m currently viewing the Ring Video Doorbell 2 product that I imported from Amazon, so I’m going to type Home Security System.
- Click Add Custom Field.
- Save your changes, by clicking Update.
- Rinse and repeat for every item that you want to tag with a custom field and value.
Configure Your Search Instance
Next, we need to configure our search instance:
- In WordPress’ left-hand menu, select Ajax Search Pro.
- Find the search instance that you want to use, and click its accompanying Settings icon.
- Select the Frontend Search Settings tab, followed by the Custom Fields tab.
Click to place your cursor inside the Search custom fields… box and then start typing the name of the custom field you created in the previous step (in my instance, that’s smarthome_category). When the correct custom field appears, select it.

- In the Title label field, give your filtering system a descriptive title that you can optionally display as part of the filter dialogue; I’m using Department.
- Decide whether you want to display the title label as part of your filter dialogue, by either selecting or deselecting the Show the label on the frontend? checkbox.
- Open the Type dropdown and choose how you want your custom filters to be displayed. The available options are: Radio, Dropdown, Checkboxes, Text, DatePicker, Slider, and Range Slider.
By default, the Values field displays the following:
||Any value**
sample_value1||Sample Label 1
sample_value2||Sample Label 2
sample_value3||Sample Label 3
This is where you’ll need to manually input all your Values. We need to replace each sample_value1||Sample Label 1 with a unique value, for example I’ve used the following values: Lock Cylinders, LED lighting, Thermostat, Switches & Dimmers, Water Detector and Surveillance Camera.
After replacing the sample values, I wind up with this:
Lock Cylinders||Lock Cylinders
LED lighting||LED lighting
Thermostat||Thermostat
Switches & Dimmers||Switches & Dimmers
Water Detector||Water Detector
Surveillance Camera||Surveillance Camera
Finally, you need to let the plugin know which value should be selected by default, using the ** characters. I want Lock Cylinders to be selected by default, so my finished Values box looks like this:
Lock Cylinders||Lock Cylinders**
LED lighting||LED lighting
Thermostat||Thermostat
Switches & Dimmers||Switches & Dimmers
Water Detector||Water Detector
Surveillance Camera||Surveillance Camera
Next, open the Operator dropdown, which allows you to specify how the value entered in the search field will relate to the results. For numeric values, you should use one of the numeric operators, such as Equals, Not Equals, or More Than, but if you’re working with text values then you can choose between Like and Exactly like. I only want to display results if they’re an exact match, so I’m using Exactly like.
When you’re happy with the information you’ve entered, click Add. At this point, you can use the Show/Hide box to preview how your custom filters appear and function in the search dialogue.
If you do need to make any changes to the way your custom filters look or function:
- Hover over where your custom filter appears in the grey box, and a pencil Edit icon will appear.
- Give this icon a click, and you’ll be able to edit your custom filter.
- When you’re happy with your filters, save your settings by giving Save all tabs! a click.
Conclusion
In this article, I showed you how to quickly and easily add a live search bar to your WordPress website, using the Ajax Search Pro plugin.
After mastering the default search bar, we looked at several ways that you can enhance Ajax Search Pro, including turning the default search into a collapsible, compact search bar and adding filters using the built-in taxonomies. Finally, I showed how to turn the search bar into your own custom search engine, complete with filters designed by you.
For more information about this plugin, check out its listing on CodeCanyon or head over to the official Ajax Search Pro docs.