
By making sure that your application is tested, you are able to reduce the amount of bugs you find in your code, increase the maintainability of your application, and design well structured code.
Client side unit testing presents different challenges than server side testing. When dealing with client side code, you will find yourself struggling to separate application logic from DOM logic, as well as just structuring JavaScript code in general. Fortunately there are a lot of great client side testing libraries out there to help test your code, create metrics about the test coverage, as well as analyze the complexity of it.
Why Test at All?
First of all, unit testing in general is a way to reduce bugs by ensuring that your application functions as it’s supposed to. Beyond that though, are the notions of Test Driven Development (TDD) and Behavior Driven Development (BDD).
These two unit testing strategies will help you design your application by writing tests before you write your application logic. By writing the tests before you write the code, you’re giving yourself the opportunity to think through the design of your application.
This happens because when you’re writing tests, you’re basically trying to design the API for how you interact with your code, so you therefore get better insight into its design. Testing first will quickly show you any flaws you have in your design because you’re writing test code that essentially uses the code you’re writing!
TDD is a code discovery process
You’ll learn that TDD helps you discover your code as you’re writing it. TDD is summed up very quickly as “Red, Green, Refactor”. What this means is, you write a test, write enough code to make the test fail first. Then, you write the code that makes your test pass. After that, you think through what you just wrote and refactor it. Nice and easy.
BDD is a slightly different take on TDD and is based more on business requirements and specifications.
Client Side Testing
There are many reasons that you should be testing your client side code. As mentioned before, it will help reduce bugs, and help you design your application. Client side testing is also important because it gives you a chance to test your front end code, in isolation, away from your presentation. In other words, one of its advantages is you get to test your JavaScript code without actually spinning up an application server. You simply run the tests and make sure things function without clicking around and testing things. In many cases, you don’t even have to have internet access, as long as your tests are set up correctly.
With JavaScript taking such an important role in modern web development, it’s important to learn how to test code and reduce the chances of bugs making their way into production code. Your boss doesn’t like it when that happens and neither should you! In fact, a good place to get started working with client side testing is to write tests around a bug report. This will allow you to get practice writing tests when you don’t have a place to start from scratch.
Another reason to test your client side code is that once a suite of tests exists and has decent coverage over your code, when you get ready to go and add new features to your code, you’ll be able to add the new feature, re-run your tests, and make sure you didn’t regress and break any existing features.
Getting Started
Getting started with client side testing can be daunting if you’ve never done it before. One of the hardest parts about client side testing is figuring out the best way to isolate the DOM from your application’s logic. That often means you’ll need some sort of abstraction over the DOM. The easiest way to achieve this is through a client side framework such as Knockout.js, Backbone.js, or Angular.js, to name just a few.
When using a library such as these, you get to think less about how your page renders in the browser and more about the features of your application. It’s not like it’s impossible to unit test with just plain JavaScript though. In that case, your life will be much easier if you design the code in such a way that the DOM can easily be abstracted.
Choose a Testing Library
There are a lot of different testing libraries to choose from, although the three front runners tend to be QUnit, Mocha, and Jasmine.
Jasmine and Mocha are both from the BDD school of unit testing, whereas QUnit is just a unit testing framework of its own.
For the rest of this post, we’ll explore using QUnit as its barrier to entry in client side testing is very low. Check out this detailed intro to QUnit for more information.
TDD Your Code With QUnit
Getting started with QUnit is extremely simple. The following HTML is all you need:
<!DOCTYPE html> <html> <head> <meta charset="utf-8"> <title>QUnit Example</title> <link rel="stylesheet" href="qunit.css"> </head> <body> <div id="qunit"></div> <div id="qunit-fixture"></div> <script src="qunit.js"></script> <script src="../app/yourSourceCode.js"></script> <script src="tests.js"></script> </body> </html>
For the next few examples, let’s assume that we’re building a small widget that you input a zip code into a text box and it returns the corresponding city, state, and county values using Geonames. It’ll show only a zip code at first, but as soon as the zip code has five characters it’ll retrieve the data from Geonames. If it is able to find data, it will show a few more fields containing the resulting city, state, and county information. We’ll also be using Knockout.js. The first step is to write a failing test.
Thinking through the design slightly before the first test is written, there probably needs to be at least two viewModels, so that will be a good starting point. To start off, we’ll define a QUnit Module and our first test:
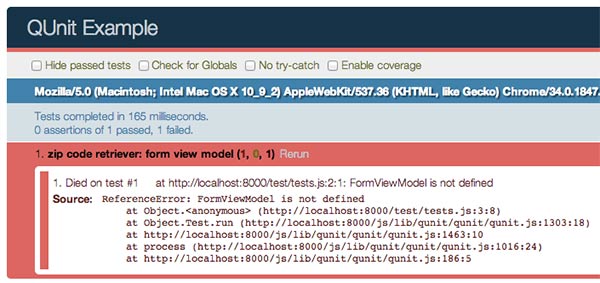
module("zip code retriever"); test("view models should exist", function() { ok(FormViewModel, "A viewModel for our form should exist"); ok(AddressViewModel, "A viewModel for our address should exist"); });
If you run this test, it will fail, now you can go write the code to make it pass:
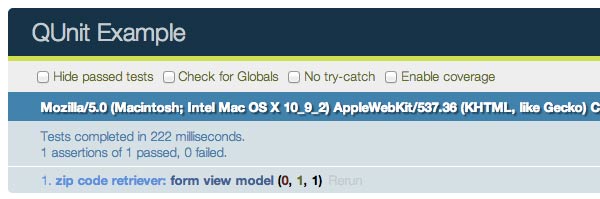
var AddressViewModel = function(options) { }; var FormViewModel = function() { this.address = new AddressViewModel(); };
You’ll see green rather than red this time. Tests like this seem a bit silly at first, but they are useful in that they force you to at least think through some of the early stages of your design.
The next test we will write will work on the AddressViewModel‘s functionality. We know from the specification of this widget that the other fields should be hidden at first, until the data is found for the zip code.
module("address view model"); test("should show city state data if a zip code is found", function() { var address = new AddressViewModel(); ok(!address.isLocated()); address.zip(12345); address.city("foo"); address.state("bar"); address.county("bam"); ok(address.isLocated()); });
None of the code for this has been written yet, but the idea here is that the isLocated will be a computed observable, that returns true only when the zip, city, state, and county are all truthy. So, this test will of course fail at first, now let’s write the code to make it pass.
var AddressViewModel = function(options) { options = options || {}; this.zip = ko.observable(options.zip); this.city = ko.observable(options.city); this.state = ko.observable(options.state); this.county = ko.observable(options.county); this.isLocated = ko.computed(function() { return this.city() && this.state() && this.county() && this.zip(); }, this); this.initialize(); };
Now if you run the tests again, you’ll see green!
This is, at its most basic, how you can use TDD to write front end tests. Ideally, after each failing test, you’d write the simplest code that will make the test pass and then go back and refactor the code. You can learn a lot more about TDD practices though, so I suggest reading up and studying it further, but the previous examples are enough to get your mind thinking about writing tests first.
Mocking Dependencies With Sinon.js
Sinon.js is a JavaScript library that provides the ability to spy, stub, and mock JavaScript objects. When writing unit tests you want to make sure that you are able to test only a given “unit” of code. This oftentimes means you’ll have to do some sort of mocking or stubbing of dependencies to isolate the code being tested.
Sinon has an extremely simple API for doing this. The Geonames API supports retrieving data via a JSONP endpoint, which means we’ll be able to easily use $ .ajax.
Ideally though, you won’t have to depend on the Geonames API in your tests. They could be down temporarily, your internet may die, and it also is just slower to actually make the ajax call. Sinon to the rescue.
test("should only try to get data if there's 5 chars", function() { var address = new AddressViewModel(); sinon.stub(jQuery, "ajax").returns({ done: $ .noop }); address.zip(1234); ok(!jQuery.ajax.calledOnce); address.zip(12345); ok(jQuery.ajax.calledOnce); jQuery.ajax.restore(); });
Here in this test, we’re doing a few things. First of all, the sinon.stub function is actually going to proxy over jQuery.ajax and add the ability to see how many times it has been called, and many other assertions. As the test reads, “should only try to get data if there’s 5 chars“, we are going to assume that when the address is set to just “1234“, that no ajax call has been made yet, then set it to “12345“, and by that point an ajax call should be made.
We then need to restore jQuery.ajax to its original state, because we are good citizens of unit testing and want to keep our tests atomic. Keeping your tests atomic is important to ensure that one test does not depend on another test, and there’s no shared state between tests. They can then be ran in any order as well.
Now that the test is written, we can run it, watch it fail, and then write the code that performs the ajax request to Geonames.
AddressViewModel.prototype.initialize = function() { this.zip.subscribe(this.zipChanged, this); }; AddressViewModel.prototype.zipChanged = function(value) { if (value.toString().length === 5) { this.fetch(value); } }; AddressViewModel.prototype.fetch = function(zip) { var baseUrl = "http://www.geonames.org/postalCodeLookupJSON" $ .ajax({ url: baseUrl, data: { "postalcode": zip, "country": "us" }, type: "GET", dataType: "JSONP" }).done(this.fetched.bind(this)); };
Here we are subscribing to changes of the zip code. Whenever it changes, the zipChanged method will be called. The zipChanged method will check to see if the length of the value of the zip is 5. When it reaches 5, the fetch method will be called. Here is where the Sinon stub comes in to play. At this point, $ .ajax is actually a Sinon stub. So calledOnce will then be true in the test.
The final test we’ll write is for when the data comes back from the Geonames service:
test("should set city info based off search result", function() { var address = new AddressViewModel(); address.fetched({ postalcodes: [{ adminCode1: "foo", adminName2: "bar", placeName: "bam" }] }); equal(address.city(), "bam"); equal(address.state(), "foo"); equal(address.county(), "bar"); });
This test will test how the data from the server gets set onto the AddressViewmodel. Run it, see some red. Now make it green:
AddressViewModel.prototype.fetched = function(data) { var cityInfo; if (data.postalcodes && data.postalcodes.length === 1) { cityInfo = data.postalcodes[0]; this.city(cityInfo.placeName); this.state(cityInfo.adminCode1); this.county(cityInfo.adminName2); } };
The fetched method just makes sure there is an array of postalcodes in the data from the server, and then sets the corresponding properties on the viewModel.
See how easy this is now? Once you get the flow of doing this down, you’ll find yourself hardly ever wanting to not TDD again. You end up with nice small functions that are testable. You force yourself into thinking about how your code interacts with its dependencies. And now you have a suite of tests to run when some other new requirement is added to the code. Even if you miss something and there is a bug in the code, you are now able to simply add a new test to the suite, to prove that you’ve fixed the bug! It actually ends up being kind of addicting.
Test Coverage
Test coverage provides an easy way to evaluate how much of your code has been tested by a unit test. It’s often hard and not worth it to reach 100% coverage, but do what you can to get it as high as possible.
One of the newer and easier coverage libraries is called Blanket.js. Using it with QUnit is dead simple. Simply grab the code right off of their homepage or install it with Bower. Then add blanket as a library in the bottom of your qunit.html file, and then add data-cover to all of the files you want coverage tests on.
<script src="../app/yourSourceCode.js" data-cover></script> <script src="../js/lib/qunit/qunit/qunit.js"></script> <script src="../js/lib/blanket/dist/qunit/blanket.js"></script> <script src="tests.js"></script> </body>
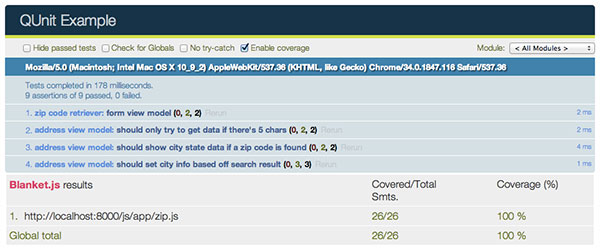
Done. Super easy, and now you’ll get an option in your QUnit runner for showing coverage:

In this example, you can see that the test coverage isn’t quite 100%, but in this case since there’s not much code, it’ll be easy to bump it up. You can actually drill down and see the exact functions that haven’t been covered yet:

Here in this case, the FormViewModel was never instantiated in the tests and therefor is missing test coverage. You can then simply add a new test that creates an instance of the FormViewModel, and perhaps write an assertion that checks that the address property is present and is an instanceOf the AddressViewModel.
You’ll then get the pleasure of seeing 100% test coverage.
Complexity Tests
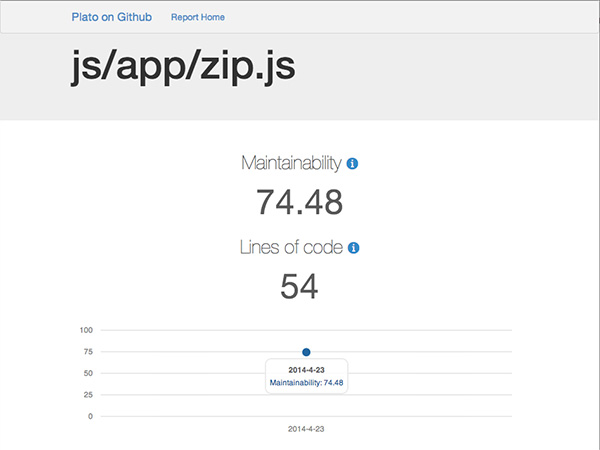
As your applications get larger and larger, it’s nice to be able to run some static analysis on your JavaScript code. A great tool for running analysis on JavaScript is called Plato.
You can run plato by installing it via npm with:
npm install -g plato
Then you can run plato on a directory of JavaScript code:
plato -r -d js/app reports
This will run Plato on all of the JavaScript located at “js/app” and output the results into reports. Plato runs all kind of metrics on your code, including average lines of code, a computed maintainability score, JSHint, difficult, estimated errors, and more.
There is not a whole lot to see in that previous image, simply because for the code we’ve been working on, there’s only one file, but when you get into working with a large application that has a lot of files and lines of code, you’ll find the information it gives you extremely useful.
It even keeps track of all of the times you’ve run it, so you can see how your statistics change over time.
Conclusion
While testing the client side seems like a difficult proposition, there are so many great tools to use these days to make it super easy. This article barely scratches the surface of all of the things out there nowadays to make client side testing easy. It can be a tedious task, but you’ll find that in the end, the benefits of having a test suite and testable code far outweighs it. Hopefully with the steps outlined here, you’ll be able to begin testing client side code quickly.