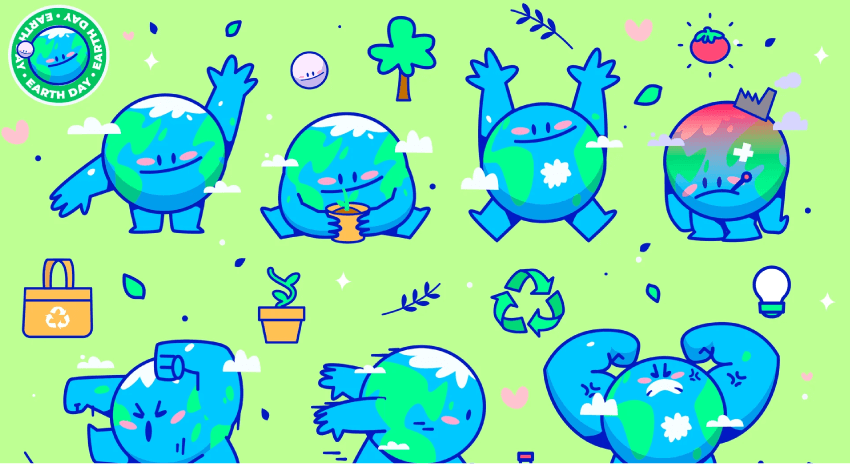
Earth Day is a time to celebrate and reflect on the beauty of our planet. If you’re looking for Earth Day inspiration, this tutorial will guide you through how to draw Earth and create a meaningful illustration using Adobe Illustrator.
Whether you want to design happy Earth Day images or learn how to draw the world, this step-by-step guide will help you bring your vision to life. You’ll also explore techniques for illustrator drawing and tips on how to draw in Illustrator for a polished result.
If you’re looking for a professional way to promote your Earth Day event, check out the professionally designed Earth Day Event Flyer on Envato. This ready-to-print, customizable template is perfect for spreading awareness. Download it now and make your event stand out!
What you’ll learn in this Earth Day tutorial
- How to draw Earth in Illustrator
- How to create flowers in Illustrator
- How to create leaves in Illustrator
- How to draw the sun in Illustrator
- How to draw a cloud in Illustrator
- How to draw stars in Illustrator
1. How to create the background in Illustrator
Step 1
We’ll start with a background for our Earth Day illustration. After you’ve opened Adobe Illustrator, make a new artboard (File > New) that is 850 x 850 pixels.
Then, create a square with the Rectangle Tool (M). Click on the artboard and enter 850 x 850 pixels. Press OK and make its fill color R=54, G=79, B=104. Place the background in the middle of the canvas.


2. How to draw Earth
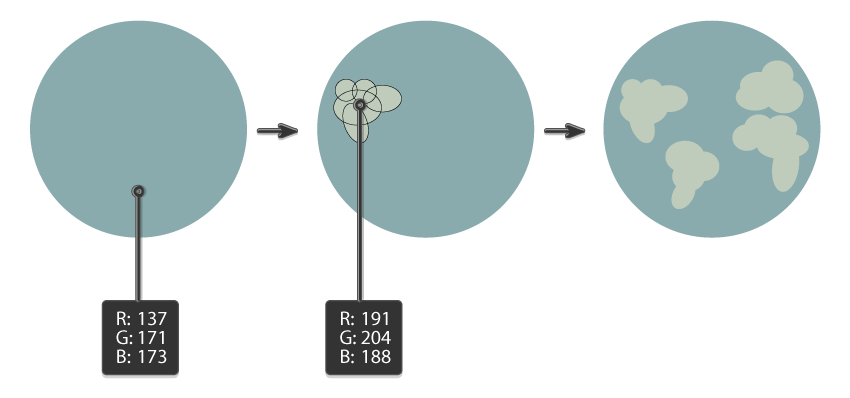
Step 1
Take the Ellipse Tool (L) and draw a circle. Hold the Shift button while drawing so you will have an even circle. The fill color is R=137, G=171, B=173, with no stroke color.
Change the fill color to R=191, G=204, B=188, to create the simplified continents. For this, create a lot of ellipses grouped together. You don’t need the black strokes—they’re just there for better visibility.


Step 2
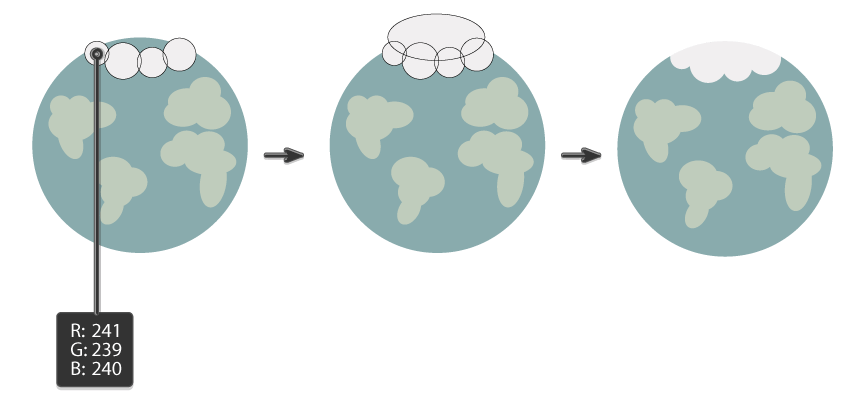
Let’s create an ice cap on the top. Take the Ellipse Tool (L) and draw a few circles and ellipses on top of the Earth, creating a shape you like. Just make sure that there are no gaps between them. Make the fill color R=241, G=239, B=240.
Select all the ellipses you just created and use the Shape Builder Tool (Shift-M) to make a single shape by dragging your cursor across them.
Next, create a copy of the Earth shape on top, without continents (Control-C, Control-F). We will use this top copy as a cutter for the next move.
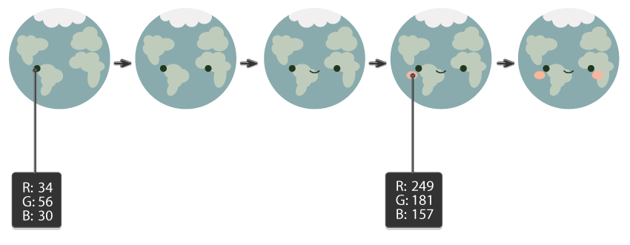
Keep the top copy of the Earth shape selected, and while holding the Shift button, select the ice cap. On the Pathfinder panel (Window > Pathfinder), press the Intersect button. Your result should be similar to the one in the image below.

Step 3
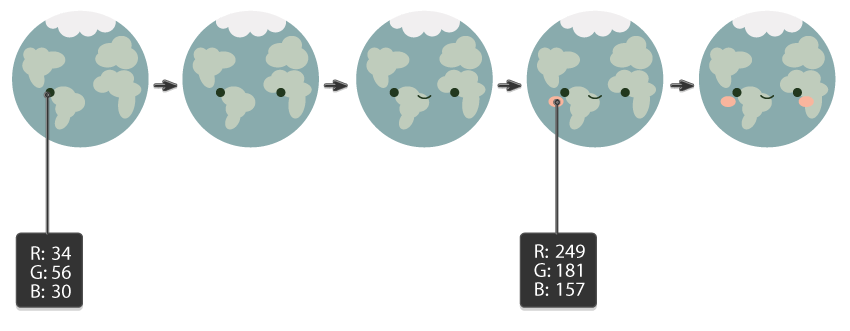
Next, let’s give our Earth a cute little face. Use the Ellipse Tool (L) and hold the Shift button to draw a tiny eye. Change its fill color to R=34, G=56, B=30.
To create another eye, select the circle and drag it to the right while holding the Shift and Alt keys. Shift will move it in a straight line, and Alt will create a copy. Be sure the eyes are placed symmetrically.
Let’s make the mouth. Make sure that neither eye is selected, and press the Swap Fill and Stroke (Shift-X) button to get a stroke color and no fill color. Using the Arc Tool, draw the mouth. On the Stroke panel, you can adjust the stroke Weight however you like—it depends on how big the mouth is. Also, in the Cap section, make sure you select the Round Cap option.
To add even more cuteness to the Earth illustration, let’s give it some cheeks. Using the fill color R=249, G=181, B=157, create a small ellipse under the Earth’s eye. Keep it selected, and while holding the Shift and Alt keys, move it to the right. Place them symmetrically.

Be sure the whole planet is grouped (right-click > Group), and place it on the background.


3. How to create the first flower
Step 1
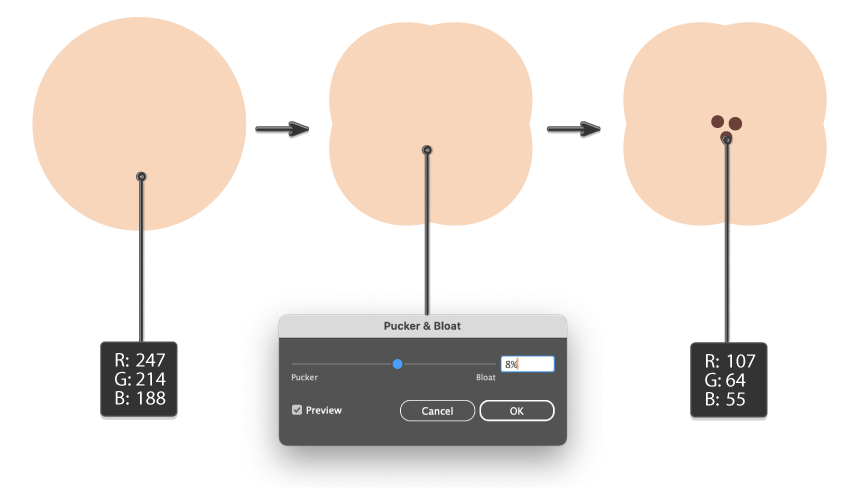
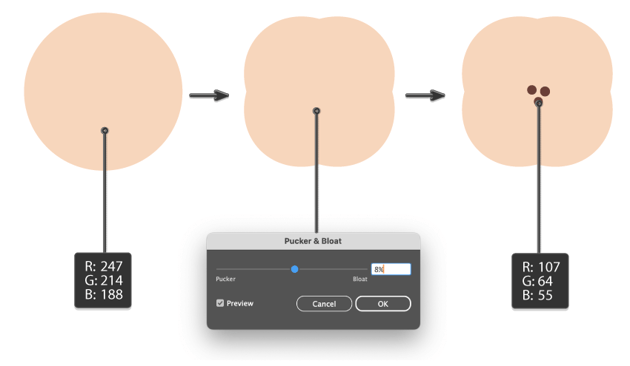
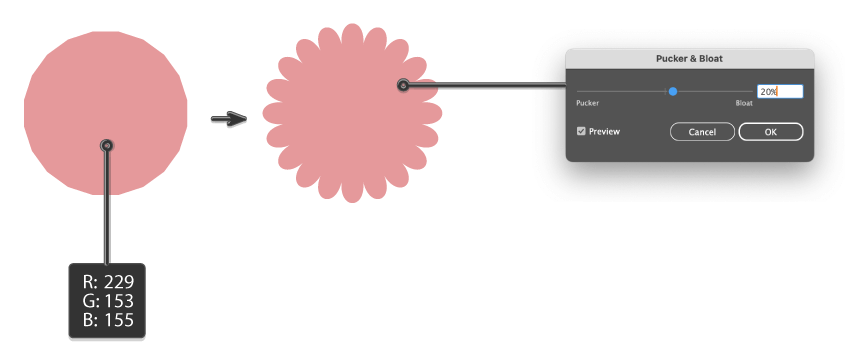
To create a flower, we will need the Ellipse Tool (L) again. So grab this tool, create a circle, and then change the fill color to R=247, G=214, B=188.
With this circle still selected, go to Effect > Distort & Transform > Pucker & Bloat. Enter the options shown below and press OK.
Then, add a few tiny circles in the middle (fill color to R=107, G=64, B=55). This is the base shape for our first flower.

Step 2
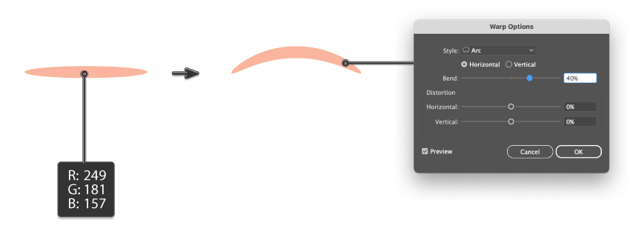
Change the fill color to R=249, G=181, B=157, and create a new horizontal ellipse.
Go to Effect > Warp > Arc, and in the new dialogue window, enter the options you see below and press OK. You should end up with a curve.


Step 3
Create a new copy of the curve and make it smaller. Then, expand these two shapes: Object > Expand Appearance.


Step 4
Place the bigger curve on the flower base shape, like in the image below.
While holding the Alt button, create more copies of it and place them around the tiny brown circles in the middle of the flower base.
Take the smaller curve, and place it on the flower base. Create more copies of it and place them even closer to the tiny brown circles in the middle of the flower base.
The first flower is ready! Group the whole flower (right-click > Group).


Place this flower close to the Earth, like in the image below.


4. How to create the second flower
Step 1
To create the second flower, we will need the Polygon Tool. Grab this tool and click on your artboard. Now enter about 20 Sides with any Radius, and press OK.
With this shape selected, go to Effect > Distort & Transform > Pucker & Bloat. Then enter the options shown below. Press OK. This is the base for the second flower.


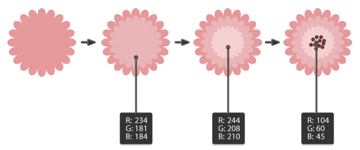
Step 2
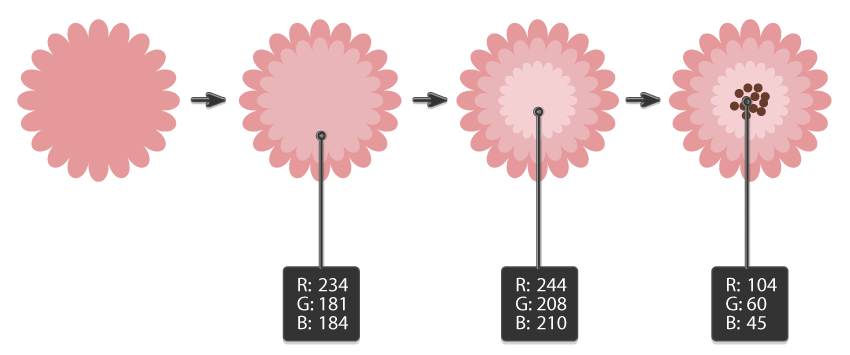
Create a copy of the second flower base, and change its fill color to R=234, G=181, B=184. Make it smaller by holding down the Shift and Alt buttons at the same time while shrinking it.
Create a new copy of the flower base. It should be the smallest and the lightest (R=244, G=208, B=210). Be sure it stays in the middle. Finally, add a few brown (R=104, G=60, B=45) circles in the middle.
The second flower is ready! Group the whole flower together (right-click > Group).

Place the second flower behind the Earth (right-click > Arrange > Send to Back).


5. How to create the first leaf
Step 1
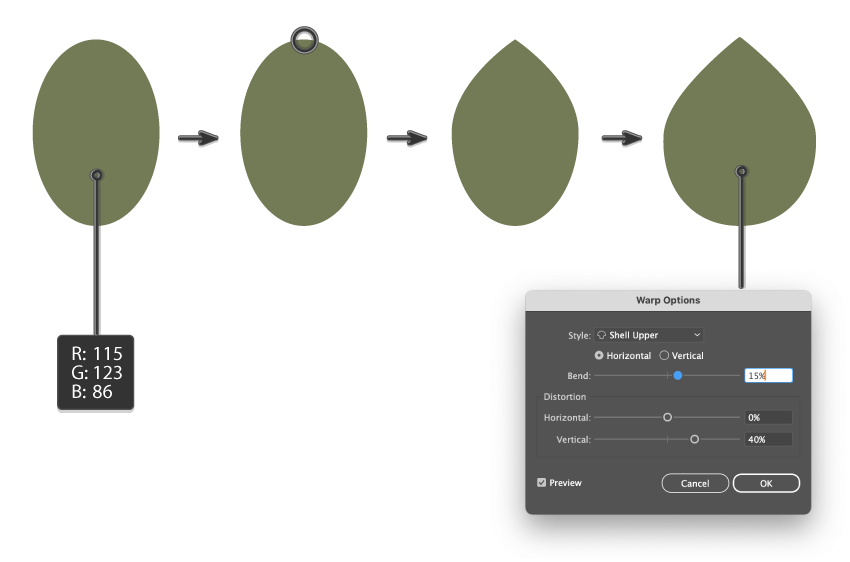
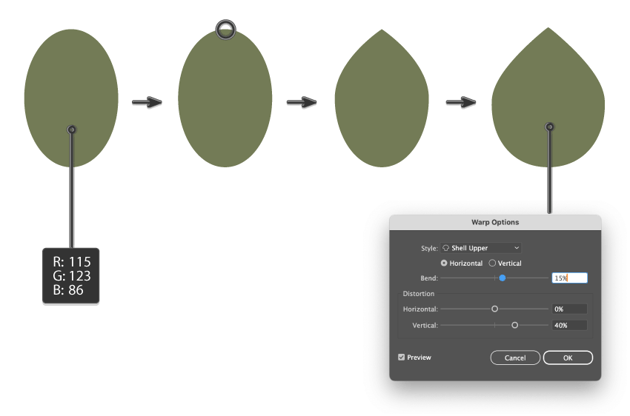
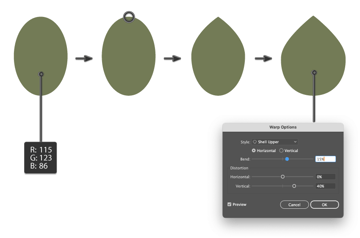
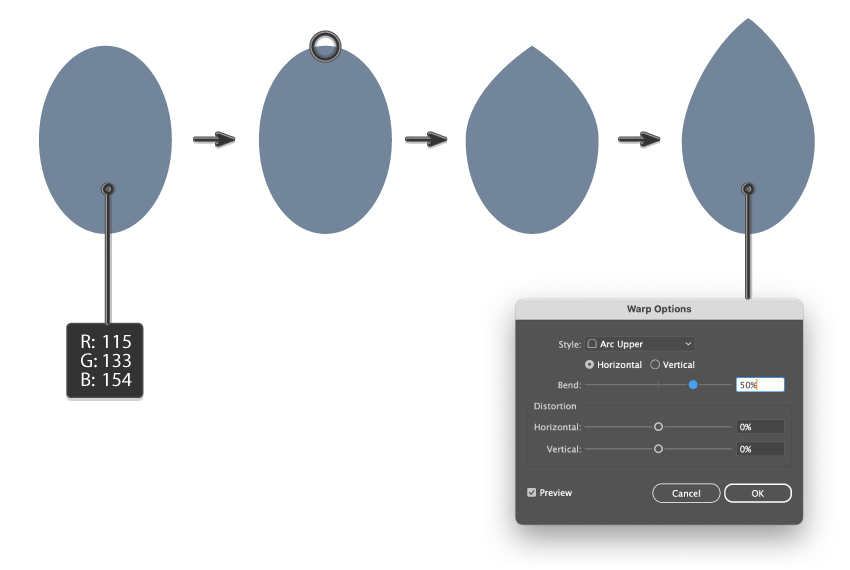
Next, our Earth Day image needs a leaf. Create a green vertical ellipse with the fill color R=115, G=123, B=86.
Using the Anchor Point Tool (Shift-C), click on the top anchor point of the ellipse. Now you have a sharp corner on top of the ellipse.
Then, go to Effect > Warp > Shell Upper and enter the options you see below. Lastly, expand this shape (Object > Expand Appearance).
Step 2
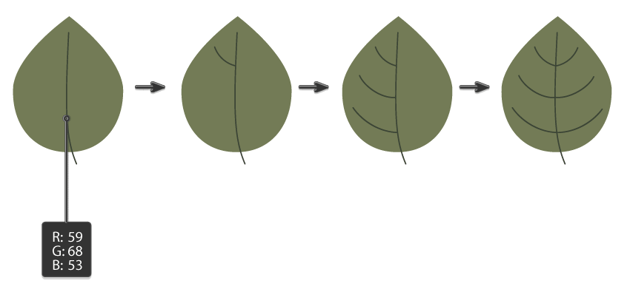
Let’s make a stalk for the leaf. Make sure the leaf is not selected, press the Swap Fill and Stroke (Shift-X) button, and change the stroke color to R=59, G=68, B=53. Using the Arc Tool, draw the stalk. On the Stroke panel, you can adjust the stroke Weight however you like—it depends on how big the leaf is. Also, in the Cap section, make sure you select Round Cap. Using the Direct Selection Tool (A), you can adjust the handles of the anchor points to achieve the result you want.
Using the Arc Tool, create the left and then the right veins of the leaf. After that, group the whole leaf.

Place the first leaf behind everything (right-click > Arrange > Send to Back).


6. How to create the second leaf
Start the second leaf with a long vertical ellipse and the fill color R=149, G=155, B=114.
Using the Anchor Point Tool (Shift-C), click on the top and bottom anchor points of the ellipse. Now you have sharp corners.
Let’s make a stalk for the second leaf. Be sure you have the stroke color R=91, G=96, B=69 and no fill color. Using the Arc Tool, draw the stalk. On the Stroke panel, you can adjust the stroke Weight however you like, as it depends on how big the leaf is. Also, in the Cap section, make sure you select Round Cap. Using the Direct Selection Tool (A), you can adjust the handles of the anchor points to achieve the result you want.
Place the sharp pointed leaf on the top of the stalk. After that, create more copies of the sharp pointed leaf and place them on the left side of the stalk. Create even more copies of the leaf and place them on the right side of the stalk.
The second leaf is ready! Group it.

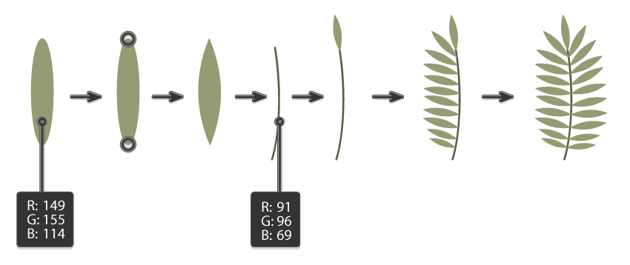

Place the second leaf behind everything (right-click > Arrange > Send to Back).


7. How to create the third leaf
Step 1
Next, we want to create the third leaf. Create a long vertical ellipse with the fill color R=190, G=191, B=172.
Using the Anchor Point Tool (Shift-C), click on the top and bottom anchor points of the leaf. Press the Swap Fill and Stroke (Shift-X) button, and change the stroke color to R=135, G=142, B=123. Using the Line Segment Tool (\), draw the stalk. On the Stroke panel, you can adjust the stroke Weight however you like, as it depends on how big the leaf is. In the Cap section, make sure you select Round Cap.
Then, using the Line Segment Tool (\) again, create the veins of the third leaf.
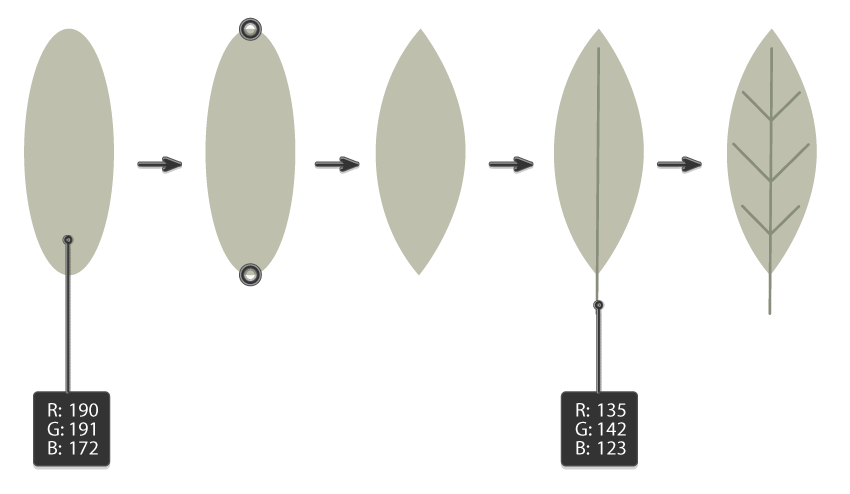


Step 2
Make a copy of the third leaf, either a smaller or bigger one, and make sure each leaf is grouped separately.


Place the two leaves behind everything, like in the image below.


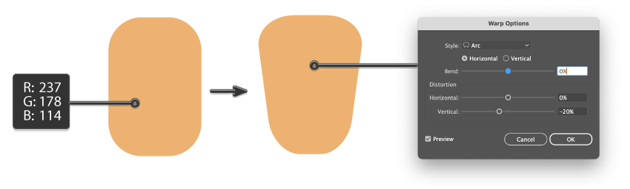
8. How to create the sun in Illustrator
Step 1
Using the Rounded Rectangle Tool, draw a rounded rectangle (fill color R=237, G=178, B=114).
After that, go to Effect > Warp > Arc.


Step 2
We’ll continue by creating a yellow circle with the same fill color. Then, place the rounded rectangle you created in the previous step on top of the circle.
Be sure the rounded rectangle is selected. Grab the Rotate Tool (R) and click in the middle of the circle while holding Alt. A new window called Rotate will pop up, where you want to enter 45 degrees and press Copy.
Press Control-D (it repeats your last movement) until you fill up the whole circle with sun rays. Group the sun.


Place the sun behind the Earth.


9. How to create a rainy cloud
Step 1
Draw an ellipse. The fill color is R=241, G=239, B=240. Add a few more ellipses and place them together to form a cloud.


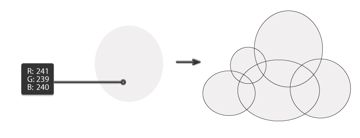
Step 2
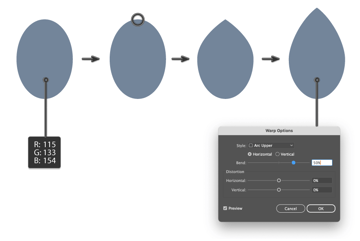
Let’s make a raindrop by drawing a small vertical ellipse (fill color R=115, G=133, B=154).
Using the Anchor Point Tool (Shift-C), click on the top anchor point of the ellipse. Then, go to Effect > Warp > Arc Upper. Expand this shape (Object > Expand Appearance).

Step 3
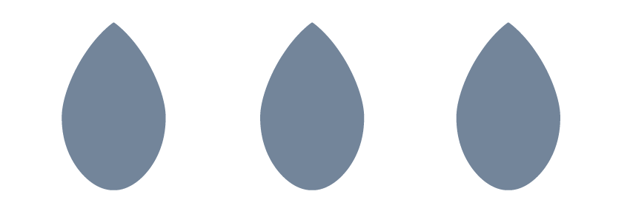
Make two more copies of the raindrop.


Step 4
Place them close to the cloud that you created before.


Place the rainy cloud on the left side of the Earth.


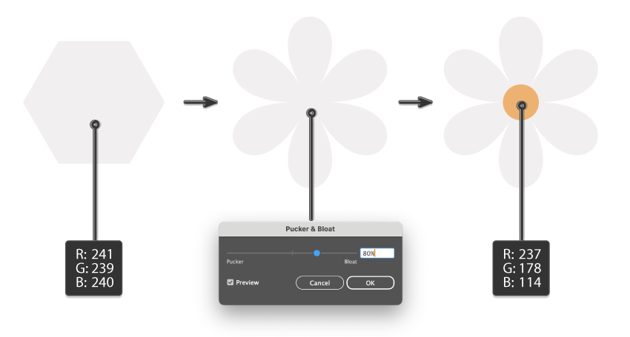
10. How to create filler flowers in Illustrator
Step 1
To create a flower, we will need the Polygon Tool. So grab this tool and click on your artboard. Now enter 6 Sides with any Radius, and press OK. The fill color should be R=241, G=239, B=240. You can also use the Eyedropper Tool (I) to take the fill color from the cloud.
While keeping the hexagon selected, go to Effect > Distort & Transform > Pucker & Bloat. Then, enter the options shown below.
Finally, add a yellow (R=237, G=178, B=114) circle in the middle. The flower is ready!


Step 2
Make two more copies of the flower in different sizes.


Place the filler flowers around the Earth Day image.


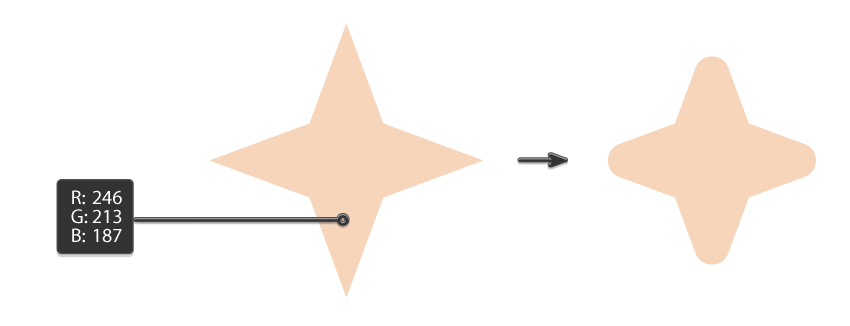
11. How to create a star in Illustrator
Step 1
Let’s put some stars in the sky! Change the fill color to R=246, G=213, B=187, take the Star Tool, and click on your board. In the new dialogue window, enter 4 Points with any radius.
Now go to View > Show Corner Widget, since this feature allows you to make the corners of any shape rounded. Now you can see a little circle with a dot inside each corner of the star. Drag these circles towards the inside to make the star corners rounded.

Step 2
Make a few more stars in different sizes.


Place the stars around the whole composition.


Step 3
Now for the final touch: use the Eyedropper Tool (I) to take the fill color from the cloud and create a few tiny circles all around the image. You are now done!


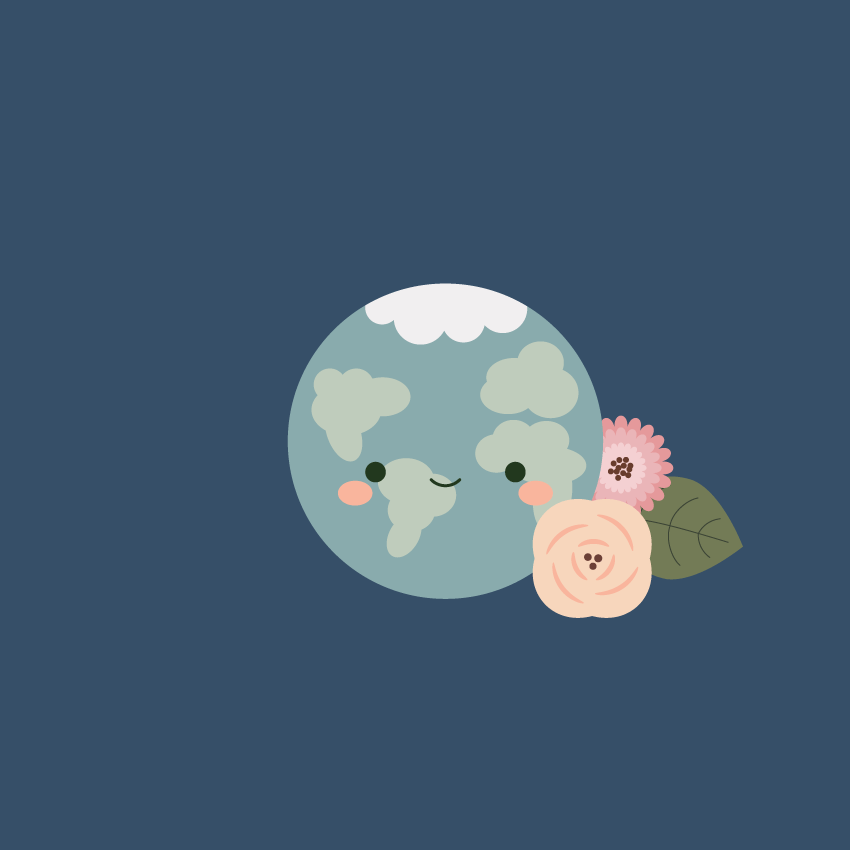
Congratulations!
Creating a world illustration for Earth Day is more than just an artistic expression—it’s a statement of care for our planet.
When is Earth Day this year? It is celebrated on April 22. Now’s the perfect time to use your creativity to inspire awareness. Through colors and shapes, your work can serve as a reminder of our shared responsibility.
Keep creating, keep caring, and let your creativity make a difference!
Recommended resources from Envato
Unlock a versatile collection of scalable vectors and editable layered graphics on Envato. Perfect for logos, illustrations, and digital designs, these high-quality assets offer easy customisation in Adobe Illustrator, Photoshop, and more.
1. Planet Earth Illustration Pack (EPS, AI, JPG, PNG)


Planet Earth Illustration Pack is a versatile set that’s perfect for landing pages, apps, social media, websites, presentations, and more. These Earth Day images are scalable, high-quality, and easy to use. The pack includes EPS, AI with swatches, and 10 PNG files in RGB color mode. Upgrade your designs today!
2. World Earth Day (AI, EPS, JPG, PNG, SVG)


Create a unique and customizable illustration for websites, apps, or presentations. This pack is perfect for enhancing your header section and digital projects. Easily resize, recolor, and combine elements to craft your own unique designs. Included are AI, EPS, JPG, PNG, and SVG files, all fully editable and 100% vector.
3. Earth Day 3D Illustrations (PNG, OBJ)

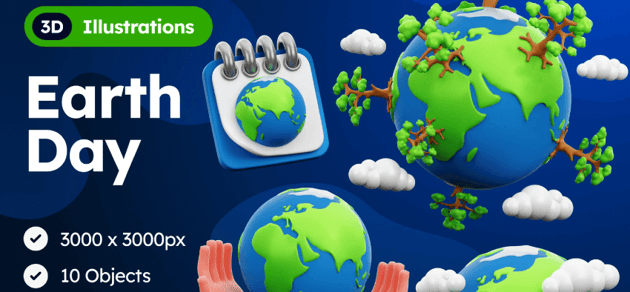

Enhance your designs with Earth Day 3D Illustrations. Perfect for animations, web design, UI, presentations, posters, and more, this pack includes 10 high-quality rendered objects at 3000×3000 px in PNG and OBJ formats. Get yours today!
4. 50 Earth Day Illustration Pack (EPS, PNG, SVG)


Celebrate with this 50 Earth Day Illustration Pack, perfectly crafted for your content. It includes 50 EPS, 50 SVG, and 50 PNG files, all in scalable vector format for easy customization. Start creating today!
5. Earth Day Illustrations (EPS, JPG)

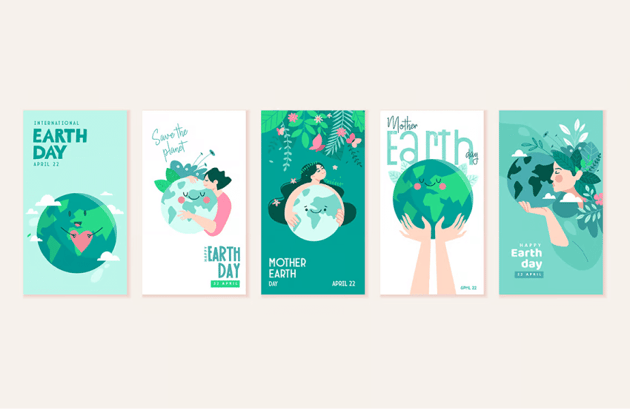

Check out these versatile vector illustration concepts for graphic and web design, business presentations, marketing, and print materials. They’re perfect for any creative Earth Day project!
Do you know what? Check out these tutorials to learn more!
If you enjoyed my tutorial, you’ll probably love these tutorials too!