If you’re keen to learn more on AI, check out our screencast Microsoft Cognitive Services and the Text Analytics API, for AI sentiment in your bot.

The potential of a personal assistant gets exciting when it has access to personal data and the real world via the Internet of Things. New possibilities arise — from requesting your assistant turn on your lights to asking it how well you slept. We’ll be connecting your Api.ai assistant to the Jawbone Up API as an example of this.
Note: this article was updated in 2017 to reflect recent changes to Api.ai.
What You’ll Need
This article builds upon a variety of concepts we’ve already covered in previous articles here at SitePoint. In order to follow along with this tutorial comfortably, you’ll need the following.
- An Api.ai agent connected to a simple HTML web app. See this article if you’d like to understand this process. Otherwise, you can download the code from this guide and use it too.
- An agent that has been taught the entity of “sleep”. We created this in Empowering Your Api.ai Assistant with Entities. It should understand concepts like “how much sleep did I have last night?” and “how much REM sleep did I get?” If you’re looking to adapt this to your own IoT device, you’ll need to have created your own custom entity that understands your IoT functionality.
- A general knowledge of Node.js and running a Node server. Without it, you won’t be able to get the server running!
- Knowledge of how to use the Jawbone UP API (or another API you intend to use). We’ve covered the Jawbone Up API previously in Connecting to the Jawbone Up API with Node.js, and I’ll be referring to sections from that article throughout.
- An SSL certificate to run your site on HTTPS. You’ll need this if working with the Jawbone Up API. As mentioned at the start of this series, overall it’s a bit easier to do a lot of this on HTTPS. We cover how to set up a self signed certificate on the Jawbone Up API article if you’re interested, but it’s not the easiest option these days. You can do it really easily using Let’s Encrypt as mentioned in the first article in the series. Glitch.com also provides a great prototyping environment that comes with HTTPS by default.
The Code
All code for this demo is available for you to download and use however you please! You can find it all on GitHub.
How This Works
Your Api.ai assistant is already connected to a simple web app that accepts statements via the HTML5 Speech Recognition API. From here, you need to add a new bit of functionality that listens for a specific action from your Api.ai agent. In your case, this is the action of “sleepHours”.
Whenever your JavaScript detects this action, it triggers a separate call to your Node.js app to ask the Jawbone API for that data. Once the web app receives this data, your web app turns it into a nice sentence and reads it out — giving your assistant a whole new range of intelligence!
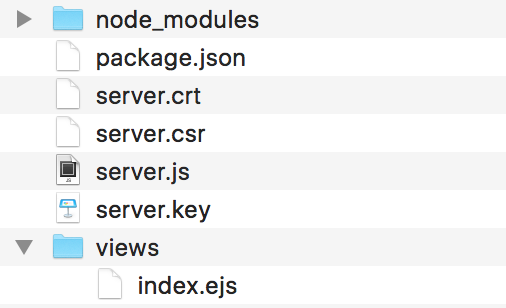
Your Project Structure
I’ve adjusted the app from the initial HTML-only structure to one that uses EJS views so that you can switch pages in your web app when logging into the Jawbone Up API via OAuth. In reality, you only really have one page, but this method allows you to add more in future if needed for other IoT devices. This single view is at /views/index.ejs. You then have your Node server in the root folder as server.js and certificate files in root too. To keep things relatively simple and contained, all front-end JavaScript and CSS is inline. Feel free to move these into CSS and JS files as you prefer, minify them and make them pretty.
Responding to Api.ai Actions in JavaScript
As you might remember from the previous article, when Api.ai returns a response, it provides a JSON object that looks like so:
{
  "id": "6b42eb42-0ad2-4bab-b7ea-853773b90219",
  "timestamp": "2016-02-12T01:25:09.173Z",
  "result": {
    "source": "agent",
    "resolvedQuery": "how did I sleep last night",
    "speech": "I'll retrieve your sleep stats for you now, one moment!",
    "action": "sleepHours",
    "parameters": {
      "sleep": "sleep"
    },
    "metadata": {
      "intentId": "25d04dfc-c90c-4f55-a7bd-6681e83b45ec",
      "inputContexts": [],
      "outputContexts": [],
      "contexts": [],
      "intentName": "How many hours of @sleep:sleep did I get last night?"
    }
  },
  "status": {
    "code": 200,
    "errorType": "success"
  }
}
Within that JSON object there are two bits of data you need to use — action and parameters.sleep:
"action": "sleepHours",
"parameters": {
  "sleep": "sleep"
},
action is the name you gave to the Api.ai action that the user has triggered. In the case of your sleep example, you named it “sleepHours”. parameters contain the variables in your sentence that can change a few details. In the case of sleep, your parameter tells you what type of sleep — “sleep”, “deep sleep”, “light sleep” or “REM sleep” (or just “REM”).
Initially, in an earlier article on Api.ai, the prepareResponse() function took the JSON response from Api.ai, put the whole thing into your debug text field on the bottom right and took out Api.ai’s verbal response to display in the web app. You completely relied on what your Api.ai agent said, without adding any of your own functionality:
function prepareResponse(val) {
  var debugJSON = JSON.stringify(val, undefined, 2),
    spokenResponse = val.result.speech;

  respond(spokenResponse);
  debugRespond(debugJSON);
}
This time around, keep an eye out for the action field and run your own function called requestSleepData() if the action contains "sleepHours". Within this function, pass in the sleep parameter so you know what type of sleep is being requested:
function prepareResponse(val) {
  var debugJSON = JSON.stringify(val, undefined, 2),
    spokenResponse = val.result.speech;

  if (val.result.action == "sleepHours") {
    requestSleepData(val.result.parameters.sleep);
  } else {
    respond(spokenResponse);
  }

  debugRespond(debugJSON);
}
Within requestSleepData(), request all sleep data from your Node.js server and then filter it by looking at the very first value in the returned array of data (data.items[0].details): this would be last night’s sleep. Within these details, you have data.items[0].details.rem with your REM sleep, data.items[0].details.sound with your deep sleep, data.items[0].details.light with your light sleep and data.items[0].details.duration with the combined amount of sleep recorded:
function requestSleepData(type) {
  $.ajax({
    type: "GET",
    url: "/sleep_data/",
    contentType: "application/json; charset=utf-8",
    dataType: "json",
    success: function(data) {
      console.log("Sleep data!", data);

      if (data.error) {
        respond(data.error);
        window.location.replace("/login/jawbone");
      }

      switch (type) {
        case "REM sleep":
          respond("You had " + toHours(data.items[0].details.rem) + " of REM sleep.");
          break;
        case "deep sleep":
          respond("You had " + toHours(data.items[0].details.sound) + " of deep sleep.");
          break;
        case "light sleep":
          respond("You had " + toHours(data.items[0].details.light) + " of light sleep.");
          break;
        case "sleep":
          respond("You had " + toHours(data.items[0].details.duration) + " of sleep last night. That includes " + toHours(data.items[0].details.rem) + " of REM sleep, " + toHours(data.items[0].details.sound) + " of deep sleep and " + toHours(data.items[0].details.light) + " of light sleep.");
          break;
      }
    },
    error: function() {
      respond(messageInternalError);
    }
  });
}
toHours() is a crude and quick function that formats your times into sentences like “1 hour, 53 minutes and 59 seconds”:
function toHours(secs) {
  hours = Math.floor(secs / 3600),
  minutes = Math.floor((secs - (hours * 3600)) / 60),
  seconds = secs - (hours * 3600) - (minutes * 60);

  hourText = hours + (hours > 1 ? " hours, " : " hour, ");
  minuteText = minutes + (minutes > 1 ? " minutes " : " minute ");
  secondText = seconds + (seconds > 1 ? " seconds" : " second");

  return hourText + minuteText + "and " + secondText;
}
As you’ll see when looking into the requestSleepData() function, the end result is a call to respond() — the same function that previously took Api.ai’s voice response. You reuse your existing functionality to bring speech to your own response, allowing your assistant to tell the user this information once it’s ready.
One last aspect of your front-end JavaScript to point out is error handling. If you have an issue with how Jawbone returns data (usually due to not being logged into the service), your server responds with a JSON value in the format of {"error" : "Your error message"}. The assistant sees this and automatically takes the user to your OAuth login page:
if (data.error) {
  respond(data.error);
  window.location.replace("/login/jawbone");
}
Your Node.js Server
Your Node.js server is based on the one used in Connecting to the Jawbone UP API with Node.js. If any of the code looks confusing, feel free to refer to that earlier article, as it explains all about connecting to the Jawbone API via OAuth and setting up an HTTPS server to run it. If you don’t have a Jawbone Up, the same concepts can be used for other IoT devices. You would just need to add your own methods of responding to GET requests with different data (and you may not need to worry about OAuth). The Jawbone Up data here is just an example.
Your Jawbone data has been adjusted from the earlier article to provide a simple JSON response rather than formatting it all into a table template view. The variables of up and options have been moved to global variables so that they can be reused in multiple requests to the API (in that other SitePoint example, we only requested data in one big chunk each time).
To log into the Jawbone API via OAuth, the user can go to /login/jawbone. However, as you saw above, they don’t need to know to do this. Your assistant can also redirect them if it notices they aren’t logged in. You could also add a new intent into your Api.ai agent that understands the phrase “log me into my Jawbone Up data”, if you wanted to make this truly seamless. Your login route in Node.js looks like so:
app.get("/login/jawbone",
  passport.authorize("jawbone", {
    scope: ["basic_read","sleep_read"],
    failureRedirect: "/"
  })
);
Once you’ve logged into the Jawbone API via passport.use("jawbone", new JawboneStrategy()), assign this access to your up variable and direct the user to /barry. You could redirect the user to any path of your choice, as long as it’s different from your root directory (that seemed to just cause an endless struggle for my server). I chose /barry, as I named my assistant Barry and thought it self explanatory (the page shows the exact same index view and thus isn’t different in any way). You could also use this as a way of providing a different view for users who have logged into their Jawbone device successfully if you so desire. Once logged in, the user can go back to the root https://localhost:5000 page and use Up functionality as well.
Sending Back Your IoT Data
Your retrieval of Jawbone data is done in a very simple way upon receiving a GET request for /sleep_data. Check if the up variable is defined: if not, your user hasn’t logged in and you tell the web app this so that it can perform the redirection and tell the user they’ll need to log in. Do the same thing if Jawbone returns any errors when you call up.sleeps.get() and if jawboneData.items isn’t defined:
app.get("/sleep_data", function(req, resp) {
  if (up !== undefined) {
    up.sleeps.get({}, function(err, body) {
      if (err) {
        console.log("Error receiving Jawbone UP data");
        resp.send({"error": "Your sleep tracker isn't talking to me. Let's try logging in again."});
      } else {
        var jawboneData = JSON.parse(body).data;

        if (jawboneData.items) {
          resp.send(jawboneData);
        } else {
          console.log("Error: " + jawboneData);
          resp.send({"error": "Your sleep tracker isn't talking to me. Let's try logging in again."});
        }
      }
    });
  } else {
    console.log("Up is not ready, lets ask to log in.");
    resp.send({"error": "Your sleep tracker isn't talking to me. Let's try logging in again."});
  }
});
The errors here could be caused by other factors too, but to keep it simple, I’m focusing on getting them to try logging in again. In a production level app, you’d want to look into various causes and adjust your response.
If all is well and you receive a valid response, send it as a JSON response back to the web app to read and parse through nicely:
if (jawboneData.items) {
  resp.send(jawboneData);
}
With the web app and your Node.js server working together, you should be able to retrieve sleep data from your Jawbone Up device now. So let’s give it a go.
In Action
Run your server with the usual node server.js. Remember that you’ll need to have run npm install for your npm modules and will need to have a certificate on your server to run it via HTTPS.
Visiting https://localhost:5000 in your web browser should bring you to your AI assistant. (If you’re using a service like Glitch, you’ll have a Glitch URL instead.) Ask it how much sleep you’ve had:
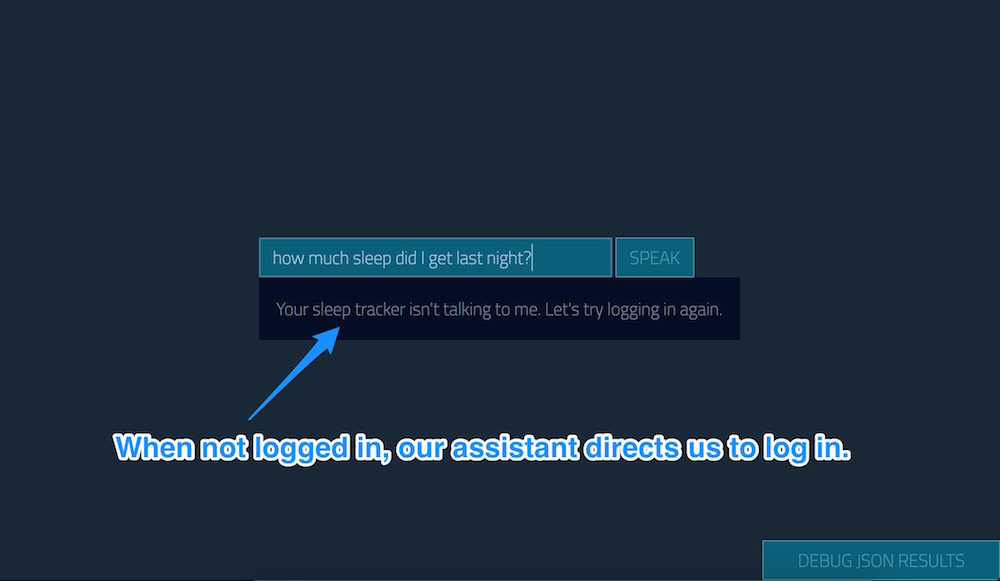
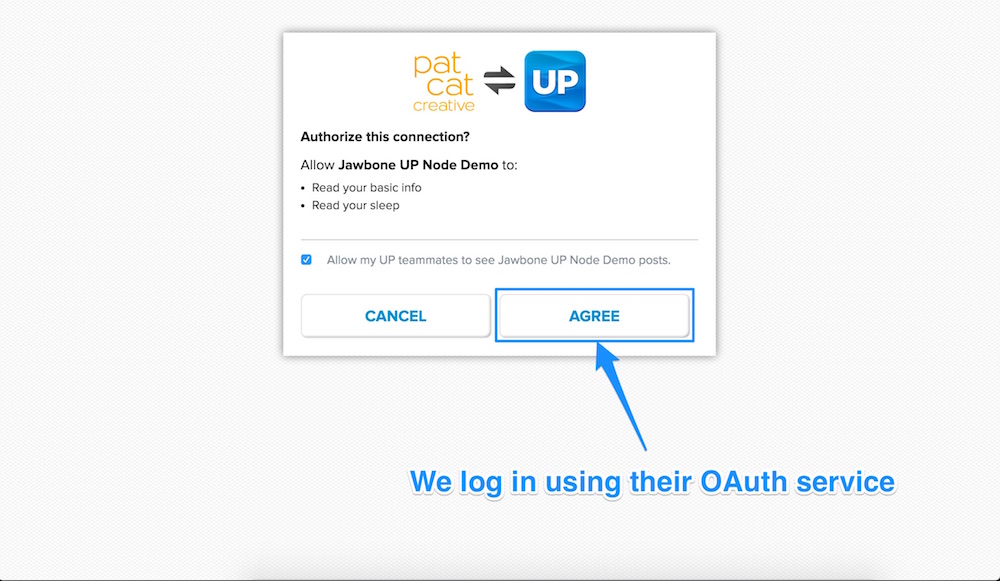
Turns out you aren’t logged in yet. It directs you to the Jawbone Up OAuth login screen. Log in and agree to provide access to your data, then click “Agree”:
If you ask it this time around, you’ll receive the right answer:
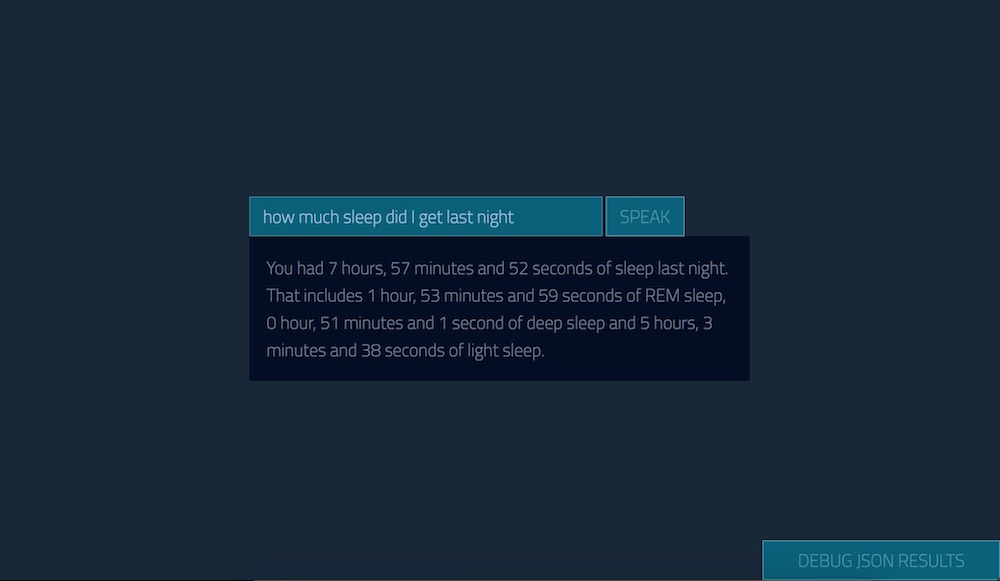
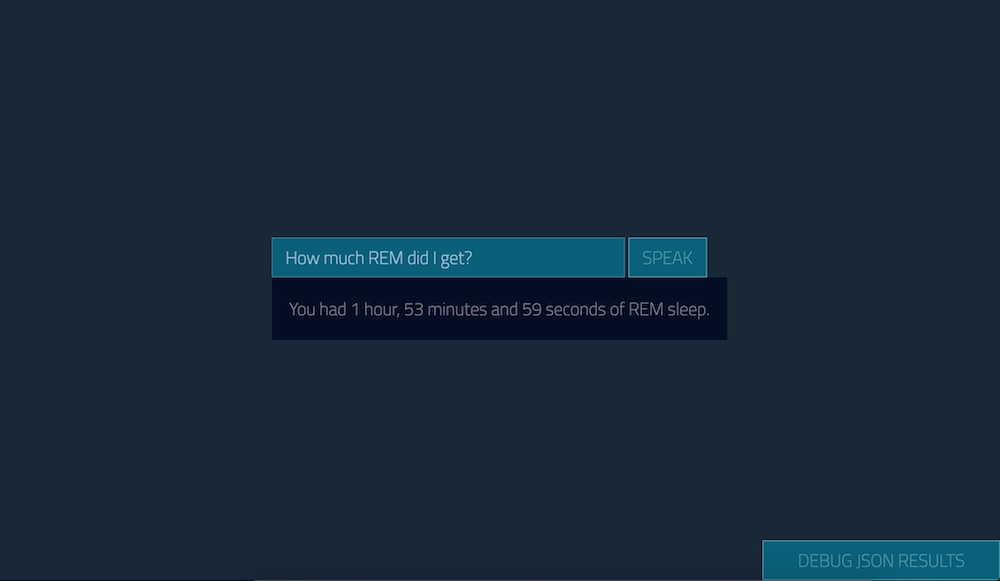
You can also ask it something more specific, such as “How much REM did I get?” to test out the parameters:
Conclusion
More from this author
That concludes quite a varied exploration of Api.ai’s capabilities for now! You could expand upon this example to allow it to understand date ranges (e.g. “How much sleep did I get on Tuesday?”) or to format the time slightly better (notice a slight bug in one of the responses?). You might have much nicer and shorter ways of phrasing the responses too. Personalize it — make it your own!
As you can see, by using these methods you can connect up any Node.js compatible or web API compatible service to your Node.js server, hook it up to an intent in your Api.ai agent and teach it all sorts of things! You could connect up plenty of IoT devices via IFTTT, connect up your LIFX smart lights via IFTTT or even connect up your very own Nodebot. Possibilities are limited only by the devices you have at your disposal!
If you’ve been following along and building your own personal assistant using Api.ai, I’d love to hear how you went! What have you connected it to? Let me know in the comments below, or get in touch with me on Twitter at @thatpatrickguy.
Give your AI the human touch with a sentiment tool. Check out our screencasts on the Microsoft Cognitive Services and the Text Analytics API.