Welcome to the WordPress Secure Setup Guide. In this tutorial, I’ll show you a number of ways to secure the WordPress admin area. Before I show you these, consider whether the WordPress site has an SSL certificate.
An SSL connection helps secure any website and is recommended, especially for use on WordPress sites.
This video is part of my course WordPress Secure Setup Guide. You can watch the entire course for free here on Envato Tuts+.
-
FREE
 WordPressWordPress Secure Setup Guide
HTTP and HTTPS
SSL stands for Secure Socket Layer. Essentially, it’s what makes the difference between HTTP and HTTPS when serving a website from a server. The S denotes that the connection is secure.
If you don’t already have SSL set up on a WordPress installation, contact the web host, they’ll tell you what you need to do.
You can also follow our guide on how to secure your WordPress site with SSL.
When you have the SSL certificate set up and running on your site, the URL that you’ll use for your site will go from HTTP to HTTPS.
Now that you know S stands for secure, when you see HTTPS in the URL, you can be confident that you’re browsing in a secure connection.
Forcing SSL Using wp-config

A wise step to take is to activate a feature in WordPress that forces the connection to go over HTTPS whenever somebody is logging in and whenever they’re in the admin area so that there’s no unsecured access.
The way to do this is by copying a little snippet of code to the the wp-config.php file. Copy the following line of code:
define('FORCE_SSL_ADMIN', true);
Now scroll all the way down to the bottom of your wp-config.php file, after the WP_DEBUG line here, pasting the code snippet in.
Once that code has been added, the only way to access the admin area will be through a secure connection.
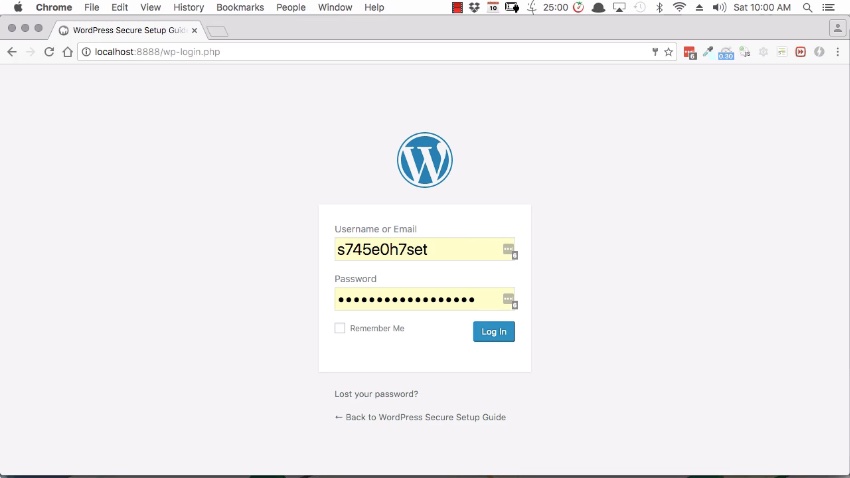
The next thing to consider is changing the location of the login page. If you look in the URL bar, you’ll see this login page is at wp-login.php. This is the default for all WordPress websites.
Change the Name of wp-login
You’ll recall that brute force attacks may be used to hack their way into the WordPress admin area. Part of that automated process is to examine the domain name. The attack just adds wp-login.php to the end of it. Then, if a login page is found, the script knows exactly where the WordPress login page is, and it will begin the brute force attack.
One way of preventing such an automated brute-force attack is to change the name of the login page to something non-default, thus changing the URL.
Again, this is achieved using a plugin.
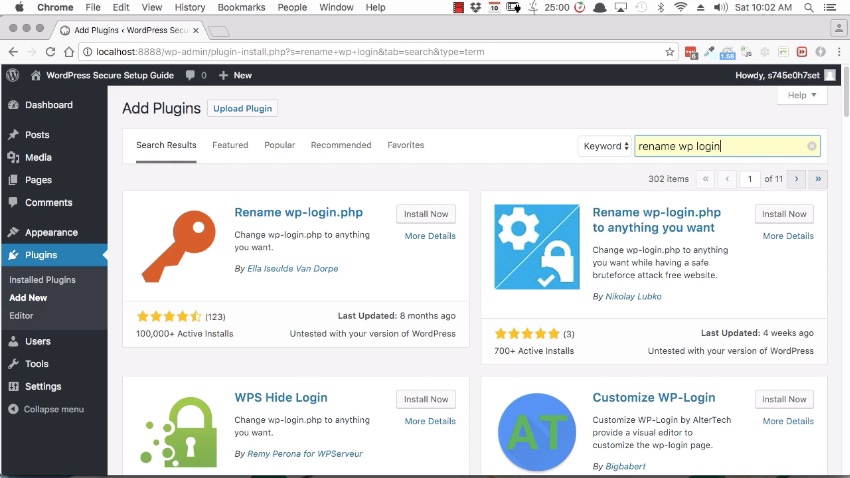
In the WordPress admin panel, navigate to Plugins > Add New then search for Rename wp-login.
There are actually several different plugins that you may use to rename the login area, so feel free to have a browse through and choose the one that you prefer.
Or you can just go with Rename wp-login We’ll install that and activate it. Once activated, you’ll be taken straight a settings page where you can rename the login area. You may leave it as login, or you may come up with something a little more obscure.
This is known as security by obscurity.
And if you do go with something a bit more obscure, then ensure you bookmark the new login page so that you don’t accidentally lose it.
In this example, I’ll leave it as login, and save the changes. So now if I log in, the URL will say login, not wp-login.php.
Recovering WordPress if You Get Locked Out
On that note, if you ever install a plugin for security and then accidentally lock yourself out, go to the File Manager or FTP client. Navigate to the Plugins folder, in the WordPress installation, then rename the folder for that plugin.
That has the effect of deactivating the plugin, in turn removing whatever mechanism is locking you out. Then you can get yourself back into the WordPress admin area and correct the issue.
Limit the Number of Unsuccessful Login Attempts
Another good security measure is to limit the number of unsuccessful login attempts a person may make. Generally speaking, a valid user is only going to forget their password a few times before they reset it or they remember it.
If, however, there’s a single IP address making many login attempts, that’s an indication that somebody trying to hack their way into the site.
The way to counter this is by setting a maximum number of login attempts. If you set it to five, then after five incorrect attempts to log in, a user would be temporarily locked out. And you may set how long to lock them out for, say five minutes or 20 minutes. That would usually be enough to interrupt a brute force attack.
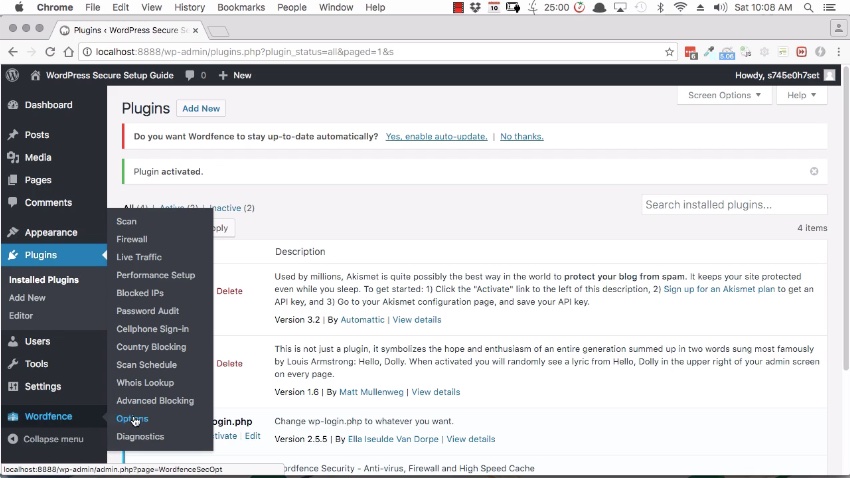
Once again, there’s a couple of different plugins that you can use for this. I’m using the functionality that’s included in one of the most popular security plugins for WordPress, Wordfence.
Install and activate Wordfence in the usual way and navigate to the lower left of the WordPress menu to find the Wordfence menu. Select Options.
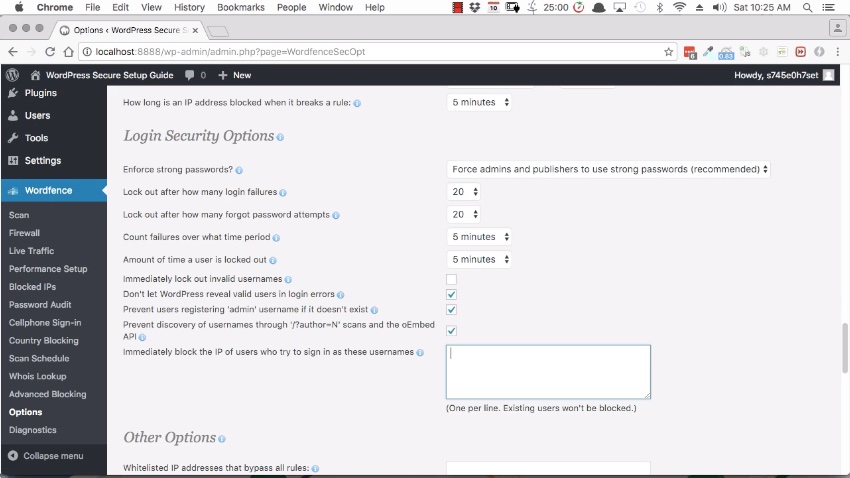
Wordfence does a number of things, many of which I’ll show you in another tutorial. For now, I’m focusing on limiting the login attempts. So scroll down to the Login Security Options section.
Here, you may configure:
- the number of login attempts a person may make
- how many times they may forget their password
- the period of time that you’ll allow those attempts to occur within
- how long you want have that person locked out
Well, I say a person, but this won’t actually affect people as much as it will affect automatic login attempts. And that’s the point.
Generally speaking, you can probably leave the settings at the default values. Pay attention to the activity on the site to see if there are brute force attacks being made.
Lock Out Invalid User Names
If you’re the only person using the site, you may set rules to be as strict as you want. If, however, you have a business website where you have customers as members on your site, then you’ll need to consider the customer service side of things.
For example, I had a website where all of my customers needed to be able to log-in to the back-end in order to access products that they had purchased from me. At the same time, I experienced a relentless series of brute force attacks that went on for years, non-stop, 24/7.
So, in order to protect the data of my customers, I had to make the call to make these rules very strict.
One of the things that I activated was this option here to immediately lock out invalid usernames. Because, my logic was, sometimes you forget your password but, generally speaking, you’re less likely to forget your own username.
Now if you do find yourself in a situation where you have to do this, just have some type of customer service process ready because when people get locked out, they may get a bit irritated.
Ensure that you provide an easy way for locked-out customers to contact you and let you know that they’ve been locked out. Then explain to them that the reason that you’re doing it is to protect their information. Once they know that, they’ll always be happy; the irritation will disappear!
And if anything, you have an opportunity to build greater trust with your customers because they know that you’re looking out for their privacy and security.
Now one great feature that this area also includes is you can see here. It says prevent users registering admin username if it doesn’t exist. And you already know why you don’t want to have an admin username on your site. But you can also add extra usernames that you don’t want to allow on the site.
So you might add wp-admin, you might add your full name to make sure that nobody can use that. And that just gives you extra ways to try to prevent these brute force login attempts.
Another thing that you should be aware of. If you have customers that need to log in to your site and you limited the number of login attempts that they can make. Is the Alerts section at the top of these options. So here, you can get an alert whenever somebody’s IP address is blocked.
Now, of course, you get to know customers over time, so if you see that someone who’s been locked out is a trusted member you can be a bit proactive. You may unblock them and let them know that they’re able to log in again.
Unblocking IP Addresses
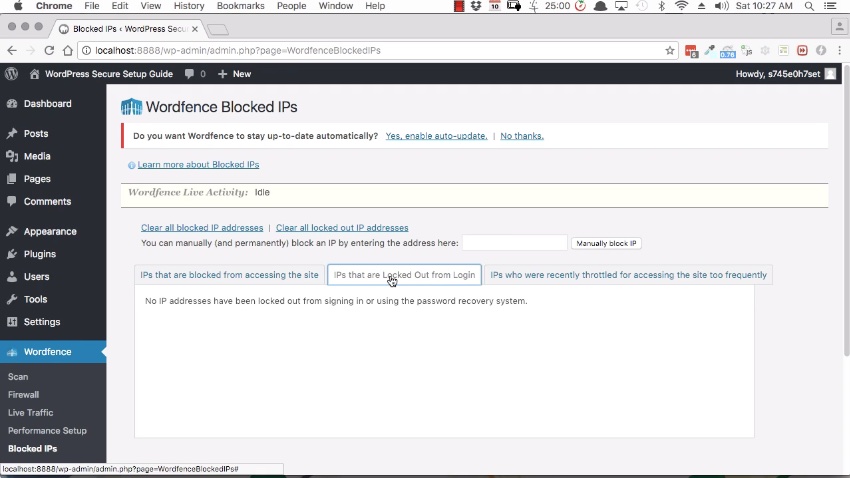
If somebody contacts you, who has been locked out, and they are legitimate user, then go to the Wordfence menu, and go to Blocked IPs.
Here, you’ll see IP addresses that are blocked out from login. You’ll be able to identify the person who’s been blocked and remove that block. Or you can just choose Clear all locked out IP addresses if you feel that it’s safe to do so.
Limiting WordPress Admin to an IP Address
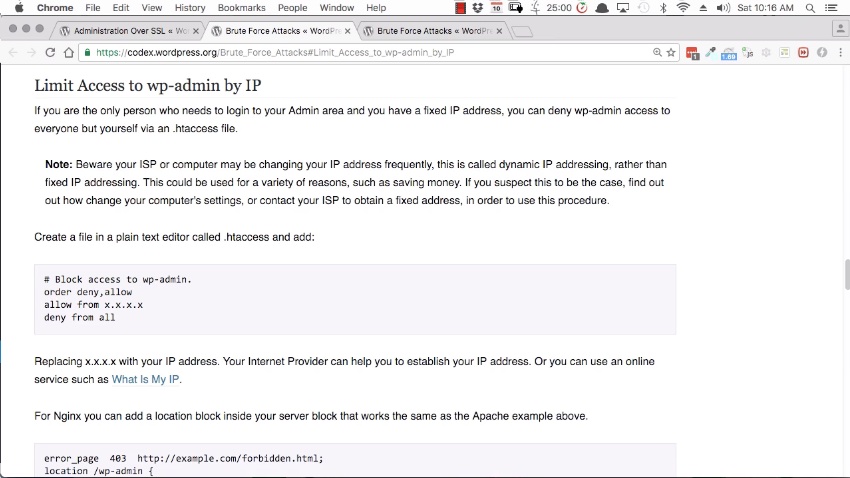
Allowing only specific IP addresses to have access to the WordPress admin area as another good security precaution.
This is something you can do if only you and a handful of other people are accessing the site. And you’ll all need to have a static IP address. That is to say an IP addresses that doesn’t change over time but which stays the same.
If these circumstances are satisfied, then follow the WordPress Codex instructions on how to modify the .htaccess file so that it only allows certain IP addresses to access the admin area. .htaccess is found in the root folder of your site.
Now I’m not going through exactly what you have to do here because this does get a little technical. You’ll need to know whether the server is an Apache server or an Nginx server. If you don’t feel confident with that, then you probably don’t want to attempt this technique. But if you do, then you’ll find a link, in the notes below this tutorial, on the process to follow.
.htaccess Login
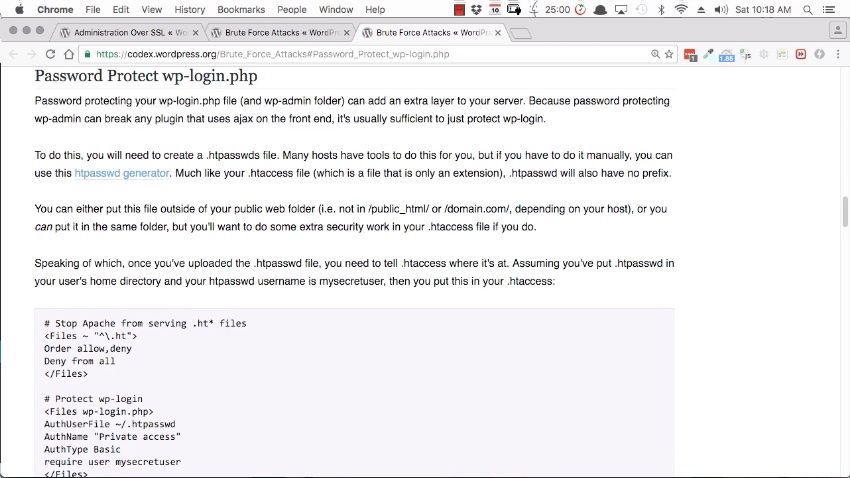
Another, similar technique is to create an extra layer of password protection on the login page.
Again, this is done by editing the .htaccess file in the root folder of the website. This security measure creates a popup that prompts for a username and password—not the password to your WordPress site but a different one. And this functionality is completely separate from WordPress. Only once you successfully log in through this popup can you even access the login page.
If you’re dealing with brute force attacks, and you don’t have to allow public access to the admin area for your customers, then this is a really great option.
Once again, this is a little technical. You can find the complete instructions on how to password protect wp-login from the WordPress Codex.
Just a quick note, though. If you’ve renamed the login area, ensure that you don’t leave wp-login.php in here, which is the default address of your login area. Ensure you update so that it’s protecting the correct location for the login page.
CAPTCHA Code
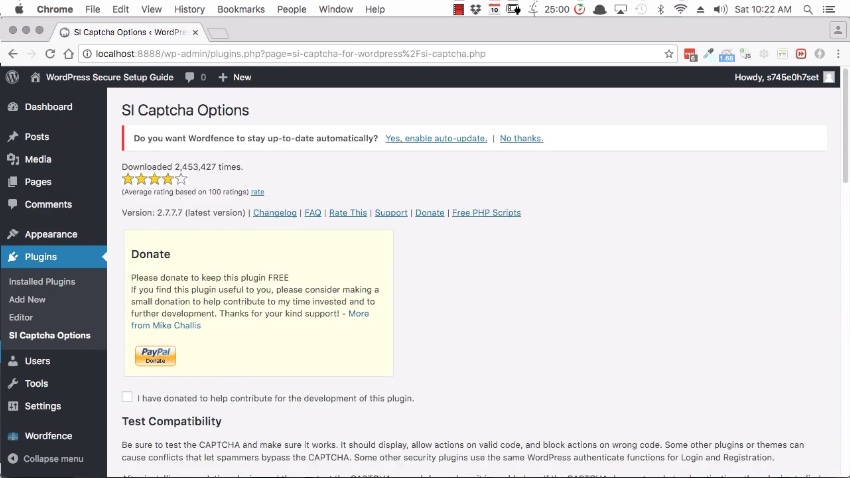
Another technique is to add a CAPTCHA code to login pages. Again, this is achieved with a plugin so navigate to Plugins > Add New.
There are several different CAPTCHA plugins, and you can use any one that you like. One of my favorites, though, is SI CAPTCHA Anti-Spam. So I’ve installed that and activated it.
Go to Settings, scroll down and this is where to set up a CAPTCHA code for the registration form, for the lost password form and for the comment form. You do have the option to activate it on the login form, as well, as that one is not enabled by default.
Once again, if you are having trouble and you really need to clamp down on brute force attacks, you may enable this.
Once enabled, you’ll have a CAPTCHA code here and it won’t be possible to log in without getting that code correct.
Two-Factor Authentication in WordPress
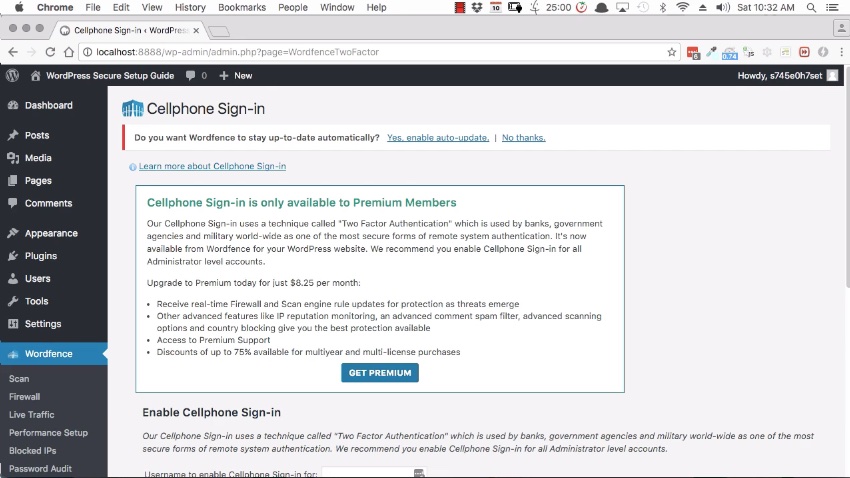
The last technique to protect the WordPress admin area is two-factor authentication, also known as two-step authentication.
You’re probably familiar with this from personal use of this security technique.
The two-step basically refers to needing two things in order to get in. Normally something you have and something you know.
You have your username and password—something you know—and one method is to text a security code to a mobile phone—something you have.
Wordfence does have functionality built in for this. If you go to Wordfence > Cellphone Sign-in. This, however, is something that you’ll need to pay for in order to enable.
Alternatively, there are other plugins that you can use. You can learn more about two-factor authentication on the WordPress website.
Conclusion
That wraps up the list of top techniques for securing the WordPress admin area. I’ve done quite a lot so far to secure the WordPress site, but there are still other things that can be done.
In the next lesson of this free course, I’ll show you some additional security methods to implement.
-
FREEWordPressWordPress Secure Setup Guide
