
Dragon anatomy is a problematic topic, mainly due to the fact that they’re mythical creatures. However I can show you how to design a believable body for this mythical creature based on basic anatomy theory. In this tutorial you’ll learn about dragon skeleton, muscles and movement. If you want your dragons to look real, this is the tutorial for you!
1. Skeleton
We all know dragons are like dinosaurs with six limbs, able to fly actively and breath fire. They lay eggs and they’re covered with scales or plates. Also, they’re carnivores with sharp teeth and long claws. These are the only things all dragon fans will agree with. The rest of them are questionable – are dragons warm or cold blooded? Do they have fur and/or feathers? How long is the tail, how many fingers do they have? I’ll try to show you the most universal tips for your dragon. The rest is up to your imagination!
Step 1
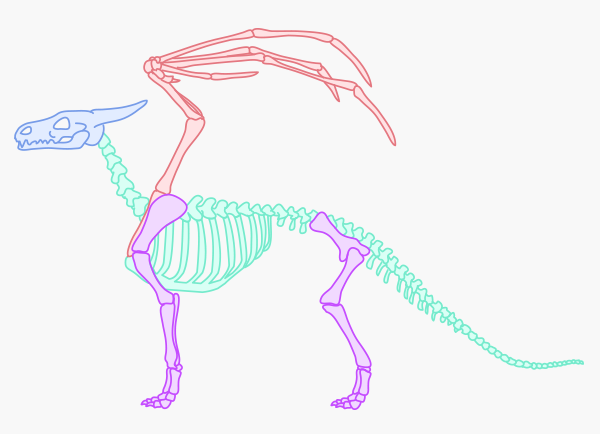
A skeleton is perfect to start with. Convincingly placed bones and joints will let your dragon look quite realistic no matter what you’ll do with it afterwards! I used a mix of dog, T-Rex and bat for this skeleton.
Step 2
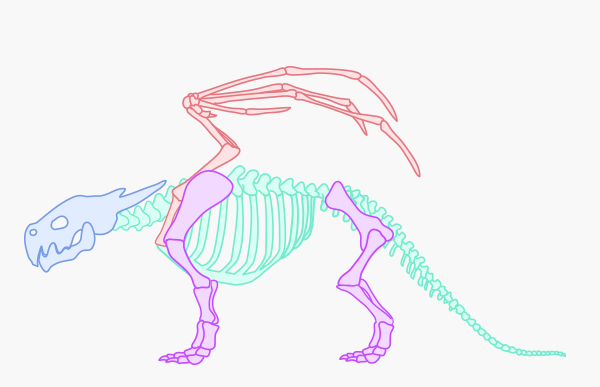
Did the previous picture ruffle you? Did you think: “hey, dragons have shorter legs/longer necks/bigger wings/whatever”. It’s still OK! This picture is just a template you’re free to modify. Do you want a huge, heavy silhouette? Try this one for size.
Step 3
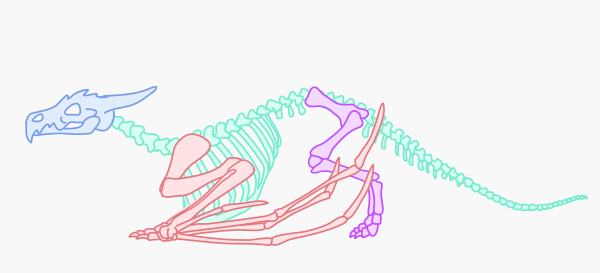
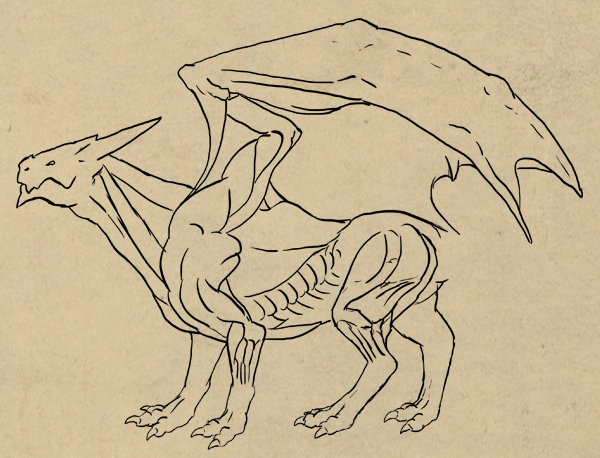
And maybe a wyvern? They’re technically not dragons (only four limbs), but they’re certainly closely related to them. Also, Skyrim’s popularized wyvern as a dragon, so maybe it’s time to change definitions?
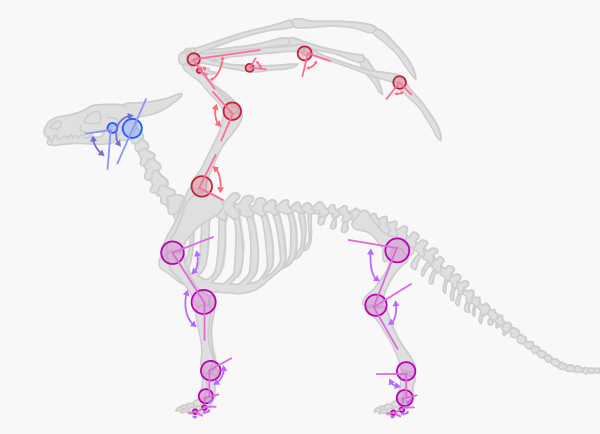
As you can see, you can change a lot of things in the skeleton to create your favorite pose. Just remember:
- An elbow should be placed on the same level with a knee;
- There should be a space between the chest and the hips – the bigger, the wider range of their motion;
- Wings should be at least as long as the barrow. The bigger, the better.
- The neck should start at the back of skull (not the bottom of it);
- Joints should have limited range of motion – check the next step for more information on this.
Step 4
Even the most correctly formed anatomy will not save you, if you use joints without any limits. They are crucial for correct poses. You’re aware of what a dislocated joint is, right? Don’t do it to your dragons!
Step 5
Of course, I don’t want you to draw a complete skeleton every time you draw a dragon. This is what you should really see when looking at a bunch of bones:

Step 6
With this image in mind, you can finally sketch your pose:
2. Muscles
Step 1
Dragon muscles can be quite problematic, since there’s no other animal with both arms and wings. You need to use your intuition here. What is sure though, wings should be built like another pair of arms (more about wings). For the rest of the body you can borrow muscles from any other animal with the same style of motion like your dragon. Here I used a bit of a dog and a horse.
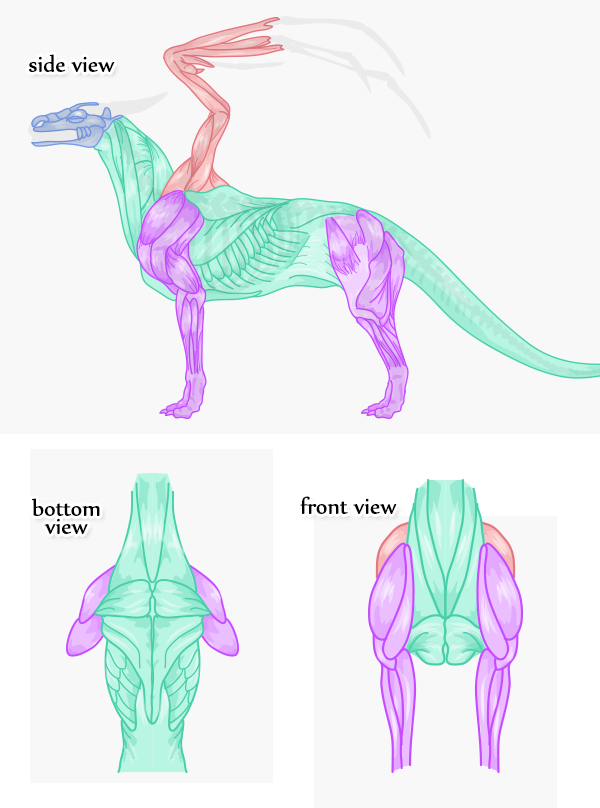
Step 2
While it’s quite easy to create a muscle structure for a dragon, it’s usually very hard to remember. And we don’t want to use a reference every time we draw a dragon! I’ll try to show you a mnemonic to better remember the muscle placement. It may not be perfect, but it should help you with the most complicated parts.
Let’s start with the front leg (arm). Can you see a heart with legs and a cute creature with big, fin-like hands? Sketch it!

Step 3
In the forearm we can see a birdie covering two sticks with its wings.
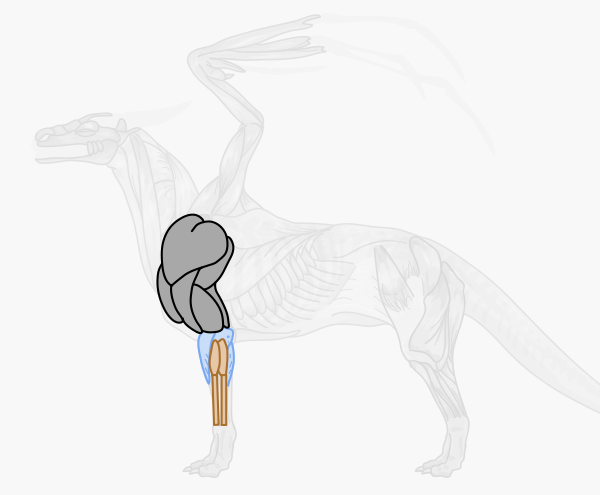
Step 4
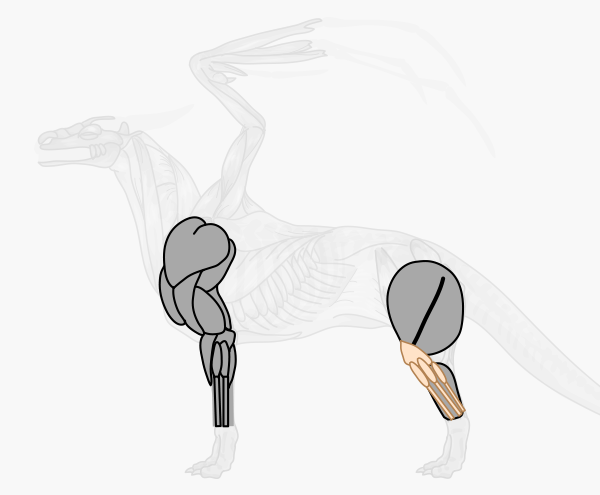
When drawing the hind leg, base on the skeleton. Both bones should be covered with big pieces of muscle.
Step 5
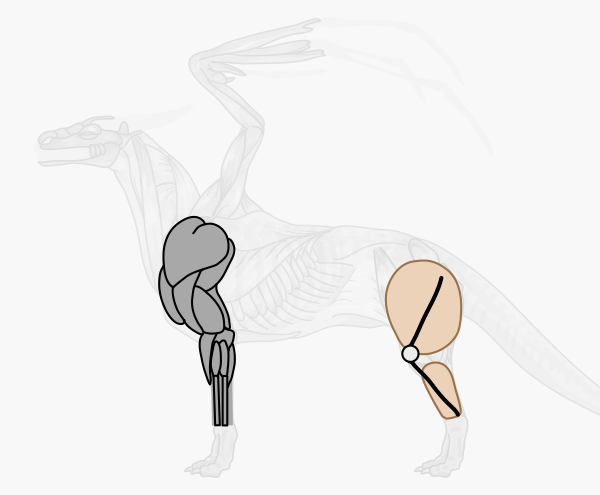
Now, notice a knee and three another sticks between it and the heel.
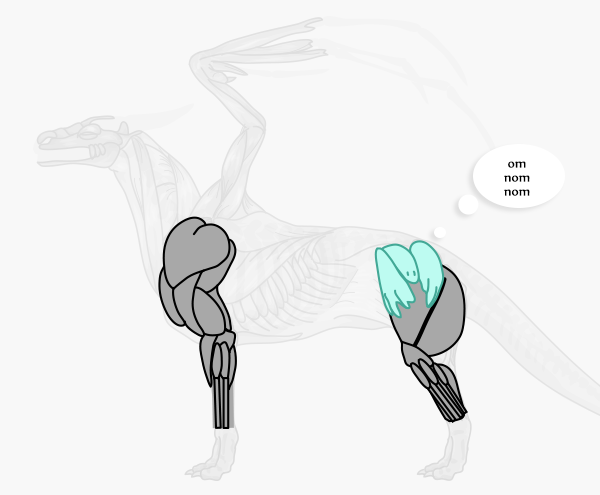
Step 6
A big, winged creature is trying to eat the thigh!
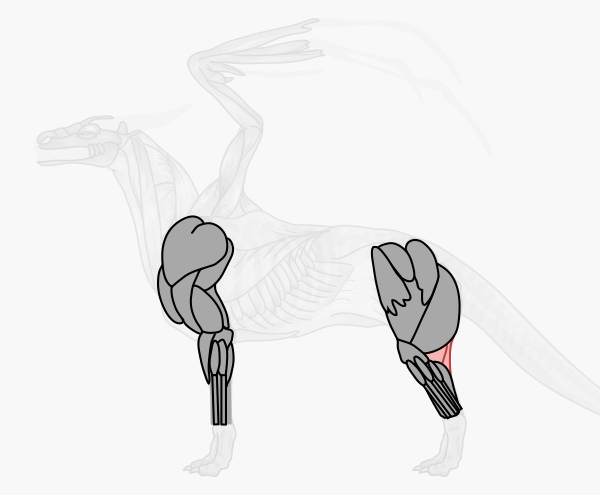
Step 7
Now just connect both parts with two muscles.
Step 8
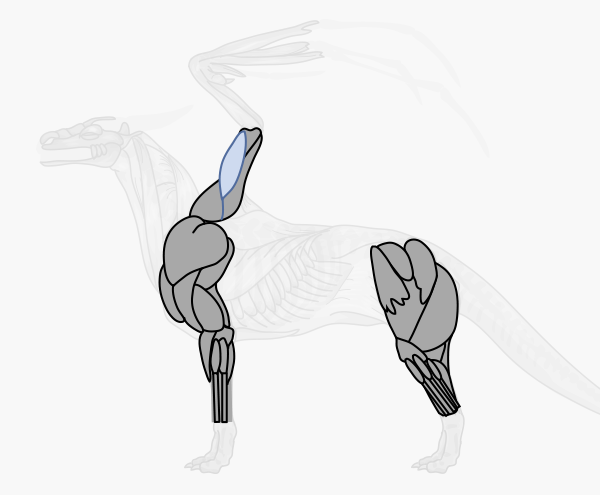
Time for the wing muscles. The arm is pretty easy to remember – cover the bone with a tapered muscle first…
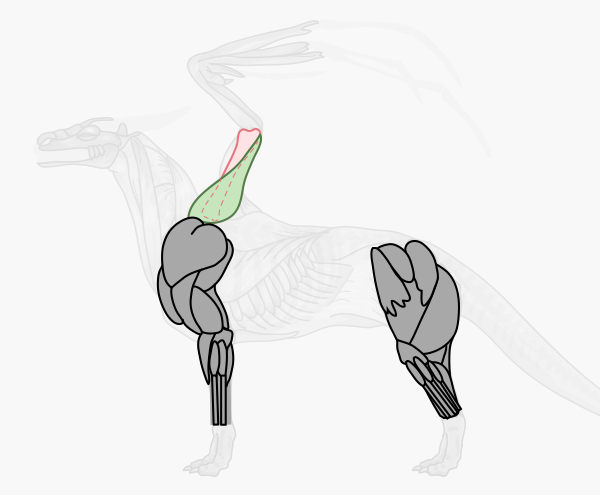
Step 9
…then just add a biceps.
These were the most difficult parts. The rest of muscles should be easy to remember even without any mnemonics, just take a good look at them.
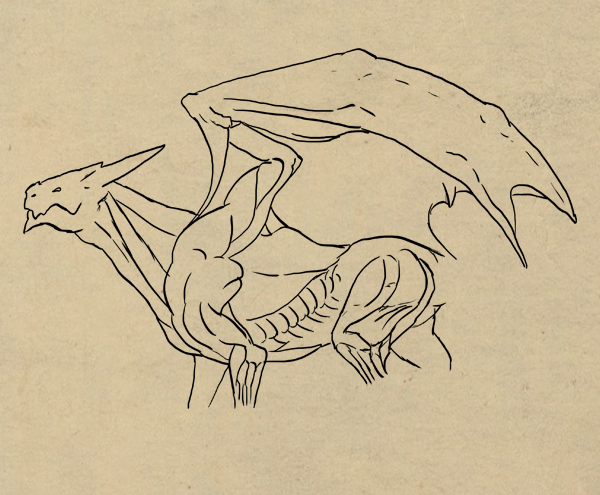
Step 10
If your dragon is fully armored, you don’t need to sketch all the muscles. Just establish the shape of the body. If your dragon is scaled as a snake, stressed muscles are a must.
3. Feet
Step 1
How many fingers should your dragon have? It doesn’t really matter. I personally prefer T-Rex like feet with three fingers, but it’s all up to you. What matters is the middle finger/fingers should be the longest, and the outer ones should come a little outside for better support.
Step 2
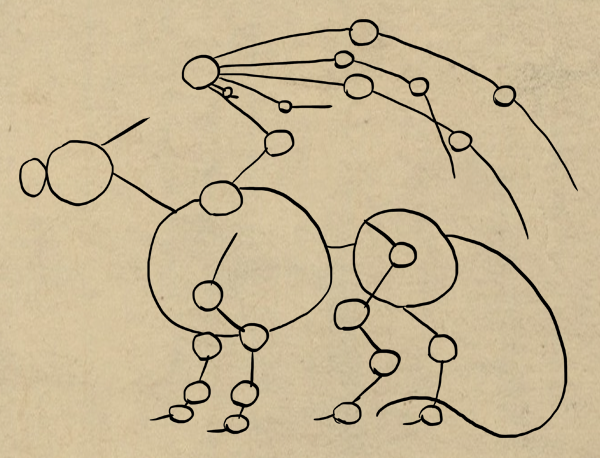
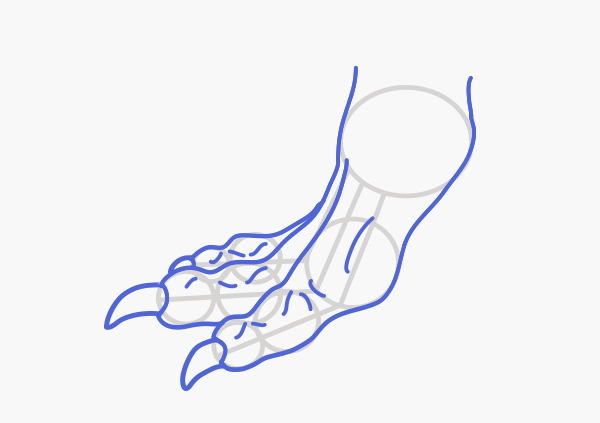
/K, let’s draw a foot now. Start with two circles and draw three or four finger lines.

Step 3
Draw a circle at the end of every finger. Again, the middle one/ones should be the bigger. The last circle in the background looks the smallest, because it’s furthest from us.

Step 4
Add another circles connected to the previous ones. They should be bigger and rather consistent in size. Leave a space between them and the first two circles.

Step 5
Add the claws. Don’t make them too pointy! Also, they look (and work) best when they’re slightly curved.

Step 6
Now you can just connect all the circles with lines, creating a body.
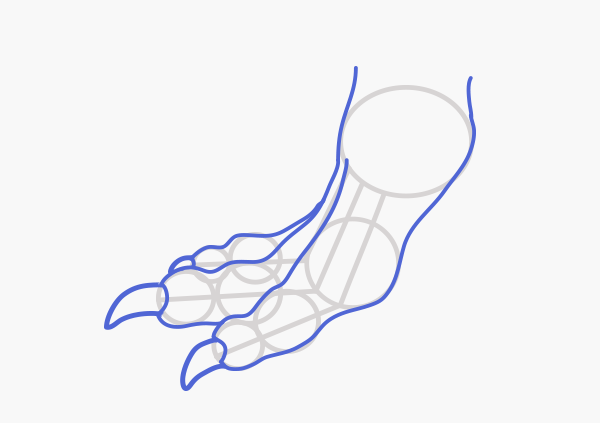
Step 7
You can use the shapes you’ve drawn to add wrinkles to the foot. They should help you properly draw the skin.
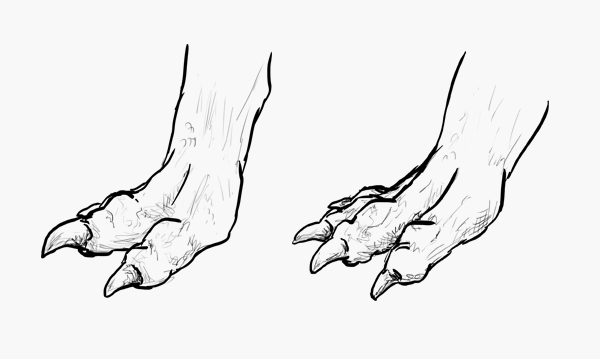
Step 8
And that’s my dragon with his feet added:
4. Tail
Step 1
/K, you’re right – everyone knows how to draw a tail! However, if you don’t want it to look flat or unnatural, you may need to take a good look at this step.
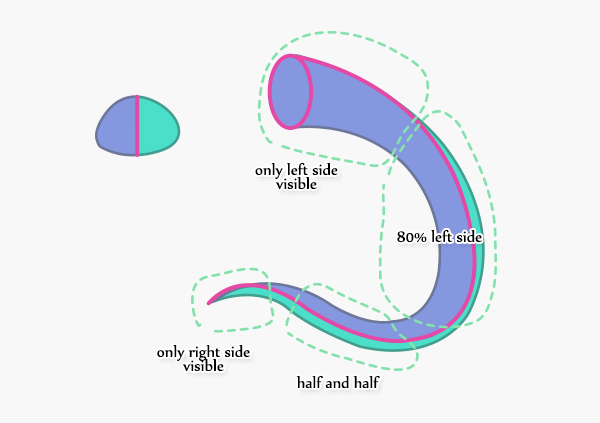
The main rule is pretty simple – a tail has two sides, and they can never be both fully visible at the same time. The more of one side you can see, the more of the other side disappears. To achieve a natural effect, first draw a central line (pink) and then add a bit of both sides.
Step 2
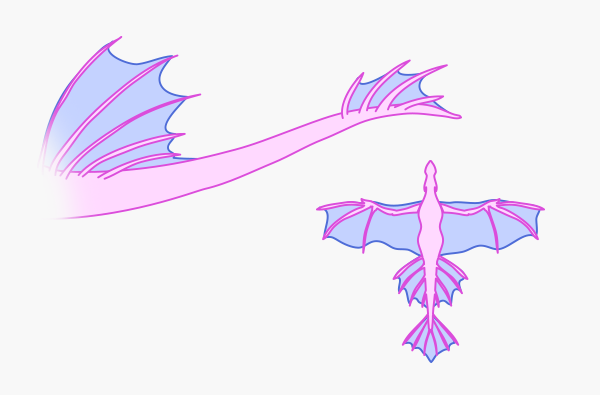
A dragon tail doesn’t really help fly. It’s usually heavy (dragons can crush buildings with them, right?) and are too round to create any lift. You can make it more useful by adding some “fins” to it.
Step 3
When it comes to the tail, there’s another thing that comes from relying on dinosaurs’ anatomy. A naked tail looks quite boring, that’s why we attach some pseudo-practical decorations to it. While empty inside spikes are OK, a big, heavy ball is suicidal for lift. When you want to add some cool features to your dragon (anywhere on the body), always think about practical side first.

Step 4
So, our dragon’s body is almost done!

5. Dragon Armor – Scales and Plates
Step 1
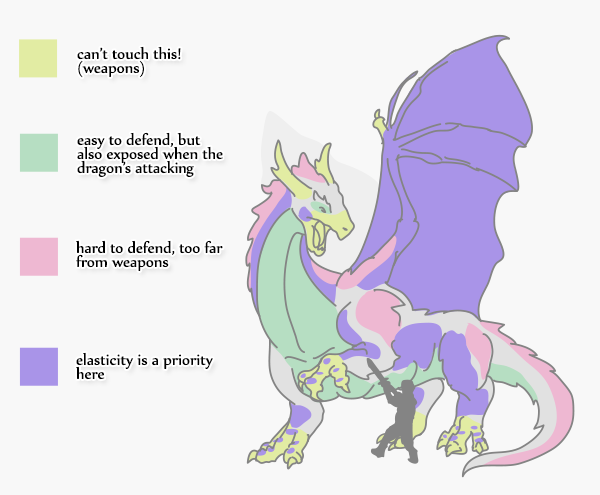
Before you start to create an armor for your dragon, you need to think what it really needs. Just attaching a scale here and there won’t necessary be useful for the dragon. Certain areas on its body have different purposes and therefore, different needs.
- Weapons (yellow) – they are created for exposure, they will most certainly seek contact with the enemy’s body or their weapon. They’re hard and very well protected.
- Front (green) – while it’s very easy to protect the area with claws, attacking dragon will exposure it a lot. Good protection here is necessary!
- Back (pink) – the area is far from weapons, so impossible to defend. The dragon will try not to show this area to the enemy. However, it needs to be armored too, as there may be more enemies/one fast enemy.
- Elastic points (purple) – big, hard plates are best for defense, but they can hardly move. Some places will need stronger elasticity – small plates or scales that won’t restrict the dragon’s movement.
Step 2
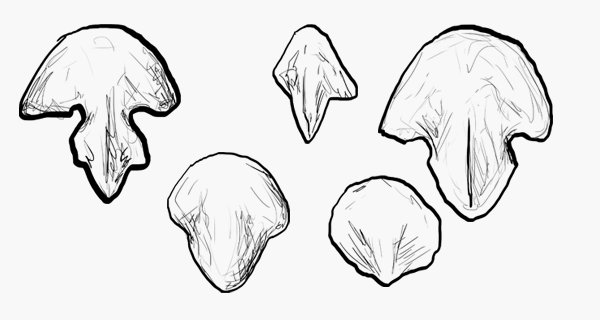
There are a lot of shapes you can use for scales. They can look like leaves, hands, rocks or just like simple ellipses. What is important, you need to see which of them to use on the areas we just determined.
Tip: there’s no better exercise for scales than sculpting a clay dragon. It’ll help you understand what is the purpose of their shape and size.
Step 3
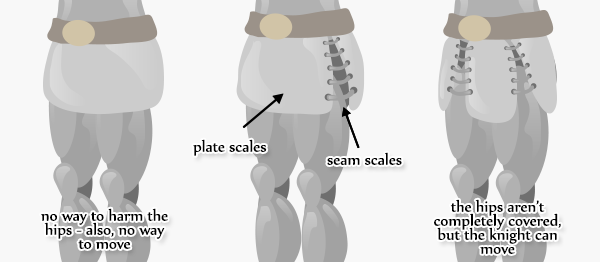
Basically, there are two kind of scales:
- The plate scales are like big plates on a knight’s armor – they’re hard and rigid. The more plates, the stronger and heavier the armor. They also make the whole silhouette bigger, since they’re not attached very tightly.
- Seam scales are smaller and they’re used to connect plates – like chains between armor plates. The more seam scales between the plates (and the smaller they are), the more agile the dragon. Also, the smaller they are, the closer to the skin they’re attached.
Step 4
Once you know how to distinguish the scales, you can get your dragon dressed. There are plenty of ways to do it – you just need to follow the rule of four areas to create a beautiful and realistic armor.
Step 5
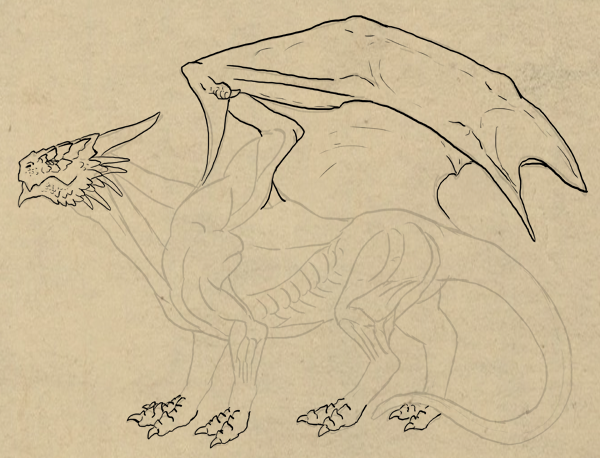
So, here goes a short process of this technique. I’m going to use a heavy armor (it’s my favorite!). I started with the head (you can learn more about dragon heads in my dragon head tutorial), a wing (wing tutorial) and the feet that are just covered with simple messy scales.
Step 6
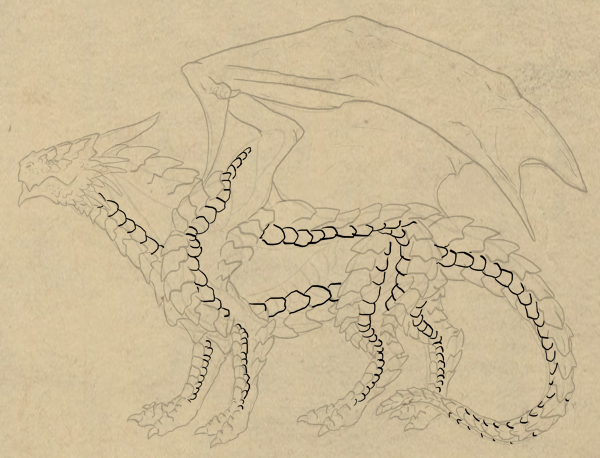
Now you can cover all the contours with big, leaf-shaped plates. Look at the tail – can you now see why defining the sides is so important?

Step 7
Add a row of smaller seam-scales. On the tail they connect the top and the bottom directly.
Step 8
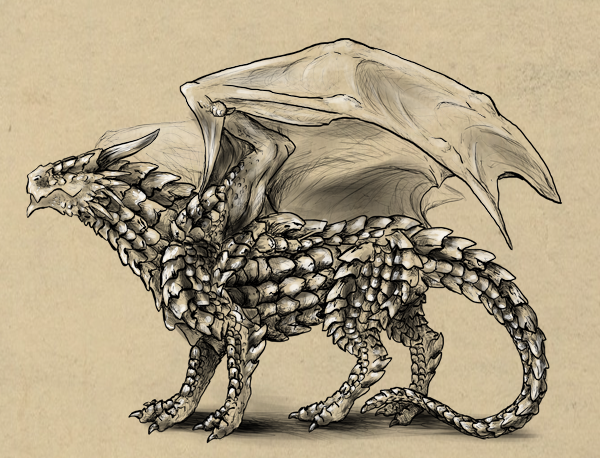
Now just fill the empty space with whatever fits.

Step 9
Now you can do whatever you want with your line art. If you want to reach the same effect as below when drawing traditionally, use a grey/brown paper and watercolors, then fix the sketch with a black marker.
Step 10
You may now ask yourself, why have I shown you the whole muscle structure, if it’s completely invisible under all the scales? There are two reasons for it:
- The skeleton makes the pose, but it’s muscles that give a shape to the body;
- When you want to draw an agile, slim dragon like below, you won’t use big plates and the muscles will be visible.

Rawr! You Can Now Draw a… Real Dragon!
You should now know how to create your own dragon based on realistic anatomy. You can adapt these rules to your own imagination, because – let’s say it once again – it’s only the artist who can make the dragon exist!