,When you work in JavaScript, events are a common occurrence. An event can be as simple as a hover, or click. When events happen, there are listeners to perform a desired functionality.
With every event, the action propagates through the Document Object Model (DOM). The DOM has a tree structure, with siblings, children and parent elements. Events work their way through the tree in a sequence we’ll explore in this post.
Most of the time, there will be multiple handlers for every event. This is why it is important to know the event order. All events are propagated towards a target element—the element where the event occurs. They start in a parent element, propagate down to a target, and then get bubbled back up to the parent.
In JavaScript, every event goes through three different phases.
- capture phase
- target phase
- bubble phase
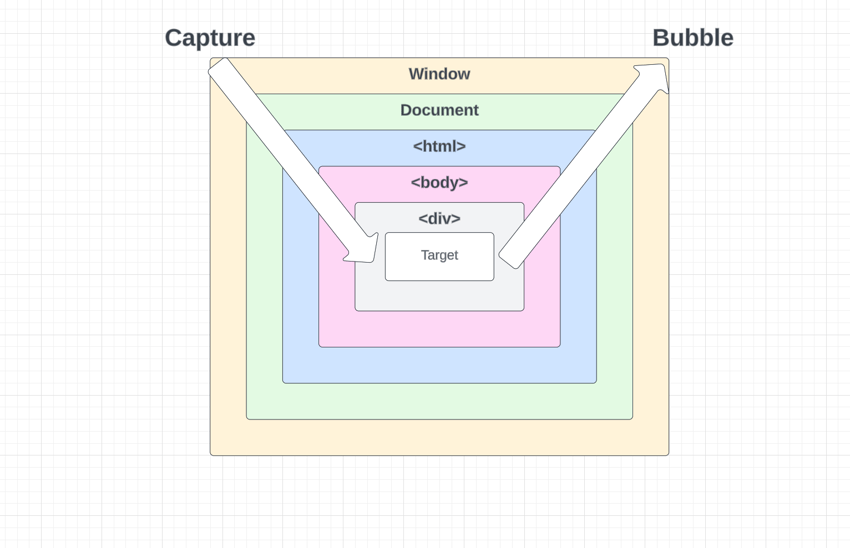
Let us try to understand these phases, with a simple diagram.


The Event Capturing Phase
Event capturing is the process where events start to propagate. It starts from the wrapper element, which could be the document or window and goes down towards the target element. The target element is responsible for initiating an event cycle. As seen in the above diagram, the event bound to the window gets executed first. Then, it goes down in the following order: document, html, body, div and the target element.
Event capturing ends with the target element. It does not propagate to the child elements of the target. If you want to listen to events in the capturing phase, the useCapture property of the addEventListener method can be used.
1 |
target.addEventListener(type, listener, useCapture) |
If you want to test event capturing, the following piece of code will be useful. The useCapture property is true, in each event listener. When the button is clicked, the console output would be
WindowDocumentdivButton!
1 |
window.addEventListener("click", () => { |
2 |
console.log('Window'); |
3 |
},true); |
4 |
|
5 |
document.addEventListener("click", () => { |
6 |
console.log('Document'); |
7 |
},true); |
8 |
|
9 |
document.querySelector(".div1").addEventListener("click", () => { |
10 |
console.log('div'); |
11 |
},true); |
12 |
|
13 |
document.querySelector("button").addEventListener("click", () => { |
14 |
console.log('Button!'); |
15 |
},true); |
The Target Phase
Next in line would be the target phase. The UI component that triggered the event is known as the target element. The property for identifying this target is event.target. As mentioned above, event capturing always ends at event.target. When the target phase begins, the following changes happen:
- The browser starts to look for an event handler.
- If the user has registered an
addEventListeneron the target, it will be called. - Next, it looks at the
bubbleproperty of thetargetelement. - If the bubble property is
true, the target element’s direct parent will receive the event.
The Event Bubbling Phase
The last phase of any event in JavaScript is the bubbling phase.
Bubbling can be treated as the direct opposite of capturing. As seen in the above diagram, this is where the event flows from the target to the parent. The upward flow of an event can reach the document, or even the window. With event bubbling, the following can occur:
- The browser will check if the direct parent of the target has an event handler.
- If the direct parent has an event handler, this listener will be executed. Then, the event flows to the ancestor of the parent element.
- If the direct parent does not have an event handler, the event will flow to the ancestor of the parent element and check if there is a registered event handler.
- Steps 2 and 3 will continue until a
rootelement is reached.
Event bubbling continues until the root is reached. This is nothing but the highest level parent of the target. In most cases, the document or window is the root.
Let’s Use Capturing and Bubbling
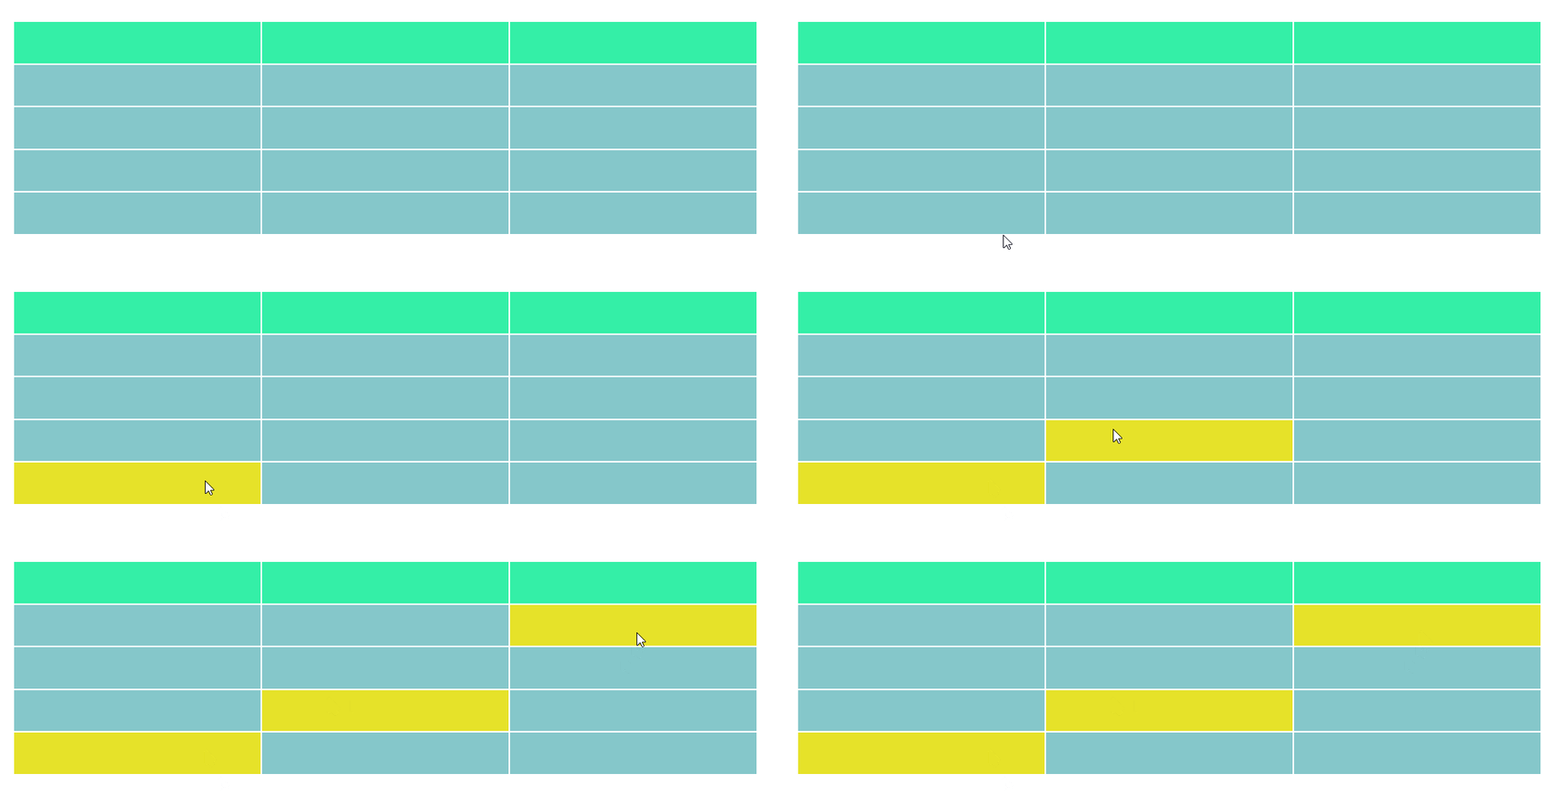
So, why is event capturing and event bubbling necessary? This is a common question raised by developers. Let us try to understand the use of capturing and bubbling with a simple example. The picture seen below represents a table. Imagine having to enter an event listener at each cell. This will make the code difficult to read, and maintain. In such cases, it would be great to have an event listener registered at the parent element, which could be the table.
With each event, the event.target property gives plenty of information about the event. This includes details of where, and when the event started. With this information, the event listener can perform the required functionality.
Interrupt Capturing and Bubbling
Technically, capturing is not widely used like bubbling. Even the above logic depends on event bubbling. Whether it is bubbling or capturing, there will be instances where propagation should stop. And, to stop propagation you can make use of event.stopPropagation or event.stopImmediatePropagation.
To understand the above methods, let us use an example:
1 |
function first() { |
2 |
console.log(1); |
3 |
}
|
4 |
function second() { |
5 |
console.log(2); |
6 |
}
|
7 |
function third() { |
8 |
console.log(3); |
9 |
}
|
10 |
var button = document.getElementById("button"); |
11 |
var container = document.getElementById("container"); |
12 |
button.addEventListener("click", first); |
13 |
button.addEventListener("click", third); |
14 |
container.addEventListener("click", second); |
When you click on the button, 1, 2 and 3 will all print. But suppose when we run the first handler, we don’t want any other handlers in parent components to run. To achieve this, event.stopPropagation can be used. This method needs to be introduced inside the button’s event handler. The role of this method is to ensure none of the target’s parent handlers are invoked.
1 |
function first(event) { |
2 |
event.stopPropagation(); |
3 |
console.log(1); |
4 |
}
|
With the above change, only 1 and 3 will print—only the event handlers in this element will be run and the event handlers in its parents will not run.
You might also wish to stop other event handlers registered to the same element from running . To achieve this, event.stopImmediatePropagation will be useful. The role of event.stopImmediatePropagation is to stop all other event handlers on the target, the parent and its ancestors.
1 |
function first(event) { |
2 |
event.stopImmediatePropagation(); |
3 |
console.log(1); |
4 |
}
|
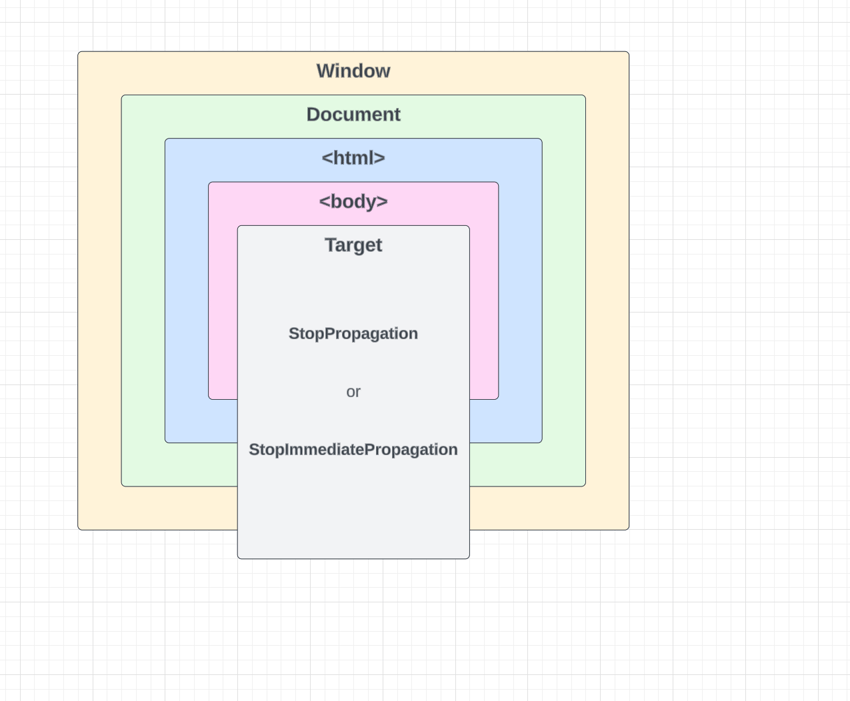


When you have multiple handlers for an event, stopImmediatePropagation is the best way to avoid any propagation.
On the other hand, you should not stop bubbling without a real need. Why? Bubbling is a very convenient process and has been architecturally thought out. Of course, stopPropagation can be used—if you are aware of its hidden pitfalls. These pitfalls vary from one application to another. And, there is a high likelihood of experiencing them in your application too!
Finally, let us try to go through few important properties, and methods that can help you decode an event.
event.target: is the DOM element which triggered the event. The target will not change during the capturing or bubbling phase.
event.currentTarget: this represents the DOM element which is listening to the current event.
For example, if you have a form and a field inside it, any event that occurs on the field will reach the form. Here, form becomes the currentTarget and field becomes the target.
event.eventPhase: sometimes, you may need to see which phase an event flow is in. The eventPhase property offers this piece of information.
- 0—there are no event flows.
- 1—capturing phase
- 2—target phase
- 3—bubbling phase
Conclusion
In this post, we have seen the three different phases of an event. The event lifecycle is important, because it helps us write better event handlers. Every event in the Document Object Model has its very own life cycle. This is what makes the entire architecture useful, and extensible. When you know how the DOM events work, the overall performance and quality of your event handlers will improve.
Also, our cheatsheet has some of the most widely used event properties. We hope these properties help you create an engaging user experience.