In this tutorial we will create lightweight wishlist functionality for WooCommerce using AJAX, WordPress REST API, and SVG graphics. WooCommerce doesn’t come with wishlist functionality as standard, so you’ll always need to rely on an extension to do the work for you. Unless you build it yourself for complete control..
Wish Upon a Star
Wishlist functionality will allow users to mark certain products, adding them to a list for future reference. In some eCommerce stores (such as Amazon) multiple wishlists can be created, and these can be shared with others, which makes them ideal for birthdays or weddings. In our case, the WooCommerce wishlist we’re going to create will enable customers to easily revisit products they’re considering.
Our wishlist functionality will add a heart icon to the product thumbs, which when clicked will add the product to a wishlist in a table.
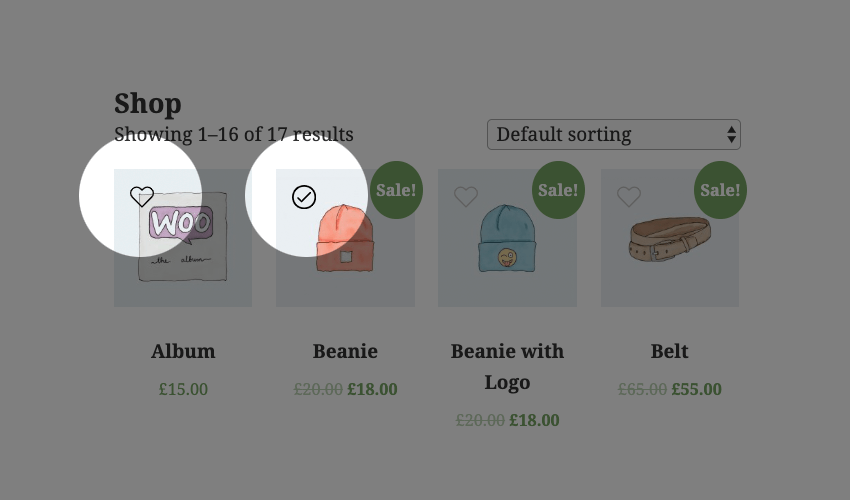
Take a look at the demo for a proper idea of how it works.
1. Create the Plugin Structure
Let’s start by building our plugin. Create a folder with
the name “wishlist” and a PHP file with the same name. Add the following snippet to the
PHP file:
/*
    Plugin Name: Woocommerce wishlist
    Plugin URI: https://www.enovathemes.com
    Description: Ajax wishlist for WooCommerce
    Author: Enovathemes
    Version: 1.0
    Author URI: http://enovathemes.com
*/

if ( ! defined( 'ABSPATH' ) ) {
    exit; // Exit if accessed directly
}
We won’t go into detail about the plugin creation process, but if you are new to plugin development I highly recommend this amazing new course by Rachel McCollin:

Add the Plugin Functions
Let’s sketch out our plan so we know what to build:
- Add wishlist toggle to products in loop and single pages
using WooCommerce hooks - Create wishlist table shortcode to hold the products added
to the wishlist - Create wishlist custom option in the user profile
All the plugin code will go inside the init action for the plugin, as we first need to make sure that the WooCommerce plugin is active. So
right after the plugin details add the following code:
add_action('init','plugin_init');
function plugin_init(){
    if (class_exists("Woocommerce")) {
    // Code here
    }
}
And now let’s enqueue our plugin scripts and styles.
Add the following code to the main plugin file:
function wishlist_plugin_scripts_styles(){
    wp_enqueue_style( 'wishlist-style', plugins_url('/css/style.css', __FILE__ ), array(), '1.0.0' );
    wp_enqueue_script( 'wishlist-main', plugins_url('/js/main.js', __FILE__ ), array('jquery'), '', true);
    wp_localize_script(
        'main',
        'opt',
        array(
            'ajaxUrl'        => admin_url('admin-ajax.php'),
            'ajaxPost'       => admin_url('admin-post.php'),
            'restUrl'        => rest_url('wp/v2/product'),
            'shopName'       => sanitize_title_with_dashes(sanitize_title_with_dashes(get_bloginfo('name'))),
            'inWishlist'     => esc_html__("Already in wishlist","text-domain"),
            'removeWishlist' => esc_html__("Remove from wishlist","text-domain"),
            'buttonText'     => esc_html__("Details","text-domain"),
            'error'          => esc_html__("Something went wrong, could not add to wishlist","text-domain"),
            'noWishlist'     => esc_html__("No wishlist found","text-domain"),
        )
    );
}
add_action( 'wp_enqueue_scripts', 'wishlist_plugin_scripts_styles' );
Here we enqueue the main style.css file and the main.js
file for the plugin, also we pass some parameters to the main.js file to work
with:
-
ajaxUrl– required to fetch some data from WordPress, like current
User ID -
ajaxPost– required to update user wishlist -
restUrl– required to list the wishlist items in the
wishlist table -
shopName– required to add wishlist items to the session
storage for non-registered or non-logged-in users
And some strings instead of hardcoding them into the js file, in case
they need to be translatable.
So for now create a css, and js folder and put the corresponding
files inside those folders: style.css in the css folder and main.js in the js folder.
2. Hook the Wishlist Toggle
Right inside the init action add the following code:
// Add wishlist to product
add_action('woocommerce_before_shop_loop_item_title','wishlist_toggle',15);
add_action('woocommerce_single_product_summary','wishlist_toggle',25);
function wishlist_toggle(){

    global $product;
    echo '<span class="wishlist-title">'.esc_attr__("Add to wishlist","text-domain").'</span><a class="wishlist-toggle" data-product="'.esc_attr($product->get_id()).'" href="#" title="'.esc_attr__("Add to wishlist","text-domain").'">'.file_get_contents(plugins_url( 'images/icon.svg', __FILE__ )).'</a>';
}
Here we add a wishlist toggle to each product in the loop and
to each single product layout, using the woocommerce_before_shop_loop_item_title
and woocommerce_single_product_summary
hooks.
Here I want to point out the data-product attribute that
contains the product ID–this is required to power the wishlist functionality.
And also take a closer look at the SVG icon–this is required to power the
animation.
3. Add SVG Icons
Now create an images folder in the plugin folder and put the
following icon.svg in it:
<svg viewBox="0 0 471.701 471.701">
    <path class="heart" d="M433.601,67.001c-24.7-24.7-57.4-38.2-92.3-38.2s-67.7,13.6-92.4,38.3l-12.9,12.9l-13.1-13.1
			c-24.7-24.7-57.6-38.4-92.5-38.4c-34.8,0-67.6,13.6-92.2,38.2c-24.7,24.7-38.3,57.5-38.2,92.4c0,34.9,13.7,67.6,38.4,92.3
			l187.8,187.8c2.6,2.6,6.1,4,9.5,4c3.4,0,6.9-1.3,9.5-3.9l188.2-187.5c24.7-24.7,38.3-57.5,38.3-92.4
			C471.801,124.501,458.301,91.701,433.601,67.001z M414.401,232.701l-178.7,178l-178.3-178.3c-19.6-19.6-30.4-45.6-30.4-73.3
			s10.7-53.7,30.3-73.2c19.5-19.5,45.5-30.3,73.1-30.3c27.7,0,53.8,10.8,73.4,30.4l22.6,22.6c5.3,5.3,13.8,5.3,19.1,0l22.4-22.4
			c19.6-19.6,45.7-30.4,73.3-30.4c27.6,0,53.6,10.8,73.2,30.3c19.6,19.6,30.3,45.6,30.3,73.3
			C444.801,187.101,434.001,213.101,414.401,232.701z"/>
	<g class="loading">
		<path d="M409.6,0c-9.426,0-17.067,7.641-17.067,17.067v62.344C304.667-5.656,164.478-3.386,79.411,84.479
			c-40.09,41.409-62.455,96.818-62.344,154.454c0,9.426,7.641,17.067,17.067,17.067S51.2,248.359,51.2,238.933
			c0.021-103.682,84.088-187.717,187.771-187.696c52.657,0.01,102.888,22.135,138.442,60.976l-75.605,25.207
			c-8.954,2.979-13.799,12.652-10.82,21.606s12.652,13.799,21.606,10.82l102.4-34.133c6.99-2.328,11.697-8.88,11.674-16.247v-102.4
			C426.667,7.641,419.026,0,409.6,0z"/>
		<path d="M443.733,221.867c-9.426,0-17.067,7.641-17.067,17.067c-0.021,103.682-84.088,187.717-187.771,187.696
			c-52.657-0.01-102.888-22.135-138.442-60.976l75.605-25.207c8.954-2.979,13.799-12.652,10.82-21.606
			c-2.979-8.954-12.652-13.799-21.606-10.82l-102.4,34.133c-6.99,2.328-11.697,8.88-11.674,16.247v102.4
			c0,9.426,7.641,17.067,17.067,17.067s17.067-7.641,17.067-17.067v-62.345c87.866,85.067,228.056,82.798,313.122-5.068
			c40.09-41.409,62.455-96.818,62.344-154.454C460.8,229.508,453.159,221.867,443.733,221.867z"/>
	</g>
	<g class="check">
		<path d="M238.933,0C106.974,0,0,106.974,0,238.933s106.974,238.933,238.933,238.933s238.933-106.974,238.933-238.933
			C477.726,107.033,370.834,0.141,238.933,0z M238.933,443.733c-113.108,0-204.8-91.692-204.8-204.8s91.692-204.8,204.8-204.8
			s204.8,91.692,204.8,204.8C443.611,351.991,351.991,443.611,238.933,443.733z"/>
		<path d="M370.046,141.534c-6.614-6.388-17.099-6.388-23.712,0v0L187.733,300.134l-56.201-56.201
			c-6.548-6.78-17.353-6.967-24.132-0.419c-6.78,6.548-6.967,17.353-0.419,24.132c0.137,0.142,0.277,0.282,0.419,0.419
			l68.267,68.267c6.664,6.663,17.468,6.663,24.132,0l170.667-170.667C377.014,158.886,376.826,148.082,370.046,141.534z"/>
	</g>
</svg>
If you are new
to working with SVGs I highly recommend you read these amazing tutorials on the subject:
![]()
SVG
How to Hand Code SVG
Kezz Bracey
![]()
SVG
SVG Viewport and viewBox (For Complete Beginners)
Kezz Bracey


Our SVG animation has 3 states:
- Default: the heart path
- Process: loading group (g tag)
- End: check group (g tag)
If you now go to your shop page you will see the unstyled SVG icons piled on top of each other:
Let’s add some styling to fix this mess! Open the style.css file and
paste the following code:
.wishlist-toggle {
    display: block;
    position: absolute;
    top: 16px;
    left: 16px;
    z-index: 5;
    width: 24px;
    height: 24px;
    outline: none;
    border:none;
}

.wishlist-title {
    display: none;
}

.entry-summary .wishlist-toggle {
    position: relative;
    top: 0;
    left: 0;
    display: inline-block;
    vertical-align: middle;
    margin-bottom: 8px;
}

.entry-summary .wishlist-title {
    display: inline-block;
    vertical-align: middle;
    margin-right: 8px;
    margin-bottom: 8px;
}

.wishlist-toggle:focus {
    outline: none;
    border:none;
}

.wishlist-toggle svg {
    fill:#bdbdbd;
    transition: all 200ms ease-out;
}

.wishlist-toggle:hover svg,
.wishlist-toggle.active svg {
    fill:#000000;
}

.wishlist-toggle svg .loading,
.wishlist-toggle svg .check {
    opacity: 0;
}

.wishlist-toggle.active svg .check {
    opacity: 1;
}

.wishlist-toggle.active svg .heart {
    opacity: 0;
}

.wishlist-toggle.loading svg .loading,
.wishlist-table.loading:before {
    animation:loading 500ms 0ms infinite normal linear;
    transform-origin: center;
    opacity: 1;
}

.wishlist-toggle.loading svg .heart {
    opacity:0;
}

@keyframes loading {
    from {transform: rotate(0deg);}
    to {transform: rotate(360deg);}
}
The logic here is as follows:
- Initially we show the
heart path of our SVG. - When the user clicks on it we will hide the heart path
and show the loading path. - Once the loading finishes we will show the checkmark
indicating that the product was successfully added to the wishlist.
We will toggle the loading state via JavaScript later; the loading animation is a simple transform rotate. So for now if you refresh the page (don’t forget to clear the browser cache as sometimes old styles are cached) you will see a nice heart icon with each product.
This toggle currently does nothing, so we’ll sort that out. But for now let’s keep with our plan.
4. Create Wishlist Table Shortcode
Add the following code in the init plugin action:
// Wishlist table shortcode
add_shortcode('wishlist', 'wishlist');
function wishlist( $atts, $content = null ) {

    extract(shortcode_atts(array(), $atts));

    return '<table class="wishlist-table loading">
                <tr>
                    <th><!-- Left for image --></th>
                    <th>'.esc_html__("Name","text-domain").'</th>
                    <th>'.esc_html__("Price","text-domain").'</th>
                    <th>'.esc_html__("Stock","text-domain").'</th>
                    <th><!-- Left for button --></th>
                </tr>
            </table>';

}
This is a very simple shortcode that you can add to any page,
and the wishlist items will appear inside it. I won’t describe the shortcode
creation process, but if you are new to this, I highly recommend reading this
amazing tutorial:

Make a Wishlist Page
Now from inside the WP admin create a page called “Wishlist” and put the [wishlist] shortcode inside it. Now if you go to the wishlist page you will see an empty table.
Did you notice the loading class on the table? We will
remove the loading class with JavaScript later, once the wishlist items are ready to be
appended to the table. But for now open the style.css and add the following
code:
.wishlist-table {
    width:100%;
    position: relative;
}

.wishlist-table.loading:after {
    display: block;
    width: 100%;
    height: 100%;
    position: absolute;
    top: 0;
    left: 0;
    content: "";
    background: #ffffff;
    opacity: 0.5;
    z-index: 5;
}

.wishlist-table.loading:before {
    display: block;
    width: 24px;
    height: 24px;
    position: absolute;
    top: 50%;
    left: 50%;
    margin-top:-12px;
    margin-left:-12px;
    content: "";
    background-image: url('../images/loading.svg');
    background-repeat: no-repeat;
    background-size: 100%;
    z-index: 6;
}

.wishlist-table td {
    position: relative;
}

.wishlist-table a.details {
    padding:4px 16px;
    background: #000000;
    color: #ffffff;
    text-align: center;
    border:none !important
}

.wishlist-table a.wishlist-remove {
    display: block;
    width: 24px;
    height: 24px;
    position: absolute;
    top: 50%;
    left: 50%;
    margin-top:-12px;
    margin-left:-12px;
    background-image: url('../images/remove.svg');
    background-repeat: no-repeat;
    background-size: 100%;
    z-index: 6;
    border:none;
    opacity:0;
}

.wishlist-table td:hover > a.wishlist-remove {
    opacity:1;
}
Add the loading.svg image to the images folder:
<svg xmlns="http://www.w3.org/2000/svg" xmlns:xlink="http://www.w3.org/1999/xlink" viewBox="0 0 471.701 471.701">
    <path d="M409.6,0c-9.426,0-17.067,7.641-17.067,17.067v62.344C304.667-5.656,164.478-3.386,79.411,84.479
		c-40.09,41.409-62.455,96.818-62.344,154.454c0,9.426,7.641,17.067,17.067,17.067S51.2,248.359,51.2,238.933
		c0.021-103.682,84.088-187.717,187.771-187.696c52.657,0.01,102.888,22.135,138.442,60.976l-75.605,25.207
		c-8.954,2.979-13.799,12.652-10.82,21.606s12.652,13.799,21.606,10.82l102.4-34.133c6.99-2.328,11.697-8.88,11.674-16.247v-102.4
		C426.667,7.641,419.026,0,409.6,0z"/>
	<path d="M443.733,221.867c-9.426,0-17.067,7.641-17.067,17.067c-0.021,103.682-84.088,187.717-187.771,187.696
		c-52.657-0.01-102.888-22.135-138.442-60.976l75.605-25.207c8.954-2.979,13.799-12.652,10.82-21.606
		c-2.979-8.954-12.652-13.799-21.606-10.82l-102.4,34.133c-6.99,2.328-11.697,8.88-11.674,16.247v102.4
		c0,9.426,7.641,17.067,17.067,17.067s17.067-7.641,17.067-17.067v-62.345c87.866,85.067,228.056,82.798,313.122-5.068
		c40.09-41.409,62.455-96.818,62.344-154.454C460.8,229.508,453.159,221.867,443.733,221.867z"/>
</svg>
This is the same loading SVG separated from the main icon.svg.
We could use SVG sprites, but I decided to stick with a separate loading
SVG.
Now, if you go to the wishlist page and refresh it you will
see an empty table with loading on it. Nice, let’s move further.
5. Wishlist Custom Option in the User Profile
Our wishlist functionality will work both for logged-in users
and guest users. With logged-in users we’ll store the wishlist information in the user’s metadata, and with guest users we’ll store the wishlist in the
session storage.
You can also store the guest users’ wishlist in local
storage, the difference being that session storage is destroyed when the user closes
the tab or browser, and local storage is destroyed when the browser cache
is cleared. It is up to you which option you use for guest users.
Now add the following code to the init action:
// Wishlist option in the user profile
add_action( 'show_user_profile', 'wishlist_user_profile_field' );
add_action( 'edit_user_profile', 'wishlist_user_profile_field' );
function wishlist_user_profile_field( $user ) { ?>
    <table class="form-table wishlist-data">
        <tr>
            <th><?php echo esc_attr__("Wishlist","text-domain"); ?></th>
            <td>
                <input type="text" name="wishlist" id="wishlist" value="<?php echo esc_attr( get_the_author_meta( 'wishlist', $user->ID ) ); ?>" class="regular-text" />
            </td>
        </tr>
    </table>
<?php }

add_action( 'personal_options_update', 'save_wishlist_user_profile_field' );
add_action( 'edit_user_profile_update', 'save_wishlist_user_profile_field' );
function save_wishlist_user_profile_field( $user_id ) {
    if ( !current_user_can( 'edit_user', $user_id ) ) {
        return false;
    }
    update_user_meta( $user_id, 'wishlist', $_POST['wishlist'] );
}
Again, in order to remain within the scope of this tutorial, I won’t explain how to work with user metadata. If you are new to this I highly recommend reading
this amazing tutorial:

All we do here is create a text field input that will hold
the wishlist items comma-separated IDs. With show_user_profile and edit_user_profile
actions we add the structure of the input field, and with personal_options_update and edit_user_profile_update
actions we power the save functionality.
So once the wishlist is updated it
will save to the database. I you go to your profile page you will see a
new text field added to it. Add whatever value you want and hit save to test if the
update functionality works. With admin CSS you can hide this field if you don’t
want users to see it. I will leave it as is.
6. Turn it On!
Now we are ready to power everything up!
Open the main.js file and put the following code in it:
(function($){
    "use strict";
})(jQuery);
All our code will go inside this function.
Now let’s gather the required data and create some variables:
var shopName   = opt.shopName+'-wishlist',
    inWishlist = opt.inWishlist,
    restUrl    = opt.restUrl,
    wishlist   = new Array,
    ls         = sessionStorage.getItem(shopName),
    loggedIn   = ($('body').hasClass('logged-in')) ? true : false,
    userData   = '';
As you might remember when we enqueued our main.js script we passed
some parameters to it. Here, with JavaScript, we can collect these parameters.
Next, we will create an empty wishlist array that will
contains wishlist items. We will need the session storage data with our shop
name (the ls variable stands for local storage), and we will need to know if the
user is guest or logged-in.
Let me explain the logic here: whenever the user visits the
shop page we will need to know if he or she is logged-in or is a guest-user. If the user is logged-in we will need to check if he or she has wishlist items, and
if so highlight these items. If not we need to see if there are any items in the session/local
storage and highlight those.
Why this is done like this? Imagine,
if the user first visits the website as a guest, adds items to the wishlist, and then decides to login. If the user does not have items registered in
the profile wishlist, we will need to show the ones that he or she added before
login, that are stored in the session/local storage.
So let’s do that step by step:
If User is Logged-in
- Fetch current user data with AJAX
- If success update the wishlist
- Highlight the wishlist items
- Remove the session/local storage
- If fail show error message in the console for the developer
if(loggedIn) {
    // Fetch current user data
    $.ajax({
        type: 'POST',
        url: opt.ajaxUrl,
        data: {
            'action' : 'fetch_user_data',
            'dataType': 'json'
        },
        success:function(data) {
            userData = JSON.parse(data);
            if (typeof(userData['wishlist']) != 'undefined' && userData['wishlist'] != null && userData['wishlist'] != "") {

                var userWishlist = userData['wishlist'];
                userWishlist = userWishlist.split(',');

                if (wishlist.length) {
                    wishlist =  wishlist.concat(userWishlist);

                    $.ajax({
                        type: 'POST',
                        url:opt.ajaxPost,
                        data:{
                            action:'user_wishlist_update',
                            user_id :userData['user_id'],
                            wishlist :wishlist.join(','),
                        }
                    });

                } else {
                    wishlist =  userWishlist;
                }

                wishlist = wishlist.unique();

                highlightWishlist(wishlist,inWishlist);
                sessionStorage.removeItem(shopName);

            } else {
                if (typeof(ls) != 'undefined' && ls != null) {
                    ls = ls.split(',');
                    ls = ls.unique();
                    wishlist = ls;
                }

                $.ajax({
                    type: 'POST',
                    url:opt.ajaxPost,
                    data:{
                        action:'user_wishlist_update',
                        user_id :userData['user_id'],
                        wishlist :wishlist.join(','),
                    }
                })
                .done(function(response) {
                    highlightWishlist(wishlist,inWishlist);
                    sessionStorage.removeItem(shopName);
                });
            }
        },
        error: function(){
            console.log('No user data returned');
        }
    });
}
If User is Guest
Fetch wishlist from the session/local storage
else {
    if (typeof(ls) != 'undefined' && ls != null) {
        ls = ls.split(',');
        ls = ls.unique();
        wishlist = ls;
    }
}
As you may have noticed here we have double-AJAX and some helper functions.
So first let’s create the actions of the AJAX requests, and after that I will explain
our helper functions. I won’t describe in detail the AJAX functionality in
WordPress, but if you are new to AJAX and WordPress, I highly
recommend reading this amazing tutorial on it:

Our first AJAX request gets the user id and the user
wishlist data from WordPress. This is done with a custom AJAX action added to the
plugin code file:
// Get current user data
function fetch_user_data() {
    if (is_user_logged_in()){
        $current_user = wp_get_current_user();
        $current_user_wishlist = get_user_meta( $current_user->ID, 'wishlist',true);
		echo json_encode(array('user_id' => $current_user->ID,'wishlist' => $current_user_wishlist));
    }
    die();
}
add_action( 'wp_ajax_fetch_user_data', 'fetch_user_data' );
add_action( 'wp_ajax_nopriv_fetch_user_data', 'fetch_user_data' );
The most important part here is the action name (fetch_user_data)–make sure it is the same for AJAX and for functions wp_ajax_fetch_user_data and wp_ajax_nopriv_fetch_user_data.
Here we’re preparing JSON formatted data with user ID and user
wishlist data.
Our next AJAX request updates the user wishlist if there were already wishlist items from session/local storage. Take a close look at the url
option–see it is different.
The logic is the same
as for the first action–the difference is that here we don’t return or echo
any data, but we update the wishlist option for the current user.
function update_wishlist_ajax(){
    if (isset($_POST["user_id"]) && !empty($_POST["user_id"])) {
        $user_id   = $_POST["user_id"];
        $user_obj = get_user_by('id', $user_id);
        if (!is_wp_error($user_obj) && is_object($user_obj)) {
            update_user_meta( $user_id, 'wishlist', $_POST["wishlist"]);
        }
    }
    die();
}
add_action('admin_post_nopriv_user_wishlist_update', 'update_wishlist_ajax');
add_action('admin_post_user_wishlist_update', 'update_wishlist_ajax');
And if our user is a guest we will need to check if there are any wishlist details in the session/local storage.
Helper Functions
Before we move to the events part I want to explain our
helper functions
Array.prototype.unique = function() {
  return this.filter(function (value, index, self) {
    return self.indexOf(value) === index;
  });
}

function isInArray(value, array) {return array.indexOf(value) > -1;}

function onWishlistComplete(target, title){
    setTimeout(function(){
        target
        .removeClass('loading')
        .addClass('active')
        .attr('title',title);
    },800);
}

function highlightWishlist(wishlist,title){
    $('.wishlist-toggle').each(function(){
        var $this = $(this);
        var currentProduct = $this.data('product');
        currentProduct = currentProduct.toString();
        if (isInArray(currentProduct,wishlist)) {
            $this.addClass('active').attr('title',title);
        }
    });
}
The first helper function makes the array unique, by removing duplicates,
the second one checks if the given value is present in the given array. The next
function executes when an item is added to the wishlist and the last
one shows items that are in the wishlist.
Add Toggle
Now let’s add a click event to the wishlist toggle to power
the actual functionality. On each toggle click event the
animation is triggered and if the user is logged-in the wishlist update action
fires with AJAX. If the user is a guest the item is added to the
session/local storage.
Now if you go to the shop page, refresh the browser, and
click on any wishlist toggle you will see it is working!
$('.wishlist-toggle').each(function(){

    var $this = $(this);

    var currentProduct = $this.data('product');

    currentProduct = currentProduct.toString();

    if (!loggedIn && isInArray(currentProduct,wishlist)) {
        $this.addClass('active').attr('title',inWishlist);
    }

    $(this).on('click',function(e){
        e.preventDefault();
        if (!$this.hasClass('active') && !$this.hasClass('loading')) {

            $this.addClass('loading');

            wishlist.push(currentProduct);
            wishlist = wishlist.unique();

            if (loggedIn) {
                // get user ID
                if (userData['user_id']) {
                    $.ajax({
                        type: 'POST',
                        url:opt.ajaxPost,
                        data:{
                            action:'user_wishlist_update',
                            user_id :userData['user_id'],
                            wishlist :wishlist.join(','),
                        }
                    })
                    .done(function(response) {
                        onWishlistComplete($this, inWishlist);
                    })
                    .fail(function(data) {
                        alert(opt.error);
                    });
                }
            } else {

                sessionStorage.setItem(shopName, wishlist.toString());
                onWishlistComplete($this, inWishlist);

            }

        }


    });
});
7. List Items in Wishlist Table
Now it is time to list our wishlist items in the wishlist
table we created earlier.
Add the following code into main.js at the very bottom of
our wrapper function:
setTimeout(function(){

    if (wishlist.length) {

        restUrl += '?include='+wishlist.join(',');
        restUrl += '&per_page='+wishlist.length;

        $.ajax({
            dataType: 'json',
            url:restUrl
        })
        .done(function(response){
            $('.wishlist-table').each(function(){
                var $this = $(this);
                $.each(response,function(index,object){
                    $this.append('<tr data-product="'+object.id+'"><td><a class="wishlist-remove" href="#" title="'+opt.removeWishlist+'"></a>'+object.image+'</td><td>'+object.title["rendered"]+'</td><td>'+object.price+'</td><td>'+object.stock+'</td><td><a class="details" href="'+object.link+'">'+opt.buttonText+'</a></td></tr>');
                });
            });
        })
        .fail(function(response){
            alert(opt.noWishlist);
        })
        .always(function(response){
            $('.wishlist-table').each(function(){
                $(this).removeClass('loading');
            });
        });

    } else {
        $('.wishlist-table').each(function(){
            $(this).removeClass('loading');
        });
    }

},1000);
Here we are using the
WordPress REST API to get the products by ID in the wishlist array.
For
each of the products we get we are adding a table row with the required data to
display. We need the product image, title, stock status, button and price.
Here we have two options for the REST API:
- using the WordPress REST API
- using the WooCommerce REST API.
The difference here is that product data is already present
in the Woocommerce REST API, but an API key is required. With the default
WordPress REST API product data is absent by default, but can be added, and no
API key is required. For such a simple task as a wishlist I don’t think that an API
key is needed, so we will do it by extending the default WordPress REST API to return our product price, image code and the stock level.
Go to the main plugin file and at the very bottom add the
following code:
// Extend REST API
function rest_register_fields(){

    register_rest_field('product',
        'price',
        array(
            'get_callback'    => 'rest_price',
            'update_callback' => null,
            'schema'          => null
        )
    );

    register_rest_field('product',
        'stock',
        array(
            'get_callback'    => 'rest_stock',
            'update_callback' => null,
            'schema'          => null
        )
    );

    register_rest_field('product',
        'image',
        array(
            'get_callback'    => 'rest_img',
            'update_callback' => null,
            'schema'          => null
        )
    );
}
add_action('rest_api_init','rest_register_fields');

function rest_price($object,$field_name,$request){

    global $product;

    $id = $product->get_id();

    if ($id == $object['id']) {
        return $product->get_price();
    }

}

function rest_stock($object,$field_name,$request){

    global $product;

    $id = $product->get_id();

    if ($id == $object['id']) {
        return $product->get_stock_status();
    }

}

function rest_img($object,$field_name,$request){

    global $product;

    $id = $product->get_id();

    if ($id == $object['id']) {
        return $product->get_image();
    }

}

function maximum_api_filter($query_params) {
    $query_params['per_page']["maximum"]=100;
    return $query_params;
}
add_filter('rest_product_collection_params', 'maximum_api_filter');
All this does is create new fields for REST API and extends the
maximum items limit per request. Again, if you are new to this subject I highly recommend reading this series.
For now, if you go to your wishlist table and refresh the
page you will see the list of items that are added to your wishlist.
8. Removing Items From Wishlist
We are almost
done; only the remove functionality remains. So let’s create that! Add the
following code at the very bottom of the wrapper function in the main.js file
$(document).on('click', '.wishlist-remove', function(){

    var $this = $(this);

    $this.closest('table').addClass('loading');

    wishlist = [];

    $this.closest('table').find('tr').each(function(){

        if ($(this).data('product') != $this.closest('tr').data('product')) {

            wishlist.push($(this).data('product'));

            if (loggedIn) {

                // get user ID
                if (userData['user_id']) {
                    $.ajax({
                        type: 'POST',
                        url:opt.ajaxPost,
                        data:{
                            action:'user_wishlist_update',
                            user_id :userData['user_id'],
                            wishlist :wishlist.join(','),
                        }
                    })
                    .done(function(response) {
                        $this.closest('table').removeClass('loading');
                        $this.closest('tr').remove();
                    })
                    .fail(function(data) {
                        alert(opt.error);
                    });
                }
            } else {
                sessionStorage.setItem(shopName, wishlist.toString());
                setTimeout(function(){
                    $this.closest('table').removeClass('loading');
                    $this.closest('tr').remove();
                },500);
            }
        }

    });

});
Once the remove icon is clicked (make sure you have a remove.svg in the images folder, you can use whatever
icon you want), we need to check if the user is logged-in. If so, we then remove the
item ID from the wishlist using AJAX with the user_wishlist_update
action. If the user is a guest we need to remove the item ID from the
session/local storage.
Now go to your wishlist and refresh the page. Once you click
on the remove icon your item will be removed from the wishlist.
Conclusion
That was quite a project! A simple, but comprehensive wishlist feature for your WooCommerce stores. You are free to use this plugin in any project; you can
extend, modify it and make suggestions. I hope you liked it. Here is the link to the source files on GitHub. And here is the demo.
Learn More WooCommerce Theme Development
At Tuts+ we have a great collection of tutorials and courses to learn WooCommerce development. Check out these four great courses to get started!