In this tutorial, we’ll learn how to create an “AI Quotes Generator” app with JavaScript. This app will demonstrate how to fetch data from the OpenAI API and generate engaging quotes for different categories or custom moods.
HTML Structure
The HTML structure will consist of the following elements:
- A button at the top right will open a modal that lets users add their OpenAI API key.
- An input that lets users add a custom mood
- Several options populated with categories
- A button which, when clicked, will generate quotes from the OpenAI API.
As we’ve done before, we’ll use the Bootstrap framework to do a lot of the heavy lifting where the UI is concerned. The HTML Structure will look like this:
1 |
<div class="position-absolute top-0 end-0 mt-2 me-3"> |
2 |
<button
|
3 |
id="api" |
4 |
type="button" |
5 |
class="btn btn-primary" |
6 |
data-bs-toggle="modal" |
7 |
data-bs-target="#myModal" |
8 |
>
|
9 |
Add API Key |
10 |
</button>
|
11 |
</div>
|
12 |
<div class="container mt-5"> |
13 |
<div class="message alert alert-danger text-center" role="alert"></div> |
14 |
<div
|
15 |
class="modal fade" |
16 |
id="myModal" |
17 |
tabindex="-1" |
18 |
aria-labelledby="exampleModalLabel" |
19 |
aria-hidden="true" |
20 |
>
|
21 |
<div class="modal-dialog "> |
22 |
<div class="modal-content"> |
23 |
<div class="modal-header"> |
24 |
<h5 class="modal-title" id="exampleModalLabel"> |
25 |
Your API Key remains stored locally in your browser |
26 |
</h5>
|
27 |
</div>
|
28 |
<div class="modal-body"> |
29 |
<div class="form-group"> |
30 |
<label for="apikey">API KEY</label> |
31 |
<input type="text" class="form-control" id="apikey" /> |
32 |
</div>
|
33 |
</div>
|
34 |
<div class="modal-footer"> |
35 |
<button
|
36 |
type="button" |
37 |
class="btn btn-secondary" |
38 |
data-bs-dismiss="modal" |
39 |
>
|
40 |
Close |
41 |
</button>
|
42 |
<button type="button" class="btn btn-primary">Save</button> |
43 |
</div>
|
44 |
</div>
|
45 |
</div>
|
46 |
</div>
|
47 |
<h1 class="header text-center display-2 fw-bold">AI Quote Generator</h1> |
48 |
<!-- Main -->
|
49 |
<div class="d-md-flex h-md-100 my-5 align-items-center"> |
50 |
<div class="col-md-6 p-0 h-md-100"> |
51 |
<div class="d-md-flex align-items-center h-100 p-5 text-center justify-content-center category-wrapper"> |
52 |
<div class="pt-5 pb-5"> |
53 |
<p class="fs-5"> |
54 |
Create the perfect quote based on your current mood.. |
55 |
</p>
|
56 |
<input
|
57 |
id="input" |
58 |
name="mood" |
59 |
type="text" |
60 |
placeholder="Enter your current mood" |
61 |
class="form-control mb-4 mx-auto w-75 text-center" |
62 |
style="width: 60%; display: inline-block" |
63 |
/>
|
64 |
</div>
|
65 |
</div>
|
66 |
</div>
|
67 |
<div class="col-md-6 p-0 h-md-100"> |
68 |
<div class="d-md-flex align-items-center h-md-100 p-5 text-center justify-content-center vstack"> |
69 |
<p class="fs-5"> |
70 |
..or choose from our custom categories |
71 |
</p>
|
72 |
<div
|
73 |
class="quotes row justify-content-center mt-8 mb-4" |
74 |
>
|
75 |
<!-- categories will go here -->
|
76 |
</div>
|
77 |
</div>
|
78 |
</div>
|
79 |
</div>
|
80 |
<!-- End Main -->
|
81 |
<div class="quotes-container text-center mt-4"> |
82 |
<button
|
83 |
id="generate" |
84 |
class="generate-btn btn btn-primary" |
85 |
type="submit" |
86 |
>
|
87 |
Generate Quotes |
88 |
</button>
|
89 |
<div class="d-flex justify-content-center mt-3"> |
90 |
<div id="loader" class="spinner-border" role="status"> |
91 |
</div>
|
92 |
</div>
|
93 |
</div>
|
94 |
</div>
|
95 |
</div>
|
96 |
<div class="container text-center mt-5 mb-4"> |
97 |
<div id="result" class="row"> |
98 |
<!-- generate quotes will go here -->
|
99 |
</div>
|
100 |
</div>
|
We will populate the quote categories dynamically with JavaScript, and once we get the quotes from the OpenAI API, they will be populated in the results container.
For this project, we’ll also use Bootstrap’s jQuery tools to enable the modal functionality. Please include the CDN links in the header.
1 |
<!-- Bootstrap CSS -->
|
2 |
<link href="https://cdn.jsdelivr.net/npm/[email protected]/dist/css/bootstrap.min.css" rel="stylesheet" integrity="sha384-QWTKZyjpPEjISv5WaRU9OFeRpok6YctnYmDr5pNlyT2bRjXh0JMhjY6hW+ALEwIH" crossorigin="anonymous" /> |
3 |
<!-- jQuery -->
|
4 |
<script src="https://code.jquery.com/jquery-3.6.0.min.js"></script> |
5 |
<!-- Bootstrap JavaScript (requires jQuery and Popper.js) -->
|
6 |
<script src="https://cdn.jsdelivr.net/npm/@popperjs/[email protected]/dist/umd/popper.min.js" integrity="sha384-I7E8VVD/ismYTF4hNIPjVp/Zjvgyol6VFvRkX/vR+Vc4jQkC+hVqc2pM8ODewa9r" crossorigin="anonymous"></script> |
7 |
<script src="https://cdn.jsdelivr.net/npm/[email protected]/dist/js/bootstrap.min.js" integrity="sha384-0pUGZvbkm6XF6gxjEnlmuGrJXVbNuzT9qBBavbLwCsOGabYfZo0T0to5eqruptLy" crossorigin="anonymous"></script> |
CSS Styling
Thanks to Bootstrap, we won’t need a great deal of custom styles. But let’s add the custom CSS styles we do need, including the DM Mono web font.
1 |
@import url("https://fonts.googleapis.com/css2?family=DM+Mono:ital,wght@0,300;0,400;0,500;1,300;1,400;1,500&display=swap"); |
2 |
|
3 |
body { |
4 |
font-family: "DM Mono", monospace; |
5 |
}
|
6 |
.form-group { |
7 |
margin: 2rem 0; |
8 |
}
|
9 |
label { |
10 |
margin-bottom: 1rem; |
11 |
}
|
12 |
@media (min-width: 768px) { |
13 |
.category-wrapper { |
14 |
border-right: 2px solid #999; |
15 |
}
|
16 |
}
|
17 |
|
18 |
#loader, |
19 |
.message, |
20 |
.radio-group input[type="radio"]{ |
21 |
display: none; |
22 |
}
|
23 |
|
Storing API KEY on Local Storage
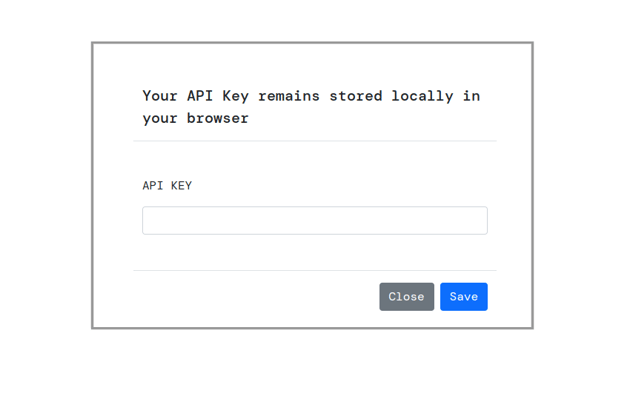
For the application to function as expected, users must add their API KEY to local storage to ensure persistence and security. To achieve this, we have the “Add API KEY” button at the top right. The button is configured with the data-bs-target attribute set to myModal indicating that clicking it will trigger the modal with the id “myModal” to be displayed.
1 |
<button
|
2 |
id="api" |
3 |
type="button" |
4 |
class="btn btn-primary" |
5 |
data-bs-toggle="modal" |
6 |
data-bs-target="#myModal" |
7 |
>
|
8 |
Add API Key |
9 |
</button>
|
Once the modal is shown to the user, we will use jQuery to attach an event listener for the shown.bs.modal event. In the event function, we will do the following:
- Get the API key value from the user.
- save the value to local storage,
- hide the modal
1 |
$("#myModal").on("shown.bs.modal", function () { |
2 |
|
3 |
const saveButton = document.querySelector("#myModal .btn-primary"); |
4 |
const apiKeyInput = document.querySelector("#apikey"); |
5 |
|
6 |
saveButton.addEventListener("click", function () { |
7 |
const apiKeyValue = apiKeyInput.value; |
8 |
localStorage.setItem("API_KEY", apiKeyValue); |
9 |
$("#myModal").modal("hide"); |
10 |
});
|
11 |
});
|
So when you click the “Add API KEY” button, the modal will be displayed like this:


The next step is to define and map our custom categories to the interface. Here are the categories. Feel free to define your own.
1 |
const categories = [ |
2 |
"motivation", |
3 |
"life", |
4 |
"hope", |
5 |
"funny", |
6 |
"love", |
7 |
"philosophy", |
8 |
"sadness", |
9 |
];
|
Let’s get the element with the class quotes that will house the categories.
1 |
const quotes = document.querySelector(".quotes"); |
Next, we will use the map() method to generate an HTML markup of a label and an input radio element for each category; the radio input element will contain the id and value of the category, while the label will contain the name of the category.
1 |
const mappedCategories = categories.map((category) => { |
2 |
capitalizeText = category.charAt(0).toUpperCase() + category.slice(1); |
3 |
return `<input |
4 |
type="radio"
|
5 |
class="btn-check"
|
6 |
name="mood"
|
7 |
id="${category}" |
8 |
value="${category}" |
9 |
autocomplete="off"
|
10 |
/>
|
11 |
<label
|
12 |
class="btn btn-secondary align-items-center justify-content-center fs-5"
|
13 |
for="${category}" |
14 |
>${capitalizeText}</label>`; |
15 |
});
|
16 |
quotes.innerHTML = mappedCategories.join(""); |
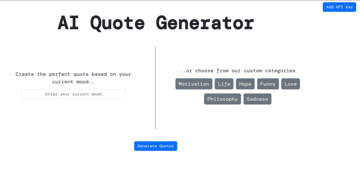
Now the app looks like this:


OpenAI API Configuration
We have implemented the add API Key functionality. Now, let’s get the key from the OpenAI website. If you don’t have an account, go to the OpenAI website and sign up for free.
Once you provide the required details, navigate to the documentation. Click API KEY on the top left , create your API key , copy and paste the key and store it in a secure location.
Using the API Key
Create an async function called getData(), which takes two parameters, namely prompt and API KEY,
1 |
const getData = async (prompt, API_KEY) => { |
2 |
|
3 |
}
|
Inside the function, we want to use fetch() function to make a request to the OpenAI API and display the generated response to the user. Inside the getData() function, add a try-catch block with the following code.
1 |
const getData = async (prompt, API_KEY) => { |
2 |
|
3 |
try { |
4 |
const response = await fetch("https://api.openai.com/v1/chat/completions", { |
5 |
method: "POST", |
6 |
headers: { |
7 |
Authorization: `Bearer ${API_KEY}`, |
8 |
"Content-Type": "application/json", |
9 |
},
|
10 |
body: JSON.stringify({ |
11 |
model: "gpt-3.5-turbo", |
12 |
messages: [ |
13 |
{
|
14 |
role: "user", |
15 |
content: `Generate 10 quotes about ${prompt}`, |
16 |
},
|
17 |
],
|
18 |
temperature: 0.7, |
19 |
}),
|
20 |
});
|
21 |
const data = await response.json(); |
22 |
|
23 |
return data; |
24 |
} catch (error) { |
25 |
|
26 |
return error; |
27 |
}
|
28 |
};
|
This is all the code we need to get data from OpenAI . Let’s break down the code.
- We use the
fetch()function inside the try block to make an asyncPOSTrequest to the specified url. - In the request body, we specify
gpt-3.5-turboas the model to be used; - The OpenAI API also expects an Authorization header containing the
API KEY,and the body of the request should be aJSONobject containing parameters such as themodel,prompt, andtemperature(indicates randomness of the responses; higher values indicate more randomness of the responses). - Finally, we return the
response.jsonobject. In case of any errors, we also return theerrorobject.
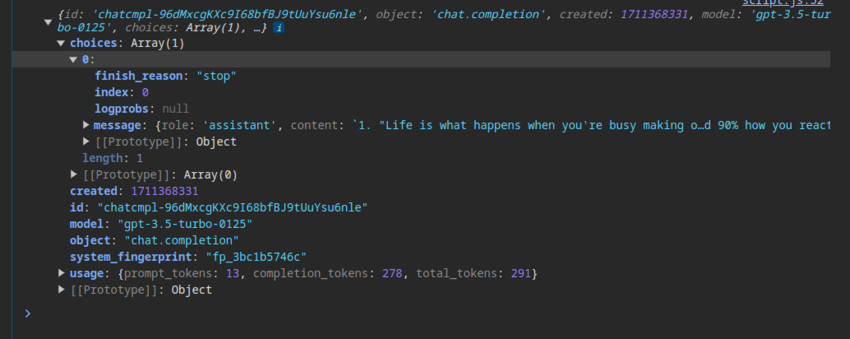
The data response looks like this;
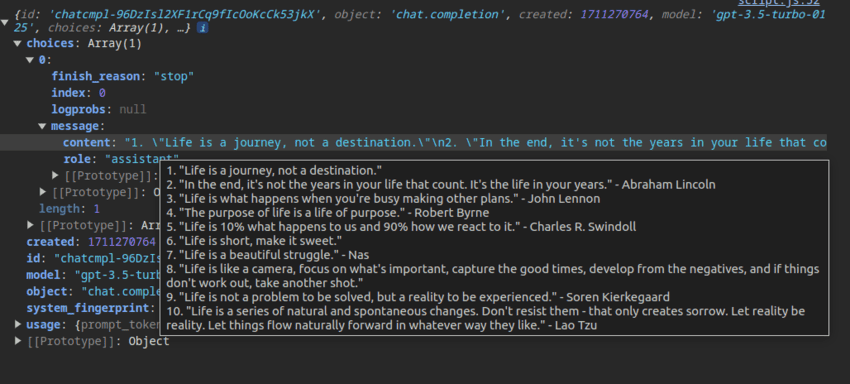

As you can see, the data we need to display to the user is contained in the choices array. The data will be formatted before being displayed to the user.
The getData() function will be called when the user clicks the generate quotes button. Let’s add an event listener to the generate button.
1 |
const generateBtn = document.querySelector(".generate-btn"); |
2 |
generateBtn.addEventListener("click", async (e) => { |
3 |
e.preventDefault(); |
4 |
|
5 |
}
|
When the click event occurs, we want to execute a function that does the following:
- Get the API KEY from local storage.
- If no API KEY is found on local storage, we will display an error, letting the user know they should add their API KEY.
- Get the prompt from either a category or a custom prompt.
- Pass the prompt and the APIKEY to the
getData()function. - Show a spinner when the application is fetching the data.
- After getting a response, stop the spinner.
- Format the data and display it on bootstrap cards.
- In case of any error, we will display the appropriate error message.
Update the event listener function as follows:
1 |
const generateBtn = document.querySelector(".generate-btn"); |
2 |
generateBtn.addEventListener("click", async (e) => { |
3 |
e.preventDefault(); |
4 |
const key = localStorage.getItem("API_KEY"); |
5 |
|
6 |
if (!key) { |
7 |
displayError("","Please add your OPENAI API Key, The KEY will be stored locally on your browser"); |
8 |
return; |
9 |
}
|
10 |
|
11 |
let prompt = ""; |
12 |
let radio = document.querySelector('input[name="mood"]:checked'); |
13 |
|
14 |
if (document.querySelector('input[name="mood"]:checked')) { |
15 |
radio = document.querySelector('input[name="mood"]:checked'); |
16 |
prompt = radio.value; |
17 |
} else { |
18 |
CustomInput = document.getElementById("input"); |
19 |
prompt = CustomInput.value; |
20 |
}
|
21 |
|
22 |
if (!prompt) { |
23 |
displayError(prompt,'Please choose a category or provide a custom mood"'); |
24 |
return; |
25 |
}
|
26 |
|
27 |
loader.style.display = "block"; |
28 |
|
29 |
const data = await getData(prompt, key); |
30 |
|
31 |
if (data.choices) { |
32 |
const container = document.getElementById("result"); |
33 |
// data from aync
|
34 |
const quotesArray = data.choices[0].message.content.split("n"); |
35 |
const mappedArray = quotesArray.map((quote) => { |
36 |
const trimmedQuote = quote.replace(/^d+.|"$/g, "").trim(); |
37 |
|
38 |
return ` <div class="col-sm-6 mt-5 mb-4"> |
39 |
<div class="card">
|
40 |
<div class="card-body">
|
41 |
<p class="card-text">${trimmedQuote}</p></div> |
42 |
</div>
|
43 |
</div>
|
44 |
`; |
45 |
});
|
46 |
|
47 |
container.innerHTML = mappedArray.join(""); |
48 |
|
49 |
} else { |
50 |
displayError("",data.error.message ) |
51 |
|
52 |
}
|
53 |
CustomInput.value = ""; |
54 |
});
|
Let’s break down what’s happening above:
- First we prevent the default nature of the browser by setting
e.preventDefault() -
const key = localStorage.getItem("API_KEY");will get the API KEY from local storage. - If no key is found, we will pass an error message to the
displayError()function. -
let prompt = "";declares an empty string that will store the value of the prompt from the user. -
if (document.querySelector('input[name="mood"]:checked')){...} :checks if the user has selected a category and if true, the value of the selected radio input is assigned to the prompt. - In the
elsestatement, the prompt will be the custom input value if the user has entered a custom mood. - If the value of the prompt is
nullorundefined, it means that the user has not provided a prompt (either by selecting a mood category or entering a custom mood), we will display an error message. - After all the validation has passed, we will display a spinner element with
loader.style.display = "block";
getData() Function
Next, we will call the await getData() function and pass the prompt and the API key. Since the function is an asynchronous function, we use await to ensure the execution is delayed until the data fetching is successful.
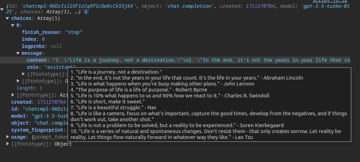
As we saw earlier, the data object returned by the API looks like this:
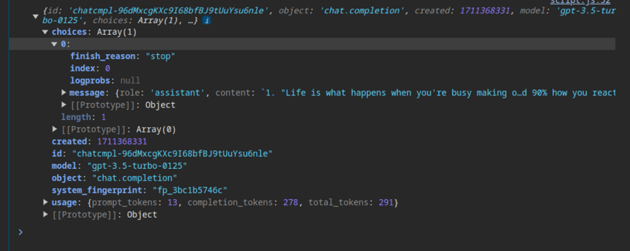

The content we need is contained in the choices[0].message object.
-
data.choices[0].message.content.split("n");creates an array of the quotes called quotesArray by splitting it where n appears. - The
quotesArraynow contains all the quotes, all we need to do is use themap()method and for each quote, remove any leading or trailing whitespace withquote.replace(/^d+.|"$/g, "").trim();and return an HTML markup for each quote represented by a Bootstrap card. - Finally, we set the
innerHTMLof thequotescontainer to the concatenated HTML markup of each quote. - In case of an error from the API,
displayError("",data.error.message) displays the returned error message.
Error Handling
Rather than repeating the error handling process, the displayError() function will handle that. It takes the valueText and a messageText as parameters, checks if the valueText is null or undefined and displays the error message contained in messageText .
The error message is displayed for 4 seconds and then hidden from the user.
1 |
function displayError(valueText,messageText) { |
2 |
const message = document.querySelector(".message"); |
3 |
if (valueText === "") { |
4 |
|
5 |
message.textContent = messageText; |
6 |
message.style.display = "block"; |
7 |
}
|
8 |
setTimeout(() => { |
9 |
message.textContent = ""; |
10 |
message.style.display = "none"; |
11 |
}, 4000); |
12 |
return; |
13 |
}
|
For the final clean-up, let’s ensure that if the user starts typing in to the custom input field, any previously selected category (via radio buttons) will be deselected.
1 |
const inputField = document.getElementById("input"); |
2 |
inputField.addEventListener("input", () => { |
3 |
const radio = document.querySelector('input[name="mood"]:checked'); |
4 |
if (radio) { |
5 |
radio.checked = false; |
6 |
}
|
7 |
});
|
Conclusion
Whew! That was a lot to take in, but the end result is worth it, and you’ll have learned a lot. We covered the steps needed to make your own AI Quote Generator App with JavaScript. Now, you can integrate AI into your application to generate unique content!
Let’s remind ourselves of the final product.