
In this tutorial, you’ll learn how to create a four-page newsletter template. We’ll put this template together in no time, and you’ll be able to reuse it for your future projects.
Newsletter templates are great to communicate with your community and update them of the latest events. This clean, high-quality, professional newsletter will make the process much easier.
In this tutorial, you’ll learn how to create a newsletter template that will make it easier for you and any user to edit. You’ll be able to change anything from colors to fonts and images. We’ll create an asymmetrical layout for each page, which will set you apart from other normal newsletter templates. We’ll take a look at essential tools you need to know in InDesign that will help you in the future.
In a hurry? We’ve got amazing InDesign newsletter templates and church newsletter template over at Envato Elements and GraphicRiver. Go check them out!
What You Will Need for Your Church Newsletter Template
You’ll need access to Adobe InDesign. If you don’t have the software, you can download a trial from the Adobe website. You’ll also need these assets:
Download the assets and make sure the font is installed on your system before starting. When you are ready, we can dive in!
1. Setting Up Your Church Newsletter Template File
Step 1
In InDesign, go to File > New. In the New Document window, select the Print tab. Choose A4 from the Blank Document Presets. Name the document Church Newsletter Template. Customize the newsletter format with the following options:
- Width to 21 cm
- Height to 29.7 cm
- Orientation to Portrait
- Units to Centimeters
- Pages to 4
- Check Facing Pages
- Columns to 6
- Column Gutter to 0.5 cm
- Margins: set the Top margin to 2 cm. Set the Bottom, Outside and Inside margin to 1 cm.
- Bleeds to 0.3 cm (it’s best to seek your professional printer’s preference)
Click Create.

Step 2
For this church newsletter template, we will work with three Layers. Organizing layers is an important practice when designing a newsletter template as they will make it easier for users to edit.
Bring up the Layers panel by going to Window > Layers. Double-click on Layer 1 and rename it Background.
On the Layers panel main menu, select New Layer. Name it Images. Click OK.
Additionally, create a new layer named Copy. Click OK.

Step 3
Let’s add some color swatches to our newsletter design. Head over to Window > Color > Swatches to expand the Swatches panel. Choose New Color Swatch from the main menu. Set the Swatch Name and values to the following:
- Sand: C=4 M=3 Y=4 K=0
- Orange: C=0 M=75 Y=75 K=0
- Purple: C=100 M=100 Y=20 K=15
Click Add and OK after you input each color value.

Step 4
For this newsletter tutorial, we’ll create a drop cap at the beginning of an article. Drop caps help emphasize the beginning of a story and let the reader know when they are starting a new article.
Head over to Window > Styles > Character Styles. On the Character Styles panel, add a new style and double-click to open the options window. In the Character Styles Options window, set the Style Name to Drop Cap. Use the following settings:
- Font Family: Sentral
- Font Style: Bold
- Size: 9 pt
Select the Character Color option from the menu on the left side. Select the orange color. Click OK.

Step 5
For this newsletter design tutorial, we will create a list of Paragraph Styles that we will use to format the portfolio design template.
Head over to Window > Styles > Paragraph Styles to open the Paragraph Styles panel. On the main menu, select New Paragraph Style, setting the Style Name to Folio. Select the Basic Character Formats option from the left side menu. Use the following settings:
- Font Family: Sentral
- Font Style: Bold
- Size: 8 pt
- Tracking: 100
Click OK.

Create a New Paragraph Style, setting the Style Name to Drop Cap. Here, we’ll set the values for the copy as the drop cap style also covers the contents in the first paragraph. Set the Basic Character Formats option to the following:
- Font Family: Sentral
- Font Style: Regular
- Size: 9 pt
Select the Indents and Spacing option from the menu on the left side. Set the Align to Grid option to All Lines (this will help keep each line of text at the same level).
Select Drop Caps and Nested Styles from the menu on the left side. Under Drop Caps, use the following settings:
- Lines number to 4
- Characters to 1
On the Character Style dropdown menu, select Drop Cap. Click OK.
Create a New Paragraph Style, setting the Style Name to Copy. Set the Basic Character Formats option to the following:
- Font Family: Sentral
- Font Style: Regular
- Size: 9 pt
Select the Indents and Spacing option from the menu on the left side. Use the following settings:
- Alignment to Left Justify
- First Line Indent to 0.5
- Align to Grid: All Lines (this will help keep each line of text at the same level)
Click OK.
Create a New Paragraph Style, setting the Style Name to Intro. Set the Basic Character Formats option to the following:
- Font Family: Sentral
- Font Style: Medium
- Size: 15 pt
- Leading: 17 pt
- Tracking: -20
Select the Character Color option from the left side menu. Set the color to the orange swatch. Click OK.
Create a New Paragraph Style, setting the Style Name to Headline. Set the Basic Character Formats option to the following:
- Font Family: Sentral
- Font Style: ExtraBold
- Size: 39 pt
- Leading: 40 pt
- Tracking: -20
Select the Character Color option from the left side menu. Set the color to the purple swatch. Click OK.
Create a New Paragraph Style, setting the Style Name to Caption. Set the Basic Character Formats option to the following:
- Font Family: Sentral
- Font Style: Medium
- Size: 8 pt
- Leading: Auto
- Tracking: -20
Select the Character Color option from the left side menu. Set the color to the orange swatch. Click OK.

Step 6
We’ll alter the baseline grids to fit our newsletter layout. Open the Preferences window by going to Indesign CC > Preferences > Grids. Under Baseline Grid, set the Start of the grid to 0 cm, and set the Relative to option to Top Margin and the Increment to 10.8 pt. Click OK.
To Show and Hide the baseline grid, press Option-Command-‘.

2. Setting Up Master Pages for Your Church Newsletter Template
Step 1
On the Layers panel, select the Copy layer.
Using the Text Tool (T), create a text frame in the top left corner of the left hand side newsletter design. Aim to start at 1 cm on the x-axis, using the Control panel to guide you.
To add a page number, right-click while in the text frame and select Insert Special Character > Markers > Current Page Number. The A symbolizes the page number. Add a space and bullet point by right-clicking on the frame and selecting Insert Special Character > Symbols > Bullet Character. In all caps, add the name of your company or church, followed by a bullet point and a section name.

Step 2
Using the Paragraph Styles, set the text frame to the Folio style.
Select the A and set the Font Style to Extra Bold. Change the color of Section on the Swatches panel to orange. This will help emphasize it.

Step 3
Using the Line Tool (/), create a horizontal line under the folio that goes from margin to margin on the newsletter layout.
On the Stroke panel (Window > Stroke), set the Weight to 0.5 pt.

Step 4
Select both items, the folio and the stroke. To Duplicate the items, press Option-Shift and drag towards the right page of the newsletter layout. By pressing Shift, you should be able to keep the x-axis alignment across the page.
Set the text frame to Align Right on the Control panel. We want this folio to mirror the one on the left side of the newsletter layout. The page number should be on the outside of the page. Swap the position of the page number with the section.

Step 5
On the Pages panel, drag the A-Master pages over pages 2-4 of the newsletter design. This will Apply this Master to those pages. Apply [None] to page 1.

3. Designing the Cover for Your Church Newsletter Template
Step 1
On the Layers panel, select the Background layer.
Using the Rectangle Tool (M), create a rectangle that measures 21.6 cm in Width and 6.5 cm in Height.
Using the Swatches panel, set the color to the Sand swatch.
Place the rectangle at the very top of the cover of the newsletter design.

Step 2
On the Layers panel, lock the Background layer and select the Copy layer.
Using the Text Tool (T), create a text box at the top of the page and add “Newsletter” as the content. With the Text Tool selected, head over to the Control panel and set the text to Align Center. Use the following settings:
- Font Family: Sentral
- Font Style: Extra Bold
- Size: 75 pt
- Tracking: -25
On the Swatches panel, set the color of the content to Purple.

Step 3
Using the Text Tool (T), create a second text frame under the title. Here, add the name of the church or company followed by a bullet point to make a clear separation. Add a date or issue number for the newsletter template.
With the Text Tool selected, head over to the Control panel and set the text to Align Center. Use the following settings:
- Font Family: Sentral
- Font Style: Extra Bold
- Size: 12 pt
- Tracking: 60
On the Swatches panel, set the color of the content to Orange.

Step 4
Using the Line Tool (/), create two strokes that extend from margin to margin. Place one stroke under “Newsletter” and the second stroke under the issue number.
Using the Stroke panel (Windows > Stroke), set the first stroke to 0.5 pt and the second stroke to 2 pt.

Step 5
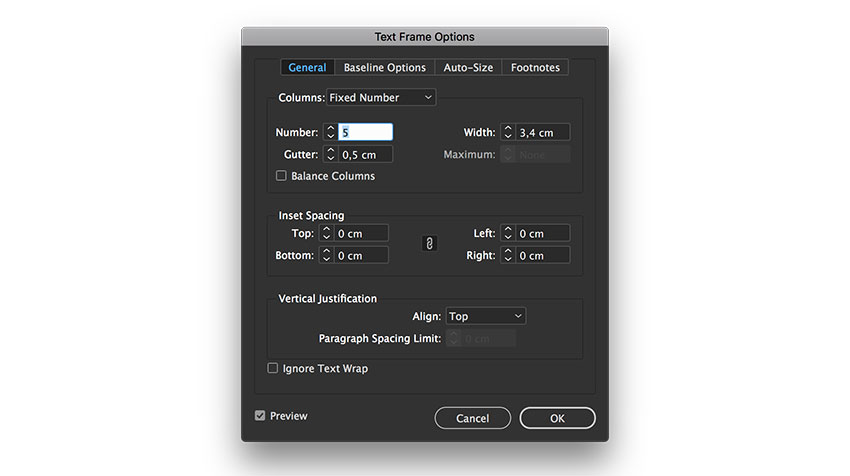
Using the Text Tool (T), create a text frame under the last stroke. Press Command-B to open the Text Frame Options window. Here, set the Number of Columns to 5 and the Gutter to 0.5 cm. Click OK.
This text frame is a great opportunity to create a small table of contents. Add the number of the page, the section, and the title of the story so it is easy to find. While selecting the Text Tool (T), head over to the Control panel and use the following settings:
- Font Family: Sentral
- Font Style: Bold
- Size: 8 pt
Feel free to use different font styles to create a hierarchy between the section titles and story titles inside the newsletter design. Using the Swatches panel, set the color of the page number and the section title to Orange. Use [Black] for the headlines.

Step 6
Using the Line Tool (/), create a vertical stroke between each column of the small table of contents. Use the gutter between each column on the newsletter layout as a guide to place the stroke.
On the Stroke panel, set the Weight to 0.75 pt and the Type to Dotted.

Step 7
To Place an image on the newsletter design, press Command-D. Navigate to the People reading in a circle and click Open.
Draw the image frame under the title and cover the width of the page.

Step 8
Using the Text Tool (T), create a text frame under the image. Use the columns we created at the beginning of the tutorial and extend the text frame to the fourth column.
Add a headline and use the Headline style from the Paragraph Styles panel to style the frame.

Open the Text Wrap panel (Window > Text Wrap) and select the text frame. Select the Wrap Around Bounding Box button and set the bottom Offset to 1 cm.

Step 9
Create a second text frame with the Text Tool (T). This time, make the width extend to the second column. Add an intro paragraph and use the Intro style from the Paragraph Styles panel to style the frame.
Place this frame at the bottom left of the cover page of the newsletter design.

Step 10
Create a text frame that covers the last four columns of the newsletter template cover. This frame is for the copy, and the headline won’t interfere as we used the Text Wrap panel to make room for it.
Add copy and set the first paragraph to the Drop Cap style from the Paragraph Style panel. Set the rest of the copy to the Copy style.

Step 11
To create a neat newsletter layout, add two strokes between the intro and text frames. Use the Line Tool (/) and set the Weight to 0.25 pt.

4. Designing the Interior of Your Church Newsletter Template
Step 1
Override the folio frame by pressing Shift-Command and clicking on the frame. Here, feel free to change the section name to fit the content on the page.
For this page, we’ll play with the six columns we created at the beginning of this tutorial. We’ll use multiple column widths to create asymmetrical layouts.
Using the Text Tool (T), create two text frames for the headline and intro. Use the Paragraph Styles panel to style both to the Headline and Intro styles.

Step 2
Place the Black middle aged man carrying his son image by pressing Command-D and clicking Open. Place it under the intro but aligned to the right margin. Use about four columns for the width of the image.

Step 3
While selecting the image, head over to the Text Wrap panel. Select the Wrap Around Bounding Box and set the Offset on all sides to 0.3 cm.

Step 4
Create a text frame under the intro. Extend the width to the third column and the length to the bottom of the page.
Create another text frame under the image. This time, leave a column between the two text frames and cover only the last two columns in width.
Add content and use the Paragraph Styles panel to style it. Use the Drop Cap and Copy styles.

Step 5
Using the Text Tool (T), add a text frame in the single column we left between the two copy text frames. Here, you’ll add a caption. Use the Paragraph Styles panel and select the Caption style.
Add two strokes between the columns with the Line Tool (/) to create a separation and polish the layout. Set the Weight of the strokes to 0.25 pt.

Step 6
Override the folio frame by pressing Shift-Command and clicking on the frame. Here, feel free to change the section name to fit the content on the page.
Using the Text Tool (T), create a text frame for the headline. Use the Paragraph Styles panel to style both to the Headline style. We’ll add an intro later.
Place the Man during a religious pilgrimage by pressing Command-D and clicking Open. Place the image under the headline, aligned to the left margin.
Make the image frame smaller than the actual image. For this, head over to the Control panel and set the Width to 10.8 cm and the Height to 9.3 cm.
While selecting the image, head over to the Text Wrap panel. Select the Wrap Around Bounding Box and set the Offset on all sides to 0.3 cm.

Step 7
Create a text frame that starts on the second column and extends to the right edge of the image. Here, add intro content and use the Intro style from the Paragraph Styles panel.
While selecting the frame, head over to the Text Wrap panel. Select the Wrap Around Bounding Box and set the Bottom Offset to 1 cm.

Step 8
Using the Text Tool (T), create a single text frame that starts on the second column and extends to the last column. As far as height goes, start under the headline and extend to the bottom margin.
While selecting the frame, press Command-B to open the Text Frame Options window. There, set the Number of Columns to 2 and the Gutter to 0.5 cm.
Add copy and use the Paragraph Styles panel to style the frame. Use the Drop Cap and Copy styles.

Step 9
Using the Text Tool (T), add a text frame in the single empty column on the very left side of the page. Here, you’ll add a caption. Use the Paragraph Styles panel and select the Caption style.

Add two strokes between the columns with the Line Tool (/) to create a separation and polish the layout. Set the Weight of the strokes to 0.25 pt.

5. Designing the Back Cover of Your InDesign Portfolio Template
Step 1
Using the Rectangle Tool (M), create a background on the whole page. Select the Sand swatch from the Swatches panel.
Override the folio frame by pressing Shift-Command and clicking on the frame. Here, feel free to change the section name to fit the content on the page.
Using the Text Tool (T), create two text frames for the headline and intro. This time, use only the first four columns for both frames. Use the Paragraph Styles panel to style both to the Headline and Intro styles.

Step 2
Place the African American male hands resting on an open bible image by pressing Command-D and clicking Open. Drag the image frame to take up the width of three columns. Place the image on the right side of the page and towards the bottom of the page, as shown in the image below.
While selecting the image, head over to the Text Wrap panel. Select the Wrap Around Bounding Box and set the Offset on all sides to 0.3 cm.

Step 3
Using the Text Tool (T), create a single text frame on the first three columns. Start the text frame at the same level as the image and extend to the bottom of the page.
Leave a column between this and create another text frame. This time, start the frame at the very top of the page and extend it to the bottom.
Add copy and use the Paragraph Styles panel to style the frame. Use the Drop Cap and Copy styles.

Step 4
Using the Text Tool (T), add a text frame in the single column we left on the very left side of the page. Here, you’ll add a caption. Use the Paragraph Styles panel and select the Caption style.

Add two strokes between the columns with the Line Tool (/) to create a separation and polish the layout. Set the Weight of the strokes to 0.25 pt.

6. How to Export a File for Printing
Before exporting a file for printing, it is useful to take a look around all the edges to make sure all the images and vectors bleeding out are touching the bleeds.
Step 1
To export the file, go to File > Export. Name the file Church Newsletter template and choose Adobe PDF (Print) from the Format dropdown menu. Click Save.

Step 2
In the Export Adobe PDF window, set the Adobe PDF Preset to Press Quality.

On the left side of the panel, select Marks and Bleeds. Check All Printer’s Marks and Use Document Bleed Settings. Click Export. You will have a ready-to-print PDF file.

Great Job! You’ve Finished This Tutorial!
In this tutorial, you learned how to create a newsletter template. The essential tools you learned today will help you properly set up all your future InDesign templates. Today, you learned to:
- set up a ready-to-print InDesign file
- add Layers to keep your file organized
- create Color Swatches that you can easily change
- set up Paragraph Styles to help you format the template
- use the Text Wrap panel to offset text
- design an asymmetrical newsletter layout
If you are new to InDesign and need an InDesign newsletter template or newsletter template ideas, head over to Envato Elements and GraphicRiver. We’ve got many options to explore!

If you liked this tutorial, you might like these: