A carousel is a great example of a possible CSS-only interactive feature. While carousels (aka sliders) are usually built with JavaScript, if we remove the complex features, they’re simply scrollable elements with an overflow; exactly what CSS is made for.
You might be thinking “CSS is used for styling while JavaScript is used for interactivity, that’s just the way the web works.”
However, considering the fact that CSS is loaded on a webpage faster than JavaScript, and CSS also causes less reflow on a page (which improves performance), it’s fair to say we should use CSS for interactivity wherever possible.
1. Layout With HTML
The layout of our easy slider is simple: we’ll create a carousel-container div to hold the carousel-slide elements.
1 |
<div class="carousel-container"> |
2 |
<div class="carousel-slide">1</div> |
3 |
... |
4 |
</div>
|
That’s all we need so let’s move on to the styling
2. Carousel Behaviour with CSS
Once we have our carousel slides set up, we’ll style the carousel to have the following features:
- Scrollable content
- Snap to next slide
- Progress bar indicating slide progress
Scrollable Content
For the scrollable content, we’ll use the display:flex and overflow-x: auto properties. We’ll also style slides so we can see 3 slides on the desktop screen and 1 slide on mobile.
1 |
.carousel-container { |
2 |
display: flex; |
3 |
overflow-x: auto; |
4 |
}
|
5 |
|
6 |
.carousel-slide { |
7 |
flex: 1 0 30%; |
8 |
}
|
9 |
|
10 |
@media (max-width: 600px) { |
11 |
.carousel-slide { |
12 |
flex: 1 0 90%; |
13 |
}
|
14 |
}
|
Snap to Slide
Next, to achieve the snapping effect on the slides, we’ll use the CSS scroll-snap properties. The scroll snap properties allow us define “snapping” points on an element (the point of the element that we want to be fully visible once scrolling). Our updated code looks like this:
1 |
.carousel-container { |
2 |
display: flex; |
3 |
overflow-x: auto; |
4 |
scroll-snap-type: x mandatory; |
5 |
}
|
6 |
|
7 |
.carousel-slide { |
8 |
flex: 1 0 30%; |
9 |
scroll-snap-align: center; |
10 |
}
|
11 |
|
12 |
@media (max-width: 600px) { |
13 |
.carousel-slide { |
14 |
flex: 1 0 90%; |
15 |
}
|
16 |
}
|
Optional: CSS-Only Progress Bar
To keep inline with our CSS-only interactivity, we can take advantage of native browser features to create a progress bar for our carousel. We’ll do this by styling the carousel container scrollbar to give the appearance of a progress bar. This is what the code looks like:
1 |
.carousel-container::-webkit-scrollbar { |
2 |
height: 8px; |
3 |
}
|
4 |
|
5 |
.carousel-container::-webkit-scrollbar-thumb { |
6 |
background: #29AB87; |
7 |
}
|
8 |
|
9 |
.carousel-container::-webkit-scrollbar-track { |
10 |
background: #b1b3b399; |
11 |
}
|
12 |
|
13 |
.carousel-container::-webkit-scrollbar-track-piece:start { |
14 |
background: #29AB87; |
15 |
}
|
Let’s look at the properties we’re using:
-
::webkit-scrollbar: the entire scrollbar element -
::webkit-scrollbar-thumb: the draggable bar on the scrollbar -
::webkit-scrollbar-track: the path that the scrollbar thumb is on -
::webkit-scrollbar-track-piece:start: the path of the track not covered by the scrollbar thumb, the:startselector targets only the path behind the scrollbar thumb

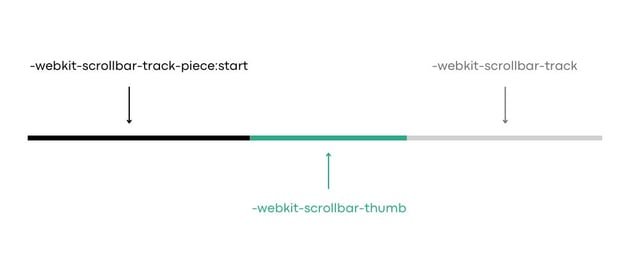

In the diagram above, we can see what parts of the scrollbar are being targeted. By making the -webkit-scrollbar-thumb and ::webkit-scrollbar-track-piece:start the same colour, the scrollbar gives the impression of being filled in as it’s being scrolled, thus creating a progress bar.
And since our progress bar is actually a scrollbar, it can also be used to scroll through the carousel as an additional feature: it’s a win/win!
The ::webkit-scrollbar properties are non-standard, pretty sketchy, and not supported by all browsers so it’s not recommended to use this in a production environment. This means our progress bar will look like a regular scrollbar on non-supported browsers, or if you choose not to include these ::webkit-scrollbar rules.
That’s all there is to our easy slider! We’ve built a scrollable container with a nifty snapping feature and even added a progress bar using only CSS:
3. More Features With JavaScript
Since we’ve gotten the basic feature of the carousel out of the way, we can go on to add even more features, using JavaScript this time.
One of those features is using arrows to handle the carousel navigation. In a previous tutorial, we looked into building a carousel with JavaScript (less than 14 lines of code!), so we can combine that tutorial with this one to add even more features to our easy slider.
This is what our combined carousel looks like:
Just for fun, in this demo the code has been refactored to use even fewer lines of JavaScript, so this is what our updated carousel arrow function looks like:
1 |
const carousel = document.querySelector(".carousel-container"); |
2 |
const slide = document.querySelector(".carousel-slide"); |
3 |
|
4 |
function handleCarouselMove(positive = true) { |
5 |
const slideWidth = slide.clientWidth; |
6 |
carousel.scrollLeft = positive ? carousel.scrollLeft + slideWidth : carousel.scrollLeft - slideWidth; |
7 |
}
|
Then we pass that function to our HTML arrows:
1 |
<button class="carousel-arrow carousel-arrow--prev" onclick="handleCarouselMove(false)"> |
2 |
‹
|
3 |
</button>
|
4 |
|
5 |
<button class="carousel-arrow carousel-arrow--next" onclick="handleCarouselMove()"> |
6 |
›
|
7 |
</button>
|
And with that, we’ll call it a day on our modded-up carousel!