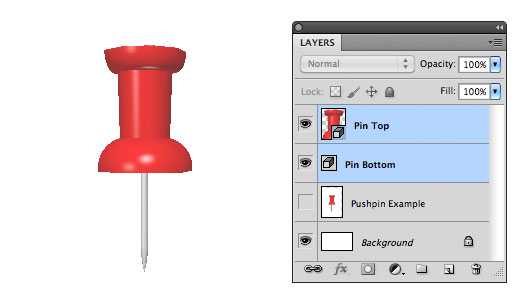
Introduction
Back when I wrote the popular A Scrap Of Notebook Paper tutorial quite a few of you wanted to know how I created the push pin shown in my final image. Well the wait’s over my friends! In this Photoshop tutorial I’ll show you how to create your own 3D push pin using Photoshop Extended’s 3D editing capabilities.
(*note: You’ll need to have Photoshop Extended CS4 or newer and we’re going to be using the Pen Tool a little bit in this lesson, so you’ll need to be minimally capable of drawing curves and lines if you plan to follow along with this tutorial at home.)
Step 1 – Setting Up The Photoshop File
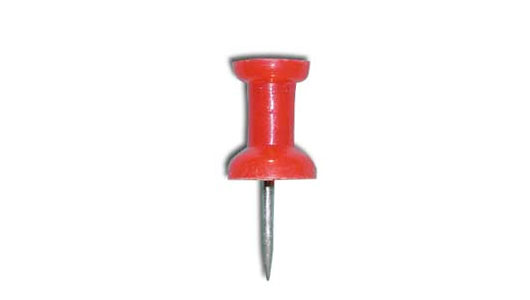
Open a new Photoshop document by choosing File > New from the Main Menu or by using the keyboard shortcut Command-N (PC: Ctrl-N). I’m using my usual 540px by 300px size at 72 pixels/inch and a background color of White. Then I jumped over to Google and did an image search for “push pin” to find a good piece of reference. The important thing for me was that the photo needed to show the pin straight-on since we’ll need to do some tracing.
Once I located an example that would work I simply right-clicked it, copied it to the clipboard and pasted it into my document by pressing Command-V (PC: Ctrl-V)… (be a slacker and just copy and paste from the image below.)
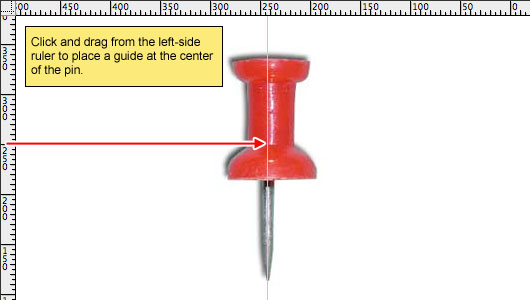
Step 2 – Set A Guide At The Centerline
To keep things symmetrical we only need to trace one half of the pin, so lets place a guide at the center-line to make it easy. Make sure your rulers are showing by choosing View > Rulers from the Main Menu or by simply pressing Command-R (PC: Ctrl-R). Now, simply click on the left-side ruler and drag a guide onto the stage to the center of the pin.
Step 3 – Cuddle Up To The Pen Tool
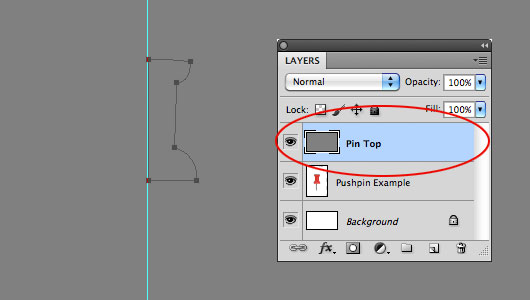
We’re going to be handling the top and bottom pieces of the pen separately so lets get started with the top first. Grab the pen tool from the Tools Bar or simply press the P key. This process is easiest if you first draw the center-line (don’t forget to hold down the shift key when placing your second point to keep the line perfectly straight, then continue around the left side tracing along the edges of the top of the pin.
TIP: Once you’ve created your path, jump over to the Paths palette and rename it so if you need to go back to it it won’t get lost when we create our next one.
(*note: In my example below I only dropped the opacity of the pin so you can see my path more clearly.)

Step 4 – Create And Fill A New Layer
Create a new layer called Pin Top by pressing Command-Shift-N (PC: Ctrl-Shift-N) and fill it with 50% Gray by pressing Shift-Delete (PC: Shift-Backspace) and choosing 50% Gray from the Use drop-down menu.
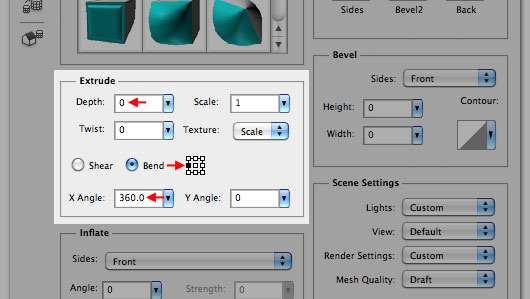
With your path still selected choose 3D > Repoussé > Selected Path from the Main Menu to open the Repoussé dialog.
Step 5 – Using Repoussé To Create The 3D Effect
With Repoussé open, we’ll need to make a few initial modifications to the Extrude settings to get our object to spin around the centerline (lathe). In the Extrude settings first change the location to the middle left box by clicking to select it, then change the Depth to 0 and the X Angle to 360. Don’t close the dialog just yet because there’s more Repoussé coming up in the next few steps.
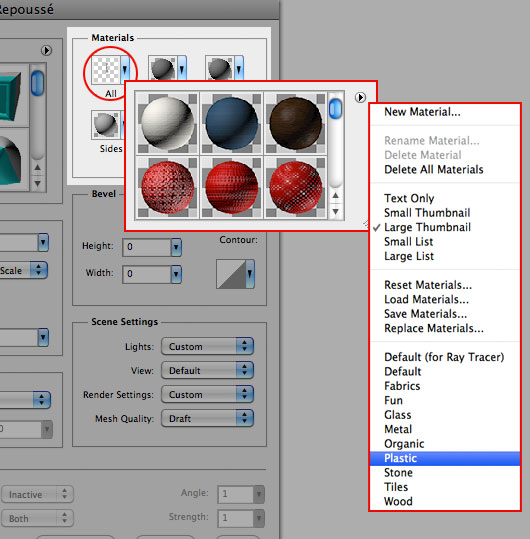
Step 6 – Loading A Glossy Red Plastic Material
With Repoussé still open, jump up to the Materials section and click on the top left box marked All. This will open the Material Picker and chances are good you’ll have to load in the Plastic set, so click on the little arrow at the top right corner of the Material Picker and choose Plastic from the list as shown below.
(*note: If you don’t see these default materials in your list, you may need to install the Materials.zxp file from Photoshop.com which can be downloaded Right Here.
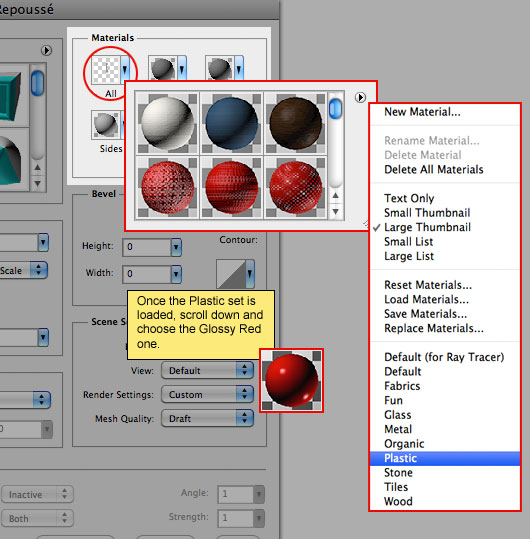
Step 7 – Loading A Glossy Red Plastic Material
With Repoussé still open, jump up to the Materials section and click on the top left box marked All. This will open the Material Picker and chances are good you’ll have to load in the Plastic set, so click on the little arrow at the top right corner of the Material Picker and choose Plastic from the list as shown below.
(*note: If you don’t see these default materials in your list, you may need to install the Materials.zxp file from Photoshop.com which can be downloaded Right Here.
With the Plastic set loaded I’ll go ahead and choose the one called Plastic Glossy (red). from the list to apply it to my push pin top. We’re not going to worry about lighting or anything else just yet, so go ahead and click OK to return to your Photoshop file.
(*note: in the second image below I’ve hidden the reference photo so you can see exactly what my pin looks like so far.)
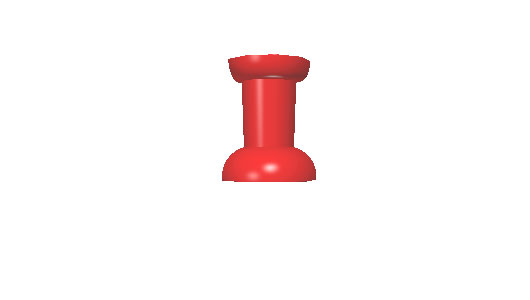
Step 8 – Back To The Pen Tool
You’ll notice in the example above that the edges of my red plastic pin top are all jaggy and nasty, but don’t worry, that’s just because we haven’t rendered a final version of the 3D object. We’ll do that later though so stick around.
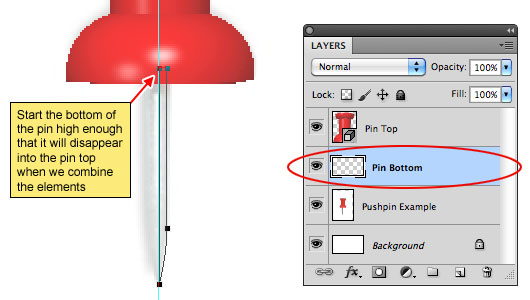
The next step is to create the actual pin portion of the push pin. To get started lets create a new layer called Pin Bottom by pressing Command-Shift-N (PC: Ctrl-Shift-N) and once the layer appears in the Layers palette, click and drag it down so it will be beneath the Pin Top layer. This way we can make the pin a bit taller to ensure it extends inside the pin top.
Go ahead and switch back to the Pen tool (if it’s not already active) and lets draw out the bottom of the pin just like we did before. Centerline first, then the right side.
Step 9 – Second Verse Same As The First
Ok, here’s where we see if you were paying attention in the beginning… Fill the layer with 50% gray, jump into Repoussé and make that sexy 3D happen, then load the Metal textures from the Materials list and pick a nice shiny one like Metal Steel2 (stainless) or whatever suits your taste. Click OK to commit the 3D effect and return to your Photoshop document. You can now turn off (or throw away) your reference layer since we won’t be needing it anymore. You can also hide or delete the guide if you’d like.
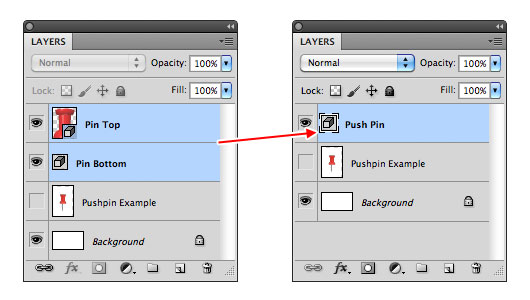
Step 10 – Combine 3D Layers
We’ve now got both pieces of our push pin built out in 3D but because they’re on separate layers we can’t manipulate them in 3D space at the same time. Lucky for us there’s an easy fix. With one of the two Pin layers selected, simply hold down the Command (PC: Ctrl) key and click on the other one in the Layers palette to select them both at the same time then from the Main Menu choose 3D > Merge 3D Layers. This will effectively combine the two elements so we can move them around together. I’m going to go ahead and rename the newly combined layer Push Pin as well.
Step 11 – Let The 3D Fun Begin
Ok, so first let me say that you’ve done a great job so far and if I was there I’d give you a big hug. But since I’m not, just close your eyes and imagine me giving you a big warm hug… unless you’re a dude, cuz that’s just weird. Dudes, high five.
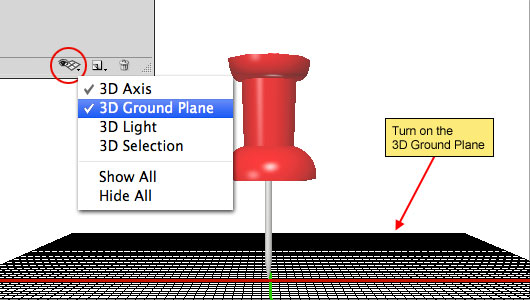
There are a lot of things that you can do with the 3D object now but I’m going to assume that you’d like to make it look like it’s sticking into something that’s on a vertical plane in front of you (like pinning a note to the wall) and for us to do that, the first thing we’ll have to do is change the camera angle so that we’re looking straight down on the Ground Plane. Don’t worry if you don’t know that that is, I’ll hold your hand through the whole process… unless you’re a dude.
First switch to the Camera Rotate Tool by pressing the N key and then lets turn on the Ground Plane by opening the 3D (MESH) panel by choosing Window > 3D from the Main Menu. When the 3D panel comes up, click on the leftmost icon at the bottom of the palette (it looks like an eye next to a tiny grid) and choose 3D Ground Plane to switch it on. Instantly you’ll see the black ground plane appear (it’ll extend farther than my screenshot below will show obviously. With the Ground Plane on, we can now move on to moving the camera angle. All this preparation will ensure that our shadows fall correctly when we get to that point.
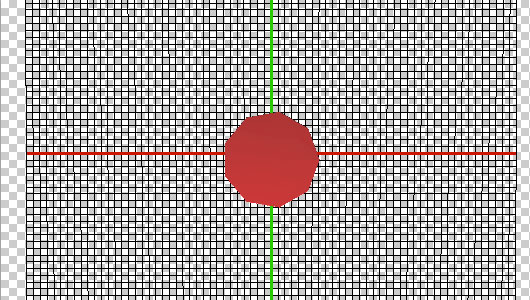
Step 12 – Rotate The Camera Angle
You should still have the Rotate Camera View tool active, so now what you want to do is hold down the Shift key and click and drag your mouse straight upward to rotate the camera’s angle to the top of the pin (since it’s sticking straight up from the Ground Plane. Holding the Shift key will constrain the move so it doesn’t get sideways. There’s no vertical snapping in this tool, so you’re going to have to eyeball the move. Luckily you’ve got Photoshop’s checkerboard background to make it easier for you. When you’ve got it where you want it (you should be looking directly at the top of the pin), let go of the mouse and head on down to the next step.
Step 13 – Adjust The Push Pin Position
With the Ground Plane now in the vertical position, press the K key to switch to the Object Rotate tool. You can go ahead and turn off the Ground Plane grid in the 3D panel now as well. The Object Rotate Tool we’ve activated will allow us to move, rotate and angle the object without disturbing the camera angle we just set. Go ahead and click and drag around with your mouse on the push pin to see what I mean. I’m going to tilt mine up and to the right so that there’s a nice view angle of the pin. Feel free to switch over to the Move tool (keyboard shortcut V) if you need to move your object to another spot on the stage and then switch back to the Object Rotate tool to continue fiddling with your pin.
(*note: you can also use the arms of the 3D tool to rotate and skew your object)
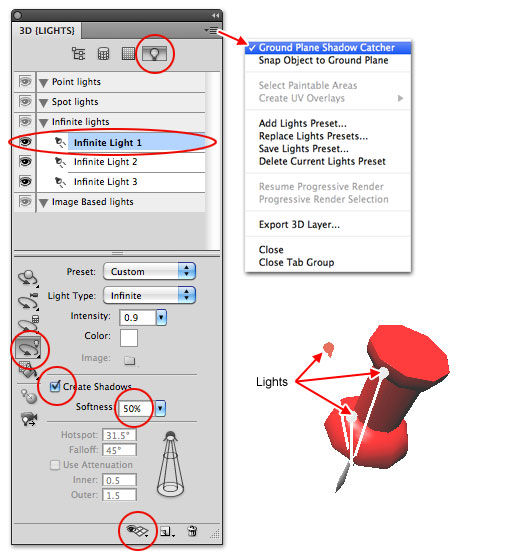
Step 14 – 3D Lighting
This is probably the toughest step to explain because it’s all about little adjustments and eyeballing things, but I’ll do what I can to get you on the right track. I probably went through this process 10 times while preparing the sequence for this lesson and never once got it to turn out exactly the same, so don’t be to hard on yourself if it takes some time to get it the way you want it.
Take a look at the 3D panel we opened earlier and down at the bottom where you turned on the Ground Plane select 3D Light from the menu. By default your 3D object comes with 3 lights, but you can turn them on and off as you wish. At the top of the 3D panel, click on the little light bulb icon to switch to the lighting panel.
Each light has a little handle at the end that can be manipulated by clicking on the Light Rotate tool along the left middle of the palette and you can select each light from the list above to change it’s settings. Each light has a few main options that we’re concerned about, mainly Light Type, Create Shadows and shadow Softness are all we’re concerned with in this lesson. I prefer a softness on the shadows of about 50%. You won’t see your shadows just yet, but I’ll show you in the next step how to turn them on. You can grab each light by its handle and move it around until you’re satisfied with the lighting on the pin.
While we’re here, lets click on the little icon in the top right corner of the 3D palette and choose Ground Plane Shadow Catcher from the menu. This way when we change the render settings in the next step, the shadows will appear.
Step 15 – Render Settings
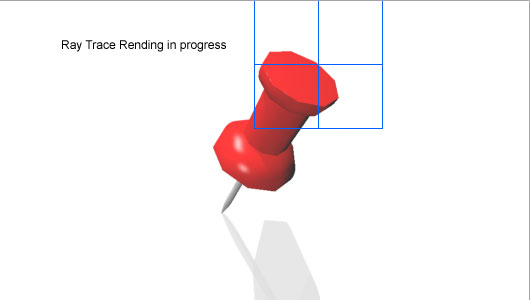
So, when you’ve got all your lights arranged and you think you’re all set it’s time to test how the shadows fall by rendering out our 3d object. First click on the far left icon at the top of the 3D panel (the one that looks like boxes connected by lines), then just below that icon, click on the word Scene to view the settings for the entire scene. In the lower half of the panel under Render Settings change the Quality to Ray Traced Draft. This will run a basic render sequence which is much quicker than a full render and will give you a good idea of where the shadows fall and if you need to make any adjustments. You can stop the render at any time by pressing the Space bar, and then if you need to make changes, switch back to Interactive (Painting) in the Quality drop-down. Make any adjustments to your lights etc and then try again.
If you don’t want all 3 lights to throw shadows, you can switch back to the Lighting area and by clicking on each light in the list you can check or un-check it’s Create Shadows checkbox.
TIP: If you select the Pin Top or Pin Bottom objects in the 3D panel asset list, you can set Shadow Opacity and whether the object Casts and Catches Shadows as well.
Step 16 – Clean Up On Isle 5…
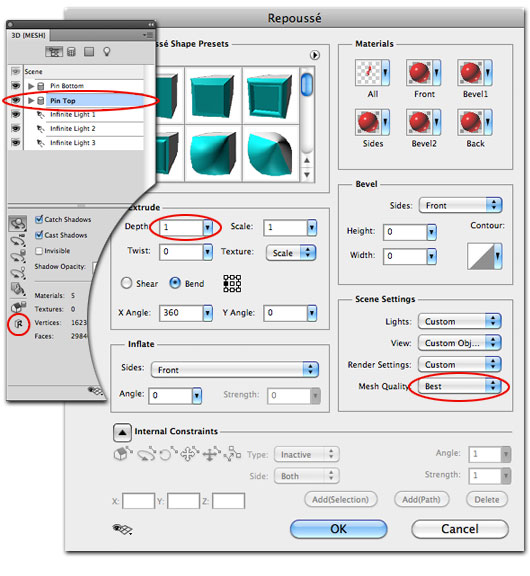
Ok, so we get to the end and even with the preliminary rendering my round push pin is still shaped like a stop sign… who’s been messing with my Photoshop presets?
Luckily a few little adjustments will fix us up. Click on the Pin Top object in the 3D palette and then click the Edit in Repoussé icon at the bottom of the icon stack in the bottom of the palette. This will bring back up our original 3D settings and we can make a few tiny adjustments as needed. All I had to do was change the Extrude Depth to 1 and then in the Scene Settings area change the Mesh Quality to Best (which was the problem all along). Click OK when you’re done and go ahead and run a preliminary rendering once again.
Conclusion
So I’m sure by now you’re head is spinning with all this 3D mumbo jumbo, and who could blame you, this tool’s a powerful disaster area and nothing is user friendly… at least at first. Experiment experiment and practice practice, there are a ton of great tutorials out there and guys like Corey Barker from Photoshop User TV have done a ton of great video tutorials on the topic.
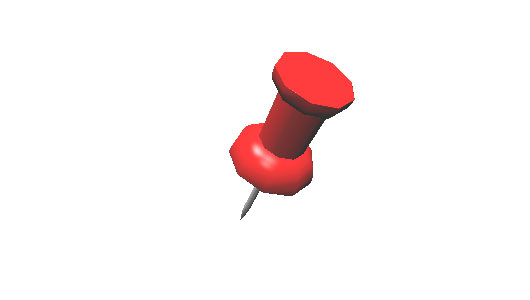
When you’re finally satisfied and ready for the final result, go back to that Quality setting (don’t forget to select Scene from the list first) and choose Ray Traced Final. Sit back and have a drink, take a short nap or maybe go outside for some fresh air, this is going to take a while. When it’s all done the edges will be pretty and round, the shadows will be soft and hopefully you’ve learned a little something valuable along the way. In my final image I used a Curves Adjustment Layer to increase the contrast of my push pin a little bit as well.
(*note: should you decide to move your object and it’s been cut off by the edge of your document during rendering you can simply toggle the render settings to have the object render out again)

Lesson Files + Additional Resources
Download the .PSD file for this lesson Right Here.
Visit PsPrint Oakland to get the best deals in online printing services!