In today’s tutorial, we’re going to be creating a very simple ‘loading circle’ animation using Photoshop CS6, which you can use on your websites, or before your video projects. This effect is going to take advantage of some of Photoshop CS6′s improved animation capabilities, leaving you with a silky smooth result.
Written
In terms of the size of the document, 1280 x 720 pixels should be large enough for most projects that you’ll be working on, but feel free to start larger or smaller if you wish.
As for the shape of the circle, there’s a very handy custom shape that comes with Photoshop that will work out great for a design like this. Grab the CustomShapeTool from your ToolsBar, then at the top on the OptionsBar, open up the ShapePicker.
By default, this shape may not be available, so you’ll have to load in some additional shapes. Open up the Shape Picker’s menu by clicking on the gear icon at the top right corner, then choose the Shapes pack towards the bottom.
This will allow you to append them to the end of your current list of shapes, or replace them completely.
And when they’ve been loaded in, scroll down until you see the CircleFrame shape.
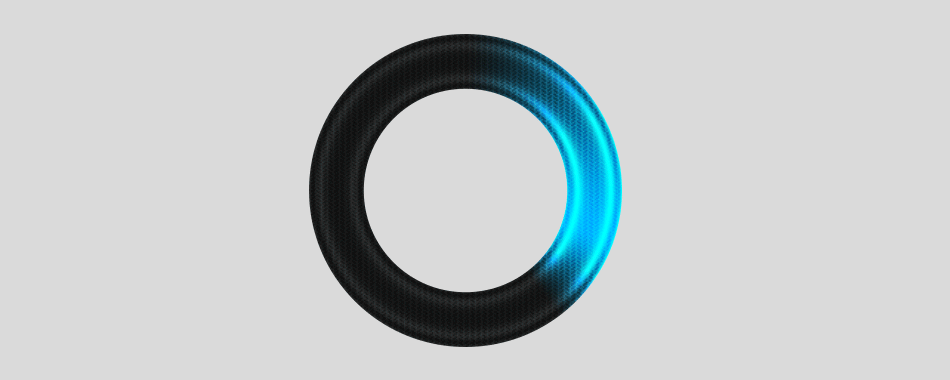
This will give us that donut shape that we’re looking for, which you can then drag out on your document as small or large as you wish. The color of the shape doesn’t matter at this point, as we’re about to add a Gradient Overlay.
And to do that, let’s hop into our Layer Styles with a simple double-click on the new shape that we just created. Let’s start out with the GradientOverlay, which is going to define the colors for our design.
Before changing any colors, you’ll want to set the Style to Angle. This will allow us to create a gradient that will travel around the circle as we adjust the Angle.
Once that’s set, clicking on the GradientBar will bring up the GradientEditor. We’re going to be working with four stops. The two on each end, then two near the left side, which will help define the color of the glow. One is going to be placed around the 30% mark, and one around 40%. Clicking right underneath the bar will add a new stop.
Now, the second stop from the left, the one placed around 30%, is going to be the glow’s color. Let’s set it to blue for this example, but you can choose any color you wish.
The other stops will be set to all the same color. We’ll go with an almost pure black. Once you’ve set one of them, you can simply click on the others, and sample right from the gradient bar.
Good, that’ll complete the gradient. Next, we’re going to add an Inner Glow to add a bit of shine to the circle.
And that will complete the design, nice and simple, and ready to animate.
To begin the animation process, we first need to reveal our timeline. This is usually found at the bottom your workspace, but if it’s not visible, you can activate it under the Window menu.
When it’s visible, you’ll likely need to press the Create Video Timeline button to begin animating. If your button currently says Create Frame Animation, click on the arrow to the right, and choose the Timeline option.
Once the Timeline has been created, you’ll notice that your layers appear in the same order as they do in your Layers Panel, and each layer can be expanded using the arrow to the left. You’ll want to expand the shape layer that we’ve been working on.
Expanding the layer will reveal all the different elements that can be animated. In this case, the Position, Opacity, Style and Vector Mask. Because we’re dealing with Layer Styles, we’re going to be animating the Style element.
Once you’ve identified what you’ll be animating, clicking on the stopwatch icon will create the first keyframe of the animation.
At this point, we want to use the playhead to go to the next point in the animation.
When you’re at the next point in your timeline, the gradient needs to be adjusted, so a simple double-click on the Gradient Overlay Layer Style will open it up.
For the first Angle adjustment, you’ll want to set the Angle to -89 degrees, in order for Photoshop to know which direction to rotate the gradient.
Now when you press okay, a new keyframe will automatically be added to the timeline. Now we can go to the next point by moving the playhead, once again.
This time, when we adjust the Angle value, we’ll want to set it at 92 degrees. Again, this will give Photoshop a nudge as to which direction to rotate the angle.
Now before we play back the animation, you can also set the last frame of the animation by dragging the end-point right to the current position of the playhead.
Now pressing the Spacebar, will playback your animation. The first playback will be a bit choppy, as Photoshop is rendering each frame, but after that, the animation will be silky smooth!
Here’s one more neat advantage of using Photoshop CS6. Layer Styles can now be added to groups, so I go ahead and place this shape layer into a group, then I’m able to further stylize this design, even after it’s been animated. For example, I can add a Pattern Overlay to give it a bit of texture. Photoshop comes with a bunch of nice textures which may work well on a design like this, and of course, you can change the Blend Mode to blend it in nicely.
Again, after applying styles, the first animation will be a bit choppy, but it’s smooth sailing after that! From here, you can export it as a movie file, of save it as an animated gif, if you choose.
And that’ll do it! A simple animated loading circle in Photoshop CS6. As with all tutorials, take what you’ve learned in this video, and make it your own by changing the colors, or adjusting the Layer Styles. Stay tuned for more Photoshop animation tutorials.