Build Your First Node.js Website
Node is a powerful tool to get JavaScript on the server. Use Node to build a great website.
Every now and then, applications require sensitive data such as passwords, database credentials, tokens and keys.
Just like we did when continuously deploying our Docker app to Google Container Engine, you might want to store such records as environment variables away from the codebase.[ADD LINK TO GCP CI/CD ARTICLE]
Introduction to Kubernetes Secrets
A Secret is an object that contains a small amount of sensitive data such as a password, a token, or a key.
Once a user (or the system) creates a secret, it can be used inside a deployment by having a pod reference it.
Built-In Secrets
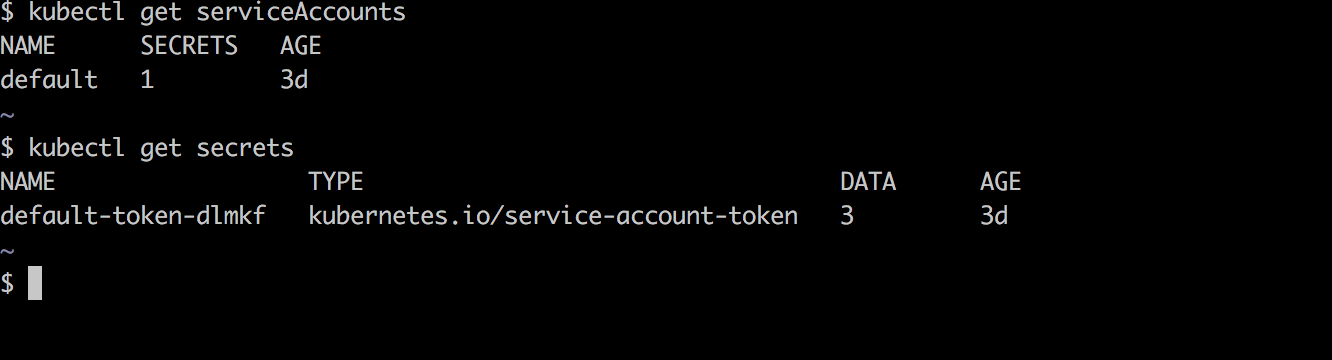
In the previous article, we generated a Service Account and activated our CircleCI build with it. However, we did not need to generate a service account locally when we authenticated our local environment using the gcloud auth login.
This is because Kubernetes generates a default secret that contains the API credentials from the Service Account and exposes it to all pods.
Creating Custom Secrets
To create a custom secret, we will specify all our sensitive records in YAML format, As an extra level of security, each record must be base64 encoded.
To illustrate how to handle secret data. We will be using the Instagram API to get information about a user.
Creating An Instagram Client
Go to the clients manager registration page and create a new client ID.
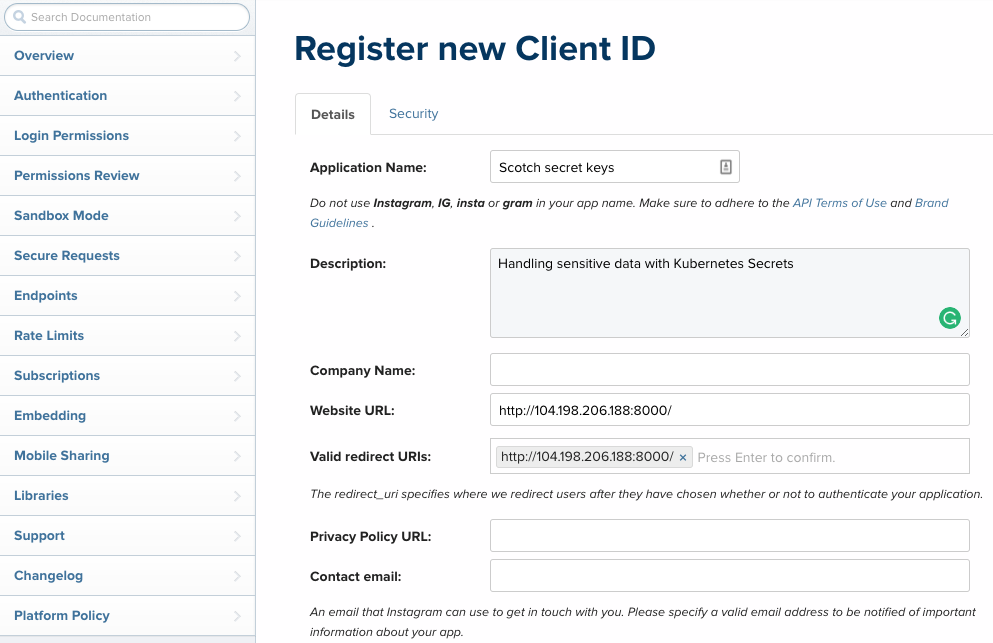
Switch to the Security section and uncheck Disable implicit OAuth to easily create an access token from the Client ID.
Once this is done, Make a GET request to the URL below to Instagram’s authorization URL.
https://api.instagram.com/oauth/authorize/?client_id=CLIENT-ID&redirect_uri=REDIRECT-URI&response_type=token
You will be redirected to a login screen and then a confirmation screen to grant your sample app access to instagram data.
You will get an access token in the redirected URL This is the token that we will be using to make requests to Instagram.
http://your-redirect-uri#access_token=ACCESS-TOKEN.
Encoding the access token
With our access token in hand, let’s go ahead and encode it to base64.
$ echo "your_access_token" | base64
eW91cl9hY2Nlc3NfdG9rZW4K
Creating the Secret
Create a secret.yml file and add the Secret configuration object below. Be sure to keep this file outside your git workflow as you would not want the encoded string being visible to anyone.
kind: Secret
apiVersion: v1
metadata:
    # Name to reference the secret
    name: scotch-secret
type: Opaque
data:
  # Key value pairs of all your senstive records
  access_token: eW91cl9hY2Nlc3NfdG9rZW4K
All the sensitive records will be specified as key/value pairs. Lastly, go ahead and create the secret with the kubectl command.
$ kubectl create -f secret.yml
secret "scotch-secret" created
To list all secrets, run kubectl get secrets. To see the details of our newly created secret, use the kubectl describe command.
$ kubectl describe secrets/scotch-secret
Name:       scotch-secret
Namespace:  default
Labels:     <none>
Annotations:    <none>

Type:   Opaque

Data
====
access_token:   51 bytes
Using The Secrets As Environment Variables From The Pods
Once the secret is created, we have to notify all our running pods that they have access to the secrets. To do this, we will have to edit the spec section of our deployment.yml file by adding the env section and then update the deployment.
apiVersion: extensions/v1beta1
kind: Deployment
metadata:
  name: scotch-dep
  labels:
    #Project ID
    app: scotch-155622
spec:
  #Run two instances of our application
  replicas: 2
  template:
    metadata:
      labels:
        app: scotch-155622
    spec:
      #Container details
      containers:
        - name: node-app
          image: gcr.io/scotch-155622/node-app:0.0.1
          imagePullPolicy: Always
          #Ports to expose
          ports:
          - containerPort: 8000
          env:
          # Name of the environment variable as will be in the Pod
            - name: IG_ACCESS_TOKEN
              valueFrom:
                secretKeyRef:
                    # Name of the secret
                    name: scotch-secret
                    # key of the value stored in the secret
                    key: access_token
Update the deployment by running:
$ kubectl apply -f deployment.yml
deployment "scotch-dep" configured
Our application should now have access to the environment variable as process.env.IG_ACCESS_TOKEN. Let’s try that out next!
Adding An Instagram Route
To make a HTTP request to the instagram endpoint, install needle, a HTTP client for NodeJS, and require it in index.js.
npm install --save needleLast but not least, let’s make a GET request to your personal profile in a new route.
index.js
...
//Get your Instagram profile
app.get('/my_ig', (req, res) => {
  needle
    .get('https://api.instagram.com/v1/users/self/?access_token=' + process.env.IG_ACCESS_TOKEN,
    (err, response, data) => {
      res.status(200).json(data);
    })
});
...
And we should be ready to see Kubernetes secret in action! Push the updates to Github and once CircleCI builds and rolls out an update to our application. Visit the /my_ig route.
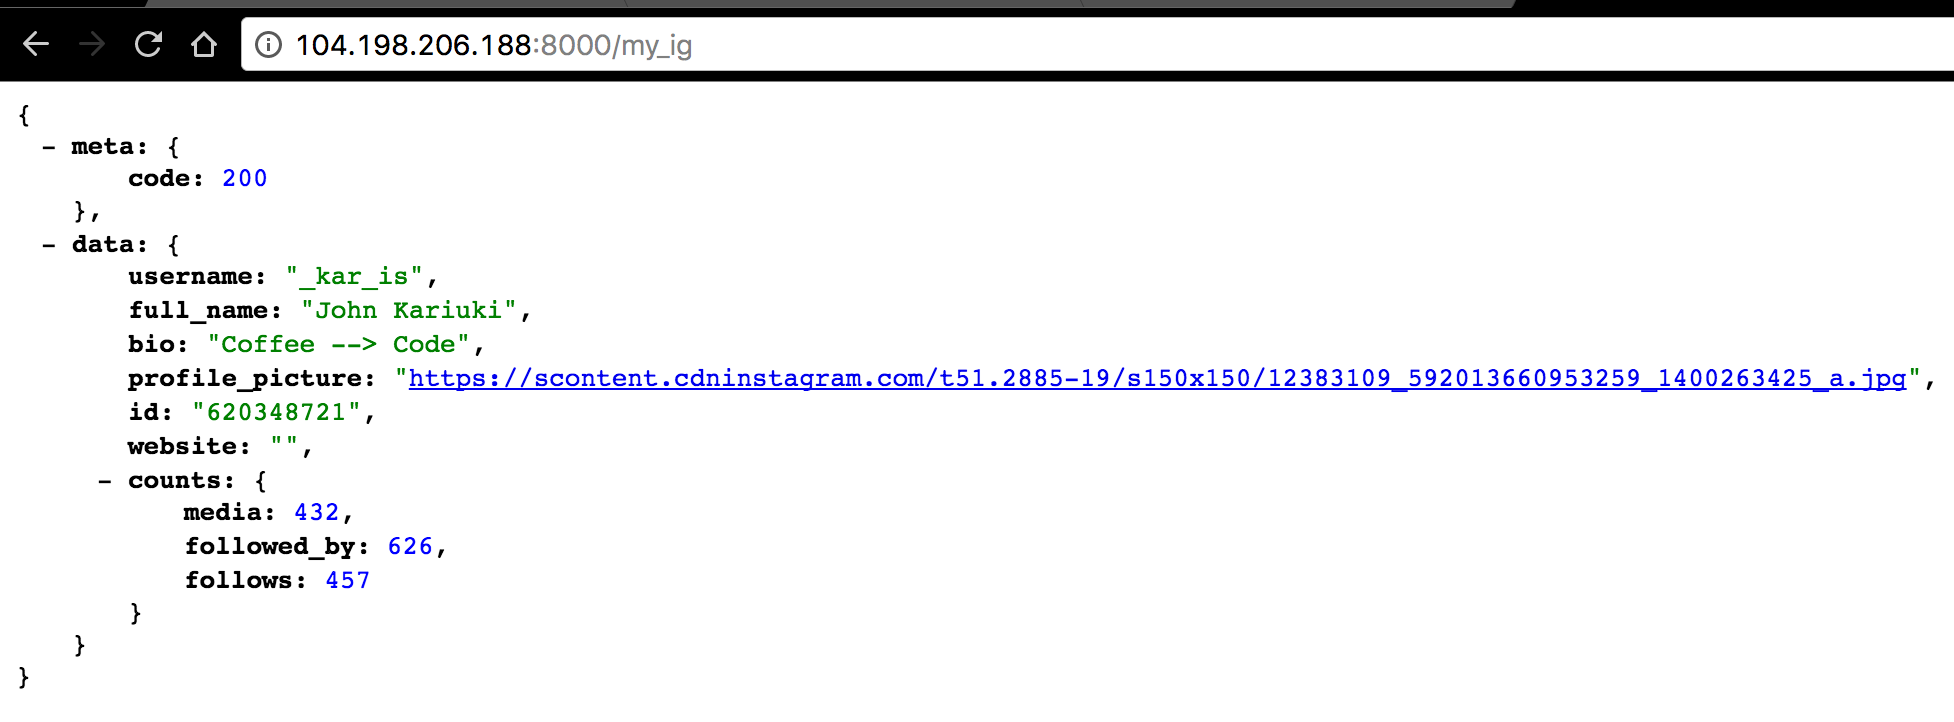
Bam! There is my Instagram profile! Well this would only mean that our access token was exposed to the pod!
Directly Interacting with Pods
Once in a while you may want to play around with the Pods by either remotely accessing them or simply viewing the stdout/stderr of a running process.
To interact with a pod . Simply get the pod name by running kubectl get pods and use the exec command to ssh into the pod.
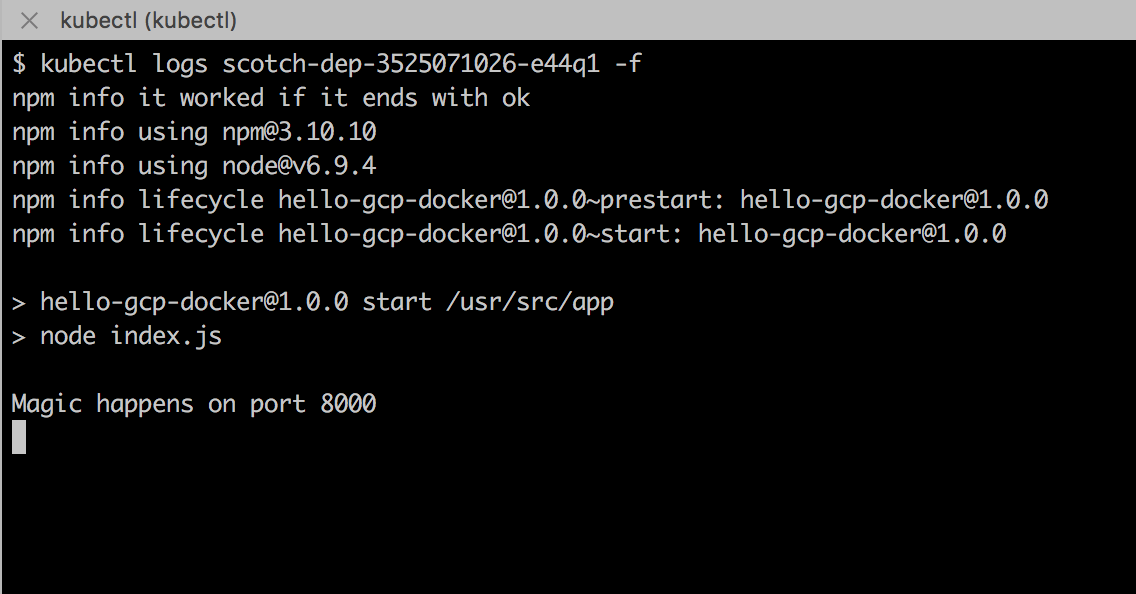
$ kubectl exec -i -t scotch-dep-3525071026-e44q1 sh
/usr/src/app #
Type exit to exit the container.
To view the stdout/stderr of a running pod. Simply type kubectl logs {pod_name}. Optionally, You can add the -f flag to keep streaming the logs.
Caveats
Before a secret volume is used in a pod, the secret has to exist, otherwise, an error is thrown. Make sure a secret is created before a pod is updated to use it.
Secret API objects reside in a namespace. They can only be referenced by pods in that same namespace.
Individual secrets are limited to 1MB to avoid overloading the kubelet but you can create multiple secrets.
Secrets are created independently from the pods so there is less risk of the secret being compromised as long as the secret.yml configurations are not exposed in the workflow, say Github.
Conclusion
In this article, we took a look at how to handle sensitive data such as access tokens in Docker applications using Kubernetes secrets. This should set you on the path of securely storing data that you would not want being exposed to the public.
The Kubernetes team is still working on ways to improve the security of secrets before, during and after creation. While there are a few loopholes or gaps that need to be improved on, this is a very solid provision of the kubernetes platform.