

In this quick tip tutorial, you will learn how to add Type on a Path in Adobe Illustrator. This is handy for logos and badges. So let’s get to it!
Text Around a Circular Path
Let’s start with the badge scenario. The first thing you need to do is create a baseline for the text to follow. Create either a circle or part of a circle within the badge. Your choice will depend on how much text you have and how far you would like it to wrap around the circle.

After you create your path, click on it using the either the Type Tool or the Type On A Path Tool. If you are working with a closed path, such as a circle, your only option is the Type On A Path tool. Click on the path and a blinking cursor will appear. Enter your text.
In some cases, the text will not fit on the curve. Notice the square box with a plus (+) symbol in it? That indicates that there is more text than path. No worries! This is easily remedied.

The first thing I like to do is to give the text some breathing room. Click on the text with the Selection Tool. This will allow you to see the left, center and right alignment brackets. Using the Selection Tool again, drag the left bracket to the far left of the path and the right bracket to the far right. Now you have access to the entire path.

If your text is still falling off the path (indicated by the square box with plus (+) symbol that stubbornly refuses to disappear), you will need to adjust the size, spacing, or horizontal scale of the font to fit it along the path. Sometimes it’s as simple as using a different font. In this example, I changed both the font and the point size. The text now fits along the path perfectly.

Now that the text is in place, you will probably want to fine tune it further. Do you want the text centered? Right adjusted? Left adjusted? Simply select the text and format it the same way you would any other text using the Control panel, the Paragraph panel, or the Character panel. Alternatively, grab alignment brackets and slide them until your text sits exactly where you want it. You can also add spaces and adjust the kerning.
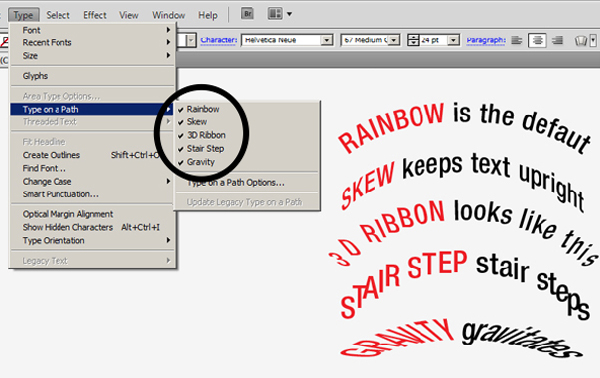
Path Options
There are several different effects you can apply to text on a path. To apply them, select the path and go to Type > Type On A Path > Type On A Path Options. Below are examples of how each option affects type on a path.
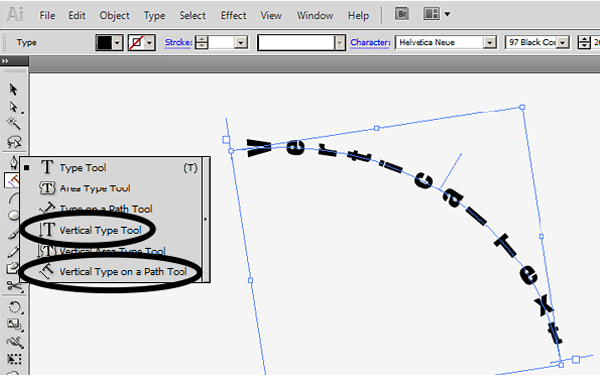
Vertical Text
So far, I’ve only shown you how to apply horizontal text. You can also create vertical text on a path. Select either the Vertical Type Tool or the Vertical Type On A Path Tool. Then, click on your path and start typing.
Adjust the Vertical Alignment of Type on a Path
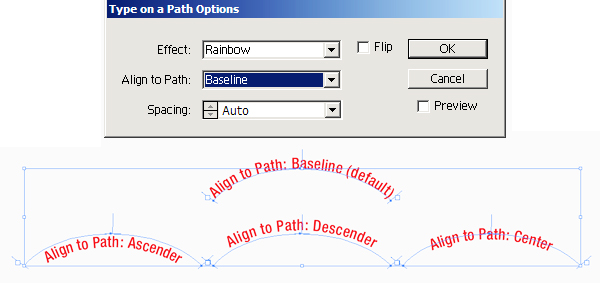
You don’t like where your text sits on the path? No problem! Select the path. Then, choose Type > Type On A Path > Type On A Path Options. In the Align To Path menu choose one of the following options: Ascender, Descender, Center, or Baseline (the default alignment).
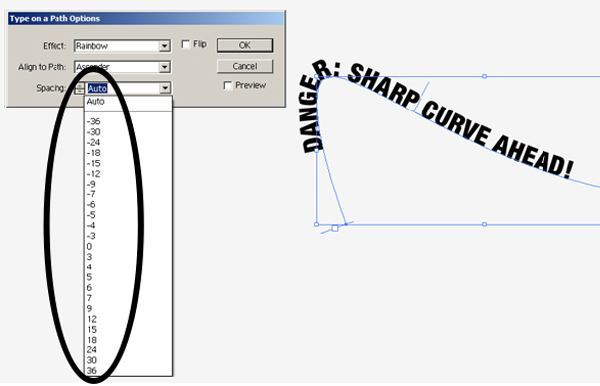
Adjust Character Spacing Around Sharp Curves
Sometimes text doesn’t flow smoothly along a path. Tight curves are especially vexing. When this happens, you will have to either adjust the curve or adjust the text.
Select the path. Then, choose Type > Type On A Path > Type On A Path Options. Enter a value or choose from the values provided. The higher the number, the more space that is removed between characters. When you are working with extremely tight angles, fine tuning can be a very tedious process. Sometimes it’s easier to either adjust the curve or slide the text along the path until it sits comfortably.
Flipping Text
What if you don’t want your type to run on top of the text path you created? Flip it! It’s as simple as grabbing one of the alignment brackets and pulling it to the other side of the path. You can also flip text by going to Type > Type On A Path > Type On A Path Options and selecting Flip.
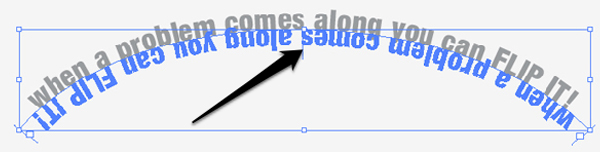
Sometimes text flips when you don’t want it to flip, which can be quite annoying. To avoid accidentally flipping text, hold down Control (Windows) or Command (Mac OS) while you move the text.
Conclusion
Now that you know the ins and outs, ups and downs, and curves and swerves of creating text on a path, you will be able to tackle your next text on a curve project with ease. Spice up your next project by throwing in a few lines of text on paths!