In the earlier parts of this series, we looked at the tables in the WordPress database and the relationships between them.
In this part I’ll cover a table which is different from the others – the wp_options table. As you can see from the diagram below, this is the only table which sits on its own:
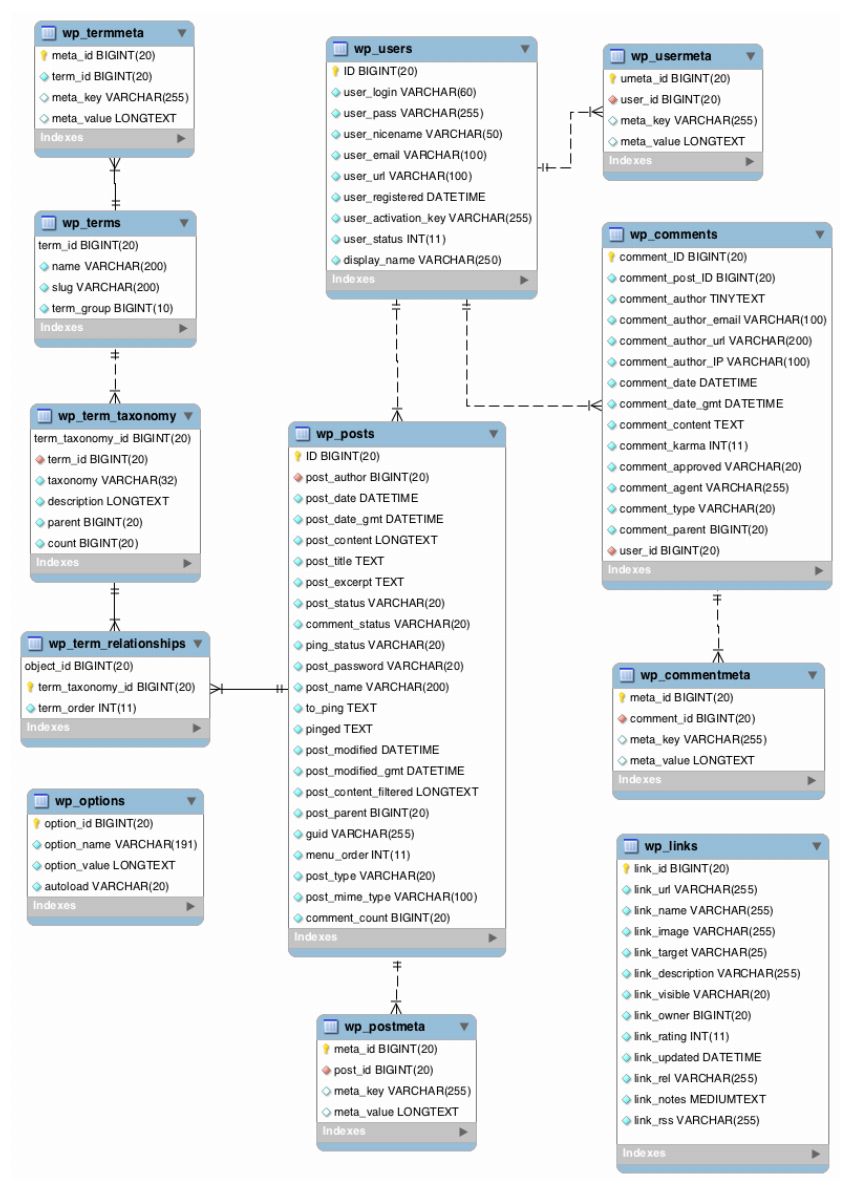
The options table stores a different kind of data from the other tables: instead of storing data about your site’s content, it stores data about the site itself. Data is written to the options table using the Options API or the Settings API, both of which consist of a set of functions used to add, update and delete data from this table.
You can add values to existing options and you can also add new records to the table when you want to create new options.
In this tutorial I’ll look at different aspects of the options table and how you interact with it:
- Access to the
wp_optionstable - Structure of the
wp_optionstable - Populating the
wp_optionstable - The Options API
- The Settings API
I will just give an overview of the APIs and how they interact with the options table – if you want to learn more, read Tom McFarlin’s series on the Settings API.
Access to the wp_options Table
As the wp_options table stores data which is related to the setup and administration of the site as a whole, access to it is restricted. To be able to amend settings and options, users will need to have the manage_options capability. The only default user role with this capability is the administrator role (and in Multisite, the network administrator or the super admin role).
This means that if you need to add options that other user roles have access to, you’ll have to assign the manage_options capability to them. This carries risks, so only do it if you’re sure!
The options stored in the wp_options table come from the values that you have set under Administration > Settings inside the WordPress admin dashboard. This includes general settings like the site title, tagline etc. It also stores options related to reading, writing, comments, media, permalinks etc. on the website.
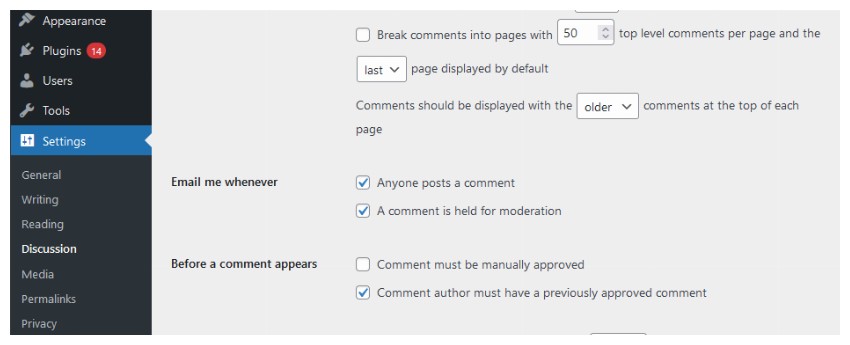
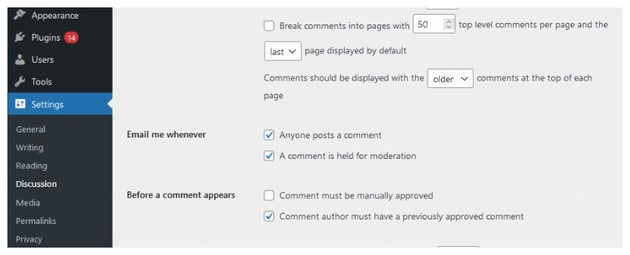
Some other plugins that you have installed might also use this table to store their configuration options.
Structure of the wp_options Table
The options table has a similar structure to the three metadata tables. It has four fields:
option_IDoption_nameoption_value-
autoload– specifies whether the option is automatically loaded on each page load. This defaults toyesin a single site installation andnoin Multisite.
Each record in the option_name field will be a unique value. If you add more than one value to an option, WordPress stores this in an array in the option_value field. A good example of this is the active_plugins option, which stores an array of plugins activated on your site.


When adding, editing or deleting data in the wp_options table, you must always specify the option_name, as I’ll show later in this tutorial.
Populating the wp_options Table
The wp_options table is populated from one of three sources:
- the default Settings screens
- theme options screens
- settings and options screens which you add via plugins
There are a number of options built in to WordPress – you can see all of these in the Option Reference. But you can also create your own.
To create new options in your theme or plugin, you would use the Options API or the Settings API. I’ll cover these in more detail below.
Using the Options API
The Options API consists of eight functions which allow you to add, get, update or delete options:
| Function | Parameters | Notes |
|---|---|---|
add_option() |
$option, $value, $deprecated, $autoload
|
Only $option is required. If there’s an existing record with your $option parameter as the value of its option_name field, WordPress will add your $value to an array in the option_value field for that record, otherwise it will create a new record. |
delete_option() |
$option |
Deletes all fields for that option |
get_option() |
$option, $default
|
$default (optional) is the default value to return if no value is stored against the option in the database. |
update_option() |
$option, $new_value, $autoload
|
$new_value is the value which will populate the option_value field |
add_site_option() |
$option, $value
|
Similar to add_option() but adds the option network-wide in Multisite (meaning that the option is stored in the wp_options table and not the wp_XX_options table where XX is the site ID). $autoload is not included as site options do not autoload in Multisite and this cannot be overridden. |
delete_site_option() |
$option |
The same as delete_option() but works network-wide in Multisite. |
get_site_option() |
$option, $default , $use_cache
|
Similar to get_option() but retrieves the network-wide option in Multisite. |
update_site_option() |
$option, $value
|
Identical to update_option() but works network-wide in Multisite. |
There are some other important points worth keeping in mind when you use these functions:
Using the add_option() function, you can create records with no value in the option_value field. This allows site administrators to populate that field at a later time. This function also performs a check to confirm that you aren’t adding a protected WordPress option.
You cannot use the delete_option() function to remove protected WordPress options. This function returns true if the deletion was successful and false otherwise.
The get_option() function will return false if the option is not stored in the table and you haven’t provided a default value during the function call.
The update_option() call will create a new option if the one you are trying to update doesn’t already exist. Also remember that you can change the autoload value of an option using this function only if you updated the value of the option itself.
Using the Settings API
As well as the Options API, you can also use the Settings API to interact with data in the wp_options table. The Settings API lets you create settings which site administrators can use to add or update data in the options table. In other words, it adds a user interface for site administrators to access your options.
The Settings API has more to it than the Options API so I won’t cover it in detail here, but essentially it has three elements:
- the setting (the data in the
wp_optionstable) - the field (which is used to add and edit data)
- the settings section, which is a group of related fields.
The two functions in the Settings API which interact directly with the wp_options table are as follows:
| Function | Parameters | Notes |
|---|---|---|
register_setting() |
$option_group, $option_name, $args
|
The $option_name parameter refers to the option_name field in the wp_options table. The other parameters interact with other functions in the Settings API |
unregister_setting() |
$option_group, $option_name
|
It will de-register settings from the wp_options table. It is normally used with deactivation hooks for themes or plugins. |
These functions don’t add values to the options in the wp_options table, but they create settings which can then have values added to them via other functions in the Settings API.
You should know that the third parameter in both register_setting() and unregister_setting() was a callback function in the past. However, the third parameter in register_setting() now accepts an array of arguments while the third parameter in unregister_setting() is now deprecated.
The optional third parameter in register_setting() contains description of the setting that you want to register such as the type of data, call callback function to sanitize the option value, default value when get_option() is called etc.
Summary
The wp_options table is unique among WordPress database tables in that it doesn’t share a relationship with any of the other tables. This is because it stores data about the site or network, and not the content. To interact with the options table, you can use the functions in the Options API or the Settings API, and you can also make use of functions which add data network-wide in a Multisite insulation.
In the final part of this series I’ll look at Multisite, as it uses some additional database tables which have not been covered so far in this series, and also creates multiple instances of each of the core tables, one for each site.