With this tutorial I’ll show you how to create a Bazinga text effect made famous by Sheldon from the sitcom The Big Bang Theory in Adobe Illustrator. We’ll be using some techniques to add multiple effects to a single shape, also duplicating and copying objects quickly, as well as creating a pattern and even rotating that pattern without disrupting the shape it’s applied too.
Tip: Please be aware that you may have to install fonts before you open Illustrator in order for it to show up in your list of fonts.
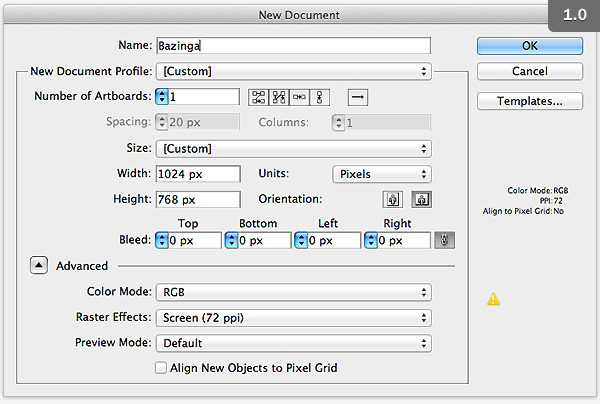
1. Create a New Document
Let’s start off by preparing our document. Open Illustrator and hit Command + N to create a New document. You can make your document any size but for this tutorial I’ll be using a default desktop wallpaper size so enter 1024 in the width box and 768 in the height box then click on the Advanced button. Select RGB, Screen (72ppi) and make sure that the Align New Objects to Pixel Grid box is unchecked before your click OK.
2. Create Your Base Shapes
Step 1
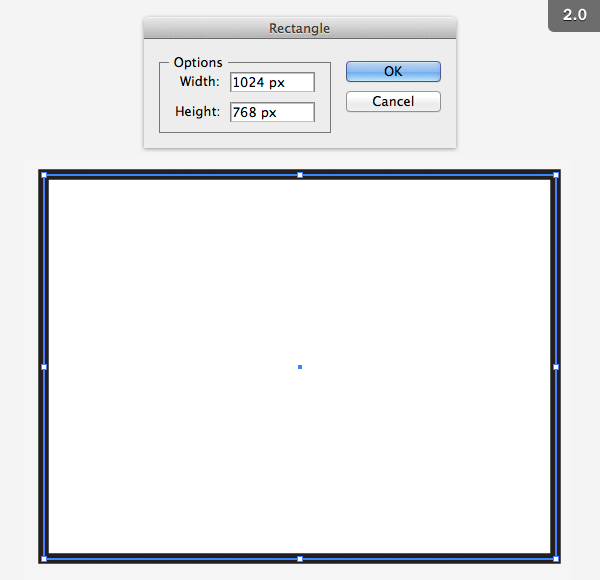
Now we’ll create the very background color that our text will fit ons. Select the Rectangle Tool (M) from the toolbar then click anywhere on the canvas to create a rectangle the same dimensions of the canvas 1024 x 768px. Once the rectangle is made enable the Selection Tool (V) from the toolbar and drag it to fit inside the document canvas. Don’t worry about being too exact with the placement. In a few steps we’ll align the background perfectly with the artboard.
Step 2
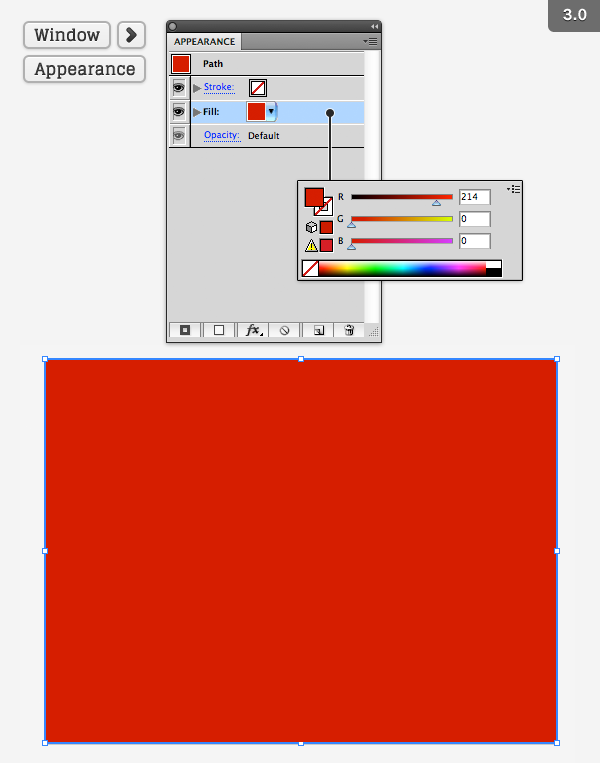
With the rectangle created let’s style it. While the rectangle is still selected, navigate to the Appearance panel (Window > Appearance) and remove the Stroke item by dragging the item to the trash icon at the bottom of the panel. Now select the Fill item and fill it with a red color as outlined below.
Step 3
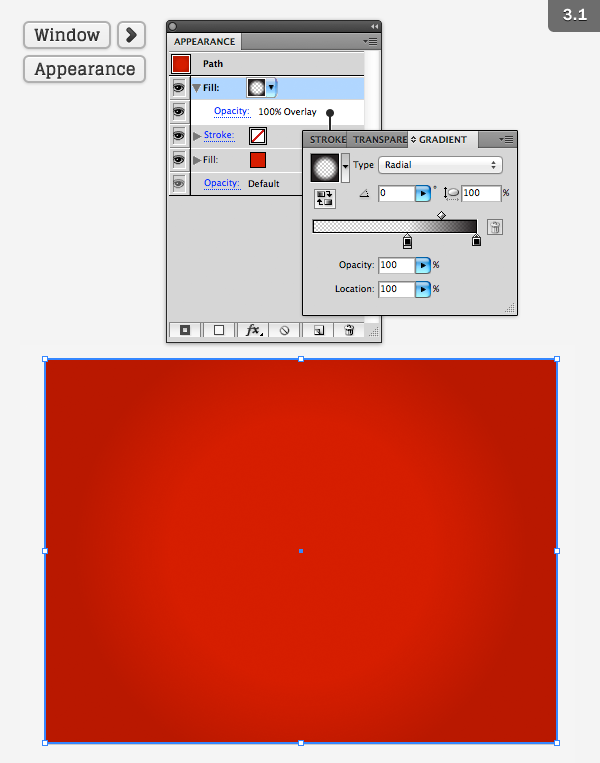
You’re welcome to stop here but let’s give the background some depth and also add a gradient. While in the Appearance panel (Window > Appearance) click the Add New Fill button at the bottom of the panel. This will create another red fill layer but we’ll change this now. Navigate to the Gradient panel (Window > Gradient) and create a opaque to transparent black radial gradient with the following attributes.
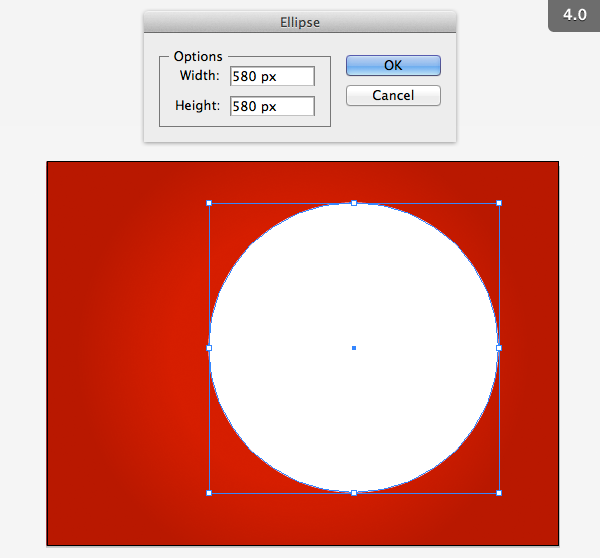
3. Draw a Circle Central to the Artboard
Step 1
To finish the background select the Ellipse Tool (L) then click once on the document and create a circle 580px wide and 580px high. Let’s then change the color to plain white.
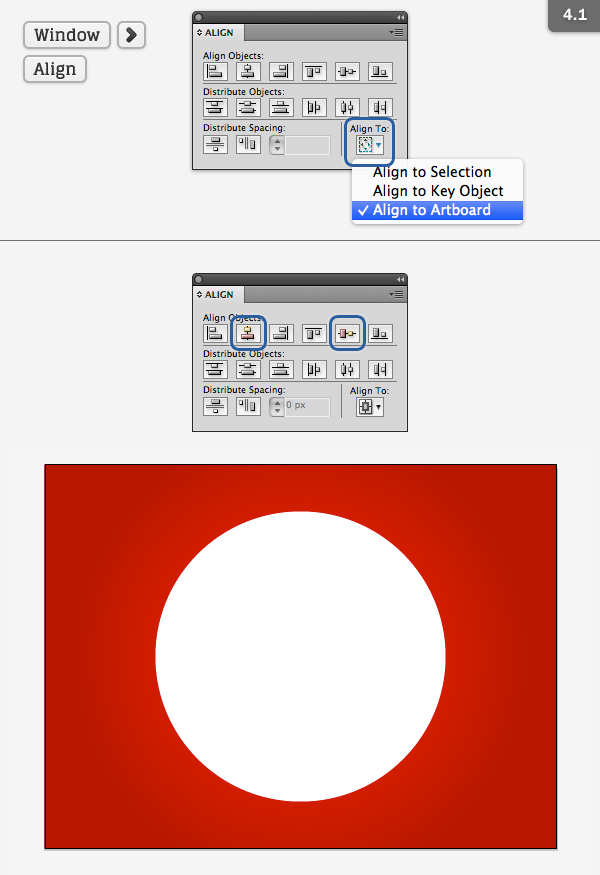
Step 2
We’ll need to center the circle inside our rectangle shape now. To do so enable the Selection Tool (V) then SHIFT-CLICK both of our shapes to select them both. Now navigate to the Align panel (Window > Align) and select the Align to button in the lower right of the panel and choose the Align to Artboard option from the menu that appears. Now, under the Align Objects header choose the second button from the left labeled Horizontal Align Center Then select the second button from the right labeled Vertical Align Center.
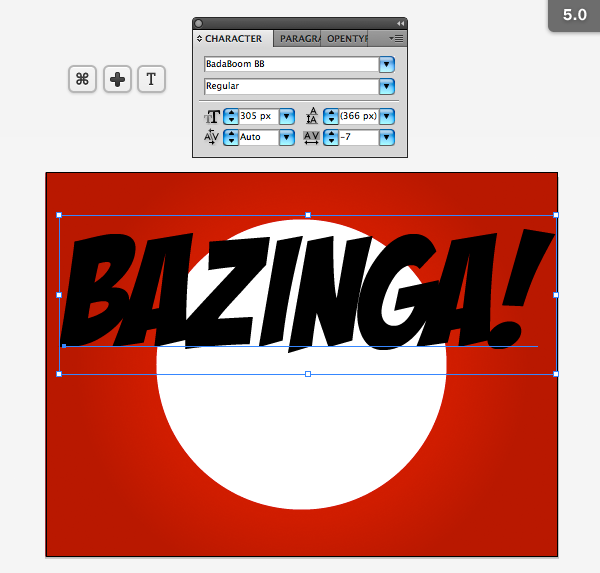
4. Add Your Text
With our background out of the way let’s get to the fun stuff, the text treatment! We’re using a free font available from dafont.com called “Badaboom BB“, which you can download here. Select your Type Tool (T) then click on the artboard and write out “BAZINGA!” in all caps. Be sure not to get too near any of the background shape edges or else your text will try to adhere to that shape. Once your text is written navigate to the Character panel (Window > Type > Character) then choose your font and change the Font size to 305px and the Tracking to -7.
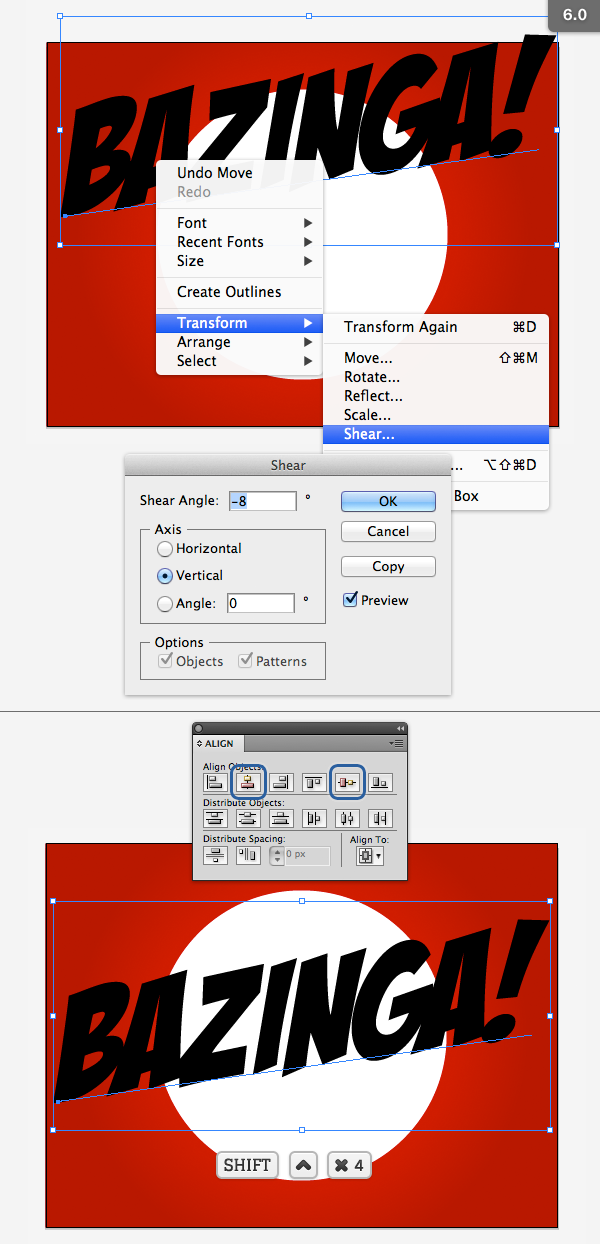
5. Shear and Centralise Your Text
Now we’ll adjust the angle our text is on. Enable the Selection Tool (V) and RIGHT CLICK with your mouse over the text and choose Transform > Shear from the menu that appears. When the Shear panel opens enter the options indicated below. Let’s also align the text to the correct place in the document by navigating to the Align panel (Window > Align) and select the Align to button in the lower right of the panel and choose the Align to Artboard option from the menu that appears. Now, under the Align Objects header choose the second button from the left labeled Horizontal Align Center Then select the second button from the right labeled Vertical Align Center. Then while holding SHIFT on your keyboard press the UP arrow on your keyboard four times to nudge the text up 40 pixels.
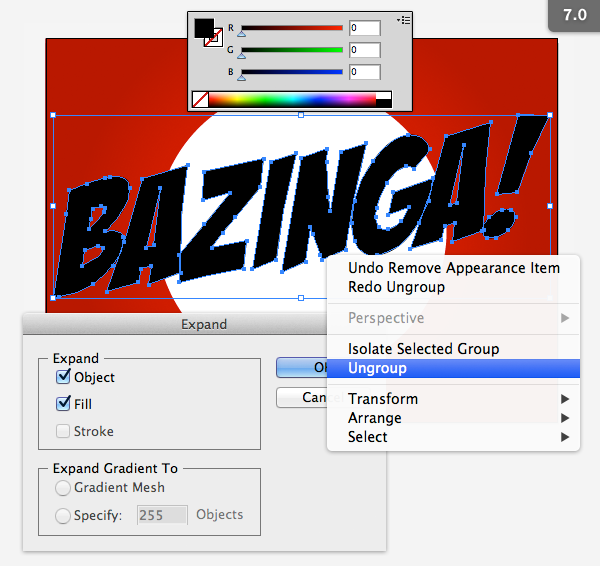
6. Adding Style to Expanded Text
Step 1
Once our text is in place navigate to the Appearance panel (Window > Appearance) adjust the Fill item to black. Next, enable the Selection Tool (V) and choose Object > Expand to expand the text to shape layers. Then RIGHT CLICK on the text and choose Ungroup.
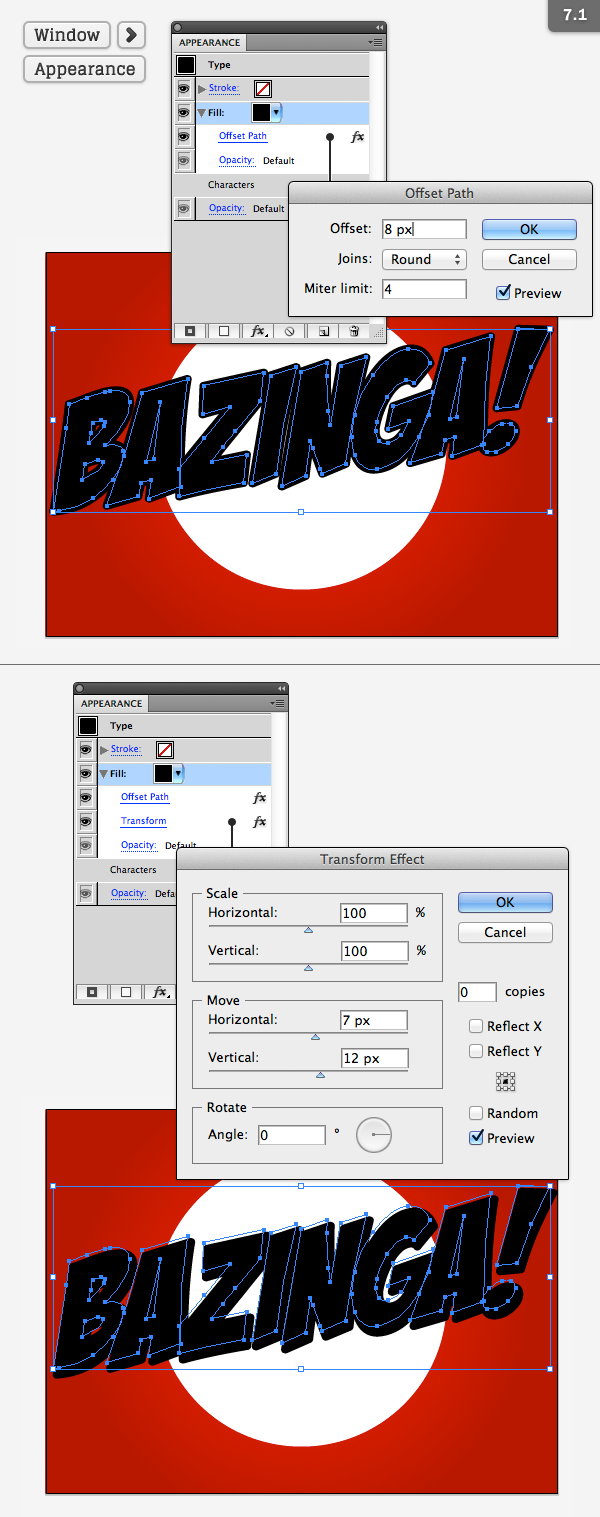
Step 2
Go back to the Appearance panel (Window > Appearance) and select the black Fill item. Click the Add New Effect button (it looks like the letters “fx”) on the bottom of the Appearance panel then select Path > Offset Path and enter the attributes outlined below. Click the Add New Effect button again and choose Distort & Transform > Transform and enter the attributes as seen below.
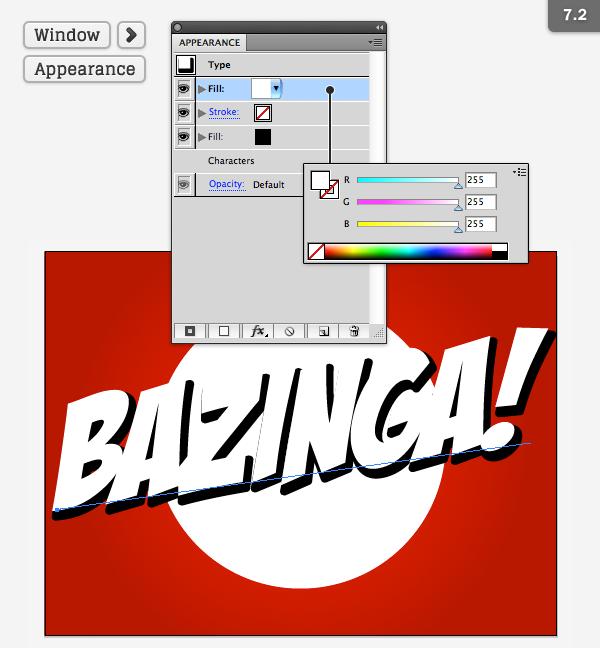
Step 3
Let’s add another Fill item. In Appearance panel (Window > Appearance) select the Add New Fill button at the bottom of the panel. Fill this item with a flat white color as outlined below.
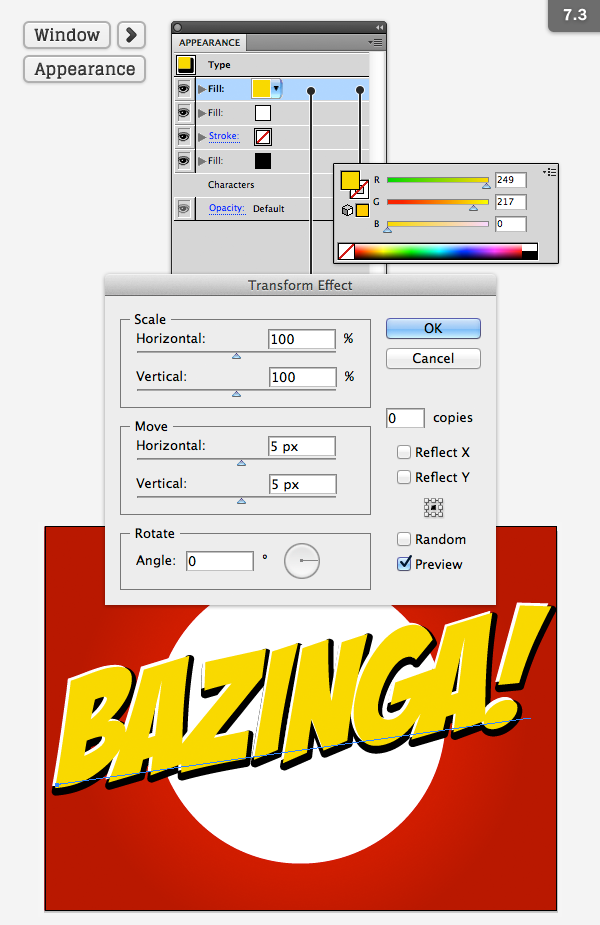
Step 4
Once again we’ll add a Fill item. In Appearance panel (Window > Appearance) select the Add New Fill button at the bottom of the panel. Fill this item with a nice mustard yellow color as outlined below. Now click the Add New Effect button and choose Distort & Transform > Transform and enter the attributes as seen below.
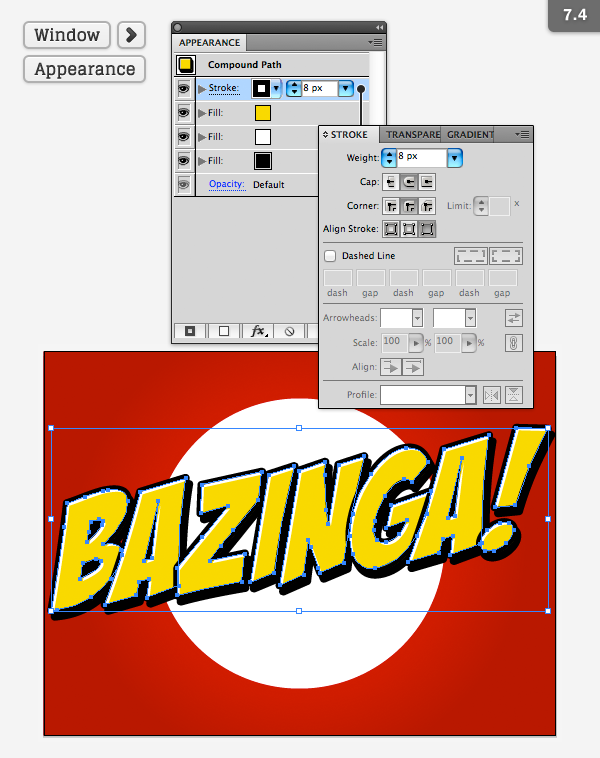
Step 5
Now in the Appearance panel (Window > Appearance) locate the Stroke item and click and drag it to the top most spot in the Appearance panel if it isn’t already there. Navigate to the Stroke panel (Window > Stroke) and adjust the attributes as seen below.
7. Creating a Simple Geometric Pattern
Step 1
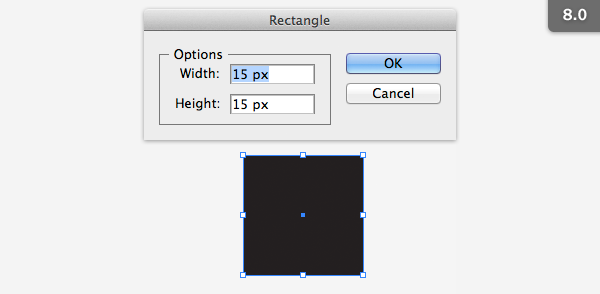
To help add some extra pizazz to the text we’re going to create and apply a pattern. To create our pattern let’s select our Rectangle Tool (M) then click on the artboard and create a 15 x 15px square filled with flat black.
Step 2
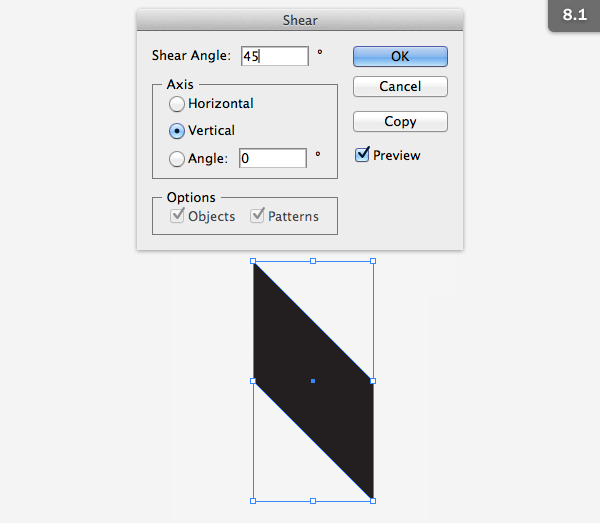
With our square created enable the Selection Tool (V) and select the square by clicking on it. Then RIGHT CLICK the square and choose Transform > Shear then enter the following attributes.
Step 3
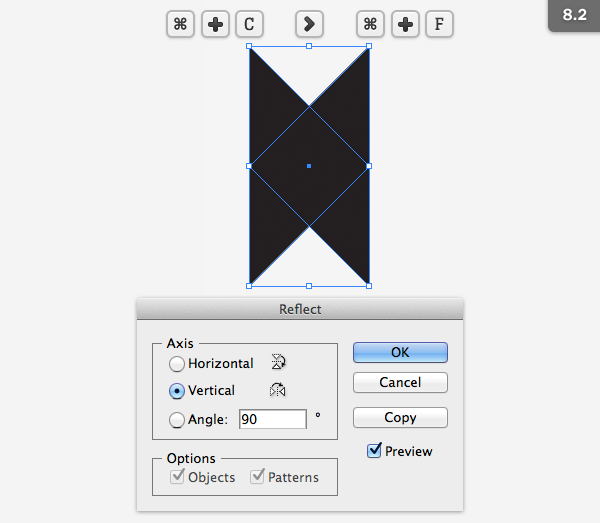
With the shape still selected we’ll Copy it (Command + C) then Paste in Front (Command + F). Then RIGHT CLICK on the shape and choose Transform > Reflect and enter the following attributes.
Step 4
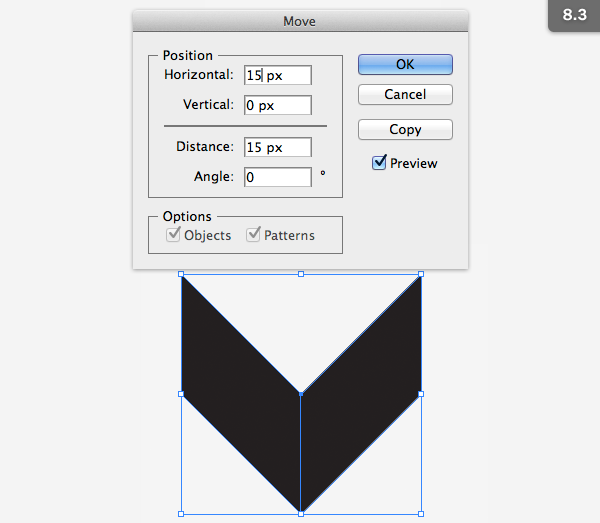
Now that the shape is flipped, RIGHT CLICK it one last time and choose Transform > Move and enter the following attributes.
Step 5
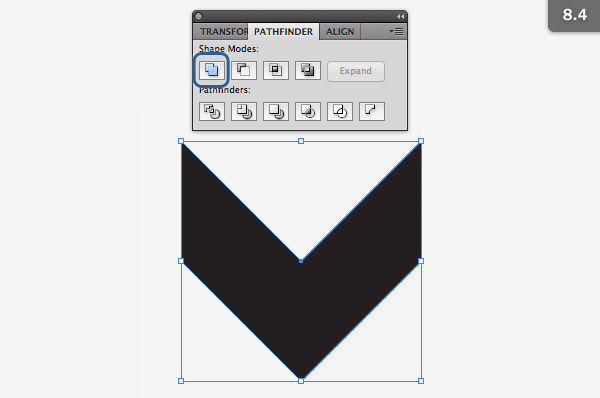
Now SHIFT-CLICK both shapes and navigate to the Pathfinder panel (Window > Pathfinder) then click the first option under the Shape Modes header titled Unite. Both objects should now be joined in to one.
Step 6
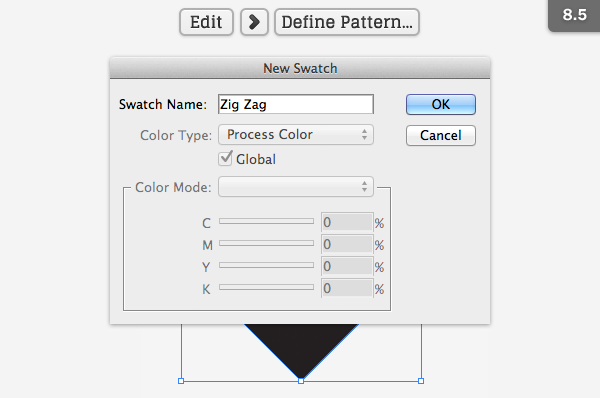
Finally, with the combined shape select Edit > Define Pattern and name your pattern as you see fit. We’ve now completed our pattern! You can delete this chevron shape now and return to your text.
8. Add the Pattern to the Text
Step 1
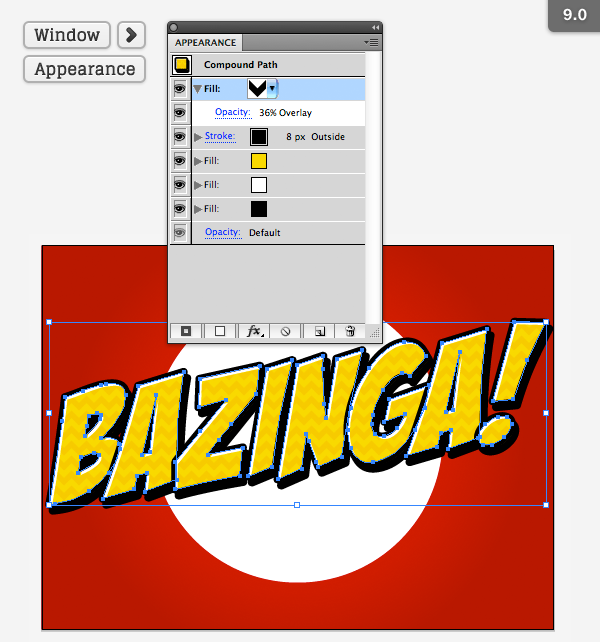
Let’s reselect all the text by SHIFT-CLICKING each shape then navigate to the Appearance panel (Window > Appearance) and click the Add New Fill button at the bottom of the panel. Locate the newly created pattern from the Swatches panel and apply it to this Fill item then select the Blending Mode to Overlay and drop the Opacity to 36%.
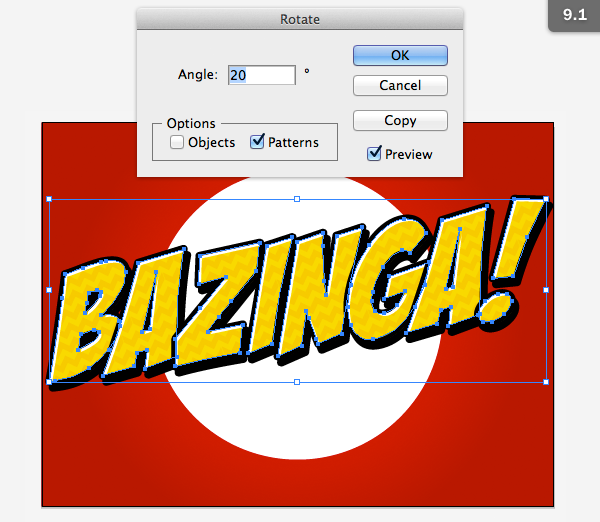
Step 2
To finish off the text effect we’ll RIGHT CLICK on the text and choose Transform > Rotate and enter the following attributes. Be sure to deselect Objects so as to ensure you’re only rotating the pattern and not the text itself.
9. Add a Lightening Bolt
Step 1
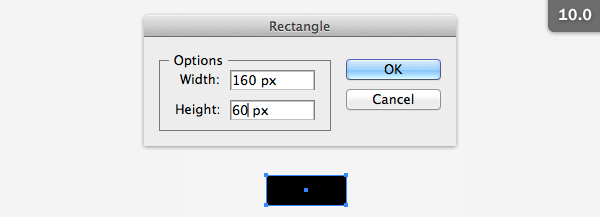
Let’s wrap up this tutorial by creating the lightening shape below the text. Select the Rectangle Tool (M) then click on your artboard and create a rectangle that is 160 pixels wide by 60 pixels high.
Step 2
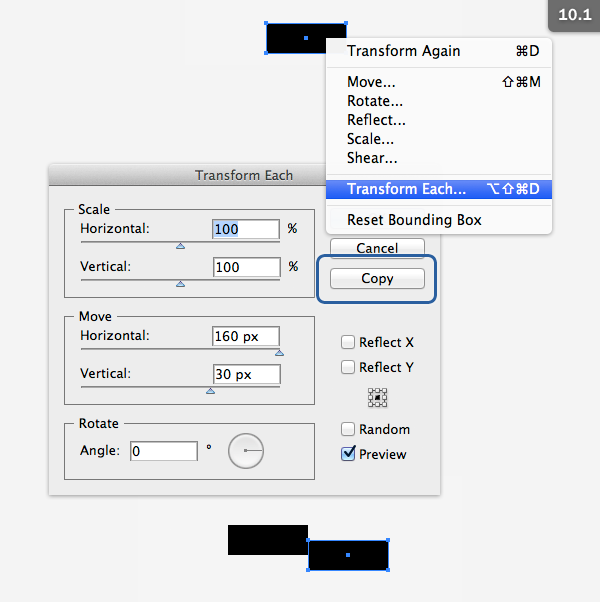
Now let’s duplicate and transfer this shape to create a total of six rectangles. To quickly duplicate and move the rectangle we’ll need to use the Transform Each tool. With the rectangle we just created still highlighted, RIGHT CLICK on the rectangle and choose Transform > Transform Each then enter the following parameters and click Copy, not OK. Clicking OK will simply move the rectangle, but clicking Copy will move and duplicate it.
Step 3
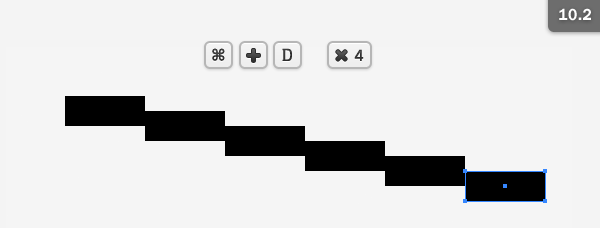
We should now have two rectangles side by side forming a step shape. This new rectangle that was created should be selected so let’s RIGHT CLICK on the rectangle and choose Transform > Transform Again. Repeat the Transform Again step four more times until you have six rectangles forming a elongated staircase.
Step 4
Enable your Selection Tool (V) and drag a selection over the six rectangles to select them all simultaneously. Then navigate to the Pathfinder panel (Window > Pathfinder) and click the first option under the Shape Modes header titled Unite. All objects should now be joined in to one.
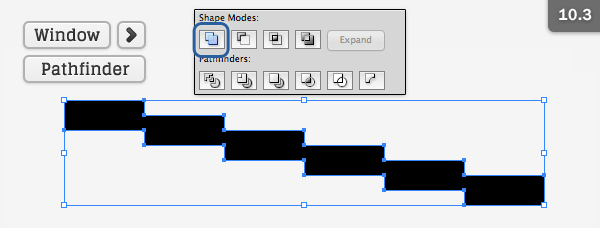
Step 5
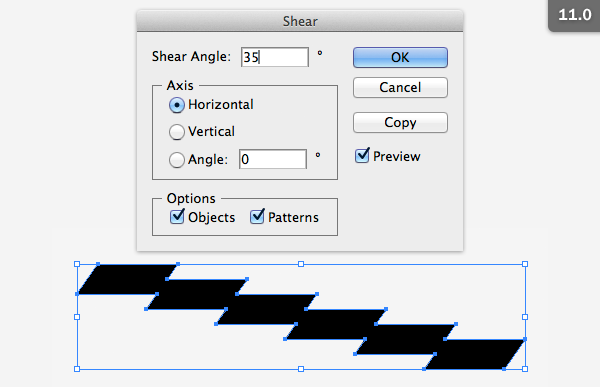
With the staircase shape still selected, RIGHT CLICK on the shape and choose Transform > Shear and enter the attributes outlined below.
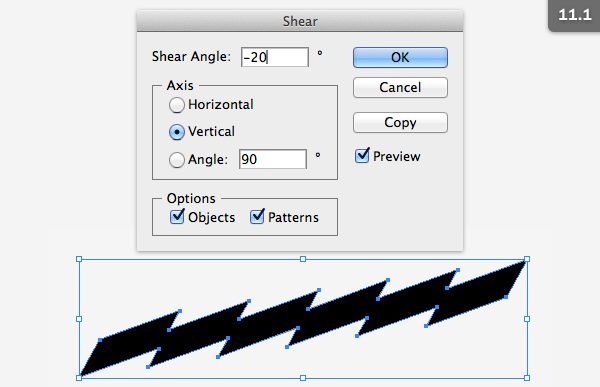
We’ll repeat this shearing step only we’re going to change up the angle. Once again RIGHT CLICK on the shape and choose Transform > Shear and enter the attributes outlined below.
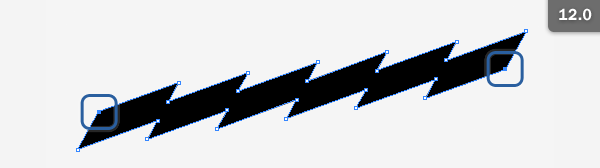
Step 6
To finish it off let’s enable our Direct Selection Tool (A) and select point on the top right of the shape and also the bottom left of the shape. Once these points are selected press DELETE (backspace) on your keyboard.
Step 7
This will leave us with an open pathed shape that we will need to remedy. To do do navigate to the Object > Path > Join to close the end of the path. Do this twice to close both ends of the shape.

10. Position the Lightening Bolt
Now let’s move the lightening bolt into its final position. Navigate to the Align panel (Window > Align) and select the Align to: button in the lower right of the panel and choose the Align to Artboard option from the menu that appears. Now, under the Align Objects: header choose the second button from the left labeled Horizontal Align Center Then select the second button from the right labeled Vertical Align Center. Then while holding SHIFT on your keyboard press the DOWN arrow on your keyboard 15 times to nudge the shape down 150 pixels.

Congratulations, Now You’re Finished!
I hope I was able to show you a few techniques in Illustrator that you can use else where in your vector life. Feel free to play around with this effect and add to it as you like. I hope you have a devious April Fools day!
