

One of best cool features of CSS3 is that it reduces the use of images in web designs and allows you to create different shapes in CSS. Commonforms that you usually see in Photoshop or Illustrator can now be done using CSS3. New CSS properties like transform and border-radius add complexity with shapes instead of creating them in drawing applications.
In today’s tutorial, let’s create a simple list of the most common shapes that can be done using CSS3.
Resource you need to complete this tutorial
- Knowledge in CSS3
- Time and Patience
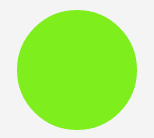
Circle
HTML
To create a circle in CSS, first we need a div and give it an ID name of the shape. So for this example, set circle as the ID name.
<div id="circle"></div>
CSS
For the CSS, simply put a width and height and then give it a border radius half of the width and the height.
#circle {
width: 120px;
height: 120px;
background: #7fee1d;
-moz-border-radius: 60px;
-webkit-border-radius: 60px;
border-radius: 60px;
}
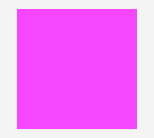
Square
HTML
To create a square shape in CSS, just like the circle shape, we need a div and give it an ID name of the shape. So, for this example, set square as the ID name.
<div id="square"></div>
CSS
For the CSS of square, simply set up a width and height of equal value and provide a value making it look visible.
#square {
width: 120px;
height: 120px;
background: #f447ff;
}
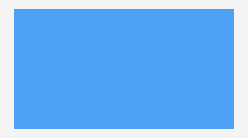
Rectangle
HTML
To create a rectangular CSS shape, just like the square shape, set-up a div with the ID name rectangle.
<div id="rectangle"></div>
CSS
Just like the square shape, we will put a simple width but this time larger than the height.
#rectangle {
width: 220px;
height: 120px;
background: #4da1f7;
}
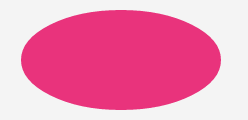
Oval
HTML
To create an oval in CSS, create a div with the ID name oval.
<div id="oval"></div>
CSS
Oval is almost similar with circle shape; however, the oval is rectangular in shape and will need a radius that is half of the height.
#oval {
width: 200px;
height: 100px;
background: #e9337c;
-webkit-border-radius: 100px / 50px;
-moz-border-radius: 100px / 50px;
border-radius: 100px / 50px;
}
Triangle
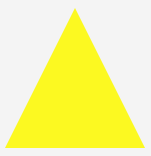
HTML
In order to create a triangle in CSS, set up again a div with the ID name triangle.
CSS
To create a triangle, manipulate the border property. Manipulating the width of the border will give you different results at rotational angles.
#triangle {
width: 0;
height: 0;
border-bottom: 140px solid #fcf921;
border-left: 70px solid transparent;
border-right: 70px solid transparent;
}
Triangle Down

HTML
To create an inverted triangle shape using CSS, create again a div with the ID name triangle_down.
<div id="triangle_down"></div>
CSS
Creating an inverted triangle, we need to manipulate the border property of the bottom.
#triangle_down {
width: 0;
height: 0;
border-top: 140px solid #20a3bf;
border-left: 70px solid transparent;
border-right: 70px solid transparent;
}
Triangle Left

HTML
To create a triangle shape that faces left, set up again a div with the ID name triangle_left.
<div id="triangle_left"></div>
CSS
Creating a triangle that faces left, manipulate the border property of the right side.
#triangle_left {
width: 0;
height: 0;
border-top: 70px solid transparent;
border-right: 140px solid #6bbf20;
border-bottom: 70px solid transparent;
}
Triangle Right
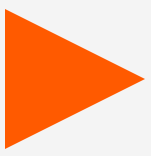
HTML
In order to create a triangle shape that faces right, set up a div with the ID name triangle_right.
<div id="triangle_right"></div>
CSS
Creating a triangle that faces left, manipulate the border property of the left side.
#triangle_right {
width: 0;
height: 0;
border-top: 70px solid transparent;
border-left: 140px solid #ff5a00;
border-bottom: 70px solid transparent;
}
Diamond
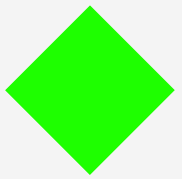
HTML
To create a diamond shape using CSS, provide a div with the ID name diamond.
<div id="diamond"></div>
CSS
Creating a diamond can be displayed in many ways. Using the transform property along with rotate value will enable to display two triangles next to each other.
#diamond {
width: 120px;
height: 120px;
background: #1eff00;
/* Rotate */
-webkit-transform: rotate(-45deg);
-moz-transform: rotate(-45deg);
-ms-transform: rotate(-45deg);
-o-transform: rotate(-45deg);
transform: rotate(-45deg);
/* Rotate Origin */
-webkit-transform-origin: 0 100%;
-moz-transform-origin: 0 100%;
-ms-transform-origin: 0 100%;
-o-transform-origin: 0 100%;
transform-origin: 0 100%;
margin: 60px 0 10px 310px;
}
Trapezium
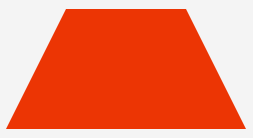
HTML
In order to create a trapezium shape using CSS, set up a div with the ID name trapezium.
<div id="trapezium"></div>
CSS
A trapezium can be displayed by setting up equal left and right border with a flat bottom.
#trapezium {
height: 0;
width: 120px;
border-bottom: 120px solid #ec3504;
border-left: 60px solid transparent;
border-right: 60px solid transparent;
}
Parallelogram
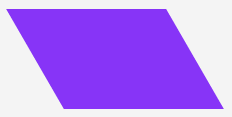
HTML
Creating a parallelogram shape using CSS will need a div with the ID name parallelogram.
<div id="parallelogram"></div>
CSS
To create a parallelogram shape, set up a transform value of skew to turn the element in a 30 degree angle.
#parallelogram {
width: 160px;
height: 100px;
background: #8734f7;
-webkit-transform: skew(30deg);
-moz-transform: skew(30deg);
-o-transform: skew(30deg);
transform: skew(30deg);
}
Star

HTML
In order to create a star shape using CSS will need a div with the ID name star.
<div id="star"></div>
CSS
Creation of a star is a strange manipulation of borders with the use of rotate value of transform. See code below.
#star {
width: 0;
height: 0;
margin: 50px 0;
color: #fc2e5a;
position: relative;
display: block;
border-right: 100px solid transparent;
border-bottom: 70px solid #fc2e5a;
border-left: 100px solid transparent;
-moz-transform: rotate(35deg);
-webkit-transform: rotate(35deg);
-ms-transform: rotate(35deg);
-o-transform: rotate(35deg);
}
#star:before {
height: 0;
width: 0;
position: absolute;
display: block;
top: -45px;
left: -65px;
border-bottom: 80px solid #fc2e5a;
border-left: 30px solid transparent;
border-right: 30px solid transparent;
content: '';
-webkit-transform: rotate(-35deg);
-moz-transform: rotate(-35deg);
-ms-transform: rotate(-35deg);
-o-transform: rotate(-35deg);
}
#star:after {
content: '';
width: 0;
height: 0;
position: absolute;
display: block;
top: 3px;
left: -105px;
color: #fc2e5a;
border-right: 100px solid transparent;
border-bottom: 70px solid #fc2e5a;
border-left: 100px solid transparent;
-webkit-transform: rotate(-70deg);
-moz-transform: rotate(-70deg);
-ms-transform: rotate(-70deg);
-o-transform: rotate(-70deg);
}
Star (6 points)
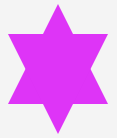
HTML
The markup for six points star shape using CSS will need a div with the ID name parallelogram.
<div id="star_six_points"></div>
CSS
Unlike the regular star with five points, the six point star will be manipulated using the border properties. Create two sets of shapes and then combine them as one.
#star_six_points {
width: 0;
height: 0;
display: block;
position: absolute;
border-left: 50px solid transparent;
border-right: 50px solid transparent;
border-bottom: 100px solid #de34f7;
margin: 10px auto;
}
#star_six_points:after {
content: "";
width: 0;
height: 0;
position: absolute;
border-left: 50px solid transparent;
border-right: 50px solid transparent;
border-top: 100px solid #de34f7;
margin: 30px 0 0 -50px;
}
Pentagon

HTML
To create a pentagon, set up a div with an id of pentagon.
<div id="pentagon"></div>
CSS
Creating a pentagon needs two elements that go into creating one. First create a trapezoid shape and then add a triangle shape on the top of it.
#pentagon {
width: 54px;
position: relative;
border-width: 50px 18px 0;
border-style: solid;
border-color: #277bab transparent;
}
#pentagon:before {
content: "";
height: 0;
width: 0;
position: absolute;
top: -85px;
left: -18px;
border-width: 0 45px 35px;
border-style: solid;
border-color: transparent transparent #277bab;
}
Hexagon

HTML
In order to create a hexagon, set up a div with an ID of hexagon.
<div id="hexagon"></div>
CSS
There are different ways to create a hexagon. One way to create is almost identical like the creation of pentagon. First create a rectangular shape and then add two triangles on the top.
#hexagon {
width: 100px;
height: 55px;
background: #fc5e5e;
position: relative;
margin: 10px auto;
}
#hexagon:before {
content: "";
width: 0;
height: 0;
position: absolute;
top: -25px;
left: 0;
border-left: 50px solid transparent;
border-right: 50px solid transparent;
border-bottom: 25px solid #fc5e5e;
}
#hexagon:after {
content: "";
width: 0;
height: 0;
position: absolute;
bottom: -25px;
left: 0;
border-left: 50px solid transparent;
border-right: 50px solid transparent;
border-top: 25px solid #fc5e5e;
}
Octagon
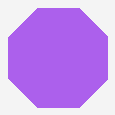
HTML
Creating an octagon, will require a div with an ID octagon.
<div id="octagon"></div>
CSS
A octagon can be a hack too. First create two identical trapezoids and then put two triangles from each side. Although there are also some other ways to do this, this is the best way to do it.
#octagon {
width: 100px;
height: 100px;
background: #ac60ec;
position: relative;
}
#octagon:before {
content: "";
width: 42px;
height: 0;
position: absolute;
top: 0;
left: 0;
border-bottom: 29px solid #ac60ec;
border-left: 29px solid #f4f4f4;
border-right: 29px solid #f4f4f4;
}
#octagon:after {
content: "";
width: 42px;
height: 0;
position: absolute;
bottom: 0;
left: 0;
border-top: 29px solid #ac60ec;
border-left: 29px solid #f4f4f4;
border-right: 29px solid #f4f4f4;
}
}
Heart
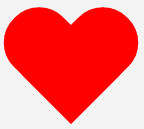
HTML
To create a heart shape CSS, let’s first create a div with an ID name of heart.
<div id="heart"></div>
CSS
Heart shape can be hard to do but it can be done by rotating elements from different angles and changing the transform-origin property to enable the changing of the position on transformed element.
#heart {
position: relative;
}
#heart:before,#heart:after {
content: "";
width: 70px;
height: 115px;
position: absolute;
background: red;
left: 70px;
top: 0;
-webkit-border-radius: 50px 50px 0 0;
-moz-border-radius: 50px 50px 0 0;
border-radius: 50px 50px 0 0;
-webkit-transform: rotate(-45deg);
-moz-transform: rotate(-45deg);
-ms-transform: rotate(-45deg);
-o-transform: rotate(-45deg);
transform: rotate(-45deg);
-webkit-transform-origin: 0 100%;
-moz-transform-origin: 0 100%;
-ms-transform-origin: 0 100%;
-o-transform-origin: 0 100%;
transform-origin: 0 100%;
}
#heart:after {
left: 0;
-webkit-transform: rotate(45deg);
-moz-transform: rotate(45deg);
-ms-transform: rotate(45deg);
-o-transform: rotate(45deg);
transform: rotate(45deg);
-webkit-transform-origin: 100% 100%;
-moz-transform-origin: 100% 100%;
-ms-transform-origin: 100% 100%;
-o-transform-origin: 100% 100%;
transform-origin: 100% 100%;
}
Egg
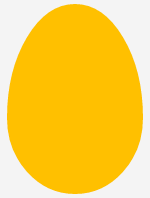
HTML
In order to create an egg shape CSS, first create a div with an ID name egg.
<div id="egg"></div>
CSS
An egg shape is almost identical with the oval shape except that the height is a bit higher than the width and the radius is carefully manipulated to get a good result.
#egg {
width: 136px;
height: 190px;
background: #ffc000;
display: block;
-webkit-border-radius: 63px 63px 63px 63px / 108px 108px 72px 72px;
border-radius: 50% 50% 50% 50% / 60% 60% 40% 40%;
}
Infinity
HTML
To create an infinity shape in CSS, create a div with an ID name infinity.
<div id="infinity"></div>
CSS
Infinity shape can be achieved by carefully manipulating the borders and setting the angle of the circle like shape.
#infinity {
width: 220px;
height: 100px;
position: relative;
}
#infinity:before,#infinity:after {
content: "";
width: 60px;
height: 60px;
position: absolute;
top: 0;
left: 0;
border: 20px solid #06c999;
-moz-border-radius: 50px 50px 0;
border-radius: 50px 50px 0 50px;
-webkit-transform: rotate(-45deg);
-moz-transform: rotate(-45deg);
-ms-transform: rotate(-45deg);
-o-transform: rotate(-45deg);
transform: rotate(-45deg);
}
#infinity:after {
left: auto;
right: 0;
-moz-border-radius: 50px 50px 50px 0;
border-radius: 50px 50px 50px 0;
-webkit-transform: rotate(45deg);
-moz-transform: rotate(45deg);
-ms-transform: rotate(45deg);
-o-transform: rotate(45deg);
transform: rotate(45deg);
}
Comment Bubble

HTML
In order to create a comment bubble shape in CSS, create a div with an ID name comment_bubble.
<div id="comment_bubble"></div>
CSS
A bubble comment shape can be created by creating a rectangle and giving it a border radius, then place a triangular shape like on the left side.
#comment_bubble {
width: 140px;
height: 100px;
background: #088cb7;
position: relative;
-moz-border-radius: 12px;
-webkit-border-radius: 12px;
border-radius: 12px;
}
#comment_bubble:before {
content: "";
width: 0;
height: 0;
right: 100%;
top: 38px;
position: absolute;
border-top: 13px solid transparent;
border-right: 26px solid #088cb7;
border-bottom: 13px solid transparent;
}
Pacman

HTML
To create a pacman shape in CSS, create a div with an ID name of pacman.
<div id="pacman"></div>
CSS
Creating a pacman is a hack too. Just manipulate the border and the radius to create an opening on the left side of the circle.
#pacman {
width: 0;
height: 0;
border-right: 70px solid transparent;
border-top: 70px solid #ffde00;
border-left: 70px solid #ffde00;
border-bottom: 70px solid #ffde00;
border-top-left-radius: 70px;
border-top-right-radius: 70px;
border-bottom-left-radius: 70px;
border-bottom-right-radius: 70px;
}
Final Words
There are a lot of advantages in using CSS shapes than putting images on your website. You can use shapes today as a part of your progressive workflow, though they have acceptable fallback in non-supporting browsers especially with the Jurassic IE browsers.
Though you can build shapes from scratch, there are some sites, I would recommend for you to see that generates CSS shapes for you. Check out the following sites.
And that’s really it. Hope you enjoyed this tutorial and let me know in comment section if you have any other way to create similar result like the CSS shapes you see in the demo.