Datasets are extremely essential in building API models, and various business processes. This is why importing and exporting CSV is an often-needed functionality.
In this tutorial you will learn now to download and import a CSV file within an Angular app. We’ll be working with a CSV file that contains employee details. The code will be written in TypeScript.
Before you start, you’ll need to set up a new Angular environment, create a new workspace with an initial application and start serving. A step-by-step guide to creating the boilerplate for your Angular app can be found in the official tutorial.
Here’s the folder structure of the boilerplate application:
1 |
Root |
2 |
-- src |
3 |
---- app |
4 |
------ app-routing.module.ts |
5 |
------ app.component.css |
6 |
------ app.component.html |
7 |
------ app.component.ts |
8 |
------ app.module.ts |
9 |
---- models |
10 |
---- services |
11 |
------ csv.services.ts |
12 |
---- index.html |
13 |
---- main.ts |
14 |
---- styles.css |
1. Create a Simple Model
Firstly, let’s create a simple class to model the employee. This model will be consumed by the Angular components.
The model for holding the employee details is given below. This is just a basic model with the employee’s name, email and city.
1 |
export class User { |
2 |
name: string; |
3 |
email: string; |
4 |
city: string; |
5 |
}
|
2. Build the Service
Angular applications have a modular structure. This makes the application robust, and easy to maintain. One of the primary rules of any Angular application is that components must not be allowed to save or fetch data directly. That is why you have to make use of services to access, and present data. In our use case, we require a service for downloading, and importing CSV data.
Our service file is csv.services.ts.
Once the service is created, it can be injected into any component. Before making the CSV.service available for injection, it needs to be registered in app.module.ts as a provider.
In this demo, we will be coding two different types of functionalities:
- saving data into a CSV
- importing data from a CSV
Method to Save Data Into a CSV
Firstly, let us deal with simplest functionality. Saving data into a CSV involves reading an array of objects. Objects in Javascript come with properties that have a value. We will read all these properties for each object and join them with a comma. The below line of code will achieve this:
1 |
let propertyNames = Object.keys(data[0]); |
2 |
let rowWithPropertyNames = propertyNames.join(',') + 'n'; |
Once the titles are joined, they will be appended as the first row. Following which, a loop will run through the array and read all the properties and its values. These values will be appended into the CSV file.
The complete piece of code, for building the header, reading the contents of the array, and building the CSV is given below.
1 |
public saveDataInCSV(data: Array<any>): string { |
2 |
if (data.length == 0) { |
3 |
return ''; |
4 |
}
|
5 |
let propertyNames = Object.keys(data[0]); |
6 |
let rowWithPropertyNames = propertyNames.join(',') + 'n'; |
7 |
let csvContent = rowWithPropertyNames; |
8 |
let rows: string[] = []; |
9 |
|
10 |
data.forEach((item) => { |
11 |
let values: string[] = []; |
12 |
propertyNames.forEach((key) => { |
13 |
let val: any = item[key]; |
14 |
|
15 |
if (val !== undefined && val !== null) { |
16 |
val = new String(val); |
17 |
} else { |
18 |
val = ''; |
19 |
}
|
20 |
values.push(val); |
21 |
});
|
22 |
rows.push(values.join(',')); |
23 |
});
|
24 |
csvContent += rows.join('n'); |
25 |
return csvContent; |
26 |
}
|
Method to Import Data from a CSV
Our next service is to import data from a CSV. For this, we will define a function that would take the contents of a file in the form of a string. The property names, and data rows will be created from the contents of the file.
1 |
const propertyNames = csvText.slice(0, csvText.indexOf('n')).split(','); |
2 |
const dataRows = csvText.slice(csvText.indexOf('n') + 1).split('n'); |
With the above lines of code, we will have both the property names and data. With this information, we are only left with the job of printing the contents of the CSV. Code for printing the contents is given below:
1 |
public importDataFromCSV(csvText: string): Array<any> { |
2 |
const propertyNames = csvText.slice(0, csvText.indexOf('n')).split(','); |
3 |
const dataRows = csvText.slice(csvText.indexOf('n') + 1).split('n'); |
4 |
|
5 |
let dataArray: any[] = []; |
6 |
dataRows.forEach((row) => { |
7 |
let values = row.split(','); |
8 |
|
9 |
let obj: any = new Object(); |
10 |
|
11 |
for (let index = 0; index < propertyNames.length; index++) { |
12 |
const propertyName: string = propertyNames[index]; |
13 |
|
14 |
let val: any = values[index]; |
15 |
if (val === '') { |
16 |
val = null; |
17 |
}
|
18 |
|
19 |
obj[propertyName] = val; |
20 |
}
|
21 |
|
22 |
dataArray.push(obj); |
23 |
});
|
24 |
|
25 |
return dataArray; |
26 |
}
|
4. Building the UI Elements
Next, we are going to build the HTML elements for importing, and exporting the CSV files.
The file for UI elements is app.component.html.
Saving Contents of a CSV
To save a CSV file, we will be using a very traditional way of downloading files in JavaScript.
- Create a hidden anchor element
<a>. - Set the
hreftype of this anchor element todata:text/csv. - Automatically trigger the
clickevent.
The complete piece of code, for downloading the CSV file is given below. This code will be in app.component.ts.
1 |
public saveDataInCSV(name: string, data: Array<any>): void { |
2 |
let csvContent = this._csvService.saveDataInCSV(data); |
3 |
|
4 |
var hiddenElement = document.createElement('a'); |
5 |
hiddenElement.href = 'data:text/csv;charset=utf-8,' + encodeURI(csvContent); |
6 |
hiddenElement.target = '_blank'; |
7 |
hiddenElement.download = name + '.csv'; |
8 |
hiddenElement.click(); |
9 |
}
|
Here’s some sample data we can passed into the above function. As you can see, we are using the model created in step 1.
1 |
public arrayWithSimpleData: Array<User> = [ |
2 |
{ name: 'Eve', email: '[email protected]', city: 'San Francisco' }, |
3 |
{ name: 'John', email: '[email protected]', city: 'London' }, |
4 |
{ name: 'Nick', email: '[email protected]', city: 'Madrid' }, |
5 |
];
|
Next, we shall link the above functionality to a button that will be displayed on the screen for us to click. This will be entered in app.component.html.
1 |
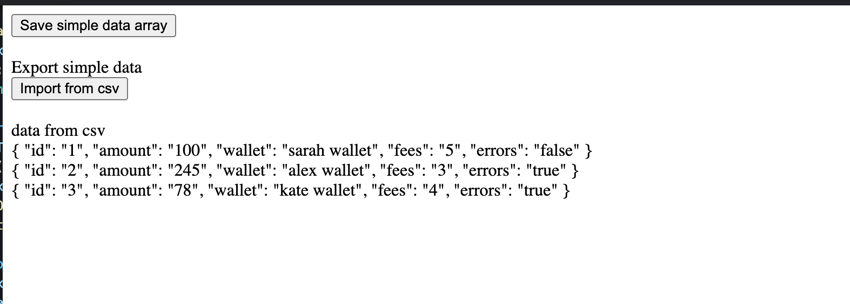
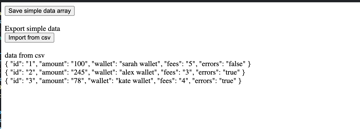
<button (click)="saveDataInCSV('simpleData', arrayWithSimpleData)"> |
2 |
Save simple data array |
3 |
</button> |
Reading the Contents of a CSV
It is quite simple to open and read files in HTML using the <input> tag. The input tag comes with properties like type, [accept] and (change).
-
typehas to be'file'to indicate that a file will be chosen by the user. -
[accept]has to be'.csv'to indicate that only CSV files should be shown to the user for selection. -
(change)willcall theimportDataFromCSVfunction with a parameter$eventthat has properties with the contents of the file.
The $event property carries the file inside event.target.files, where files is an array. Contents of the file can be extracted in different formats. For our use case, we’ll be extracting text() from the file. Remember, the method for reading the file should asynchronous. Which is why, we will use await and async. The simple piece of code for reading text from a CSV file is here:
1 |
private async getTextFromFile(event: any) { |
2 |
const file: File = event.target.files[0]; |
3 |
let fileContent = await file.text(); |
4 |
|
5 |
return fileContent; |
6 |
}
|
Once text content is extracted from the CSV file, we can use the service defined in step 2.
1 |
public async importDataFromCSV(event: any) { |
2 |
let fileContent = await this.getTextFromFile(event); |
3 |
this.importedData = this._csvService.importDataFromCSV(fileContent); |
4 |
}
|
And, the above function can be linked with a button in app.component.html.
1 |
<div>Export simple data</div> |
2 |
<input |
3 |
#fileUploadSimple |
4 |
[accept]="'.csv'" |
5 |
type="file" |
6 |
class="file-input" |
7 |
(change)="importDataFromCSV($event)" |
8 |
hidden="true" |
9 |
/>
|
10 |
<button (click)="fileUploadSimple.click()">Import from csv</button> |
11 |
<br /><br /> |
5. Integrating the Whole Application
Now, it is time to build app.module.ts. This is where all providers, imports, declarations and the bootstrap component will be registered.
1 |
import { NgModule } from '@angular/core'; |
2 |
import { FormsModule } from '@angular/forms'; |
3 |
import { BrowserModule } from '@angular/platform-browser'; |
4 |
|
5 |
import { CsvService } from '../services/csv.services'; |
6 |
import { AppRoutingModule } from './app-routing.module'; |
7 |
import { AppComponent } from './app.component'; |
8 |
|
9 |
@NgModule({ |
10 |
declarations: [AppComponent], |
11 |
imports: [BrowserModule, AppRoutingModule, FormsModule], |
12 |
providers: [CsvService], |
13 |
bootstrap: [AppComponent], |
14 |
})
|
15 |
export class AppModule {} |
With this change, you will be able to see the following screen.

Live Demo
Conclusion
In this post, you saw how to upload and download CSV data, and how to parse CSV data into and out of a text file.