As web designers living in the era of high-speed internet, we have picked up the habit of adding external dependencies such as fonts from third-party servers, most frequently from content delivery networks (CDNs). However, this is not always the best decision. Sometimes, it’s still better to stick to your own infrastructure and host your assets on your local server.
In this article, we’ll have a look at how to self-host a frequently used static asset: Google Fonts. This applies to both locally hosted websites on your system, or your own web server. Even though self-hosting Google Fonts might seem easy and self-explanatory at first, there are loads of things to pay attention to if you want to keep performance in mind.
Before getting into the practical details, let’s see when it’s worth hosting Google Fonts on your own server.
Pros and Cons of Self-Hosting Google Fonts
These pros and cons don’t only apply to Google Fonts but any web-hosted fonts. The one difference that’s probably worth noting is that Google Fonts are stored on Google’s CDN, so you can expect low latency, proper maintenance, and good performance (as opposed to some smaller providers). Plus, you don’t have to worry that the service will be discontinued at some time in the future.
Pros of Self-Hosting Web Fonts:
- Better for privacy: third-party CDNs frequently use cookies and other tracking algorithms that you don’t necessarily know about; this is especially problematic in countries where you are required to get your users’ explicit consent to be tracked on your site (for instance, here’s a good case study of the GDPR-compliance of Google Fonts).
- Better for security: it’s not likely that Google Fonts will be hacked, but on your own server, you still have full control over your security.
- Faster, better performance: Google Fonts load a lot extra CSS that you won’t need; plus if you self-host, you can bundle and minify your font-related CSS rules/files too (which also results in fewer HTTP requests).
- Offline availability: this is more important in the case of a mobile/desktop app that users frequently access offline, however, they might also want to access your website using an offline browser or simply download it for later use.
Cons of Self-Hosting Web Fonts:
-
Extra time and knowledge: it takes more work and expertise to add the font files and the
@font-facerules. - Higher latency of font delivery : Google CDN is a globally distributed network that delivers resources fast, with global distribution and low latency.
- Less likely that fonts are cached: if you pull your fonts and the related CSS from the Google CDN, it’s more likely that the user’s browser has already cached these resources.
What Happens When You Add Google Fonts from CDN?
Before looking at how to self-host Google Fonts on your server, let’s quickly see what happens when you pull them from Google’s CDN. Say you want to add the Montserrat font to your site. This font has 18 static variants, but you only want to add four: regular, regular italic, bold, and bold italic.
As Google Fonts have a user-friendly interface, you only have to select the styles you want to add, and it automatically generates the <link> tag you need to insert into your HTML file.
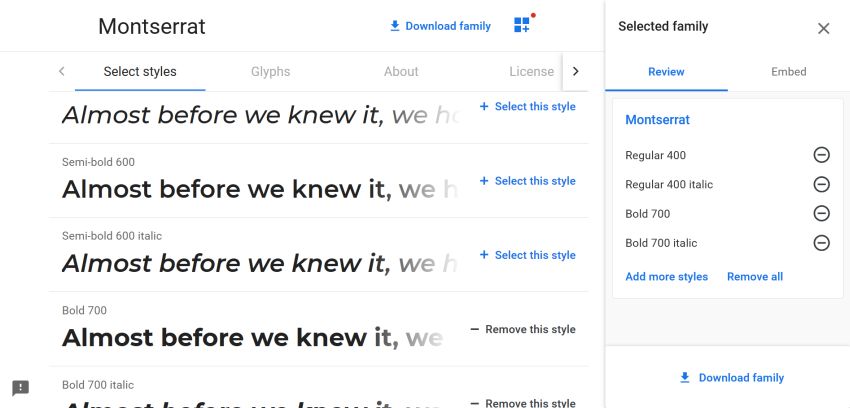
Click the Embed tab on the right of the screen, copy the <link> tag, and add it to your HTML page (don’t use the @import rule; it’s bad for performance as it increases the page load time).
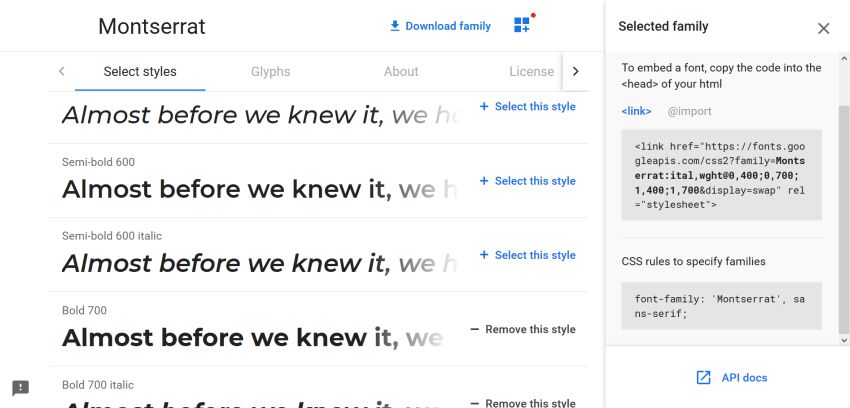
So, to add the regular, regular italic, bold, and bold italic variants of the Montserrat font to your site, you need to insert the following line into the <head> section of your HTML file:
<link href="https://fonts.googleapis.com/css2?family=Montserrat:ital,wght@0,400;0,700;1,400;1,700&display=swap" rel="stylesheet">
Then, you can add the following CSS rule to any selector in your CSS file:
div {
    font-family: 'Montserrat', sans-serif;
}
Okay, that’s all. But, what actually happens in the background? We can get an answer to that question by entering the URL above into the browser’s address bar.
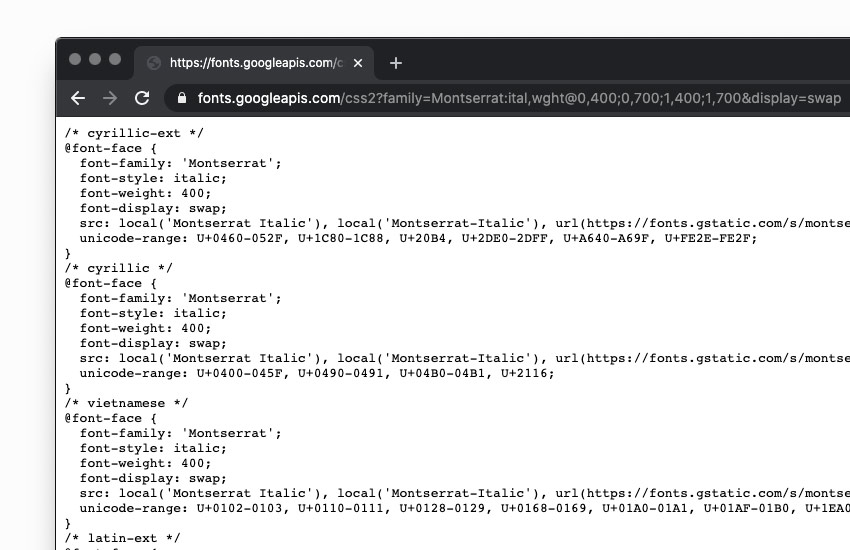
You can see that the link includes a CSS file with multiple @font-face rules to all the character sets that the Montserrat font supports; respectively Cyrillic, Cyrillic Extended, Vietnamese, Latin, and Latin Extended. This totals 20 @font-face rules for the four font variants (regular, regular italic, bold, and bold italic).
However, if we self-hosted these same fonts, the Latin character set would suffice on an English-language website. That would come to four @font-face rules altogether instead of 20. If we wanted to use all the 18 font variants of Montserrat, that would come to 90 @font-face rules instead of 18—an even a bigger difference.
Now, let’s see how to self-host Google Fonts on your own server.
How to Host Google Fonts on Your Own Server
To host Google Fonts locally, you need to upload all the font files you want to use to your server and also add the corresponding @font-face rules to your CSS. You can do all that manually, but there’s a handy open-source tool called Google Web Fonts Helper that automates the process for you.
In Google Web Fonts Helper, you can find all Google Fonts in the left sidebar. To download the font files and generate the related CSS rules, you need to fill in a simple form that lets you select the charset, styles, and the level of browser support:
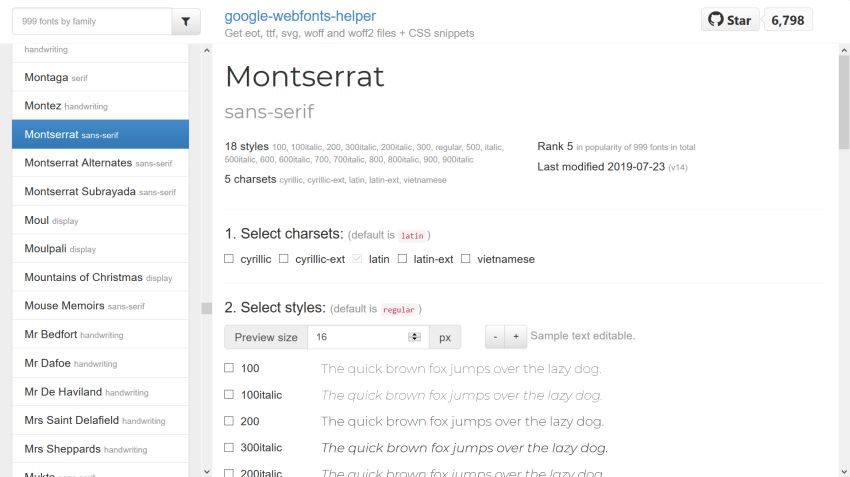
I’ve selected the Latin character set, the same styles (regular, regular italic, bold, bold italic), and support for modern browsers which means that we’ll add the WOFF and WOFF2 formats that are specific web-safe compression techniques for TTF (and OTF) fonts.
If you also want to support older browsers, choose best support instead of modern browsers, which will add the fonts in five formats: WOFF, WOFF2, TTF, EOT, SVG.
Note: the browser will only download the format it needs. For instance, if it supports WOFF2, it won’t download the WOFF, TTF, EOT, and SVG files, even if they are present on your server.
Below the form, you’ll find the @font-face rules you need to add to your CSS file. For example, here are the @font-face rules that the generator has returned for our specs:
/* montserrat-regular - latin */
@font-face {
  font-family: 'Montserrat';
  font-style: normal;
  font-weight: 400;
  src: local('Montserrat Regular'), local('Montserrat-Regular'),
       url('../fonts/montserrat-v14-latin-regular.woff2') format('woff2'), /* Chrome 26+, Opera 23+, Firefox 39+ */
       url('../fonts/montserrat-v14-latin-regular.woff') format('woff'); /* Chrome 6+, Firefox 3.6+, IE 9+, Safari 5.1+ */
}

/* montserrat-italic - latin */
@font-face {
  font-family: 'Montserrat';
  font-style: italic;
  font-weight: 400;
  src: local('Montserrat Italic'), local('Montserrat-Italic'),
       url('../fonts/montserrat-v14-latin-italic.woff2') format('woff2'), /* Chrome 26+, Opera 23+, Firefox 39+ */
       url('../fonts/montserrat-v14-latin-italic.woff') format('woff'); /* Chrome 6+, Firefox 3.6+, IE 9+, Safari 5.1+ */
}

/* montserrat-700 - latin */
@font-face {
  font-family: 'Montserrat';
  font-style: normal;
  font-weight: 700;
  src: local('Montserrat Bold'), local('Montserrat-Bold'),
       url('../fonts/montserrat-v14-latin-700.woff2') format('woff2'), /* Chrome 26+, Opera 23+, Firefox 39+ */
       url('../fonts/montserrat-v14-latin-700.woff') format('woff'); /* Chrome 6+, Firefox 3.6+, IE 9+, Safari 5.1+ */
}

/* montserrat-700italic - latin */
@font-face {
  font-family: 'Montserrat';
  font-style: italic;
  font-weight: 700;
  src: local('Montserrat Bold Italic'), local('Montserrat-BoldItalic'),
       url('../fonts/montserrat-v14-latin-700italic.woff2') format('woff2'), /* Chrome 26+, Opera 23+, Firefox 39+ */
       url('../fonts/montserrat-v14-latin-700italic.woff') format('woff'); /* Chrome 6+, Firefox 3.6+, IE 9+, Safari 5.1+ */
}
As you can see, each font variant has its own @font-face rule.
Within each @font-face rule, the src descriptor first checks if the user has the font installed on their operating system, using the local() function. If the user has the font file locally, the browser doesn’t have to download it. Then, the url() function adds the font file in both WOFF2 and WOFF formats (but the browser will download only the first file type it supports).
Copy these @font-face rules from Google Web Fonts Helper and insert them into the beginning of your CSS file. You also have to download and unzip the font files, which you can do by clicking the Download files button at the bottom of the generator:
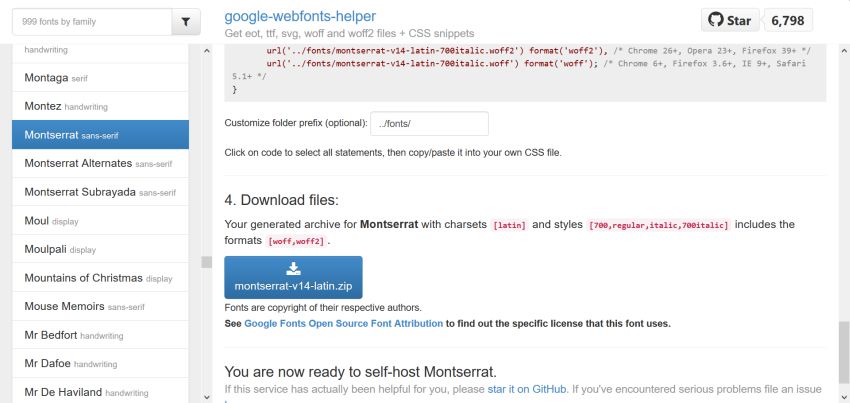
Our example ZIP file will contain eight font files, the WOFF and WOFF2 versions of the four font variants. After unzipping it, upload all the font files to your server (preferably into a folder called fonts/). Also don’t forget to pay attention to the URL path, as the url() functions have to use the exact file path where your fonts are located on your server.
Alternatively, you can also download the font files directly from Google Fonts, however, they are only available in TTF format there.
Although you can also add the font files as TTF (WOFF and WOFF2 are compressed TTF files after all), your font files will be much heavier (for instance, Montserrat Regular is 110 KB as TTF, 23 KB as WOFF, and 19 KB as WOFF2). You can also use a compression tool such as Google’s woff2 tool, but altogether it’s easier to generate the WOFF and WOFF2 files using Google Web Fonts Helper.
Add the Font-Display and Unicode-Range Properties
If you have a look again at the CSS file pulled from Google CDN, you’ll see that each @font-face declaration includes two extra rules that Google Web Fonts Helper doesn’t add: font-display and unicode-range. Both are descriptors of the @font-face rule.
The font-display descriptor defines what happens if the custom font file is not loaded immediately. Using it with the swap value is a performance optimization technique. It means that the custom font is immediately substituted with a system font and when it’s ready to use, it replaces the system font. Using this technique, you can decrease page load times and avoid invisible text during font loading.
The unicode-range descriptor specifies the character set that the belonging font file covers. According to the Mozilla Development Network:
“If the page doesn’t use any character in this range, the font is not downloaded; if it uses at least one, the whole font is downloaded.”
This descriptor can be useful when you want to load more than one character set, say Latin and Cyrillic on a bilingual website. If you add a unicode-range descriptor to each @font-face rule, then the Cyrillic font files won’t be downloaded on pages that use only Latin characters, and vice versa, the Latin font files won’t be downloaded on pages that use only Cyrillic characters.
You can also use unicode-range to load just a range of characters, which can improve page load time if you want to use a font as a display font (for instance, for a logo) or show only the numeric characters.
As in our example, we only use one character set and want to make all the characters available for the browser, it’s not necessary to add the unicode-range property here. However, as font-display: swap; can improve page load times, we add it to each @font-face rule:
/* montserrat-regular - latin */
@font-face {
  font-family: 'Montserrat';
  font-style: normal;
  font-weight: 400;
  font-display: swap;
  src: local('Montserrat Regular'), local('Montserrat-Regular'),
       url('../fonts/montserrat-v14-latin-regular.woff2') format('woff2'), /* Chrome 26+, Opera 23+, Firefox 39+ */
       url('../fonts/montserrat-v14-latin-regular.woff') format('woff'); /* Chrome 6+, Firefox 3.6+, IE 9+, Safari 5.1+ */
}

/* montserrat-italic - latin */
@font-face {
  font-family: 'Montserrat';
  font-style: italic;
  font-weight: 400;
  font-display: swap;
  src: local('Montserrat Italic'), local('Montserrat-Italic'),
       url('../fonts/montserrat-v14-latin-italic.woff2’) format('woff2'), /* Chrome 26+, Opera 23+, Firefox 39+ */
       url('../fonts/montserrat-v14-latin-italic.woff’) format('woff'); /* Chrome 6+, Firefox 3.6+, IE 9+, Safari 5.1+ */
}

/* montserrat-700 - latin */
@font-face {
  font-family: 'Montserrat';
  font-style: normal;
  font-weight: 700;
  font-display: swap;
  src: local('Montserrat Bold'), local('Montserrat-Bold'),
       url('../fonts/montserrat-v14-latin-700.woff2') format('woff2'), /* Chrome 26+, Opera 23+, Firefox 39+ */
       url('../fonts/montserrat-v14-latin-700.woff') format('woff'); /* Chrome 6+, Firefox 3.6+, IE 9+, Safari 5.1+ */
}

/* montserrat-700italic - latin */
@font-face {
  font-family: 'Montserrat';
  font-style: italic;
  font-weight: 700;
  font-display: swap;
  src: local('Montserrat Bold Italic'), local('Montserrat-BoldItalic'),
       url('../fonts/montserrat-v14-latin-700italic.woff2’) format('woff2'), /* Chrome 26+, Opera 23+, Firefox 39+ */
       url('../fonts/montserrat-v14-latin-700italic.woff’) format('woff'); /* Chrome 6+, Firefox 3.6+, IE 9+, Safari 5.1+ */
}
That’s How You Can Host Google Fonts Yourself!
Self-hosting Google Fonts has both pros and cons: you need to assess your needs and goals to decide whether to host them on your own server or pull them from Google’s CDN.
You can also choose a mixed solution to get the best of both worlds. For instance, this tutorial by John Franey shows how to add @font-face rules locally but pull the font files from online.
These days, you can host your website on Google Cloud with hosting providers such as Siteground or Kinsta as well. In this way, you can take leverage of a globally distributed network while still hosting your fonts locally.
If you can’t decide, you can also test which solution works better for your specific use case. Set up one test site with locally hosted Google Fonts and another one that loads the fonts from Google CDN, and compare page load times with a performance analysis tool such as Lighthouse or GTMetrix.
And, if you want to add Google Fonts to your WordPress site, check out Jessica Thornsby’s tutorial here on Tuts+, too.

More Web Font Inspiration
Check out these tutorials and design posts if you’re still looking for more web font inspiration:
 Fonts25+ Free SVG Fonts (Font Files to Download Now)
-
Web TypographyA Guide to Selecting Custom Fonts for Your Website
-
FontsThe 10 Best Decorative Fonts to Use on Your Website
-
Typography5 Attention-Grabbing Web Fonts to Download and Use
-
FontsVariable Fonts on the Web, Explained
-
Web TypographyHow to Use Color Fonts on the Web