Spicing up websites with 3D graphics and effects is one of the latest web design trends that may stay with us for years to come. As Spline has a more friendly learning curve than most similar design tools, it’s the perfect platform to get started with 3D web graphics.
All sounds great, right? Well, almost. If you’ve checked out one of the Spline examples above, you might have noticed that it takes a while for the 3D graphics to appear on the screen.
Spline scenes (and 3D embeds in general) do have issues with web performance, especially on older devices or slower networks, which can make visitors leave your site before they see your creation.
In this article, we’ll address this problem and look into different ways that can help you make your Spline 3D scenes load faster and comply with Google’s Web Vitals standards, which is essential for SEO.
While we’ll focus on Spline, you may also find our recommendations useful if you create interactive 3D graphics for the web with another design tool.
To investigate how to optimize Spline scenes for web performance, we created a GitHub demo with a couple of experiments (you can read about the experiments in the readme section below the demo code). You can use this demo to test Spline in your own browser, or you can fork it and add your own experiments.
We used two tools for testing:
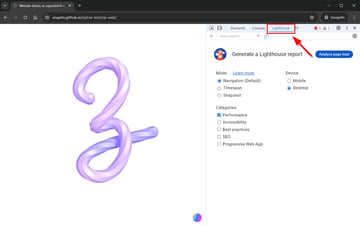
- Lighthouse – This is Google’s free performance auditing tool that allows you to run local lab tests on your own computer. It’s now built into Chrome DevTools — you can find it by clicking the Lighthouse tab (open your browser in Incognito mode to exclude the performance effects of your browser extensions).
- DebugBear – This is a web performance monitoring tool that includes both real user monitoring (RUM) and remote lab testing from different locations around the globe. It comes with a free website testing tool and a two-week free trial if you want to use the full functionality.
What’s the difference between RUM and lab testing?
RUM tests are performed on real users who visit your website. You need to add a small script to your HTML page that runs the performance tests on each of your visitors.
Lab tests (also known as synthetic tests) run in a simulated environment (e.g. in your local browser or on a remote test device) where you can pre-configure characteristics such as network bandwidth, throttling, latency, device type, server location, etc.
The two types of testing provide you with different kind but equally valuable insights on the performance of your website.


What Are Spline’s Main Web Performance Issues?
If you have a Spline scene on your page, you’ll need to download the runtime.js and scene.splinecode files so that the Spline runtime can execute and display your scene.
As 3D scenes tend to be complex and the runtime also needs to download, your visitors will need to wait for a while unless they are on a superfast connection and use a superfast device.
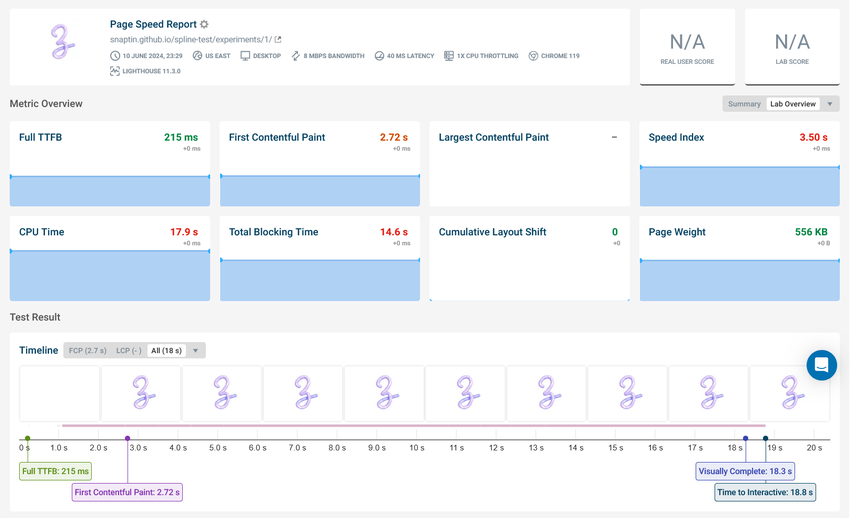
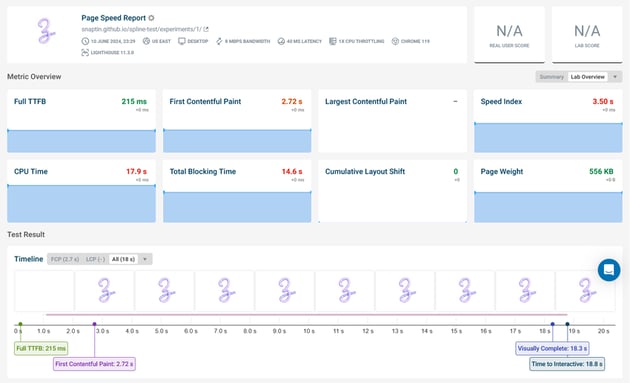
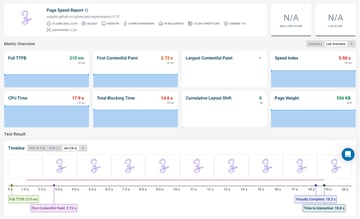
Long CPU Time
As you can see below, even a simple Spline scene has a very long CPU time (the time while the browser executes the script ― it was 17.9 seconds on desktop!), which subsequently increases other important web performance metrics that depend on it, such as Total Blocking Time (TBT), Visually Complete, and Time To Interactive (TTI):
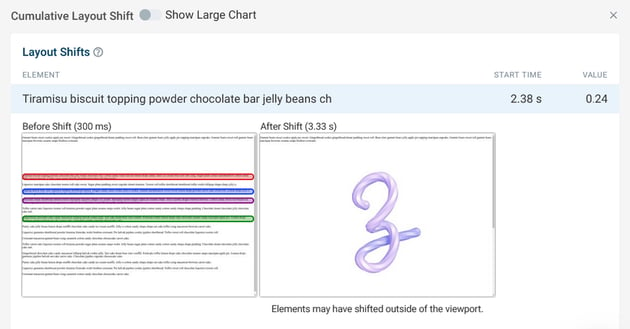
Visual Instability
Visual instability is another web performance issue that you’ll encounter on web pages that include Spline scenes. This is measured by the Cumulative Layout Shift (CLS) metric, which is part of Google’s Core Web Vitals initiative.
As a 3D scene typically loads slower than the rest of the content, it often pushes around the surrounding elements when it appears on the screen, which can harm your CLS result:

Skewed Diagnostics
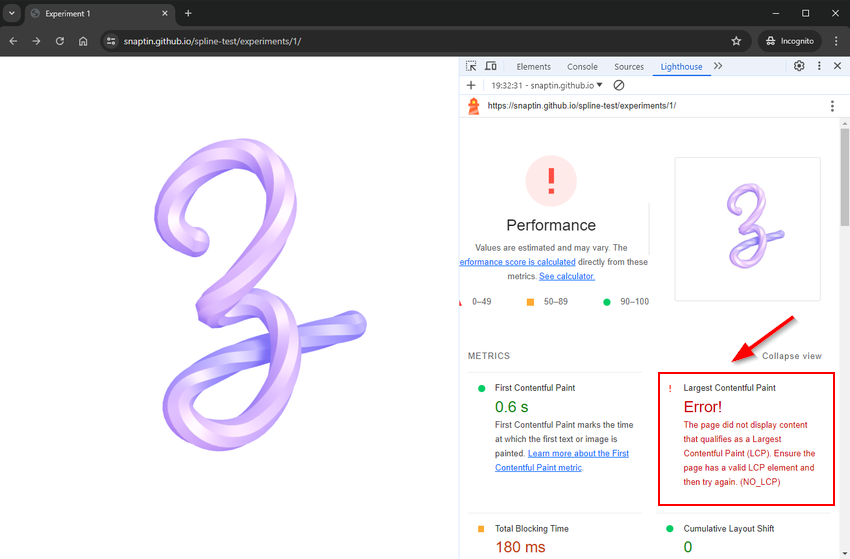
Some of Spline’s performance issues are hard to diagnose as the scenes are outputted into a <canvas> element, which is excluded from the Largest Contentful Paint metric. This appears to be a logical and fair decision, as static content (i.e. text and images) would have an unfair advantage over dynamic content, such as 3D graphics or dynamic charts, which is what the <canvas> element is often used for.
On the other hand, as the Spline scene will be the largest above-the-fold content element on most pages, performance analysis tools won’t be able to detect the issues and will show unreliable or unusable results.
For example, in our first experiment, we removed everything but the Spline scene from the page — Lighthouse couldn’t even calculate an overall performance score!:


Best Practices to Speed Up Your Spline Scenes
So — what can you do to make your Spline scenes load faster in the browser?
The bad news is that there’s no general good advice that works for everyone, as the solution will depend on the characteristics of your Spline scene (e.g. its size and complexity), your website stack and hosting setup, your technical skills, and other factors.
The good news is that there are still some recommendations that you can consider and, if they fit your situation, adopt them on your site.
1. Optimize Your Scene Before Exporting
You can reduce CPU time by optimizing your scene before exporting it from Spline. Spline has a dedicated Performance panel, which you can find by clicking the Export button that shows up in the top menu of the application.
When it opens, click the Run Test button:
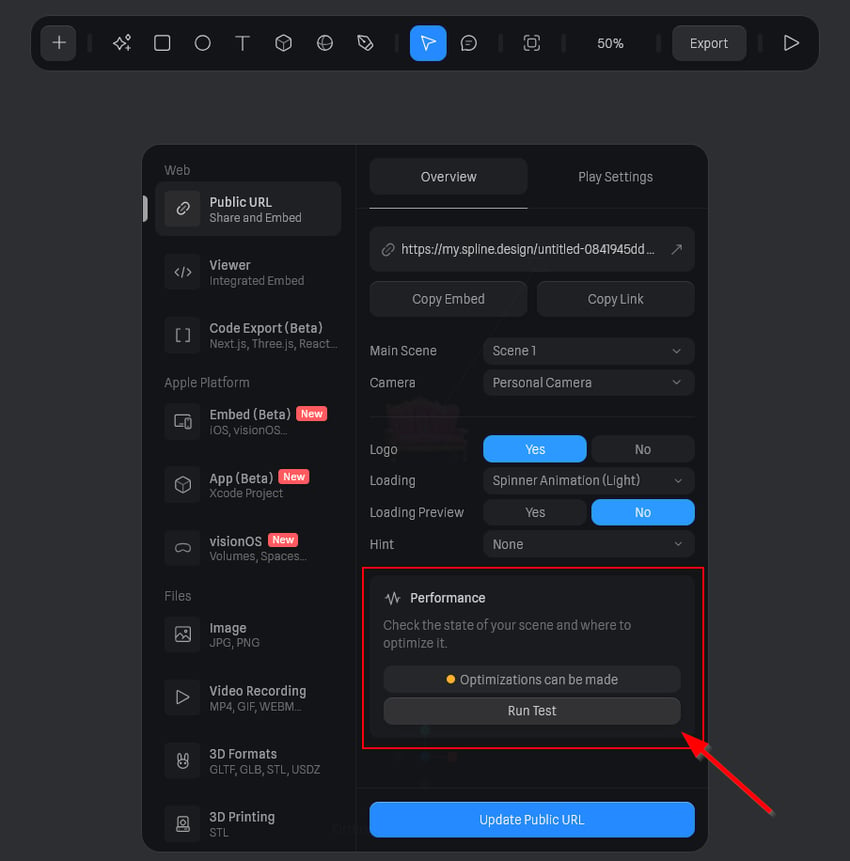


Spline will now run a performance analysis on your scene, show you the metrics that you need to improve (e.g. you may have too many objects, clones, polygons, etc.), and give you some recommendations that can help you reduce the size of your exported scene.
Overall, your goal is to reduce the complexity of your graphic, as more lightweight scenes will take less time to execute. For example, you can reduce the number of polygons or clean up the scene by removing unused Color Assets:

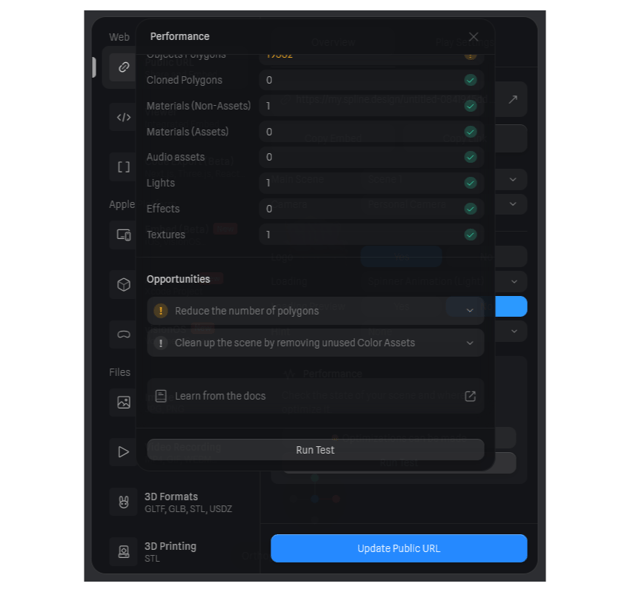

You can also find a Performance tutorial in the Spline documentation, which can give you further ideas on how to optimize your scene for performance before exporting it.
2. Make an Optimized JavaScript-Based Scene for More Complex Graphics
Spline offers various formats in which you can export your scene — for example, you can export it for 3D printing.
As we’re now speaking about web development, let’s see how you can prevent some of the web performance issues that may arise in the browser by optimizing your export.
If you have a more complex and interactive scene that listens to multiple events, the best solution is to export it as JavaScript code.
Below, you can see the various JavaScript export types available in Spline as of the time of writing and the typical use cases when they’re worth considering:
| Export Type | Where to find the option in the Spline app? | When to choose it? | Where is your scene hosted by default? |
| Vanilla JavaScript or web content | Export > Code Export > Vanilla js (Web Content) > Download Bundled ZIP | If you want to embed the scene into an HTML page (you can see a code example in our GitHub demo). | self-hosted |
| Native JavaScript (ECMAScript 6) application | Export > Code Export > Vanilla js (Web Content) > Download ZIP | If you want to add the scene to an ECMAScript application (you can see a code example in our GitHub demo). | on the prod.spline.design domain |
| JavaScript code optimized for the supported libraries (Three.js, React, Next.js, and React-three-fiber) | Export > Code Export > [library-name] | If you use one of these libraries, as these code embeds provide seamless integrations. | on the prod.spline.design domain |
| Inside the Spline Viewer web component | Export > Viewer | If you want to embed the scene into a pre-loaded viewer (added as a web component to the page — see examples here) or export it into Webflow. As Spline deeply integrates with Webflow, it allows you to further edit and optimize your scene. | on the prod.spline.design domain |
For most readers of this article, exporting it as web content will be the best option (this is also what we used in our experiments). It adds the scene as a JavaScript module to the HTML page so that it won’t be a render-blocking resource and the Spline runtime and scene will only download on the pages where they’re actually used:
1 |
<script type="module"> |
2 |
import { Application } from './runtime.js'; |
3 |
const canvas = document.getElementById('canvas3d'); |
4 |
const app = new Application(canvas); |
5 |
app.load('./scene.splinecode'); |
6 |
</script>
|
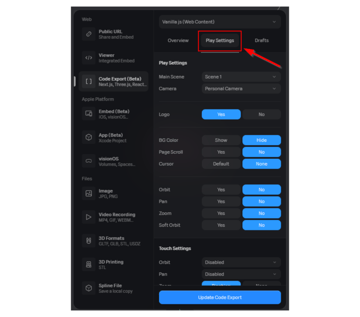
Before you export your scene as web content, you can remove certain elements to further decrease its complexity, such as the background color, page scroll, cursor, zooming, etc.
You can find these options under the Play Settings tab in the Export panel. For the best performance result, only keep the features that your scene really needs:


3. Don’t Make a Scene for Less Complex Designs
If your Spline scene is less complex and interactive, consider exporting it as an image or video file.
The main performance advantage of this export type is that you don’t have to download the Spline runtime or execute your scene at all — on your website, you’ll just have an ordinary image or video file.
Basically, you get rid of all the performance issues caused by Spline, and your CPU time won’t be longer than on a typical website without any 3D content on it. It may feel like cheating, but it can work in many cases.
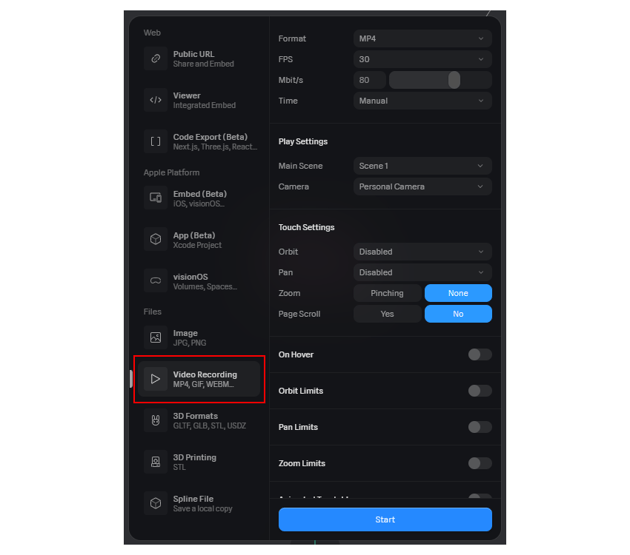
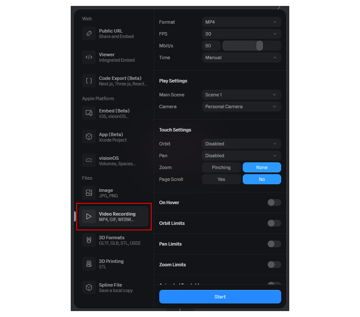
To export your Spline scene as an image or video file, open the Export panel and click either the Image or the Video Recording option. For images, you can choose between the JPG and PNG formats while for video, the available options are WebM, MP4, GIF, and Image Sequence.
If you choose Video Recording, you’ll need to record a video of your Spline scene while interacting with it. Then, you can add the video to your page as a semantic HTML5 <video> element.
Before starting the recorder, you can also select which options you want to enable and disable during the recording. Enable only the ones you’ll need, then click the Start button and record the video:

If you want to see what a Spline scene looks like as a video embed on a real-world website, check out the homepage of the Luma event manager — it doesn’t even look like a video, but a carefully crafted 3D animated illustration.
You can find another example on the homepage of the Scale AI data engine. While the first Spline design is JavaScript code outputted into a <canvas> element, the second one is an embedded video — this one doesn’t look like a video either, but like a complex 3D data animation:


4. Self-Host Your Spline Files
Most of Spline’s auto-generated JavaScript export options download your scene from Spline’s own server.
For example, this is the code you get when you export your scene as an ECMAScript application — as you can see in the last line, the scene is downloaded from the prod.spline.design domain:
1 |
import { Application } from '@splinetool/runtime'; |
2 |
|
3 |
const canvas = document.getElementById('canvas3d'); |
4 |
const app = new Application(canvas); |
5 |
app.load('https://prod.spline.design/5jA9A3n8-EuuL3K7/scene.splinecode'); |
You can speed up your scene by hosting it from your own domain, especially if you have a fast web server that comes with advanced web performance features, such as support for the HTTP/3 protocol, CDN caching, GZIP or Brotli compression, and others.
By self-hosting your Spline files, you can reduce latency (in case your server is closer to your audience or your host uses a content delivery network) and save the connection setup time to third-party servers.
If you exported your code as web content (the first option in the table above), it automatically adds the downloaded runtime.js and scene.splinecode files to your project, so you don’t need to take any extra steps.
If you used one of the other export options, upload the runtime and scene files to your own server and update the URLs accordingly.
In addition to the performance benefits, another advantage of self-hosting is that you don’t have to add a cookie notice for your Spline scenes to comply with GDPR and other privacy laws, as everything comes from your first-party server.
5. Use GZIP or Brotli Compression on Your Server
If you decide to self-host your Spline scenes, GZIP or Brotli text compression is the most important hosting feature you need to pay attention to (Brotli provides a better compression ratio but comes with a bit poorer browser support — however, it’s still supported by all modern browsers).
Note that while your Spline scene displays like a 3D illustration, it’s entirely text content (if you load it as JavaScript), so server-side text compression does make a huge difference performance-wise. Plus, it can help you avoid the Avoid enormous network payloads error in Lighthouse.
For example, the rendered size of the runtime.js file in our demo went down from 1.9 MB to 544 KB when we uploaded it to GitHub’s server (compared to our local server), as GitHub Pages uses GZIP compression by default.
Here’s the before-compression screenshot from Chrome DevTools:


And here’s the after-compression screenshot:


To find out whether your server uses GZIP or Brotli compression, you can use GiftOfSpeed’s GZIP/Brotli compression testing tool.
6. Wrap the Canvas into a Div and Add Intrinsic Dimensions to It
As I mentioned at the beginning of the article, visual instability is one of Spline’s main performance issues. However, it doesn’t always happen.
The visual instability issue won’t arise if:
- There’s only one (supposedly bigger) Spline scene on the page and you add the
overflow: hidden;CSS rule to the<body>tag, which removes both the horizontal and vertical scrollbars from the browser (Spline’s auto-generated exports add this rule to the CSS by default). - You use the Spline Viewer web component.
However, what happens if you want to add both Spline and HTML content to a page and don’t want to use the web component?
First, you need to remove the overflow: hidden; rule from the CSS.
However, if the scene just loads in the wild without having a fixed space (which was provided by the overflow: hidden; rule), it may result in unexpected layout shifts because in most cases, it will load later than regular HTML elements.
You can prevent this user experience issue by setting an intrinsic size for the <canvas> element in the following way:
1 |
<div style="width: 500px; height: 500px;"> |
2 |
<canvas id="canvas3d"></canvas> |
3 |
</div>
|
The code above informs the browser about how much space it needs to allocate for the scene before it loads. We wrapped the canvas into a <div> tag and added the width and height attributes to the <div> because the Spline runtime automatically assigns width and height values to the <canvas> element, so if we add these attributes directly to the canvas, Spline will override them.
Note that in the HTML, we only define the intrinsic width and height, which you can still change using CSS (e.g. you can add a max-width: 100%; rule for small-screen devices).
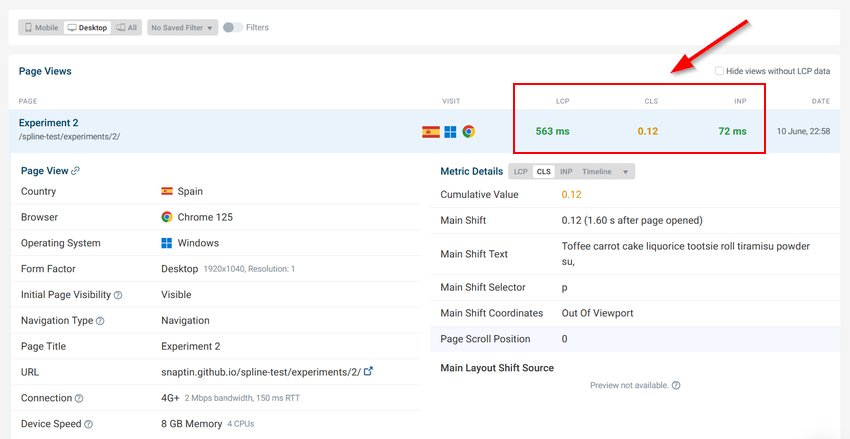
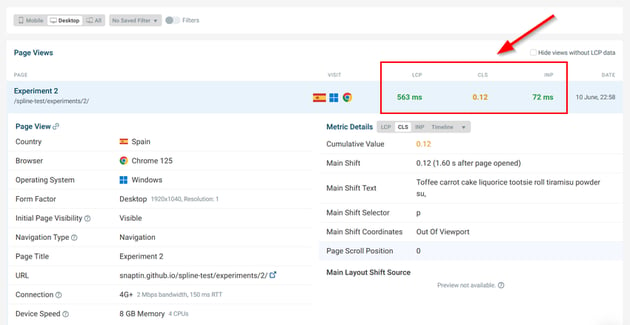
If you want to see how pre-defined intrinsic dimensions reduce layout shifts caused by Spline scenes, check out our second (undefined dimensions) and third (pre-defined dimensions) experiments in our GitHub demo.
Without the width and height attributes added to the wrapper element (Experiment 2), our CLS score was 0.24 on desktop, which is almost in the ‘poor’ range (which starts from 0.25):

However, when we added the width and height attributes to the wrapper <div> (Experiment 3), the CLS score went down to 0 (which is the best score you can get for CLS):


Also note that if the scene is smaller (as is usually the case if you add intrinsic dimensions), your Interaction to Next Paint (INP) scores will also improve, as when users interact with the scene (e.g. move it around), the page will respond faster.
Wrapping Up
Optimizing Spline scenes for web performance is not an easy task because it depends on many variables, including the complexity, interactivity, and size of your scene, your website stack, your hosting conditions, and others.
In this non-comprehensive guide, we looked into the most typical web performance issues caused by Spline and some best practices and recommendations that you can use to make your Spline scenes load faster on the web. For the best results, you’ll need to do your own testing to find out what your specific performance issues are and which techniques work for you.
We also recommend that you generally maintain good website health, follow Spline’s performance recommendations, and use their built-in performance testing tool before exporting your scene. If you can get away with adding it as an image or video file to your page, it’s the best solution to eliminate performance issues.
While Spline will never be as fast as regular HTML content, you can still improve the performance and user experience if you implement some of the above techniques.