One of our popular tutorials on Tuts+ teaches readers how to load in and animate content with jQuery.
While using jQuery allows us to write relatively less amount of code to achieve the desired functionality, it also increases page load time and introduces unnecessary dependency.
Unless the website you are working on is already loading jQuery, you might want to consider loading in and animating content using pure JavaScript. The original tutorial was written a long time ago and the browser support as well as native JavaScript capabilities have improved a lot during this time.
Webpage Markup and Styling
Since we are trying to replicate the effect from the original tutorial, it makes sense to use the same markup and styling for our webpages. Here is the markup that we used in the original tutorial for reference:
1 |
<!DOCTYPE html>
|
2 |
<html lang="en"> |
3 |
<head>
|
4 |
<meta charset="UTF-8"> |
5 |
<meta http-equiv="X-UA-Compatible" content="IE=edge"> |
6 |
<meta name="viewport" content="width=device-width, initial-scale=1.0"> |
7 |
<title>Home</title> |
8 |
<link rel="stylesheet" href="style.css"> |
9 |
</head>
|
10 |
<body>
|
11 |
<nav>
|
12 |
<ul>
|
13 |
<li><a href="index.html">Home</a></li> |
14 |
<li><a href="about.html">About Us</a></li> |
15 |
<li><a href="team.html">Our Team</a></li> |
16 |
<li><a href="contact.html">Contact</a></li> |
17 |
</ul>
|
18 |
</nav>
|
19 |
<span class="loader"></span> |
20 |
<section id="content"> |
21 |
<img src="dog.svg" /> |
22 |
<h1>Embrace Pawsitivity, Transform Lives!</h1> |
23 |
<p>Welcome to Pawsitive Care Foundation, a dedicated organization working towards the well-being and protection of animals.</p> |
24 |
<p>Our animal Welfare NGO provides a range of services to support animal welfare:</p> |
25 |
<ol>
|
26 |
<li>Rescue and rehabilitation of abused and abandoned animals</li> |
27 |
<li>Adoption programs to find loving homes for animals in need</li> |
28 |
<li>Education and awareness campaigns to promote responsible pet ownership</li> |
29 |
<li>Lobbying and advocacy for stronger animal protection laws</li> |
30 |
<li>Collaboration with local communities to implement spay/neuter programs</li> |
31 |
</ol>
|
32 |
</section>
|
33 |
<script src="load-content.js"></script> |
34 |
</body>
|
35 |
</html>
|
The only difference is that we have got rid of jQuery and our load-content.js file will now have vanilla JS instead of jQuery.
Here is the CSS that we will be using for our loader as well as the content:
1 |
.loader { |
2 |
background: white; |
3 |
width: 30px; |
4 |
height: 30px; |
5 |
display: inline-block; |
6 |
position: absolute; |
7 |
right: 2rem; |
8 |
top: 1.2rem; |
9 |
animation: 0.5s infinite spin; |
10 |
border-radius: 50%; |
11 |
border-top: 5px solid black; |
12 |
border-bottom: 5px solid gray; |
13 |
}
|
14 |
@keyframes spin { |
15 |
0% { |
16 |
transform: rotate(0deg); |
17 |
}
|
18 |
100% { |
19 |
transform: rotate(360deg); |
20 |
}
|
21 |
}
|
22 |
|
23 |
section#content { |
24 |
width: 100% !important; |
25 |
}
|
To avoid repetition, I would recommend that you can go through the original post to see why I used this particular markup structure and CSS rules if anything looks confusing.
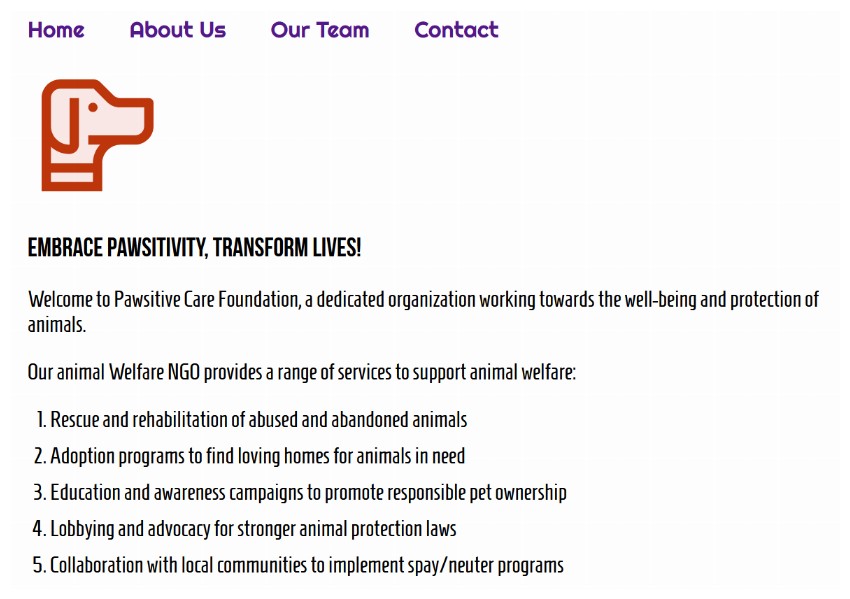
The following image shows what our webpage looks like once all the CSS is applied:


Handling Page Load and Link Clicks
It is important to make sure that our HTML document has been fully parsed before we start manipulating the DOM. We do this by listening to the DOMContentLoaded event. We attach a callback function to this event listener which executes as soon as the DOMContentLoaded event fires. Here is our initial code:
1 |
document.addEventListener("DOMContentLoaded", () => { |
2 |
const loader = document.querySelector(".loader"); |
3 |
const content = document.getElementById("content"); |
4 |
const navLinks = document.querySelectorAll("nav li a"); |
5 |
|
6 |
loader.style.display = "none"; |
7 |
});
|
At this point, we are simply using the querySelector(), getElementById(), and querySelectorAll() methods to select the needed DOM elements. You can read our tutorial on getting elements by class, ID, tag name, or other selectors to learn how these methods work.
Initially, we want the loader to stay hidden. We achieve this by simply setting the value of display property to none.
Place the following code inside the callback function now:
1 |
const handleClick = (event) => { |
2 |
event.preventDefault(); |
3 |
|
4 |
const loadURL = `${event.target.getAttribute("href")}`; |
5 |
|
6 |
content.style.display = "none"; |
7 |
loader.style.display = "block"; |
8 |
|
9 |
loadContent(loadURL); |
10 |
|
11 |
window.location.hash = event.target.getAttribute("href").slice(0, -5); |
12 |
};
|
13 |
|
14 |
navLinks.forEach((link) => { |
15 |
link.addEventListener("click", handleClick); |
16 |
});
|
We begin by defining our click handler. Inside handleClick, the first thing we do is prevent the default action from happening by calling event.preventDefault(). We are using an arrow function to define our click handler, therefore, we will have to use event.target instead of this in order to access our link element.
We get the value of the href attribute of our navigation link because we have to pass it to the loadContent() function a little later. At this point, we want to hide the currently visible content on the webpage and start displaying the loader. We do this by changing the value of the display property.
After that, we loop over all the links stored inside navLinks and add a click event listener to them. The handleClick callback is attached to each of those event listeners at the same time. This function will get called every time one of those links is clicked.
Defining the loadContent() Method
Now, we need to define the loadContent() function. It will accept our URL as its only parameter and then make an AJAX request using the Fetch API.
1 |
const loadContent = (url) => { |
2 |
content.innerHTML = ""; |
3 |
fetch(url) |
4 |
.then((response) => { |
5 |
if (response.ok) { |
6 |
return response.text(); |
7 |
}
|
8 |
})
|
9 |
.then((html) => { |
10 |
const tempElement = document.createElement("div"); |
11 |
tempElement.innerHTML = html; |
12 |
const extractedContent = tempElement.querySelector("#content").innerHTML; |
13 |
content.innerHTML = extractedContent; |
14 |
content.style.display = "block"; |
15 |
loader.style.display = "none"; |
16 |
});
|
17 |
};
|
A call to the fetch() method returns a Promise object that resolves to the Response of our request once the server responds with headers. We check if the request was successful by checking the value of the ok property of the response object. We return the webpage HTML as a string by using the text() method if everything is ok.
You should consider reading our tutorial on Promise basics if all this is new to you.
Now that we have our HTML, we make another call to then() passing our returned HTML as a parameter. At this point, we only want to extract the content that is inside our section element with id content. To do so, we create a temporary element with all of our HTML and then call the querySelector() method on this element to extract the HTML we want.
Finally, we set the display property of our content section to block and the display property of the loader to none.
Adding Animation to the Content
You might have noticed that we are simply changing the value of the display property for our #content element to either block or none. There is no animation involved.
You will now learn how to animate the content. The easiest way to do so involves the use of CSS. Add the following lines to your style.css file:
1 |
#content.fade-in { |
2 |
overflow: hidden; |
3 |
animation: fadeInAnimation 0.4s forwards; |
4 |
}
|
5 |
|
6 |
@keyframes fadeInAnimation { |
7 |
from { |
8 |
opacity: 0; |
9 |
max-height: 0; |
10 |
}
|
11 |
to { |
12 |
opacity: 1; |
13 |
max-height: 100vh; |
14 |
}
|
15 |
}
|
We have simply defined a keyframe animation which animates both the opacity and the max-height properties to give the same effect as our original tutorial. The important thing to note here is the forwards keyword which will make our #content element retain the final computed values.
Now, you simply need to add the fade-in class to the #content element by using the following line:
1 |
content.classList.add("fade-in"); |
Simply add it below the line that sets the content display property to block.
Similarly, you need to remove the fade-in class from the content element by using the following line:
1 |
content.classList.remove("fade-in"); |
Final Thoughts
In this tutorial, we learned how to load in and animate content on a webpage using a little bit of CSS and vanilla JavaScript. This is a little bit trickier compared to using jQuery. However, you can get rid of the overhead of downloading an entire library.
Now, get creative and animate the page content however you want.