There are 3 methods you can use to customize WooCommerce with Elementor. In this tutorial, we’ll break down these fast and intuitive customization options.
WooCommerce is hands down the best WordPress plugin for setting up an online shop. The only problem is, while it gives you control over a good majority of store settings, and it simplifies the product creation process, it doesn’t allow for much customization when it comes to design.
There are a number of ways you can work around this with Elementor Pro:
Method 1: Use a WooCommerce Elementor Theme
The main issue we’re dealing with here is that WooCommerce doesn’t give users the ability to customize pages like:
- Shop
- Product
- Cart
- Checkout
- My Account
Many premium WooCommerce Elementor themes provide a simple solution for this problem. Within each theme, you’ll find website demos or page templates that offer up multiple layout options for your ecommerce pages.
For example, MyDecor comes with nine product layouts to choose from:
If you don’t need or want to spend a ton of time customizing your WooCommerce pages, this will be the best method for you.
After you upload your theme into WordPress and install your preferred demo, use the Elementor page builder plugin to tweak the designs and layouts. To get the best results, you’ll have to use Elementor Pro widgets.
By the way, if you’re curious about which Elementor-compatible WooCommerce themes are the best to use, check out some of our recommendations:
Method 2: Customize Premade WooCommerce Pages with Elementor Widgets
There are three pages that WooCommerce will automatically generate for you after you install the plugin:
Most premium WordPress themes will do the same.
If you take a look inside these pages in WordPress, you’ll see a shortcode in place of where the content should be:
Open up the preview of this page and you’ll find a basic Cart page:
There’s nothing wrong with this design. However, what if you want to structure it a little differently — like by adding a sidebar to the right side of the page? Or what if you wanted to add a section with upsells or wishlist items below the cart?
The only way to customize these three WooCommerce pages is to strip out the shortcode and to edit them in Elementor. Here’s the process you’ll follow to do that:
Step 1: Locate the WooCommerce Page to Edit
Go to Pages and find the premade WooCommerce page you want to edit:
Open up the one you want to edit. In this example, we’re going to work on Checkout.
Step 2: Delete the Shortcode
In the WordPress editor, select the Shortcode block. Then click on the Options (three vertical dots) button.
Click Remove Shortcode to delete the block from the page.
Update the page. Then click the blue Edit with Elementor button at the top to open the editor.
Step 3: Customize the WooCommerce Page in Elementor
Unfortunately, Elementor page and block templates will be of little help to you. As of writing this, there are no templates for cart, checkout, or account page content.
That said, you can use Elementor Pro’s WooCommerce widgets instead. Just make sure that you’ve configured your theme’s global settings in order to minimize how much stylistic editing you have to do here.
What’s great about using Elementor Pro widgets is that there’s one for pretty much every page you’d want to customize:
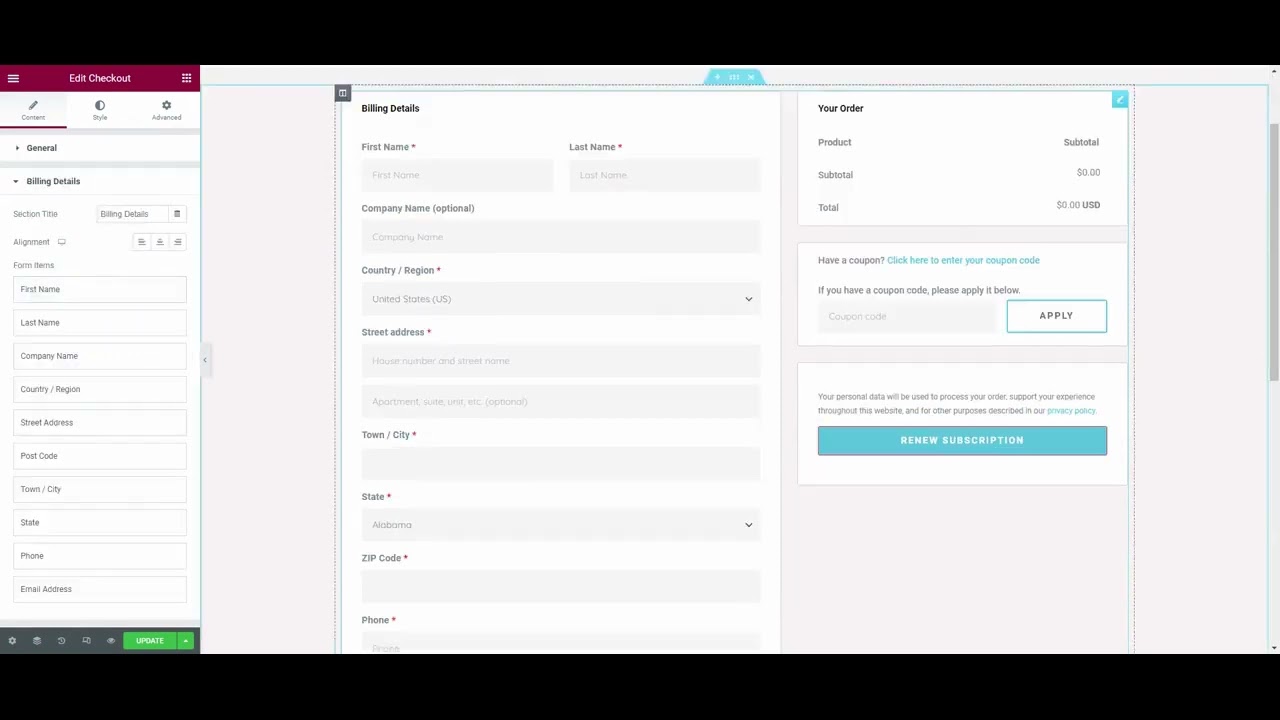
Checkout creates a checkout page with:
- Billing details form
- Order note field
- Summary box
- Coupon section
- Purchase button (with terms of service agreement)
Cart creates a cart page with:
- Cart details
- Coupon field
- Purchase total with shipping calculations
My Account creates a user account page with tabs for:
- Dashboard
- Orders
- Downloads
- Addresses
- Account Details
- Logout
With each of these widgets, you have the ability to customize how each section appears as well as the design of the overall page. In some cases, you can disable some of the features (like the coupon code) when they’re irrelevant to your shopping experience.
You can add other widgets into these WooCommerce pages, by the way. Elementor has Pro widgets for all kinds of things — Breadcrumbs, Upsells, Product Categories, and more.
Step 4: Publish the New Page
When you’re done customizing your design, click the green Update button in the bottom-right corner. Then exit to the WordPress dashboard.
Repeat this process for as many pages as you need to customize.
Method 3: Create Custom WooCommerce Pages with the Theme Builder
Use this method to build your WooCommerce Shop and Product pages with Elementor Pro.
Before you proceed with this workflow, it’s a good idea to have at least one product loaded into your shop. Otherwise, you won’t be able to see real data or images as you piece together and customize your designs.
Step 1: Go to Templates and Theme Builder
From the WordPress dashboard, locate the Templates menu. Then select Theme Builder:
Theme Builder is a Pro feature that enables users to create custom designs for the most critical components and pages on a website. When WooCommerce is installed, users gain the ability to customize the Single Product and Products Archive pages with Elementor.
Step 2: Create a New Global Part
To create a page for your Shop, hover over Products Archive and click the blue plus-sign button. To create a page for individual products, hover over Single Product and click the blue plus-sign button.
For our example, we’ll be creating a global layout for our products.
Step 3: Choose a Template
After clicking the plus-sign, Elementor will take you inside the builder and provide you with block templates that match whatever it is you’re trying to create:
Even if the premade layouts aren’t exactly what you envisioned, choose the one that’s closest to what you want to do. Starting from a template is a good time-saving trick as you can leave the foundation be and then focus your energy on editing the content.
To insert the template into the page, click on the green Insert button that appears to the top-right of it.
tip
You can use external templates here as well. So, if you have a product or shop page template you’d like to modify, there’s a workaround for it.
Save your product or shop page as a draft and then return to the WordPress dashboard. Go to Templates and Saved Templates. Click on Import Templates to pull in your external design file:
Elementor is going to ask you what type of page it is. It will then take you to the Elementor editor where you can customize it.
You won’t need to return to the Theme Builder if this is the route you take. Just make sure to finish steps 4 and 5 so you can program the page template to show up as a global page design.
Step 4: Customize the Design
When you’re ready, start by removing the widgets and features you don’t need. These should be elements you won’t be replacing with anything else. For instance, when customizing my own product page, I left the image column intact:
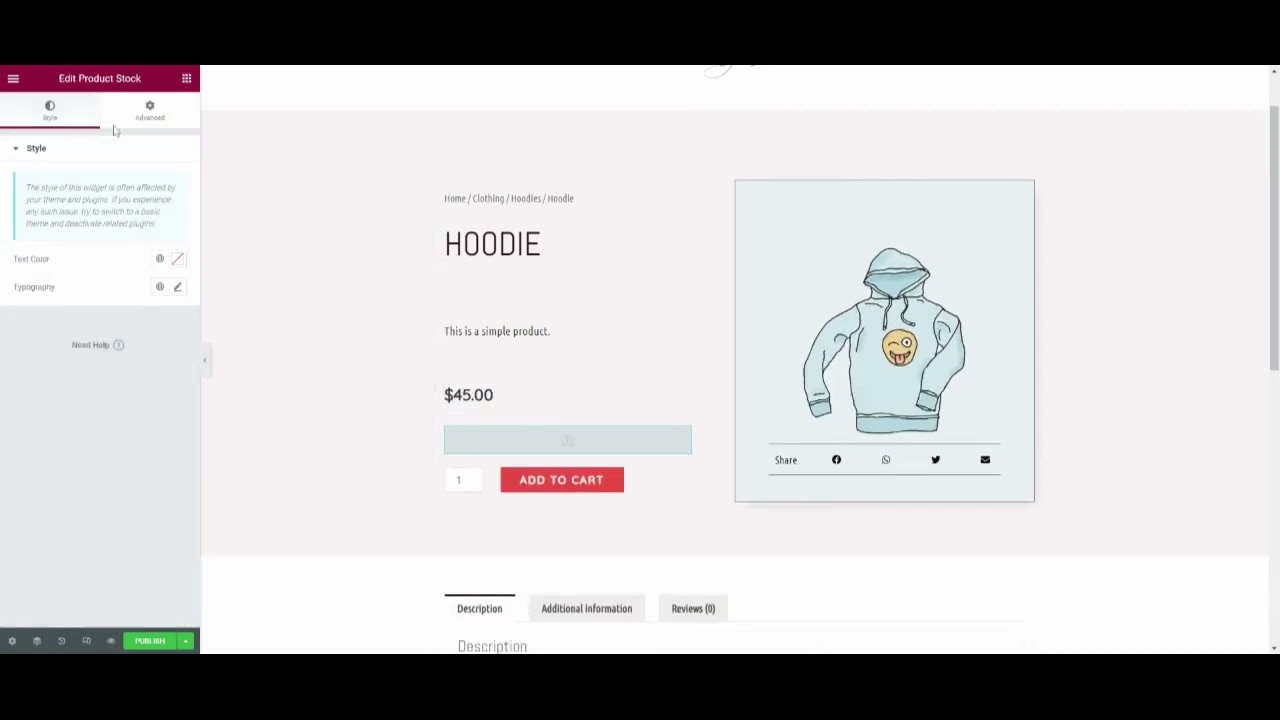
However, I removed the background image which was set to pull in the primary product photo. I then dragged the Product Images widget into the column.
This allows me to create a more complete and interactive product image experience. For starters, if I load up more than one product image into WordPress, the full gallery will appear here. Secondly, this widget comes with a hover-triggered zoom feature, which will make the imagery more useful for shoppers as they can see up-close details of the products.
Now, after you’ve removed widgets and sections you don’t need, go ahead and add widgets into the canvas for any features that are missing. You’ll likely find them under the Product and WooCommerce categories. You can use other Elementor widgets if they’re needed, too.
Lastly, spend some time going through each part of the page. Customize the content and style of everything that needs it. This goes just as much for the individual widgets as it does for the various sections on the page.
Step 5: Set Conditions for the Page and Publish
When you’ve finished finalizing your design, click the up-arrow to the right of the green Publish button. Select Display Conditions:
In the pop-up that follows, click the Add Condition button. By default, the Single Products page you’re creating will apply to all product pages:
If you only want to display it for certain types of products, click the Products dropdown and select the category, tag, or other specification you want to limit the condition to.
If you want to display this design for all products except a specific category or type, click Add Condition once more and create an EXCLUDE setting.
Once you’re done setting the conditions, click Save & Close. This will simultaneously save your conditions and publish the new design to the areas of the site where it’s applicable.
Open up your website and navigate to a product page (or the Shop page, if you customized that one first). You’ll see the changes reflected there.
Conclusion
WooCommerce is a great solution for setting up an online shop. All the basic parts you’d need to start selling your products are built right into the platform. However, it doesn’t offer much in the way of design customization.
Elementor Pro offers us a solution to this problem with its Theme Builder tool and Pro widgets.
This premium page builder plugin makes it easy to build a WooCommerce shop with Elementor and then customize the parts of it that WooCommerce itself doesn’t touch — like the Shop, Cart, and Checkout pages.
The Elementor-WooCommerce duo are a must have for building a high-performing online store. When you’re ready to level up the custom shopping experience you’ve created today, try these WooCommerce Elementor Addons.