
Tutorial Details
Software: WordPress
Difficulty: Beginner
Completion Time: 1 hour
In the first three parts of this series, you learned how to prepare static HTML for WordPress and to create a theme by splitting your HTML file into a set of template files and editing the stylesheet. You then uploaded your theme to WordPress and activated it.
The theme still isn’t displaying any content you add via the WordPress admin however; to do that you need to add a loop to your template files.
At the moment your theme only has one main template file – index.php – so you’ll add a loop to that.
What You’ll Need
- Your code editor of choice
- A browser for testing your work
- Image software for saving your screenshot in the right dimensions
- A WordPress installation, either local or remote
- If you’re working locally, you’ll need MAMP, WAMP or LAMP to enable WordPress to run
- If you’re working remotely, you’ll need FTP access to your site plus an administrator account in your WordPress installation
1. Adding a Page in WordPress
I’m going to assume that you already know how to use the WordPress admin to add a page. I’m going to create a page called ‘Home‘, add some dummy content to it and then edit the ‘Reading Settings‘ in WordPress so that this is the home page, rather than the blog post listing.
I’ll use the content from my static site as the content for my new page, except I won’t add the first, full-width image to the content – you’ll learn how to add an image like this to your theme as a featured image in Part 10 of this series.
So go ahead and create a page, include some images if you like, and edit the ‘Reading Settings‘ page so your new page is the home page.
2. Adding a Loop
Having created your new page, visit your site’s home page again. You’ll find that nothing has changed – WordPress isn’t displaying the content of your page. That’s because you need to add a loop to tell it to do so. The loop will pull in the page content from the database and is what makes WordPress work.
Open your index.php file. After the opening of the .content div and before the opening
<article>
tag, add the following:
<?php while ( have_posts() ) : the_post(); ?>
Now after the closing </article> tag, add:
<?php endwhile; ?>
The first piece of code you added starts the loop. It checks if there is a post or page to display and then opens up the first post or page.
If you’re on an archive page, it loops through all the relevant posts, either the latest posts on the main blog page or the posts in a given category on a category page.
The second piece of code ends the loop so that WordPress can move on to displaying content such as the sidebar and footer.
3. Classes and IDs for the Article
The opening
<article>
tag can have classes and an ID which are automatically generated by WordPress. You can then use these at a later date to target CSS on that post or page if you wish to do so.
Find the opening
<article>
tag:
<article class="post" id="01">
Edit it so it reads:
<article class="<?php post_class(); ?>" id="post-<?php the_ID(); ?>">
The two functions you’ve added are:
the_ID()– this adds a class to thearticleelement which is the unique ID reference for the post or page being displayedpost_class– this adds a series of classes to thearticleelement including the post category, post type and more
So you can use the ID to target a specific post with CSS, and the class to style all posts in a certain category the same way, for example.
4. Adding the Page or Post Title in the Loop
The next thing to display on your post or page is the title. In the existing code, this is a static title inside an
<h2>
tag. Find the line of code which reads:
<h2 class="entry-title">This is the title of a post or page</h2>
Edit it so it now reads:
<h2 class="entry-title">
<a title="<?php printf( esc_attr__( 'Permalink to %s', 'compass' ), the_title_attribute( 'echo=0' ) ); ?>" href="<?php the_permalink(); ?>" rel="bookmark">
<?php the_title(); ?> </a></h2>
This adds two things:
- A link to the post or page itself (using
the_permalink()). This is useful on archive pages to allow users to click on a link to the post’s own page - The title of the post or page, which will automatically be populated by WordPress
5. Adding Post Metadata
The first section element inside the loop is for post metadata – specifically the date and author of the post.
Find this line of code (or all of the code inside that first section element: it may be different in your theme):
Posted on 5 November by Rachel McCollin
Replace it with:
Posted on <?php the_date(); ?> by <?php the_author(); ?>
You’ve added two template tags:
- The date the post was published, using
the_date() - The author of the post, using
the_author()
6. Adding the Post Content
The most important thing is to make sure the post or page content is displayed and you do this using one simple template tag – the_content().
Find the section with the class .entry-content and delete its contents. Replace these with the the_content() tag so the whole section looks like this:
<section class="entry-content"><?php the_content(); ?></section><!-- .entry-content -->
7. More Post Metadata
In my design, there is more post metadata after the post or page content. This is optional, but here I’ll use it to display a list of categories associated with the post. You might choose to miss this out of your theme depending on your design and your use of categories or tags.
Delete the contents of the final section with the .entry-meta class and replace them so the whole section reads:
 <section class="entry-meta"><?php if ( count( get_the_category() ) ) : ?>
<span class="cat-links">
Categories: <?php echo get_the_category_list( ', ' ); ?>
</span> <?php endif; ?></section><!-- .entry-meta -->
It’s worth taking a moment to work through this code as it’s the longest snippet of PHP you’ve added so far.
- The opening line checks the number of categories assigned to the post using the
ifstatement and if this is more than zero, runs the rest of the code. - It then opens a
spanelement and lists the post categories inside it, usingecho get_the_catgeory_list(). Theechois important as without this theget_the_category_list()function wouldn’t actually display the list, it would just access the list and do nothing with it. - Finally the
endifstatement closes theifstatement so WordPress can move on to the next piece of code.
Finally, save your index.php file, return to your browser and refresh the home screen. This should have changed slightly, as shown below:
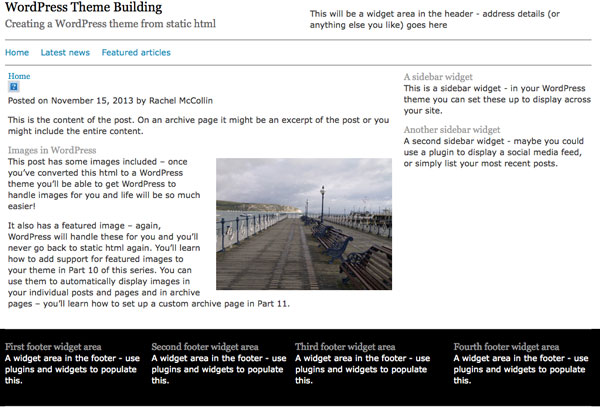
As you can see, the following items are shown:
- The page title
- The date and author
- The content of the page
- The category list is not displayed as this is a page not a post, and categories don’t apply to pages by default. You’ll see an example with the category list displayed later in the series
Note that the featured image isn’t displayed yet – you’ll fix that in Part 10 of this series.
Summary
Your theme is now well on the way to being a fully functioning theme. It has a loop in place to display content added via the WordPress admin as well as a set of template files. The next step is to edit the header.php file to include an essential action hook and some more template tags.
Resources
- The Loop (Codex page)
- A Beginner’s Guide to the WordPress Loop (tutorial)
- Template tags (Codex page)
- The the_date() function (Codex page)
- The the_author() function (Codex page)
- The get_the_category_list() function (Codex page)
- Anatomy of a WordPress Theme (blog post by Yoast)
- WordPress Theme Development Beginner’s Guide by Tessa Blakeley Silver and Rachel McCollin (yes, me!)