Providing end users with the option to enable or disable certain features of a premium plugin or a theme is pretty common. Titan Framework has recently pushed a new option to its core which does exactly that. Let’s see how you can add an enable/disable toggle button inside an admin panel, a metabox or a theme customizer section with Titan Framework (TF).
The Enable Type Option in Titan Framework
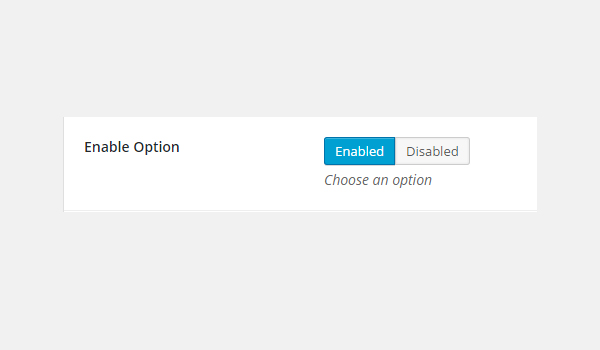
There is an enable type option in Titan Framework to create enable/disable toggle buttons. In the dashboard, the enable type option appears like this:
Here are its parameters:
-
name: It assigns the display name of an
enabletype option. - id: This parameter specifies a unique name which gets saved options values.
- desc: It adds a brief description with the option name.
- default: (Optional) It assigns the default value.
-
enabled: (Optional) It is the label for the button of the enabled state. The default is set to
Enabled. -
disabled: (Optional) It is the label for the button of the disabled state. The default is set to
Disabled. -
livepreview: (Optional) Each time you add an
enabletype option in a theme customizer section, this parameter allows you to live preview the changes you make.
All parameters are string by type, except default which is boolean.
Available Containers for the Enable Type Option
You can add this option inside:
- Admin Panel
- Admin Tab
- Metabox
- Theme Customizer Section
To add an enable type option in these containers, follow these steps:
- Get an instance via the
getInstance()function. - Create an option via the
createOption()function. - Get saved values via the
getOption()function.
If you’re interested in learning how to create these containers with TF, then read the previous articles of this series.
Creating an Enable Type Option Inside an Admin Panel
Example Declaration
Let’s create this option in an admin panel first.
<?php
    /**
     *
     * Create enable type option in an Admin Panel
     *
     */
    $aa_panel->createOption( array(

        'id'      => 'aa_enable_opt', // The ID which will be used to get the value of this option
        'type'    => 'enable', // Type of option we are creating
        'name'    => 'Allow Custom CSS', // Name of the option which will be displayed in the admin panel
        'desc'    => 'Enable/Disable Custom CSS', // Description of the option which will be displayed in the admin panel
        'default' => true  // Default value of the option

    ) );
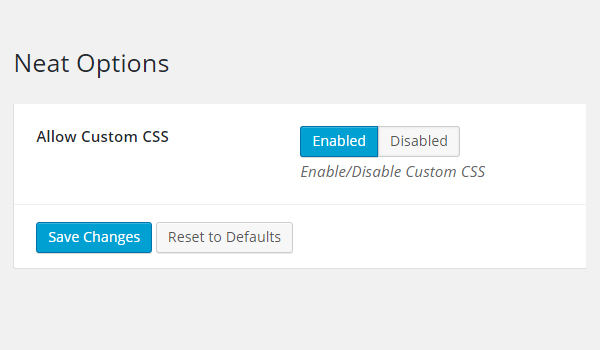
At line #8, I added an enable type option via the createOption() function in an admin panel $aa_panel. As this function takes up an array, I’ve defined the values of the parameters name, type, id, desc and default. The value of ID must be unique, i.e. aa_enable_opt. The value of default is set to true, which means the option’s status is set to ‘enabled‘ by default.
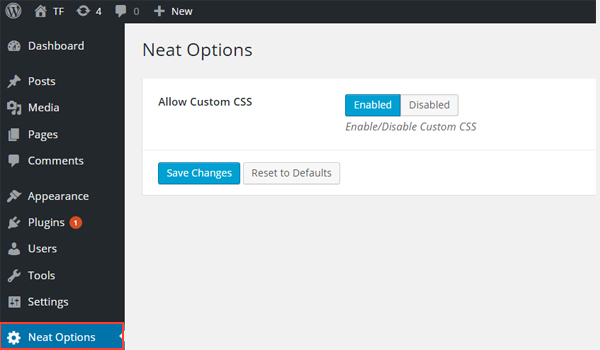
In the above screenshot, there is an enable type option named Allow Custom CSS in an admin panel Neat Options.
Example Usage
Let’s get the saved values.
<?php
// 1. Get the titan framework instance and save it to a variable
$titan = TitanFramework::getInstance( 'neat' ); // we will initialize $titan only once for every file where we use it.

// 2. Get the value via ID using getOption function
$aa_enable_opt_val = $titan->getOption( 'aa_enable_opt' );

    /**
     *
     * Print saved value
     *
     */
    if ( 1 == $aa_enable_opt_val ) {
        echo "Custom CSS in admin tab is On.";
    } else {
        echo "Custom CSS in admin tab is Off.";
    }

?>
To get the saved value, first get an instance via the getInstance() function (line #3). Then at line #6, the getOption() function retrieves the saved value by registering the option ID aa_enable_opt as its parameter. I saved the result inside a new variable $aa_enable_opt_val. Then I used an if-else check which prints the saved value at the front-end.
Now the enable type option can hold two values: either 1/0 or true/false. The value is either ‘1’ (enabled state) or ‘0’ (disabled state). Considering this fact, I wrote lines 15 to 20 of the code, which checks the value of the variable $aa_enable_opt_val. If it is ‘1’ then it prints ‘Custom CSS in admin panel is enabled’ at the front-end. If the value of the variable is ‘0’ then it prints ‘Custom CSS in admin panel is disabled‘.
Displaying the Result at the Front-End
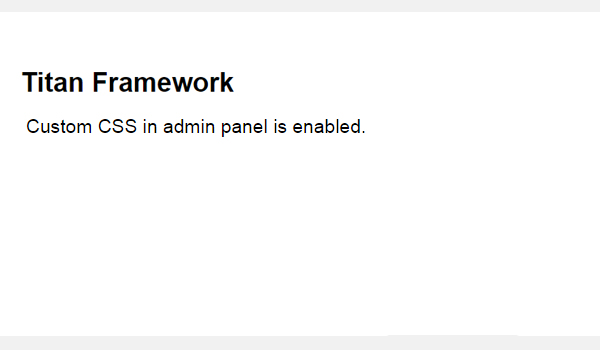
Suppose I enabled the option and saved it.
Here is a screenshot of the final result which appeared at the front-end.
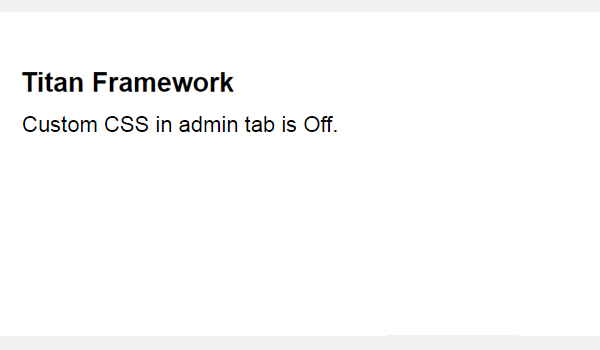
Creating an Enable Type Option Inside an Admin Tab
Example Declaration
Next I’ll create this option in an admin tab.
<?php
    /**
     *
     * Create enable type option in an Admin Tab
     *
     */
    $aa_tab1->createOption( array(

        'id'       => 'aa_enable_opt_in_tab', // The ID which will be used to get the value of this option
        'type'     => 'enable', // Type of option we are creating
        'name'     => 'Allow Custom CSS', // Name of the option which will be displayed in the admin panel
        'desc'     => 'Enable/Disable Custom CSS', // Description of the option which will be displayed in the admin panel
        'enabled'  => 'On', // Label for the enabled option
        'disabled' => 'Off' // Label for the disabled option

    ) );
Here, I added this option in an admin tab $aa_tab1. The value of the ID is aa_enable_opt_in_tab. This time, I’ve also defined new labels for the enabled and disabled parameters.

In the image, there is an enable type option inside Tab 1 of panel Neat Options 2. Also note the newly defined labels ‘On‘ for enable and ‘Off‘ for disable.
Example Usage
Now I’ll get saved values.
<?php

// 1. Get the titan framework instance and save it to a variable
$titan = TitanFramework::getInstance( 'neat' ); // we will initialize $titan only once for every file where we use it.

// 2. Get the value via ID using getOption function
$aa_enable_opt_in_tab_val = $titan->getOption( 'aa_enable_opt_in_tab' );

/**
 *
 * Print saved value
 *
 */
if ( 1 == $aa_enable_opt_in_tab_val ) {
    echo "Custom CSS in admin tab is On.";
} else {
    echo "Custom CSS in admin tab is Off.";
}

?>
The code is pretty much similar to what I wrote above. So, let me summarize all the steps:
- Get a unique instance via the
getInstance()function at line #4. - Get the saved value via the
getOption()function at line #7. - Print the saved value at the front-end via the
if-elsecheck statement on lines 15 to 20.
Displaying the Result at the Front-End
This time I toggled the option to Off. The front-end prints the following line:
Creating an Enable Type Option Inside a Metabox
Example Declaration
Now I’ll create an enable type option in a metabox.
<?php
    /**
     *
     * Create enable type option in a Metabox
     *
     */
    $aa_metbox->createOption( array(

        'id'      => 'aa_enable_opt_in_metabox', // The ID which will be used to get the value of this option
        'type'    => 'enable', // Type of option we are creating
        'name'    => 'Allow Custom CSS', // Name of the option which will be displayed
        'desc'    => 'Enable/Disable Custom CSS', // Description of the option which will be displayed
        'default' => false // Default value of the option

    ) );
Here I added yet another enable type option in a metabox $aa_metbox. Its ID is aa_enable_opt_in_metabox. The value of default is set to false.
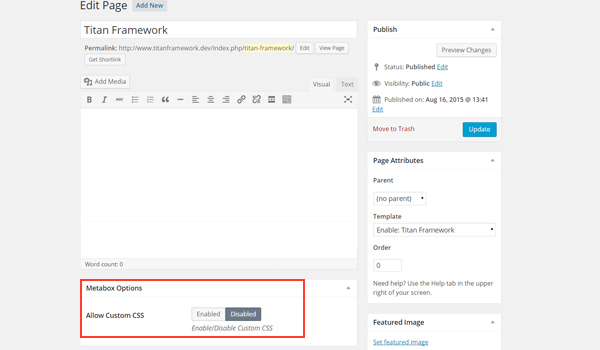
In the above screenshot, you can find this option in a metabox. It appears on all page and post editing screens.
Example Usage
Let’s get the saved value for this option.
<?php
// 1. Get the titan framework instance and save it to a variable
$titan = TitanFramework::getInstance( 'neat' ); // we will initialize $titan only once for every file where we use it.

// 2. Get the value via ID using getOption function
$aa_enable_opt_in_metabox_val = $titan->getOption( 'aa_enable_opt_in_metabox', get_the_ID() );

/**
 * Print saved value
 *
 */
if ( 1 == $aa_enable_opt_in_metabox_val ) {
    echo "Custom CSS in a metabox is enabled.";
} else {
    echo "Custom CSS in a metabox is disabled.";
}

?>
I’ve written almost the same code again. The only difference can be spotted at line #6. There exists a new parameter inside the getOption() function. This is the get_the_ID() function which is used to retrieve a specific page or post ID.
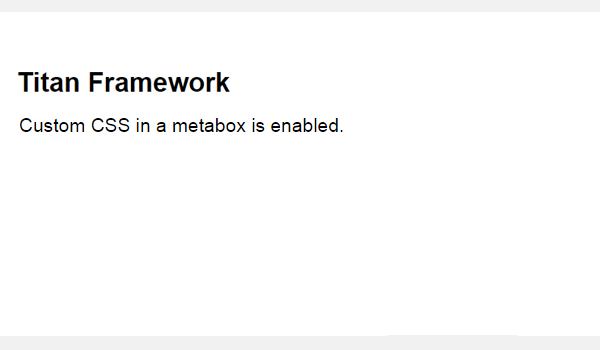
Displaying the Result at the Front-End
Let’s again enable the option and save it. The front-end appears like this:
Creating an Enable Type Option Inside a Theme Customizer Section
Example Declaration
Finally, I’ll create this option in a theme customizer section.
<?php
    /**
     *
     * Create enable type option in a Theme Customizer Section
     *
     */
    $aa_section1->createOption( array(

        'id'      => 'aa_enable_opt_in_sec', // The ID which will be used to get the value of this option
        'type'    => 'enable', // Type of option we are creating
        'name'    => 'Allow Custom CSS', // Name of the option which will be displayed
        'desc'    => 'Enable/Disable Custom CSS', // Description of the option which will be displayed
        'default' => false // Default value of the option

    ) );
Here I created this option in a theme customizer section $aa_section1. Its unique ID is aa_enable_opt_in_sec. The rest of the parameters are the same.
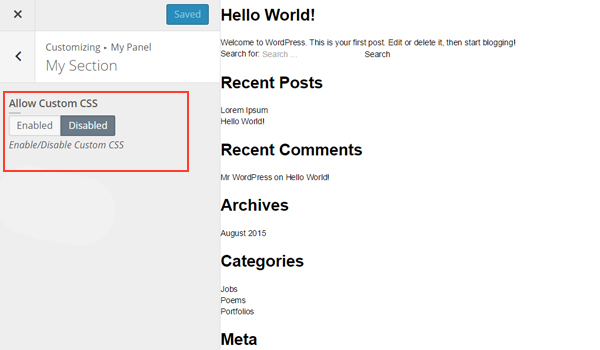
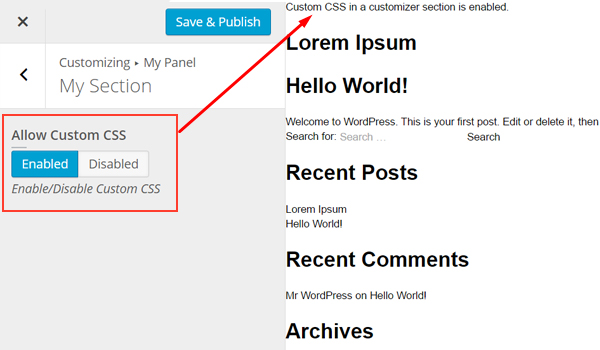
In the above image, there’s an enable type option in a theme customizer section named My Section.
Example Usage
Use the following code to get saved values.
<?php
// 1. Get the titan framework instance and save it to a variable
$titan = TitanFramework::getInstance( 'neat' ); // we will initialize $titan only once for every file where we use it.

// 2. Get the value via ID using getOption function
$aa_enable_opt_in_sec_val = $titan->getOption( 'aa_enable_opt_in_sec' );

/**
 *
 * Print saved value
 *
 */
if ( 1 == $aa_enable_opt_in_sec_val ) {
    echo "Custom CSS in a customizer section is enabled.";
} else {
    echo "Custom CSS in a customizer section is disabled.";
}

?>
Once again, the code is exactly the same. Only the ID and variable names are different.
Displaying the Result at the Front-End
Here is the screenshot, which displays the changes in live preview mode.
Conclusion
From an end user’s point of view, the enable type option is quite useful, as you can enable or disable any of the features with just a single click. So go through this tutorial and share your views about it in the comments section.
At this point, we’ve covered all there is to cover about the Titan Framework. Please remember to checkout the series page if you have any questions or comments about any of the topics that we’ve covered. Or feel free to reach out to me on Twitter.