Rapid prototyping is an essential way of saving time in our modern age where billions of apps compete for the customer’s attention. Is the great idea you had for just another app actually that great or is it just another failure among the millions of failures in app stores and the web worldwide? Apart from that angle rapid prototyping has always been the easiest and at the same time most impressive way of showing a customer a functional demo of the project you are trying to sell him. Whether it’s development for the web, for mobile or the desktop, you shouldn’t do it without having done a working prototype. Infragistics Indigo Studio is a software that can help you do just that…
The History of Prototyping
I have created websites since the early nineties. And I have worked with countless clients from different industries around the world. What always was the hardest part in any given project, was the design discussion. Just like any other designer I knew then, we used to squeeze out a quick Photoshop mockup to show it to the client.
These mockups were sent by mail, and feedback was given in the same way, except that the client more often than not had imported the mockup into Word. That bloated document then got sent back and forth until both me and the client lost track. With clients nearby I hopped into the car, drove over with printed-out versions of what I thought was the latest version. Then we sat together around the conference table and scribbled onto the prints.
This was extremely time-consuming and despite the effort not very reliable. In the late Nineties, I turned to Microsoft’s Powerpoint to solve another problem that had arisen. Clients wanted to see a working version of their site-to-be. But I didn’t mean to produce actual markup and waste time on a design that was most likely far from final. Powerpoint allowed me to link mockups together via hotspots, very similar to clickable URLs. The result could be exported in a way that no Powerpoint at the client side was needed.
Then a company named Macromedia came up with a product called Fireworks. I left Powerpoint without looking back and turned to Fireworks. With this software, we could produce mockups just like we could in Photoshop, but with a better focus on web production. Fireworks enabled us to create graphic prototypes with clickable URLs directly integrated. We would then export the project to HTML, upload it to a web server and be presentation-ready.
Adobe bought the company, did not do much to keep Fireworks updated and eventually left the software behind. You can still use it as a Creative Cloud subscriber, but there’ll be no more updates and enhancements. A substitute is utterly needed.
Infragistics Indigo Studio for Mac and Windows
To call Infragistics Indigo Studio that substitute for Fireworks is right and wrong at the same time because Indigo Studio delivers less and more than Fireworks. When it comes to features of image editing and manipulation, Indigo Studio is in no way comparable to Fireworks as these features simply do not exist. Well, we have Photoshop, Pixelmator, our hands, paper for that.
When it comes to the prototyping features, Indigo Studio leaves Fireworks far behind. Building a prototype or wireframe (if you prefer) with Indigo Studio is a pleasant experience I would call almost intuitive.
Indigo Studio is a software you will need to install to your local machine. It is not one of those hyped web apps but more the conservative kind – not the showman, more the worker. The software is available for Windows and Mac OS alike. No designer is left behind
Differences to Other Solutions
Before we take a look at the prototyping process let me work out the most significant differences to other tools I came across during the years.
As I already mentioned image editing is not a core feature of Indigo Studio. This does not mean that you can only build simple wireframes with it. The sketching functionality is excellent and the possibility to import from your favorite editors is given. You will not miss a thing.
Indigo Studio does not only let you build wireframes. It also cares for the user story around the app you are trying to create. You can design storyboards lining out the use case of your idea and how it interacts with reality. Take a look at that video in which Infragistics sketches out a car support app from a real-life situation.
Other wireframing prototypers let you create a bunch of screens, and then allow you to connect them. That’s the way I was used to working with Powerpoint in the late Nineties. Indigo Studio calls its approach seamless. In Indigo Studio, you produce the different screens while you lay out the app. Start with the initial screen and proceed from there. Screens are added as needed. You do not need to think the whole app through beforehand but can evolve from any state you are working on.
Indigo Studio can add some pizazz to the prototypes. To amp things up and have your project look more lively and appealing, you can add animations and transitions to the different screens and screen parts you create. Especially prototypes of mobile apps benefit from that feature. Flash users will recognize the timeline functionality and like the software just because of that
Although you can build just about any prototype of any interactive project you can think of, Indigo Studio sees itself as a specialist in UI design. It offers a solid feature set to support UI designers with a bunch of ready-made elements and more. Creators of artsy web pages might not feel at home with Indigo Studio, but designers and developers of feature-driven websites will. Software architecture is what Indigo Studio does best.
If you like what you just read, stick with me and let’s take a quick look at how it’s all done.
Before you read on, please note that Indigo Studio is no free offering. You can download it for free and use their 30-day trial, however. Should you be convinced afterward, and I suppose you will be, the software costs a one-time fee of 495 USD. This does sound a lot at first sight but is not that much more compared to Fireworks and much less than other tools we use on a daily basis.
What you need to judge for yourself is whether you got enough projects that need prototyping. If you do more than two or three larger wireframes a month and bill usual rates, Indigo Studio should make itself paid in a month already. But this depends largely on the way you run your business.
Indigo Studio: Starting Out
Indigo Studio is one of the most intuitive software I know. This may tell you more about me than about the software, but I tend to think that my approach to things is not too far away from the industry’s average.
Indigo Studio starts into an overview of your latest projects and their different states. From here you can open and save them, start new ones and access the support areas. Getting started with the software is accelerated by a few samples they deliver, among them a blog project and an app for searching flights. Working with these samples gives you a good idea of what to do how.
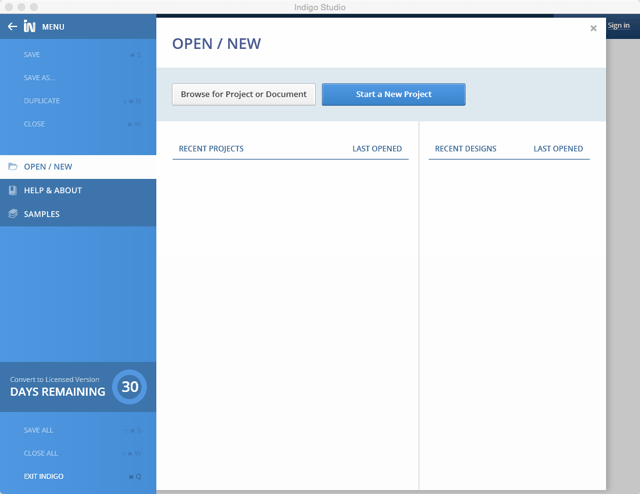
The start screen of Indigo Studio reminds me of the start screens of modern Microsoft software such as Office. I suppose this is no coincidence as – besides Indigo Studio – Infragistics has a lot of software tools for Windows developers in store.
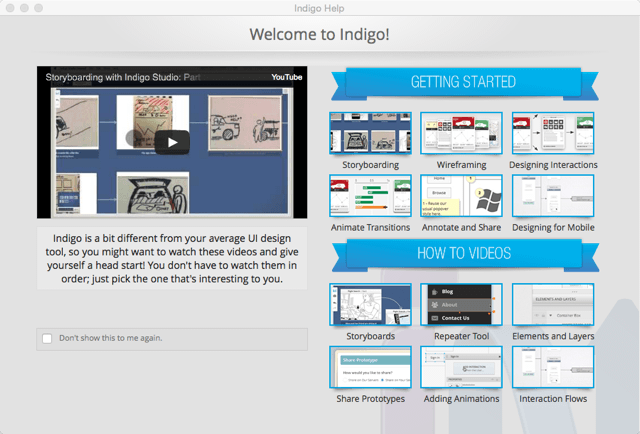
If you want to delve into the software quickly, there are two ways. The first thing to do is to watch the six videos they have to introduce you to all the main functionality. You can either view them via YouTube or access them from the splash screen of Indigo itself. These small films take up about half an hour of your time, and these are very well spent 30 minutes. I did feel right at home with the software afterward.
Once done look into the sample projects Indigo Studio installed onto your local hard-drive to get going quickly. I estimate it will take you less than half a day and you will be up and running with Indigo Studio. The 30-day trial period will definitely suffice to let you judge whether or not you want to use the software for your business.
Indigo Studio and the First Prototype
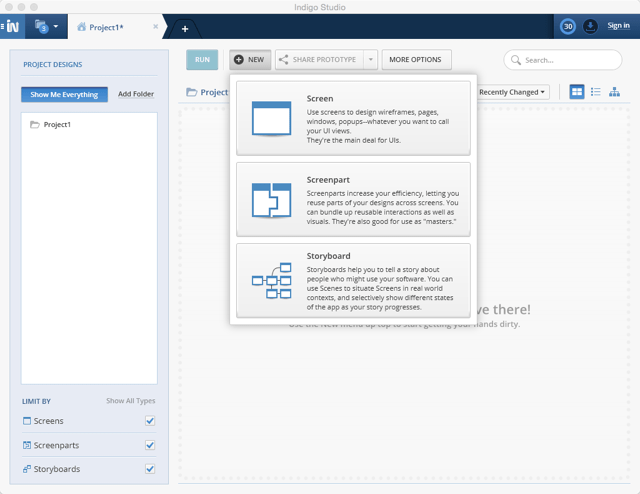
Starting a new project with Indigo Studio is pretty straight-forward. As soon as you click the “New” button, you are prompted to choose whether you want to create a screen, a screen part or a storyboard.
I already mentioned storyboards above. I am not a storyboard scribbler, but if you are, this feature will make you fall in love with Indigo Studio. You can drop all your digitized hand-drawn scribbles onto the stage. Scribbles of the app can even be framed with fitting surroundings such as a hand carrying a smartphone on which screen your scribble resides. This is great and simple and fast – a pity I never use this way to start a design project
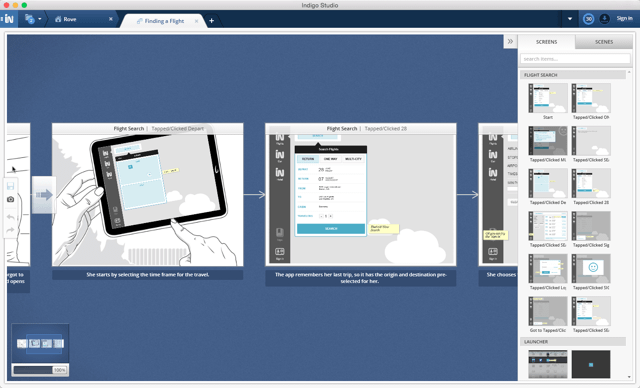
Storyboard for an App
Screen parts are – well – parts of the screen you want to reuse in your designs. Of course could you just copy and paste the reusable parts but with the dedicated feature changing and managing these parts becomes much easier and more convenient. Think of it as a library item linked to more than one destination.
Screens are what represents the UI of any given project. This is what you will create first thing. Derive screen parts from the screen and derive different states from the initial start screen. As I already mentioned you will not need to draw all the screens individually then link them together. That’s how I did it with Powerpoint in the Nineties.
Instead you go ahead and create the start screen. Then you add more screens or screen states (same screen with slight alteration) to it. The growth of your prototype is represented by a tree view showing you the connections between given screens or states. That’s what Infragistics calls a seamless process. Add whatever necessary when you find it necessary.
I know that some purist might now intervene and object that this is not a clean development process but remember, we are talking about rapid prototyping. The aim is to put a functional model out as quickly as possible. And Indigo Studio really lives up to this challenge.
Adding Beauty: Indigo Studio’s Animations and Transitions
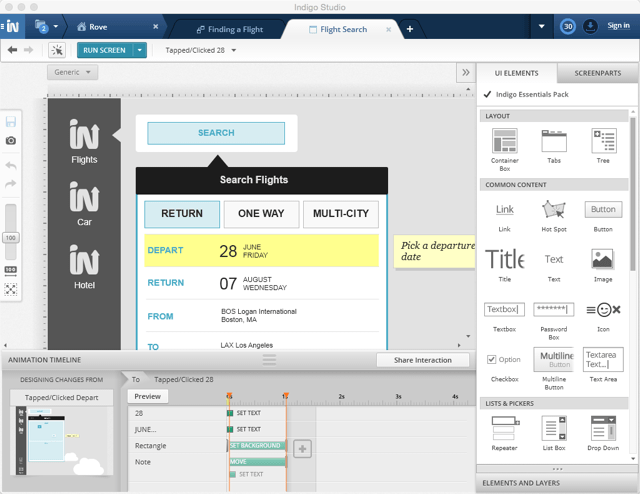
This one is mostly for (mobile) app design. We know that plain functionality usually does not look that sexy at all. Presenting numbers, charts, texts is not bound to induce euphoric oohs and aahs with anyone watching. With Indigo Studio, your prototypes will be far from boring. To achieve that, you will want to add animations and transitions.
Doing so is easy. If you have ever worked with Adobe Flash, where everything is about animation and the timeline is the single most important software feature, you will feel familiar with Indigo Studio, too. Just like you are used to from Flash, you will add different states of the same element, then stretch in a timeline on which you will animate the transition from one state to the other.
This might not be a necessary part of the prototyping process but if you are still on the way of selling the project to someone, be it your boss, your client or any other stakeholder, this might make all the difference.
Share Your Prototype Easily
Testing your prototypes is always only one click away. The button “Run” sits right above the working area and does what you’d expect it to. Click on it and see your prototype in motion. While working on individual screens the button is named “Run Screen” and runs this individual screen only.
While this is all fine during work on the project, presenting the prototype to other people needs different measures; especially when your client sits overseas. That’s where “Share Prototype” comes into play. The sharing feature is two-fold.
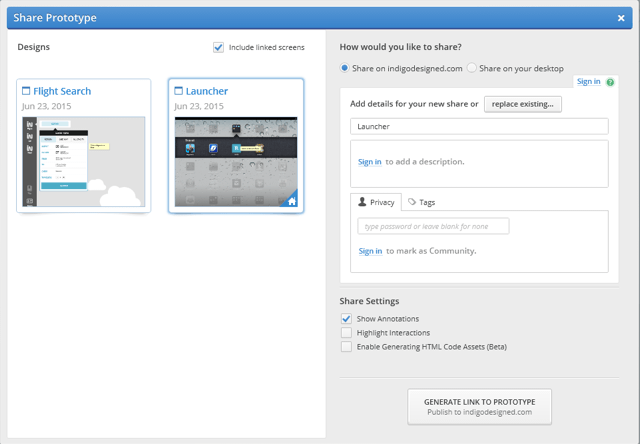
For your overseas clients, you could choose to publish the prototype to Indigo’s service under Indigodesigned.com. You could add a description, limit access and more to make sure the prototype explains itself.
Do you want to present the prototype locally or on your own server space you would choose “Share on your desktop”. That way a functional project would be exported into an appropriate folder structure with all the CSS and JavaScript needed, leaving you with an index.html to call in any browser you like to be presentation-ready. Alternatively you could as well upload the folder structure to your web host and have it called from there, even by the overseas client.
Is your prototype only representing a fragment of the intended feature set as a whole or is your project not so easy to understand, feel free to make extensive use of Indigo Studio’s annotate functionality. Tell your users where to click or tap to achieve what and make sure to handle potential errors that way. The annotate feature is a good way to guide users through your design.
Conclusion
Infragistics Indigo Studio for Mac OS and Windows is a user-friendly software for real rapid prototyping. I got a grip of how to achieve what in less than an hour time and was able to get productive the same day. Are you looking for a fast way to get that wireframe out and approved, Indigo Studio might end your search. With its 495 USD one-time fee, it is not exactly cheap but the feature set is extensive and will not leave you with post-decisional regret once you made the purchase.
Make sure to check out the 30-day trial that comes entirely free of charge and with no strings attached. All you need to offer is a functional email address to receive the download link. That’s all. No payment or personal data is required. What are you waiting for?