In this tutorial you will learn how to make your WooCommerce store a little more stylish by organizing the product archive with tabs. We’ll create tabs with a multi-column layout, a multi-row carousel, and a grid layout.
What We’re Going to Build
Over the coming steps we will create a WordPress plugin, inside which we
will setup the required shortcodes. Should you wish to take your WooCommerce product archive further, you could convert it to a Gutenberg block,
use it with Elementor as a widget, or integrate it with Visual Composer.
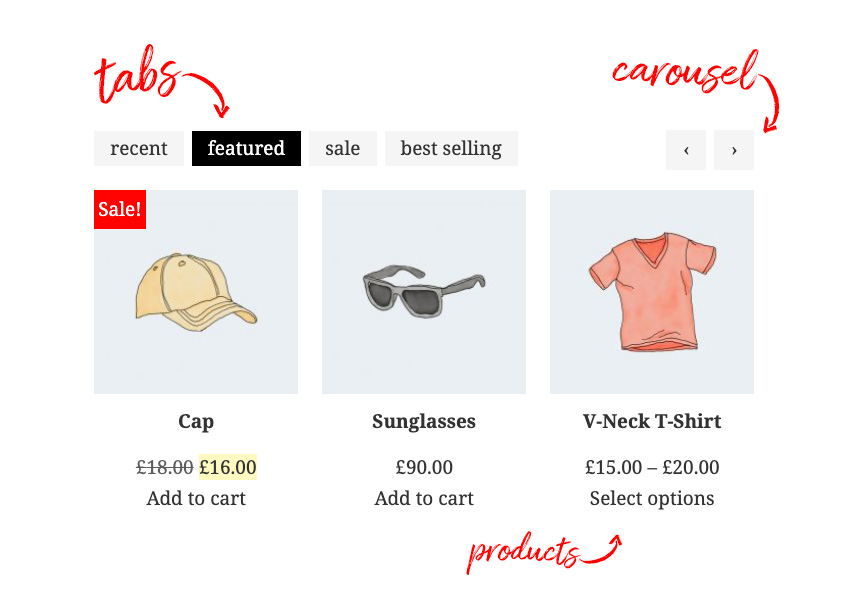
This tabbed product archive will be perfect for showing recent, featured, sale, and best selling products, like this:
So let’s get started!
1. Create a WordPress Plugin
In your WordPress site under wp-content/plugins create a
folder called (perhaps not the most original name) “woocommerce-products”, then inside that folder
create a php file with the same name. Open the file and paste into it the code below (change the details to fit your own):
/*
    Plugin Name: WooCommerce products
    Plugin URI: https://www.enovathemes.com
    Description: Better product grouping presentation for your WooCommerce shop
    Author: Enovathemes
    Version: 1.0
    Author URI: http://enovathemes.com
*/

if ( ! defined( 'ABSPATH' ) ) {
    exit; // Exit if accessed directly
}
Here we’ve done nothing more than define our plugin name and provided some meta info.
Enqueue Scripts and Styles
For our WooCommerce product archive plugin we will next need to enqueue the required scripts and styles, so add the following code snippet:
// Enqueue/register styles and scripts
function plugin_scripts_styles(){

    wp_enqueue_style( 'style', plugins_url('/css/style.css', __FILE__ ), array(), '1.0.0' );

    // Required Plugins
    wp_enqueue_script( 'imagesloaded');
    wp_enqueue_script( 'owl-carousel', plugins_url('/js/owl.carousel.js', __FILE__ ), array('jquery'), '', true);
    // Main js file
    wp_enqueue_script( 'main', plugins_url('/js/main.js', __FILE__ ), array('jquery'), '', true);
}
add_action( 'wp_enqueue_scripts', 'plugin_scripts_styles' );
First, we’ve added a basic CSS file to store our styles. Next we loaded the built-in imageLoaded
plugin (which comes with the WordPress core), and to create the carousel we will use the wildly popular
jQuery plugin owlCarousel.
And, of course, the main js file.
Note: Make sure these files are added to your plugin folder in the relevant subfolders.
For more on WordPress
plugin and shortcode creation, or further information on using owl.js, here are some recommended tutorials on Tuts+:
2. Create a Tab Shortcode
In this step we will create a tab shortcode. It will consist of two shortcodes actually; the parent tab container, and then child tab items. For the
first parent container add this code to the PHP file:
// Create tab shortcode
function et_tab($atts, $content = null) {

    extract(shortcode_atts(array(), $atts));

	$output = '';

	static $id_counter = 1;

	$class   = array();
	$class[] = 'et-tab';
	$class[] = 'et-clearfix';

	$output .='<div id="et-tab-'.$id_counter.'" class="'.implode(" ", $class).'">';
		$output .= do_shortcode($content);
	$output .= '</div>';

	$id_counter++;

	return $output;

}
add_shortcode('et_tab', 'et_tab');
This shortcode doesn’t require any attributes, it just wraps the
tab items inside it.
Speaking of tab items, next add the code below to create the child tab item
element:
function et_tab_item($atts, $content = null) {

    extract(shortcode_atts(array(
		'title'  => '',
		'active' => 'false',
	), $atts));

	$output = '';

	static $id_counter = 1;

    $class   = array();
	$class[] = 'tab-item';
    $class[] = 'et-clearfix';
	$class[] = 'active-'.esc_attr($active);

	$output .= '<div data-target="tab-'. sanitize_title( $title ) .'" class="'.implode(' ',$class).'">';
		if (isset($title) && !empty($title)) {
			$output .= esc_attr($title);
		}
	$output .= '</div> ';
	$output .= '<div id="tab-'.sanitize_title($title).'-'.$id_counter.'" class="tab-content et-clearfix">';
	    $output .= do_shortcode($content);
	$output .= '</div>';

	$id_counter++;

	return $output;
}
add_shortcode('et_tab_item', 'et_tab_item');
This shortcode has two attributes; the title and the active
indicator, in case you want to make the targeted tab active on first load.
When used in the WordPress editor the two shortcodes together will look like this:
[et_tab] [et_tab_item title="Your title"] …content here[/et_tab_item][/et_tab]
At this point, if you were to add them to your front-page, then view the result in your browser, you
would see unstyled and non-functional HTML output. So let’s fix it.
3. Add jQuery to Power the Tabbed Content
Go to the
main.js file and paste the code
(function($){

    	"use strict";

		$('.et-tab').each(function(){

			var $this    = $(this),
				tabs     = $this.find('.tab-item'),
				tabsQ    = tabs.length,
				tabsContent = $this.find('.tab-content');

			tabs.wrapAll('<div class="tabset et-clearfix"></div>');
			tabsContent.wrapAll('<div class="tabs-container et-clearfix"></div>');

			var tabSet = $this.find('.tabset');

				if(!tabs.hasClass('active')){
					tabs.first().addClass('active');
				}

				tabs.each(function(){

					var $thiz = $(this);

					if ($thiz.hasClass('active')) {
						$thiz.siblings()
						.removeClass("active");
						tabsContent.hide(0).removeClass('active');
						tabsContent.eq($thiz.index()).show(0).addClass('active');
					}
				});

				if(tabsQ >= 2){

					tabs.on('click', function(){
						var $self = $(this);

						if(!$self.hasClass("active")){

							$self.addClass("active");

							$self.siblings()
							.removeClass("active");

							tabsContent.hide(0).removeClass('active');
							tabsContent.eq($self.index()).show(0).addClass('active');

						}

					});
				}

		});

	})(jQuery);
I won’t describe all this code in great detail, but the logic here powers the tab functionality. If you are not familiar with JavaScript or
jQuery, I highly recommend this amazing free course for beginners:
Style the Tabs
Now the tabs work, but they still appear ugly, so let’s add some
basic CSS:
.tabset {
    margin-bottom: 24px;
}

.tabset > * {
    display: inline-block;
    vertical-align: middle;
    padding: 8px 16px;
    line-height: 1em;
    background: #f5f5f5;
    margin-right: 8px;
    cursor: pointer;
}

.tabset > .active {
    background: #000000;
    color: #ffffff;
}

.tabset > :last-child {
    margin-right: 0;
}
4. Create WooCommerce Products Shortcode
We’re making great progress; our tabbed WooCommerce product archive is nearly there! The time has come to
create a shortcode for the products. This will fetch the products with a query, then from those results create a series of arrays: featured, sale, and best-selling products. It will then output the contents of those arrays to give us our tabs of products.
Add this code to the PHP file:
function et_products($atts, $content = null) {
    extract(shortcode_atts(
        array(
            'layout'     	        => 'grid',  // grid OR carousel
            'autoplay'              => 'false', // true OR false
            'columns' 		        => '1', // 1 | 2 | 3 | 4
            'rows'                  => '1',     // 1 | 2 | 3 | 4 - carousel only
            'quantity' 		        => '12',
            'type' 			        => 'recent', // recent | featured | sale | best_selling
        ), $atts)
    );

    static $id_counter = 1;

    if (class_exists('Woocommerce')) {

        $output = '';

        global $post;

        $query_options = array(
            'post_type'           => 'product',
            'post_status'         => 'publish',
            'meta_query'          => WC()->query->get_meta_query(),
            'tax_query'           => WC()->query->get_tax_query(),
            'ignore_sticky_posts' => 1,
            'posts_per_page' 	  => absint($quantity),
        );

        if ($type == "featured"){
			$query_options = array(
				'post_type'           => 'product',
				'post_status'         => 'publish',
				'meta_query'          => WC()->query->get_meta_query(),
				'ignore_sticky_posts' => 1,
				'posts_per_page' 	  => absint($quantity),
				'tax_query'           => array(
					array(
						'taxonomy' => 'product_visibility',
						'field'    => 'name',
						'terms'    => 'featured',
						'operator' => 'IN',
					)
				),
			);
		}

        if ($type == "sale"){
			$query_options = array(
				'post_type'           => 'product',
				'post_status'         => 'publish',
				'meta_query'          => WC()->query->get_meta_query(),
				'ignore_sticky_posts' => 1,
				'posts_per_page' 	  => absint($quantity),
				'post__in'            => array_merge( array( 0 ), wc_get_product_ids_on_sale() ),
			);
		}

		if ($type == "best_selling"){

			$query_options = array(
				'post_type'           => 'product',
				'post_status'         => 'publish',
				'meta_query'          => WC()->query->get_meta_query(),
				'tax_query'           => WC()->query->get_tax_query(),
				'ignore_sticky_posts' => 1,
				'posts_per_page' 	  => absint($quantity),
				'orderby'             => 'meta_value_num',
				'meta_key'            => 'total_sales',
			);
		}

        $products = new WP_Query($query_options);

        if($products->have_posts()){

            $counter    = 1;

            $class      = array();
            $attributes = array();

            $class[] = 'products';
            $class[] = esc_attr($layout);

            if ($layout == 'carousel') {
                $class[] = 'owl-carousel';
            }

            $attributes[] = 'data-columns="'.esc_attr($columns).'"';
            $attributes[] = 'data-autoplay="'.esc_attr($autoplay).'"';

            $output .= '<ul class="'.esc_attr(implode(' ', $class)).'" '.implode(' ', $attributes).'>';

                while ($products->have_posts() ) {

                    $products->the_post();

                    global $product;

                    if ($layout == "carousel" && $rows != 1) {

                        $product_wrapper_start = '';
                        $product_wrapper_end   = '';

                        if (($counter % 2 == 1 && $rows == 2) || ($counter % 3 == 1 && $rows == 3) || ($counter % 4 == 1 && $rows == 4)){
                            $product_wrapper_start = '<li class="product-wrapper">';
                        }

                        if (($counter % 2 == 0 && $rows == 2) || ($counter % 3 == 0 && $rows == 3) || ($counter % 4 == 0 && $rows == 4)){
                            $product_wrapper_end   = '</li>';
                        }

                        $output .= $product_wrapper_start;
                            $output .= '<div class="product" id="product-'.esc_attr($product->get_id()).'">';
                                ob_start();
                                    do_action( 'woocommerce_before_shop_loop_item' );
                                    do_action( 'woocommerce_before_shop_loop_item_title' );
                                    do_action( 'woocommerce_shop_loop_item_title' );
                                    do_action( 'woocommerce_after_shop_loop_item_title' );
                                    do_action( 'woocommerce_after_shop_loop_item' );
                                $output .= ob_get_clean();
                            $output .= '</div>';
                        $output .= $product_wrapper_end;

                        $counter++;

                    } else {
                        $output .= '<li class="product" id="product-'.esc_attr($product->get_id()).'">';
                            ob_start();
                                do_action( 'woocommerce_before_shop_loop_item' );
                                do_action( 'woocommerce_before_shop_loop_item_title' );
                                do_action( 'woocommerce_shop_loop_item_title' );
                                do_action( 'woocommerce_after_shop_loop_item_title' );
                                do_action( 'woocommerce_after_shop_loop_item' );
                            $output .= ob_get_clean();
                        $output .= '</li>';
                    }

                }

                wp_reset_postdata();

            $output .= '</ul>';

            $id_counter++;

            return $output;

        }

    } else {
        echo "Please install/activate Woocommerce plugin";
    }
}
add_shortcode('et_products', 'et_products');
The shortcode we’ve created here has several attributes:
-
Layout – this can
be grid or carousel - Autoplay – true or false, this is an additional option for the carousel layout
-
Columns – here you can
specify how many columns you want -
Rows – this is the same
as columns, and only applies to the carousel layout - Quantity – the number of items to display
-
Type – here you
can specify recent products, best sellers, sale, or featured products
A Note on Our Carousel Rows
When you have a carousel, each product becomes a carousel item–normal behavior when you have one row. However, what happens if you want two, three, or four rows
per carousel item?
In this case you would need to wrap each of these possibilities inside a wrapper that would act as the carousel item. And you have
the question: do you do this with JavaScript or with PHP? I prefer the second option, as JS has
some delay on execution. So if you examine the shortcode you will find the following:
$product_wrapper_start = '';
$product_wrapper_end   = '';

if (($counter % 2 == 1 && $rows == 2) || ($counter % 3 == 1 && $rows == 3) || ($counter % 4 == 1 && $rows == 4)){
    $product_wrapper_start = '<li class="product-wrapper">';
}

if (($counter % 2 == 0 && $rows == 2) || ($counter % 3 == 0 && $rows == 3) || ($counter % 4 == 0 && $rows == 4)){
    $product_wrapper_end   = '</li>';
}
Note the
$counter = 1;
right after the
if($products->have_posts()){
This is very similar to a for loop, we need an increment to
loop through our query and wrap each two, each three, and each four product items
inside the carousel item wrapper markup.
You’ll notice the %, which is the modulo operator. It gives the
remainder of a division; 0 when the number is exactly divisible
by 2/3/4, and 1 when not. And with each loop we will need to increment
the counter with:
$counter++;
This happens right after the code:
$output .= $product_wrapper_start;
    $output .= '<div class="product" id="product-'.esc_attr($product->get_id()).'">';
        ob_start();
            do_action( 'woocommerce_before_shop_loop_item' );
            do_action( 'woocommerce_before_shop_loop_item_title' );
            do_action( 'woocommerce_shop_loop_item_title' );
            do_action( 'woocommerce_after_shop_loop_item_title' );
            do_action( 'woocommerce_after_shop_loop_item' );
        $output .= ob_get_clean();
    $output .= '</div>';
$output .= $product_wrapper_end;
5. Add Owl Styles 🦉
We’re almost ready, but first let’s add some owl carousel
styles and some additional styling to our products.
Open the style.css file
and paste the owl carousel styles (you should find these in your owlCarousel
plugin download .zip file). And some additional style for carousel navigation
and our products:
ul.products {
    list-style: none;
    margin: 0;
    padding: 0;
}

ul.products.grid {
    display: grid;
    grid-row-gap: 24px;
    grid-column-gap: 24px;
}

ul.products.grid[data-columns="2"]{grid-template-columns: repeat(2, 2fr);}
ul.products.grid[data-columns="3"]{grid-template-columns: repeat(3, 3fr);}
ul.products.grid[data-columns="4"]{grid-template-columns: repeat(4, 4fr);}

ul li {
    display: block;
    padding: 0;
    margin: 0
}

.product {
    position: relative;
    text-align: center;
}

.woocommerce-loop-product__title  {
    margin-top: 16px !important;
    font-size: 1em !important;
}

.product a {
    display: block;
    text-decoration: none;
    border-bottom: none !important;
}

.product .onsale {
    position: absolute;
    left: 0;
    padding: 4px;
    background: red;
    color: #ffffff;
}
.et-tab .owl-nav {
    position: absolute;
    top: -60px;
    right: 0;
}

.et-tab .owl-nav > * {
    display: inline-block;
    vertical-align: middle;
    width: 40px;
    height: 40px;
    text-align: center;
    line-height: 40px;
    background: #f5f5f5 !important;
}

.et-tab .owl-nav > :last-child {
    margin-left: 8px;
}

.et-tab .owl-nav > *:hover {
    background: #000000 !important;
    color: #ffffff !important;
}
But wait a minute, we haven’t yet called the carousel plugin, so
let’s now go to the main.js file, and right after the tab code add the following:
// Initialize carousel for the first load

$('.products.carousel').each(function(){

	var $this = $(this);
    $this.imagesLoaded(function(){
        $this.owlCarousel({
                margin:24,
                nav:true,
			    autoplay:$this.data('autoplay'),
				items:$this.data('columns'),
			    responsive:{
			    	320 : {items:1},
			    	768 : {items:2},
			    	1024 : {items:3},
			    	1280 : {items:$this.data('columns')}
			    },
			});
    });

});
Here we use two plugins at the same time: first we make sure
that our images are loaded to avoid any kind of content overlapping, and then
we call the plugin for our carousel products layout.
6. Fix Carousel Glitch
One thing remains to be done: if you now go to the
tabs and state that you want a carousel based layout you will see it working on the active tab
for the first page load, but if you start switching from tab to tab your
carousel layout will break. On the tab change event our carousel needs to updated. So at the very beginning of the file add the function:
function refreshCarousel(tab){
    tab.find('.products.carousel').each(function(){
        jQuery(this).trigger('refresh.owl.carousel');
    });
}
This function refreshes the carousel layout each time the tab is
changed. And now inside tab function right after the code:
tabsContent.eq($self.index()).show(0).addClass('active');
call the function:
refreshCarousel(tabsContent.eq($self.index()));
Now, clear the browser cache and add the following shortcode
content to your page:
<!-- wp:shortcode -->
[et_tab][et_tab_item title="recent"][et_products layout="grid" autoplay="false" columns="3" rows="1" quantity="6" type="recent" /][/et_tab_item][et_tab_item title="featured"][et_products layout="grid" autoplay="false" columns="3" rows="1" quantity="6" type="featured" /][/et_tab_item][et_tab_item title="sale"][et_products layout="grid" autoplay="false" columns="3" rows="1" quantity="6" type="sale" /][/et_tab_item][et_tab_item title="best selling"][et_products layout="grid" autoplay="false" columns="3" rows="1" quantity="6" type="best_selling" /][/et_tab_item][/et_tab]
<!-- /wp:shortcode -->

<!-- wp:separator -->
<hr class="wp-block-separator"/>
<!-- /wp:separator -->

<!-- wp:shortcode -->
[et_tab][et_tab_item title="recent"][et_products layout="grid" autoplay="false" columns="4" rows="1" quantity="8" type="recent" /][/et_tab_item][et_tab_item title="featured"][et_products layout="grid" autoplay="false" columns="4" rows="1" quantity="8" type="featured" /][/et_tab_item][et_tab_item title="sale"][et_products layout="grid" autoplay="false" columns="4" rows="1" quantity="8" type="sale" /][/et_tab_item][et_tab_item title="best selling"][et_products layout="grid" autoplay="false" columns="4" rows="1" quantity="8" type="best_selling" /][/et_tab_item][/et_tab]
<!-- /wp:shortcode -->

<!-- wp:separator -->
<hr class="wp-block-separator"/>
<!-- /wp:separator -->

<!-- wp:shortcode -->
[et_tab][et_tab_item title="recent"][et_products layout="carousel" autoplay="false" columns="3" rows="1" quantity="12" type="recent" /][/et_tab_item][et_tab_item title="featured"][et_products layout="carousel" autoplay="false" columns="3" rows="1" quantity="12" type="featured" /][/et_tab_item][et_tab_item title="sale"][et_products layout="carousel" autoplay="false" columns="3" rows="1" quantity="12" type="sale" /][/et_tab_item][et_tab_item title="best selling"][et_products layout="carousel" autoplay="false" columns="3" rows="1" quantity="12" type="best_selling" /][/et_tab_item][/et_tab]
<!-- /wp:shortcode -->

<!-- wp:separator -->
<hr class="wp-block-separator"/>
<!-- /wp:separator -->

<!-- wp:shortcode -->
[et_tab][et_tab_item title="recent"][et_products layout="carousel" autoplay="false" columns="4" rows="2" quantity="12" type="recent" /][/et_tab_item][et_tab_item title="featured"][et_products layout="carousel" autoplay="false" columns="2" rows="2" quantity="12" type="featured" /][/et_tab_item][et_tab_item title="sale"][et_products layout="carousel" autoplay="false" columns="3" rows="2" quantity="12" type="sale" /][/et_tab_item][et_tab_item title="best selling"][et_products layout="carousel" autoplay="false" columns="3" rows="1" quantity="12" type="best_selling" /][/et_tab_item][/et_tab]
<!-- /wp:shortcode -->
In this case I am using the default WordPress theme with Gutenberg editor (hence the Gutenberg comments <!-- wp:separator -->), if
you have the classic editor, just copy the shortcodes.
And now if you have done everything right you will see a beautiful
layout like this!
Conclusion
You are free to use and modify this plugin in your projects,
both commercial and non-commercial. Visit the repo on Github to grab the source code in full. I hope you find it useful, thanks for reading!

