I recently gave a talk called “Tools of the trade: Accessibility without the cost” to Accessibility NYC (a11yNYC) in Lower Manhattan. The session focused on accessibility tools—which ones to invest in, how to get the most out of them, and when to consider paid features.
In this post, I’ll recap some of the insights I shared. We’ll take a look at tools designed for three stages of development: writing code, testing locally, and post-commit/pre-production. I’ll specifically focus on free linting tools and browser extensions that you can use right away.
Choosing and using tools requires an investment of time and, often, money. My goal is to help expose you to some readily available free tools to help you get started with digital accessibility and ensure you can make the right investment for your development needs.
You can enjoy the full presentation below:
Linters
For writing code, the first development stage, free linters can be really useful. Linters are like spell checkers for your code, quickly identifying errors based on pre-defined rules.
One of the most prevalent a11y linters is the eslint-plugin-jsx-a11y, which is maintained by the JSX-ESLint organization on GitHub:
This plugin does a static evaluation of the JSX to spot accessibility issues in React apps. Because it only catches errors in static code, use it in combination with @axe-core/react to test the accessibility of the rendered DOM. Consider these tools just as one step of a larger a11y testing process and always test your apps with assistive technology.
You can use this fantastic tool to catch errors within your coding environment and pinpoint certain WCAG violations. There’s an exhaustive list of pre-existing rules, and you can even create your own.
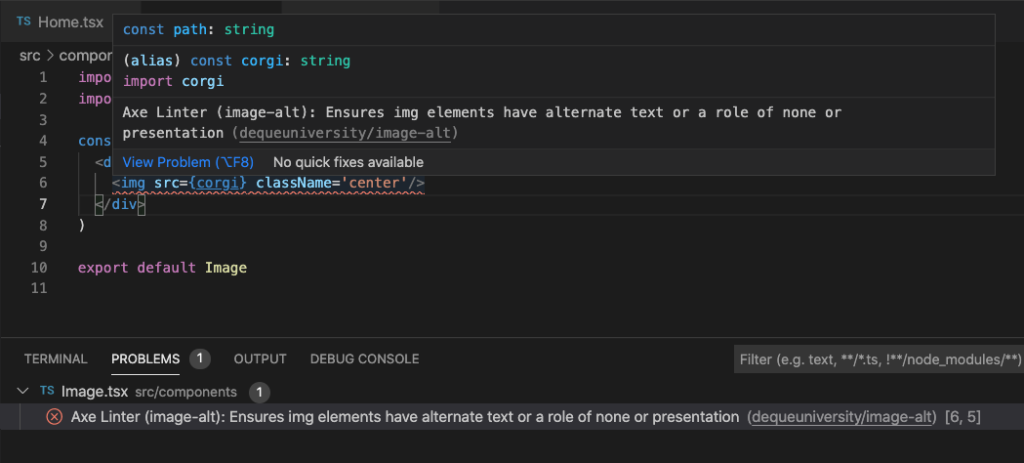
I encourage you to also explore the axe DevTools Linter plugin. This linter identifies errors with a red squiggly line under the problematic code. It also provides a link to Deque University, where you can get comprehensive information about fixes, disabilities affected by the violation, WCAG criteria violated, and more.
You can see these features in the image below:
Another addition is the output to the Problems tab. An additional feature for Pro gives the user the option to block a pull request that has accessibility issues.
Browser extensions
Testing locally is the second development stage. Let’s look at three different types of browser extensions that can be very useful for identifying a11y issues during testing:
Lighthouse enables you to run audits to assess page performance and identify a11y issues. Lighthouse uses a scoring system and graphs. You can also use it to test performance, SEO, and more.
WAVE provides a visual overlay of accessibility issues directly on the page, making it great for manual review and learning.
axe DevTools Extension delivers developer-focused, code-accurate results with zero false positives and in-depth remediation guidance. You can use axe DevTools not just to identify issues but also to learn how to fix them. Get started with a free trial today.
During my presentation, we walked through a color-contrast issue. After fixing it, we re-scanned the page and saw those errors disappear.
You can check out the video below for an overview of the axe DevTools Extension:
Pull-request/review
Our final tools fit into the third development stage—the review, pull request, and greater CI/CD process:
Axe Developer Hub API tracks accessibility across your entire repository, monitors Git commits for regressions, and can integrate with GitHub to block pull requests that introduce new accessibility issues. You can use it to visualize trends over time and easily share or export results. Axe Developer Hub starts with a free trial (no credit card required) and provides an API key and code snippet for easy integration into your workflow.
WAVE API automates page-level accessibility checks by submitting URLs and returning JSON or XML results based on fully rendered pages—including dynamic content. Both tools start free and then move to a paid model.
Next steps
Getting and using a tool is an investment in your craft, and free tools are a fantastic way to get started with digital accessibility.
You’ll be able to make immediate improvements, and more importantly, you’ll also develop a much clearer sense of what kind of investment you’ll need to make to get and stay accessible for the long term.
With the right tools in place and the right level of investment, you can start building products and services that will be usable by everyone, including people with disabilities.
Let’s all work towards making the web a more accessible place.