I believe you have used Microsoft Excel on some occasion. It is very powerful when it comes to working with spreadsheets, tables, charts, etc. But what does Python have to do with that?
Python is a game changer when it comes to Excel files because it can automate daunting stuff you might encounter in some Excel-related task. For instance, you may be required to look for some information in hundreds of spreadsheets of the company’s budgets. Very daunting, isn’t it? In this tutorial, I will show you how Python can be used easily to work with Excel documents.
Oh, don’t worry if you don’t have Microsoft Excel installed on your machine. You can use other alternatives to walk through this tutorial, such as LibreOffice Calc and OpenOffice Calc.
So, let’s get started!
OpenPyXL
OpenPyXL is a library used to read and write Excel 2010 .xlsx/.xlsm/.xltx/.xltm files. This is the library we will be using in this tutorial to work with Excel documents.
The first thing we need to do in order to make use of this library is install OpenPyXL.
Installing OpenPyXL
In order to install OpenPyXL, we will be using pip, which is (based on Wikipedia):
A package management system used to install and manage software packages written in Python. Many packages can be found in the Python Package Index (PyPI).
You can follow the steps mentioned in the Python Packaging User Guide for installing pip, but if you have Python 2.7.9 and higher, or Python 3.4 and higher, you already have pip!
OpenPyXL now can be simply installed by typing the following command (in Mac OS X’s Terminal):
pip install openpyxl
Opening an Excel Document
After installing OpenPyXL, we are ready to start working with Excel documents. The first normal task we would perform on an Excel document is to open that document. Go ahead and download the Excel file sample.xlsx in order to follow along with the tutorial, or you can use whichever Excel file you like.
Before we can use OpenPyXL, we need to import it, as follows:
import openpyxl
The method we need in order to open the Excel document is load_workbook(). If you are wondering what is meant by a workbook, it is simply the Excel spreadsheet document. The script that we thus need to open an Excel document is as follows:
import openpyxl
excel_document = openpyxl.load_workbook('sample.xlsx')
Let’s now see the type returned from the load_workbook() method. This can be done as follows:
print type(excel_document)
This will return the following:
<class 'openpyxl.workbook.workbook.Workbook'>
As we can see, the object returned is Workbook, of data type workbook. The Workbook object here represents the Excel file.
Sheet Names
Sheets in Excel consist of columns (with letters starting from A, B, C, etc.) and rows (starting from 1, 2, 3, etc.). In order to check what sheets we have in our Excel document, we use the get_sheet_names() method as follows:
print(excel_document.sheetnames)
If we print the above command, we get the following:
['Sheet1']
Thus showing that we have one sheet, called Sheet1.
If you have multiple sheets, you can access a specific sheet by its name using this method: get_sheet_by_name(). For example to get the current sheet
print(excel_document. get_sheet_by_name('Sheet1'))
The output will be:
Worksheet "Sheet1"
Accessing Cells
Now that we have learned how to open an Excel file and get the sheet, let's see how easy it is to access a cell in that sheet. All you have to do is retrieve that sheet, and then determine the location (coordinate) of the cell. Let's say that we want to access column A row 2 in the Excel document we have, that is A2. This can be implemented as follows:
sheet = excel_document['Sheet1']
print(sheet['A2'].value)
In this case, you will have the following value returned:
Abder
We can also use a row-column notation. For instance, if we want to access the cell at row 5 and column 2, we type the following:
sheet.cell(row = 5, column = 2).value
The output in this case will be: programmer.
If we want to see the object type representing the cell, we can type:
print(type(sheet['A2']))
In this case, you would get the following output:
<class 'openpyxl.cell.cell.Cell'>
which means that the object is of type Cell.
Accessing a Range of Cells
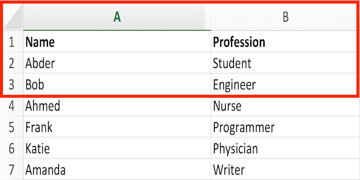
What if you were interested in accessing a range of cells rather than only one cell? Let's say we want to access the cells from A1 to B3, which look like this in our Excel document?


This can be done using the following script:
multiple_cells = sheet['A1':'B3']
for row in multiple_cells:
    for cell in row:
        print(cell.value)
In this case, you will get the following output:
Name
Profession
Abder
Student
Bob
Engineer
Accessing All Rows and Columns
OpenPyXL enables you to access all the rows and columns in your Excel document, using the rows() and columns() methods, respectively.
In order to access all the rows, we can do the following:
for row in sheet.rows:
    print(row)
The output of the above script would be as follows:
(<Cell 'Sheet1'.A1>, <Cell 'Sheet1'.B1>)
(<Cell 'Sheet1'.A2>, <Cell 'Sheet1'.B2>)
(<Cell 'Sheet1'.A3>, <Cell 'Sheet1'.B3>)
(<Cell 'Sheet1'.A4>, <Cell 'Sheet1'.B4>)
(<Cell 'Sheet1'.A5>, <Cell 'Sheet1'.B5>)
(<Cell 'Sheet1'.A6>, <Cell 'Sheet1'.B6>)
(<Cell 'Sheet1'.A7>, <Cell 'Sheet1'.B7>)
On the other hand, if we want to access all the columns, we simply do the following:
for column in sheet.columns:
    print(column)
In which case, you will get the following output:
(<Cell 'Sheet1'.A1>, <Cell 'Sheet1'.A2>, <Cell 'Sheet1'.A3>, <Cell 'Sheet1'.A4>, <Cell 'Sheet1'.A5>, <Cell 'Sheet1'.A6>, <Cell 'Sheet1'.A7>)
(<Cell 'Sheet1'.B1>, <Cell 'Sheet1'.B2>, <Cell 'Sheet1'.B3>, <Cell 'Sheet1'.B4>, <Cell 'Sheet1'.B5>, <Cell 'Sheet1'.B6>, <Cell 'Sheet1'.B7>)
There is of course more that you can do with Excel documents, as you can see in the OpenPyXL documentation.
Conclusion
From this tutorial, we have noticed how flexible it can be to work with Excel documents using Python. Remember the scenario mentioned at the beginning of the tutorial? Worth trying as a project!
This post has been updated with contributions from Esther Vaati. Esther is a software developer and writer for Envato Tuts+.