This Affinity Designer tutorial is a continuation of our free beginner’s guide to Affinity Designer. You can watch the whole video explaining all the basics of Affinity Designer in this video from the Envato Tuts+ YouTube channel.
In this installment, we’ll focus on how to use the Affinity Designer Vector Brush. You can follow the video too to learn this important skill!
Watch the Lesson: How to Use the Vector Brush

First and foremost, let’s discuss what the Affinity Vector Brush is, what it does, and why you should learn about it.
Basically, the Vector Paint Brush is an Affinity Designer tool that allows you to add stroke-like vector paths with different textures, colors, etc. to your designs. You can customize them and scale them seamlessly to give your artwork a more interesting and less stiff finish.
Pretty cool, isn’t it? Now that we got that settled, let’s continue with the Affinity Designer tutorial and figure out how to use an Affinity Designer Vector Brush!
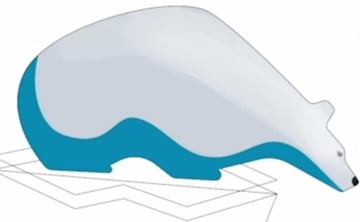
As you may remember from previous tutorials on Affinity Designer tips and tricks, we were working on a bear design. In this case, we want to add highlights to our bear to give it more dimension. And here’s how to do it with the Vector Paint Brush:
Frequently Asked Questions About the Affinity Designer Vector Brush
Learning to use the Vector Paint Brush in Affinity Designer is easy enough. However, you may still have a few questions about it. If that’s the case, fear no more! Here are the answers to some frequently asked questions about the Affinity Vector Brush.
Can I Load More Brushes?
Of course! Affinity Designer comes with a few options, but if you don’t find the specific brush stroke style you want, you can upload more of your own to make your vision a reality.
Can I Adjust the Shape After Drawing the Path?
Yes! One of the beauties of vectors is that you can customize them without losing quality. This means that you can adjust the shape of the stroke however you like. To that end, you can use the vector nodes to modify it. You can also reverse the stroke, make it bigger or smaller, and more.
Can I Change the Brush Stroke Completely?
Yup, no sweat. If you decide you’d like a different type of brush, another color or effect, or whatever your heart desires, you can do that even after you’ve completed the path.
Check Out Our Final Result
And there you go! We’re done with this Affinity Designer tutorial on how to use the Vector Paint Brush tool. Here’s how the bear turned out after we added some highlights to its back, around the eyes, and other spots. It really makes the design look less flat and more appealing, doesn’t it?


Continue reading these Affinity Designer tutorials to learn new skills and see how the bear design will turn out.
Learn More About Affinity Designer
Eager to learn more about Affinity Designer? Here are other Envato Tuts+ tutorials for different skill levels: